How to cancel an iOS update (iPad, iPhone, iPod Touch). iPhone Software Update: How to Prevent, Stop and Block Updates from Downloading, How to Uninstall iOS Update on iPhone and iPad Quick Uninstall Method
How to delete iOS update 11, if you decide that the capabilities of the previous version are sufficient for the normal operation of the iPhone? Uninstalling the update before installation on the phone and rolling back after installation.
Deleting the firmware file
First, let's figure out how to remove an uninstalled iOS 11 update that has already been downloaded to your phone. The update will download only after you confirm your desire to install it. The firmware file is then stored in the device's memory until you start installing a new system. All this time, the “Settings” application icon will have a light on, indicating the need to make changes to the configuration.
If you want to go to new version, go to the “Software Update” section in the “General” settings submenu, and click “Download and Install”. After downloading the firmware file, two action options will appear in the same section: “Install” and “Later” (run the installation at night or remind me later). If you click “Install,” you will have to restore your device later to remove iOS 11. If you click "Later" and select "Remind Me Later", you can easily remove the firmware from your iPhone's memory.
To remove downloaded firmware:
- Open settings.
- Select the "Basic" submenu.
- Go to the “Storage and iCloud Usage” section, click “Manage”.
- Find the downloaded file and tap “Uninstall update”.
Done, the update is deleted, the system will not be updated. But this is only temporary peace of mind: the next time you connect to Wi-Fi, iOS will again signal the presence of an update. You can completely ignore updates only after they are banned.
Device recovery
If the user has already updated the system, then no amount of deleting the firmware file will help - it is already installed. On iPhone 5S and other models, this can cause annoying crashes and errors. Users report that after installing the update, their touchscreen does not work and they cannot connect Wi-Fi devices and Bluetooth, there are problems with the battery.
To return your phone or tablet to a working state, you need to remove the update and roll back to the previous stable one iOS versions. This can only be done in recovery mode via iTunes.
Before restoring your device, be sure to back up your data.
- Download the appropriate version of iOS 10.3.3.
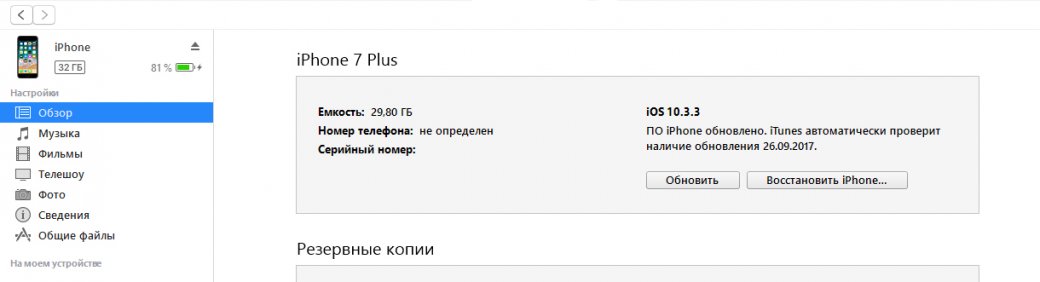
- Launch iTunes on your computer.
- Turn off your device.
- Clamp Home button. While holding it, connect the phone to the computer (on iPhone 7 you need to hold the power and volume down buttons).
- Wait for the connection screen to appear in iTunes.
- Hold Shift on your keyboard (Alt/Option on Mac) and click “Restore.”
- Select the previously downloaded file iOS firmware 10.3.3.
- Click "Restore and Update".
You are back on the usual tenth iOS, but this will not save you from notifications about the availability of updates. You can ignore them, or you can ban them - temporarily or forever.
Prohibit update
To prevent your device from searching for and downloading updates, add a profile from Apple TV to it. In this case, the update server will change to tvOS, and the device will not search for new versions of iOS. To do this:
- Launch Safari.
- Download the NOOTA.mobileconfig file through it (for example, from hikay.github.io/app).
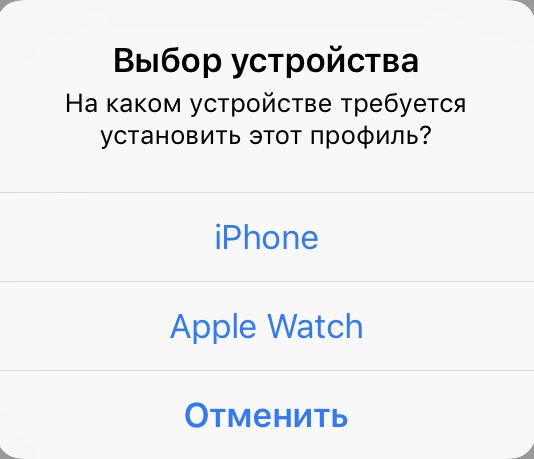
- Select your device and save the profile in Settings.
- Reboot the device when prompted by the system.
To make sure that the method worked, go to the “Software Update” section and search for a new version of iOS. The phone/tablet will not find anything, as it will connect to tvOS servers. A badge indicating the availability of updates will be displayed in the settings, but it can also be removed - however, for this you will have to delve into system files through the iBackupBot program.

If you decide to get rid of the ban, then it will be easy to do: you just need to go to “Settings” - “General” - “Profiles” and delete account with tvOS10.
This is the easiest way to block updates, which does not require jailbreaking or installing tweaks. If the phone/tablet has a jail, then the number of options for blocking an update increases, but it’s not worth breaking the system just for this, especially considering the fact that you can block an update by simply adding a profile from Apple TV.
Let's look at how to quickly update your iPhone to iOS 11 without losing your personal files.
The new iOS 11 was presented to the public in June of this year.
A full-fledged version of the system replaced iOS 10. On June 5, the world-famous WWDC conference was held in San Jose (California), at which Tim Cook and leading Apple developers presented to the world new iOS 11.
All new functions and features of the system were also described at the event.
Within a couple of hours after the developer conference, the beta version of the new operating system.
With the start iPhone sales 8 and iPhone X users can now get the full official version of iOS 11, rather than having to settle for the beta version.
What's new?
In the process of creating iOS 11, Apple developers tried to pay attention to all the wishes of users.
The bugs have been fixed previous versions firmware, support for new functions has been added.
Benefits of iOS 11:
- Updated interface ;
- Option for creating scans of documents using the camera. It is enough to read the desired image, after which it will be turned into Text Document with the ability to edit content;
- Now you can move the contents of your file manager and desktop using a simple dragging elements ;
- Store updated App Store . Now users have access to new selections of programs, daily lists best apps and new more user-friendly interface App Store;
- An option has appeared in typing mode speed dial one hand ;
- New OS animation . iOS 11 introduces new transitions, graphic effects and allows you to create photos;
- Full synchronization of contacts with the cloud . All text messages and media data from iMessage is stored only in. In this way, Apple managed to save space in the smartphone’s memory;
- Now you can use it not only to pay for purchases, but also to send money to other users. iMessage also now has a feature for quickly transferring money to a card account.
Device support
Even before the official release, it was known that Apple planned to end support for all iPhone models 5.
Now Latest updates The OS is not tested on fifth generation smartphones.
The list of all supported devices is as follows:
- iPhone 6;
- iPhone 6 Plus;
- iPad Air(both generations);
- iPod Touch 6G;
- The entire iPhone 7 line;
- iPad (9.7, 12.9 and 10.5 inch gadgets only);
- iPad mini(2, 3, 4 generations).
Please note, despite the lack of official supportiPhone5, OS can still be installed oniPhone5 andiPhone 5 c. However, some new features may be unstable..
Installing the new iOS 11
You can install a new operating system only if your device is included in the list of supported gadgets and on it.
To obtain IOS 11 firmware, the previous official version of the system – IOS 10.3 – must be installed on the smartphone.
You can download the update in two ways:
- "By air." All you need is a smartphone or tablet and a fast Internet connection;
- Using iTunes. Requires a wired connection between the phone and PC, as well as Internet access from the computer.
Let's take a closer look at how to install iOS 11. To update to iOS 11 over the air, go to your smartphone's settings.
Open the “Basic” tab and click on “Profile”.
Then check the connection with global network and press the key "Install updates".
The phone will be turned off, and then the installation procedure for the new OS will begin.
Before rebooting the device, a window with detailed information will appear in the settings window about available firmware. For more detailed information, you can follow the link provided in this window and check whether your gadget is compatible with the new OS.

To install iOS 11 using, connect your mobile gadget to your computer and wait for it to be identified by the program.
Then in the main application window, click on the “Update” button and wait until the beta version is installed new system from Apple.
Installing the software using iTunes will take no more than 5-7 minutes.
Immediately after the update is completed, the smartphone will reboot and the new version of the OS will be available to you without the need to.

Installing iOS 11 using any of the methods described above saves all device user data.
Photos, videos, music, documents and system settings will not be deleted.
5 problems with iOS 11
In the first days after the public distribution of the OS, users noted and several negative qualities in the design and functionality of the system:
- Control Center design. This system window has undergone changes. The developers added more icons and did not finalize the final appearance of the options;

- The 3D Touch App switcher is no longer available on iOS. Now users cannot quickly access the latest open applications;
- Problems with the Drag and Drop function. This option has become a long-awaited new product, however, its operation is not yet stable enough. While dragging explorer elements, an error often appears;
- Cluttered Notification Center. Users note that in future versions it would be better to separate notifications into groups and individual programs.
A message constantly appears on the iPhone asking you to install a new version of the software or postpone the installation until later. Don't know how to disable automatic iOS updates on iPhone? Read the instructions to decide this problem in a couple of clicks.
Disable automatic iOS updates
IN Lately, we are increasingly witnessing the hype around automatic updates various devices. The scandals are related to the actions of companies that include various mechanisms in updates that worsen the stability of gadgets and reduce productivity. This is explained by the fact that each giant of the electronic market needs to sell a huge number of new models, which is not always successful due to the huge price of new products.
Apple was no exception to the loud scandal surrounding the “aging” of its past models. But what to do if your “used” Apple Five serves you faithfully, and you don’t want to change it? That's right, you need to somehow disable automatic updates on iOS.
Apple's policy is to automatically download updates to your smartphone. You will only be asked whether you want to install them now or defer installation until later. You are not given any other option. Putting off installing automatic updates on iOS is also not an option, since you will have to perform this action every day. This imposition begins to terribly irritate and enrage.
Currently there is one reliable alternative way bypass the installation of automatic iOS updates. You just need to replace your device's profile with the Apple TV profile. In this case, the smartphone’s request to the update server will result in a redirection to another resource, which will serve as a negative response for your iPhone. For these manipulations you do not need to be a programming guru, you just need to perform three simple steps:
How to refuse an iOS update: instructions
2. We agree to the offer to install a new profile: to do this you need to enter the password set on the device.
3. We agree to reboot to complete the installation.

After turning on your smartphone, check for updates in the corresponding settings menu item and make sure that there are no more updates.
This alternative solution does not affect the performance of your iPhone in any way, and the profile itself is safe. To cancel the ban, simply delete the profile and reboot the device.
Now you know how to remove the constant message asking you to install an iOS update or postpone it until tomorrow.
How to downgrade from iOS 11 to iOS 10? The only correct way.
iOS 11 is certainly an interesting update, but many found it crude, and some of the system’s functions are not the most convenient. Fortunately, downgrading from iOS 11 to the stable and fast iOS 10 is very easy. This instruction tells you how to do it.
Attention! On October 5, Apple signed iOS 10.3.3. It is no longer possible to roll back to the firmware from iOS 11.
Important!You can only rollback from iOS 11 to iOS 10 without losing data if you have a backup copy of your iPhone or iPad saved in iTunes or iCloud, made specifically on iOS 10. If a new backup created under iOS 11 replaces the old one, restoring to this backup from iOS 10 will be impossible.
Important! Before you can downgrade from iOS 11 to iOS 10, you must remove password protection from your iPhone or iPad. You can remove the password in the menu " Settings» → « Touch ID and passcode».
Step 1: Turn off your iPhone or iPad.
Step 2. Press the " Home» (Volume Down button on iPhone 7 and iPhone 7 Plus).
Step 3: Hold down the " Home", connect mobile device to the computer via USB cable. Hold the button for a few seconds until the iTunes icon appears on the screen.

Step 4: Launch iTunes. The utility recognizes your iPhone or iPad in recovery mode. In the warning window that opens, click " Cancel».

Step 5. Download the iOS 10.3.3 firmware version for your device from the following links:
Step 6. With the key held down Shift(Alt on Mac) click on the “ button Update“.

And select the previously downloaded firmware file.

Step 7. Confirm the start of recovery on iOS 10.3.3 and wait for the procedure to complete. Important! Do not disconnect your iPhone, iPad, or iPod touch from your computer while the firmware is being installed.

Ready! You have downgraded from iOS 11 to iOS 10.3.3. After the device turns on, you need to perform its initial settings and restore from backup copy.
Recently, Apple began to force all owners of iPhone, iPad and iPod Touch to install new software. Almost every day a notification comes to your device asking you to install the latest version of the iOS operating system, and you cannot refuse it. There are options: update now and remind at night. If you choose the second option, you have the option to close the notification, but it will appear again the next day. For this reason, the editors of the site began searching for a solution that would prevent automatic updating of the iOS operating system on all iPhones, iPads and iPod Touches.
Such a solution was found and it was a rather non-standard solution, but completely working. As you know, even before a message appears asking you to update to a new OS, the firmware is already loaded into the permanent iPhone memory, iPad and iPod Touch, thereby taking up free space and consuming unnecessary Internet traffic in Wi-Fi networks. To prevent automatic updates of the iOS 10 or iOS 11 operating system, just install the tvOS Beta profile. To do this, open the Safari web browser on the desired Apple device, and then in the “Settings” application that appears, click on the “Install” button. You may be required to enter a password and then restart the device.
These simple measures will prevent any iPhone, iPad, or iPod Touch from automatically downloading new versions of the iOS operating systems, but will also stop the intrusive notification that appears every day. Note that if some kind of new firmware, then even after installing this profile it will still be in permanent memory, taking up precious space.
In order to delete a new version of the iOS operating system already loaded into the device’s memory, you should launch “Settings” and follow the path “General” - “Storage and iCloud” - “Storage” - “Management” “iOS 10.X.X”, and then select "Uninstall update" item. To start receiving updates over the air again, go to “Settings” - “General” “Profiles” and remove the installed tvOS Beta profile from there. After this, be sure to restart the device.
Such simple instructions allows you to permanently solve one of the main problems of the iOS operating system, which millions of people face every day and cannot solve it, as Apple makes every effort to ensure that iPhone, iPad and iPod Touch owners install the latest on their device software, even if it works worse than the older one.
Until March 10 inclusive, everyone has a unique opportunity to use Xiaomi Mi Band 3, spending only 2 minutes of their personal time on it.
Join us on
Apple's policy regarding operating system updates is stated quite simply and clearly. For security reasons, any update, regardless of the number of innovations, must be installed on all compatible devices. This is the only way, according to the developers, to avoid fragmentation and protect users from all kinds of vulnerabilities. But there are times when you want to avoid updating. This is possible even if the process has already started.
You can cancel the update process at any time during the download stage. If the download has already completed and the installation status indicator appears on the screen, it will no longer be possible to prevent it.
How to prevent iOS updates from downloading
To stop the update from downloading and thereby prevent its inadvertent installation in the future, you need to check what stage the update process is at.
- To do this, go to “Settings” - “General” - “Software”. There you will see the characteristic inscription “Loading...”;

- Now return to “General” and go to the “Storage” section;
- Scroll through the list installed applications down until you find the update tab;

- Open it, and then click “Uninstall update”.

Now, when you return to the updates section, you will see that the current iOS build has not yet been downloaded.
How to permanently prevent iOS updates
If necessary, you can permanently disable operating system updates.
- To do this, download the current tvOS 12.1.2 beta profile to your device from here (yes, exactly tvOS!);
- Confirm installation;

- Wait for the reboot;

And then go to the “Software Update” section and make sure that the system no longer offers you updates, informing you that you have the most current version installed. Of course, you can only understand that the trick worked if your device is running one of the previous OS builds.
Did you know that when iPhone connection and iPad to the Internet via Wi-Fi, software updates (iOS) are downloaded to the device’s memory automatically and there is no way to prevent this?
If you agree to voluntarily give up some of the free memory in your iPhone or iPad, pass by. “Under the cut” is information on how to prevent automatic downloading of software updates to iOS devices, how to delete a downloaded update and how to prevent it from being downloaded “automatically” in the future.
Released in 2011 year iOS 5.0, owners of iPhone, iPod Touch and iPad were able to update the firmware of their devices “over the air”, the so-called (OverTheAir). In this case, the software update is downloaded by wireless network Wi-Fi and the update process itself takes place on the device itself.

This is certainly a big step forward, but at the same time, we, iPhone, iPod Touch and iPad users, have acquired a new headache: the software update is downloaded to the device’s memory in background automatically and without our consent.

Why disable automatic downloads of software updates on iPhone and iPad
If your device has plenty of memory (not RAM) (32, 64 or 128 GB) and most of it is empty all the time, you don’t have to think about blocking downloading updates. But if free space in the iPhone or iPad is “worth its weight in gold” and every time you need something in it (video, photo, install an application), the space saved on software updates will be very useful.
Size of software updates, such as iOS 8, for various types devices (iPhone, iPod Touch or iPad) and models (iPhone 5c, 5s, 6, 6 Plus, etc.) can reach from 0.9 to 1.1 GB. And if the memory in your device is only 8 GB, updating the firmware alone will take about 15%.

When software updates are downloaded to iPhone and iPad automatically
Remember, firmware updates (aka iOS) are downloaded automatically to iPhone and iPad only when the device is connected to the Internet via Wi-Fi, and even when the device is not connected to a power source, but is running on battery power. By cellular network (Mobile Internet), software updates are not downloaded.
How to prevent iOS updates from automatically downloading on iPhone and iPad
Let's assume that your device is running firmware 7.1.2 and . A software update for your device is available for download and you will be notified immediately via .

Until you yourself go to Device Settings in the “General -> Software Update” menu and Apple server a request to search for updates will not be sent, and the download of the new iOS version will not begin.
The iPhone and iPad receives the command to download updates simultaneously with the request to search for updates in “Settings -> General -> Software Update”, and in order to prevent this, on an iPhone or iPad connected to the Internet via Wi-Fi, do not go to the menu "Software Update".

Once you do this and the request to search for updates is sent to the Apple server, you can no longer cancel the download, you can only stop it.
How to stop downloading software updates on iPhone and iPad over Wi-Fi
As I already said, it is impossible to completely cancel the download of software updates that has begun. The only way to stop it - disconnect your iPhone or iPad from the Internet via a wireless Wi-Fi network. In this case, the download is not cancelled, but only paused, and as soon as you reconnect the device to a Wi-Fi network with Internet access, the download will continue.

How to remove software updates downloaded to iPhone and iPad
The memory of iOS devices can be freed from downloaded updates, but this is not always advisable. The only way to remove software updates from your iPhone is .

Why is it inappropriate, you ask? Yes, because in addition to firmware updates, priceless data (unique photos, family videos, etc.) can be stored in the device’s memory, which will be completely deleted as a result of erasing.
Of course, all the content can be transferred to the computer, and this will solve the problem, but there is always a chance that something will go wrong.
Those who own a jailbroken iPhone or iPad are luckier. On devices with software updates, you do not need to erase the content to remove them.

How to Remove iOS Update from Jailbroken iPhone and iPad
If you can boast of having Cydia installed on your device, you can remove the downloaded software update in several ways:
- Manually
- on iPhone and iPad in the iFile file manager;
- on the computer in file managers iFunbox and iTools.
- Automatically , using Cydia tweaks Software Update Killer and iLex R.A.T.
The first method involves self-removal software updates in the file managers iFile (on the device itself) and iFunbox and iTools (on the computer).
How to remove software update from iPhone and iPad directly from the device

Let me remind you, this method Only works on jailbroken devices with .

How to remove iPhone and iPad software updates on your computer

How to Remove Software Updates from iPhone and iPad Using Cydia
The alternative Cydia app store from the famous Saurik has several tweaks that allow you to clear the memory of iOS devices from updates downloaded over Wi-Fi; for firmware from 4.x.x to 6.x.x there are at least 2: Software Update Killer and iLex R.A.T.


The first one does not have its own shell (you won’t find an icon on the desktop) and is installed as an add-on in Cydia and is intended only to remove updates (they are removed immediately after installation). The second has more functionality and allows you not only to remove the content, but also to remove all applications and tweaks from Cydia, and all this without losing the jailbreak and the need to re-jailbreak.
The tweak descriptions indicate that all devices running iOS up to 6.x.x are supported. I can’t personally check their performance; I have iOS 7.1.2 installed on my iPhone 5s, and I don’t want to risk losing the jailbreak if something goes wrong, especially since it’s not difficult to remove updates manually.

An interesting fact is that even after clearing the updates, if you reconnect the device to the Internet via Wi-Fi and request to check for updates in the “Software Update” menu, and if a new firmware version is available, it will be downloaded to the device’s memory again automatically.
On jailbroken iPhones and iPads, you can completely prevent downloading of updates and do it very simply.
How to prevent automatic downloading of software updates on a jailbroken iPhone and iPad

If you have any problems, errors in iTunes, or have questions about the topic, write to us in the comments. If our article was useful to you and you want to express gratitude for the help, share the link to this material on your page in in social networks, our resource will benefit, and we will thank you.
You can customize iOS devices and install many new programs through jailbreak to remove restrictions from your iOS devices. But if you have decided to remove jailbreak and would like to return your device to its original state, then you should not miss this article. Just follow this post to learn how to safely remove iOS 12/11 from your iPhone XS/XR/X/ 8/7/6/5s.
Part 1: How to remove jailbreak iOS 12 without recovery
iPhone won't turn on after jailbreak or standard icons disappeared after jailbreak. If you want to remove iOS 11/12 jailbreak without restoring your device, follow these steps to achieve it.
Step 1. First of all, you need to remove as many settings from Cydia as possible and please make sure that you do not remove standard/system packages such as Cydia Installer, APT, etc. Remove only those packages that you installed otherwise they may cause problems.
Step 2: Restart your iPhone/iPad/iPod touch to disable jailbreak.
Step 3: Make sure Find My iPhone is enabled on your device and WiFi is turned on.
Step 4: Go to iCloud.com and sign in to your account, then click Find iPhone.
Step 5: After this, iCloud will find your device and display its location on the map. Click on the All Devices drop-down menu at the top and select your jailbreak device

Step 6: A window with several options will appear in the top right corner of the screen. Select the "Erase iPhone" option.

iCloud will remotely send a command to your iPhone to reset its contents and remove all data, including jailbreak. The device will still remain on its current firmware without restoring to latest version iOS.
Part 2: How to properly unjailbreak iOS 12 by restoring your device
Below are two ways to help you remove iOS 12 jailbreak.
Method 1. Return from jailbreak to official firmware via iTunes
Below are detailed instructions and then restore iPhone data.
Step 1: Connect iOS device to your computer and launch iTunes and enter the password, if you want, you can use another computer that you synced with your iPhone.
Step 2: Wait a few minutes for your iPhone to sync with iTunes and then perform a backup.
Step 3. Once the synchronization process is complete and complete Reserve copy Select "Restore [your device]."
5. Once the setup screen appears on your iPhone, click "Restore" from iTunes backup.

If you've never synced with iTunes or set up Find My iPhone in iCloud, you'll need to use Recovery Mode to restore your device. Connect your iOS device to your computer and open iTunes.
Then do a forced reboot:
You need to press and quickly release the volume up button, then press and quickly release the volume down button. After that, press and hold your finger on the Power button until the Recovery Mode screen appears.
After that, select "Restore"

Once everything is done, simply follow the on-screen instructions on your iOS device and you can either set your device as new or restore from a pre-jailbreak backup.
Method 2. Erase jailbreak from iPhone and iPad using UltData jailbreak without data loss
After or during jailbreak, if there are problems, you don't want to continue jailbreaking. The program offers the opportunity to get out of this state and retrieve your lost and deleted data. It's better to restore the iOS system and become a thing of the past.
Step 1. First of all, connect your iPhone to your computer using a USB cable and run the problem. After connecting, switch to “Fix operating system” in the main interface and click the “Fix now” button to continue the process.
Step 2: To restore the operating system, you need to download compatible firmware for your iOS device natively. Just click the "Browse" button to select the save path on your computer and save the firmware files, and then you need to click the "download" button and wait.

Step 3. When the download is completed, the program continues to restore the iOS system. Do not disconnect your device during the process, otherwise your iPhone may brick. In less than 10 minutes, your abnormal iOS device can be fixed back to normal.

If restoring the system in its normal state does not work, we suggest you use “Advanced Mode”, which will increase the chance of successful repair. Whereas, "advanced mode" will erase the data on the device, so we suggest you try "advanced mode" after failing 4-5 times with standard mode.
After exiting Jailbreak, easy to help you find data and files, 3 ways to recover important contacts, messages, photos, music, videos, etc.
Step 1. Launch UltData and select the recovery method, UltData (iPhone Data Recovery) offers 3 ways to recover data, you can select the method you want on the main window.
Step 2. Preview Before recovery, iPhone Data Recovery will intelligently read files by file type, so you can find and view files easily.

Step 3: Select items to recover. Select the items you want and click "Recover". Direct messages, contacts, and notes are restored.

If after jailbreak or , then you can use Tenorshare ReiBoot, which will specifically fix problems with iPhone, iPod and iPad.
All owners Apple technology Constantly pushing to update software. This is how the company is fighting the fragmentation of gadgets and firmware that Android suffers from, and collecting amazing statistics for the next presentation. However, at the same time, our devices are slowly being killed so that we run for new and faster gadgets.
It turns out that you can disable intrusive offers to update iOS on any device, even without jailbreak.
Why is this necessary?
Although Apple insists on the need to update the software on the device to the latest version, we know that this is not always necessary.
For example, the first generation iPad Air still copes well with its tasks and runs vigorously on the latest versions of iOS. But after a couple of updates it will start to think, lag and freeze. At the same time, the device will not receive all the new features of the system, which, as always, will work only on top models.
The situation is similar with the iPhone 6. The smartphone is still quite good, but by iOS 11 Apple will definitely try to “kill” it in order to force device owners to buy new models.
So why not just stop updating the firmware on your device?
If previously it was possible not to connect your iPhone or iPad to iTunes, now the Over The Air update arrives on your device and reminds you every day of the need for an update. You have to regularly refuse new firmware, but the files for updating are already downloaded and take up space on the device.
There is an exit
Enthusiasts have come up with an interesting way to cheat the iOS update system. Using a special profile, you can redirect your iPhone or iPad to the tvOS update server. The device will not find the required firmware there and will not offer to update.
Everything is simple and legal, the method will work on any device even without jailbreak.
Here's what to do


1. Delete the update downloaded to the device if it has already arrived by air. To do this, go to Settings – General – Storage and iCloud – Manage (storage), find the update and delete it.
hikay.github.io/app/NOOTA.mobileconfig
and follow it in Safari on your mobile device.
4. Reboot your iPhone or iPad when prompted by the system.
Now you can safely enter Settings – General – Software Update and check for a new version of iOS. The device will not find any updates and will report that installed version firmware is up to date.
Unfortunately, the annoying red badge will not disappear, but these are minor things.

How to get it all back
To redirect the device back to the correct update server, simply delete the installed profile TVOS 10 on the way Settings – General – Profiles.
After a reboot, the smartphone or tablet will see everything available updates firmware.
Get real iOS-Jedim.
I continue to conduct experiments on users iPhone. Last time I brought together almost three hundred newcomers who practically do not understand the intricacies of iOS and gave high fives simple tips who are already made their lives easier. If you missed it, smart comments under the topic are very welcome.
There were fewer users who consider themselves real geeks. Maybe the majority of respondents simply did not understand the meaning of the very word that I tried to call them, but this does not change the essence of the matter much. I’ll try to figure out five of their top problems that actually have a solution.

I'm sure we'll all be interested in learning some extraordinary skills so we don't look so stupid anymore.
1. Hide the iOS update notification

There has been a flurry of discussions online about the inappropriateness of installing new versions. iOS to old devices. Of course, especially the ancient ones begin to work too slowly and very unevenly. It is on them that the notification about the system update and the update itself are recommended delete altogether.
To do this, go to the device settings, select the storage menu and iCloud in the main section, go to management and erase information from the new unnecessary item - after that iPhone should be rebooted.
Thus, we killed two birds with one stone: we got rid of the annoying badge and cleared our memory.
2. Delete the App Store cache in ten taps

Sorry, work iOS 9.x.x leaves much to be desired. I think this revision of the platform turned out to be the most buggy among all those released before. Many of those I interviewed this time particularly complained about App Store- they say, it hangs, then something else. I myself have encountered this many times.
Provident programmers from Apple We have prepared a solution to any problems with the application store. You just need tap ten times by any icon of program sections - for example, by “Selection”.
Cache App Store will be cleared, and the glitch will most likely be resolved.
3. Clear RAM completely

Despite the huge amount of relevant materials that only the lazy have not published, many still do not understand that deleting applications from the multitasking menu iOS doesn't make any sense. At least it doesn't affect time battery life devices or system performance.
However, in cleaning RAM Hardened geeks still sometimes need devices. It is for them in iOS there is one hidden function. To do this you need to go to the shutdown menu iPhone long press the power button and then hold down the key Home.
After a few seconds, the device will go to the home screen, and its RAM will truly be absolutely free.
4. Let’s remember what happened exactly a year ago

With the advent of the service Google Photos I uploaded the entire family photo archive with a volume of a couple of hundred GB there - and absolutely free of charge and without SMS. However, what pleases me most is not the storage system itself, but the “smart” assistant built into it. His favorite feature is "What a day it was" a year or two or more ago.
As it turned out, in iOS there is exactly the same feature. But it is only available to owners iPhone 6s And 6s Plus- hidden in the quick actions menu of the gallery via 3D Touch.
Please note that there will be no corresponding label if the photos a year or more ago not in the device memory.
5. Let’s finally deal with the dialer

I was surprised, because several advanced users, in their opinion, noted the inconvenience of the built-in iOS dialers - especially in terms of repeated calls. They wrote that they were nostalgic for the times of push-button Nokia, where all you had to do was press the call key twice.
I inform you that iOS there is a similar possibility. If you click on the button with the phone in an empty dialer, the field will be filled with numbers last call, which is very convenient.
Already knew? Handsome!

I'm sure not everyone knew, right? I myself was not aware of the existence of most of these features until recently, so don’t be discouraged.
![]()
Website Become a real iOS Jedi. I continue to conduct experiments on iPhone users. Last time I brought together almost three hundred newcomers who have virtually no understanding of the intricacies of iOS and gave five simple tips that have already made their lives easier. If you missed it, here is the link, and smart comments under the topic are very welcome. There were fewer users who consider themselves real geeks....
Apple constantly modifies and complements the operating systems of its devices, releasing new firmware versions. If the iPhone constantly offers updates, or even freezes when trying to install them, this problem can be resolved in the following ways:
- disable downloading updates;
- delete already downloaded files;
- replace the server with new versions.
There are tips on the Internet to prevent downloading by disconnecting from wireless Wi-Fi. This is illusory, since when a new connection appears, the update will continue. Therefore, more effective methods should be used.
It's easy to disable downloading updates. To do this, go to Settings and open the AppStore menu. In chapter Automatic downloads Move the slider next to Updates and Programs.

How to Remove and Prevent Updates from Downloading on iPhone
To remove existing downloaded update files that take a lot of time free space, you need to go to the “Settings” -> “General” -> “iPhone Storage” section.
The repository lists your apps, updates, and other files. The volume of new firmware versions is large, so it is usually at the top of the list, but not always. Find it and click “Uninstall update”.


After this, the large update file will be deleted.
There are recommendations on how to downgrade the firmware version, but without proper experience it is not advisable to carry out such manipulations.
An effective way to get rid of annoying updates is to replace servers. To do this you need to use a browser download tvOS11 Beta Software app . Further actions consist of replacing the update check address. iPhone will contact the server AppleTV, therefore the system will not be updated.

If in the future you need to download new firmware, go to the settings menu and delete the above suggestion. The device will automatically find the required server and update.
Recently, Apple began to force all owners of iPhone, iPad and iPod Touch to install new software. Almost every day a notification comes to your device asking you to install the latest version of the iOS operating system, and you cannot refuse it. There are options: update now and remind at night. If you choose the second option, you have the option to close the notification, but it will appear again the next day. For this reason, the editors of the site began searching for a solution that would prevent automatic updating of the iOS operating system on all iPhones, iPads and iPod Touches.
Such a solution was found and it was a rather non-standard solution, but completely working. As you know, even before a message appears asking you to update to a new OS, the firmware is already loaded into the permanent memory of the iPhone, iPad and iPod Touch, thereby taking up free space and consuming extra Internet traffic on the Wi-Fi network. To prevent automatic updates of the iOS 10 or iOS 11 operating system, just install the tvOS Beta profile. To do this, open the Safari web browser on the desired Apple device, and then in the “Settings” application that appears, click on the “Install” button. You may be required to enter a password and then restart the device.
These simple measures will prevent any iPhone, iPad, or iPod Touch from automatically downloading new versions of the iOS operating systems, but will also stop the intrusive notification that appears every day. Note that if some new firmware has already been downloaded to a smartphone or tablet, then even after installing this profile it will still be in permanent memory, taking up precious space.
In order to delete a new version of the iOS operating system already loaded into the device’s memory, you should launch “Settings” and follow the path “General” - “Storage and iCloud” - “Storage” - “Management” “iOS 10.X.X”, and then select "Uninstall update" item. To start receiving updates over the air again, go to “Settings” - “General” “Profiles” and remove the installed tvOS Beta profile from there. After this, be sure to restart the device.
Such a simple instruction allows you to permanently solve one of the main problems of the iOS operating system, which millions of people face every day and cannot solve it, since Apple makes every effort to ensure that iPhone, iPad and iPod Touch owners install the latest software on their device, even if it works worse than the older one.
Until March 10 inclusive, everyone has a unique opportunity to use Xiaomi Mi Band 3, spending only 2 minutes of their personal time on it.
Join us on
Automatic system updates are one of the many new features in iOS 12. When enabled, your device is automatically updated to the latest version of the operating system. In this guide we will tell you how to disable this option.

When it comes to updating software, it's best to take control of the process yourself. As a rule, new versions of iOS are released without serious errors. But there are unsuccessful releases that spoil the experience of using the device.
Before iOS 12, Apple had an interim automatic update feature. Users were notified whether they wanted to update their iPhone or iPad overnight. If the answer was yes, the device was automatically updated while the owner slept. In iOS 12, Apple removed this feature.
New function responsible for automatic updates, disabled by default. But if it was activated previously, for example, during the initial iPhone settings or iPad, you can quickly turn it off.
