When reinstalling mac os it gives an error. How to reinstall macOS on a MacBook. Why and how to reinstall the operating system on a MacBook
Reinstalling macOS does not require offline media. Apple officially recommends that users use a network installation of the system. You can run it from a special recovery partition on your hard drive or using the Internet Recovery function. In this article we will tell you how to reinstall macOS using both methods.
Any apple computer comes with a pre-installed OS. It doesn't matter if you buy all-in-one iMac or MacBook in any modification: Pro, Air or 12-inch Retina. Not every user will remember the version of the operating system it was on when purchased. Regular free macOS updates eliminate the need to fill your head with this information. You may need it when you decide to reinstall the system.
- Click on the apple logo in the upper left corner of the menu bar. In the list that opens, select the topmost item marked in the screenshot.
- On the main tab we can find out the installed version of macOS. Below is information about the model and release date of the laptop.
If you are not an obvious opponent of updates, then you should have the latest OS version available for your hardware configuration. Otherwise, knowing the model and year of manufacture will allow you to determine it.
Available options
Now that we know the necessary information about our Mac, let's look at available options. There are only three options, which are selected by different key combinations pressed when starting the computer:
- reinstalling the current version of the operating system using the recovery partition on your hard drive or SSD – (Command ⌘ + R);
- Restoring to the old OS installed at the time of purchase. Depending on the year of release, this could be Mountain Lion, Yosemite or El Capitan - (Command ⌘ +Option ⌥ + R);
- Download and install the latest version of macOS that your Mac supports - (Shift + Command ⌘ + Option ⌥ + R).
An indispensable condition for the successful completion of all the actions described below is to connect the computer to the Internet. You will need it instead of installation media to download the required distribution.
- Call up the system menu and reboot.
- Depending on the selected reinstallation option, press and hold the desired keyboard combination. Using the Option ⌥ key launches Internet Recovery. You can release the buttons when a rotating globe appears on the monitor. The indicator below it shows the time until disk utility starts, which will depend on the connection speed. The download source is determined automatically, and will be used to search for the initial OS version serial number Mac computer.
- After choosing to reinstall from the recovery partition to the SSD, wait until the loading bar logo appears on the screen. After this, the keys can be released. Any of the options used will lead us to the appearance of a window with macOS utilities. The next steps depend on whether you want to keep the previously created system settings or prefer a clean installation.
The usual reinstallation option will keep all user data in place, updating only the OS. By selecting Disk Utility, you can completely erase the boot volume. If Windows is installed on the second system, the Boot Camp partition can be left unchanged.
Installing macOS
Using Disk Utility is recommended when it is impossible to perform the usual one. For example, the installer diagnoses problems that may prevent the operation from completing without formatting the volume. When reinstalling and returning to the old version of the OS, erasing the system disk is a mandatory procedure. Otherwise, the macOS installer will report that it has detected a more recent version and refuse to continue.
- Open Disk Utility on the left side of the window and select “Macintosh HD.” By default, the OS always uses this name for the system volume. IN top menu The “Erase” checkbox will become active. In the drop-down window, select the file type indicated in the screenshot. In some cases, at this stage the third line asks you to select a partition scheme hard drive. For all versions of macOS we set the GUID.
- High Sierra supports new file system APFS, adapted to work with solid state drives. The installer will automatically select it when you reinstall to the latest current version of the OS. You don't have to enable disk encryption at this stage. If necessary, this can be done already installed system by activating the FileVault function. After formatting, close Disk Utility and start the installation.
- We accept license agreement by clicking the marked button in the drop-down menu.
- The next few steps will allow you to complete the initial settings by specifying your preferred keyboard layout and region of residence. At the final stage, so that previously saved Safari bookmarks and music in iTunes appear in a clean OS, select login with Apple ID.
During the installation process, the computer will reboot several times on its own. Progress is shown by a filling indicator bar and a countdown timer.
Finally
As you can see, if you have an Internet connection, reinstalling macOS is not a difficult task. Creating in this case is a waste of time and may only be required if you want to use an OS version intermediate between the pre-installed and the current one.
Video instruction
The video below shows in detail all the steps described. After reviewing it, you can confidently proceed when reinstalling macOS yourself.
MAC OS, like Windows, sometimes requires reinstallation. This may be due to your MAC device being slow or due to it being sold (I don't think you'll be happy with a MAC being sold with your personal information on it). Or, on the contrary, buying a MACBOOK (PRO, AIR) or iMAC with a bunch of incomprehensible files or not necessary programs. In general, there can be many reasons to reinstall MAC OS. In this article I will describe in detail how to reinstall MAC OS and get a “clean” one. operating system.
So, before you start, you need to transfer all the necessary information to external media, since after reinstalling MAC OS, it will be almost impossible to restore anything.
In order to reinstall MAC OS you will need:
1 MACBOOK (PRO, AIR) or iMAC connected to a power source;
2 Internet access from MACBOOK (PRO, AIR) or iMAC;
3 This article and about an hour of time.
To reinstall MAC OS using the method described below, you must be using OS 10.7 or higher (10.8, 10.9). In order to check what version of the operating system you have installed, click on the apple in the upper left corner and select "About this MAC". The window that opens will contain information about the installed MAC versions OS.
If you are using a version older than 10.7, you need to update it.
You should load "OS X Utilities", if this does not happen, repeat the procedure by rebooting and pressing the "COMMAND" + "R" key combinations.
Select Disk Utility.

IMPORTANT!!! The following steps will delete all data on your drive, so you need to be sure that necessary files no on MAC.
Then select the disk with the system, open the “Erase” tab on the right and click the “Erase” button.

Confirm deletion by clicking the "Erase" button.

After that, close the Disk Utility window and select Reinstall MAC OS.

After this, confirm the installation, click the "Continue" button. With the release of the new OS X 10.10, OS X Yosemite will be installed.
In the next information window, click “Continue”.

The next step is to read the license agreement and accept it.


Then select the installation drive. In this case, the choice is obvious. Click the "Install" button.


After this, the MAC OS download process will begin.

After this, the MAC will automatically reboot and MAC OS installation will begin.

After the installation is complete, you will receive a “clean” MAC OS operating system; all that remains is to set some settings.
The next step is to select the country where you plan to use MACBOOK (PRO, AIR) or iMAC.

Select your keyboard layout.

You can connect to a Wi-Fi network (you can skip this step if you wish).

If you want to restore data you previously made using Time Machine or Windows computer select the appropriate item, if you do not plan to restore anything, select “Do not transfer any information” and click “Continue”. The data that you transferred to external storage can be transferred later.

The next step is to sign in with your Apple ID. IN in this example I will not do it.

Then read the license agreement and accept it.

After this, provide your credentials (username and password) and click “Continue.”

The last step is to register your MAC (this step is optional).

And in the end you will get a "clean" MAC OS.
Video of reinstalling the MAC OS operating system on iMAC/MACBOOK PRO/AIR.
In my opinion, installing MAC OS is incredibly simplified, you don’t even need disks with the operating system - pressing a few keys + an hour of time and you have a “clean” MAC OS.
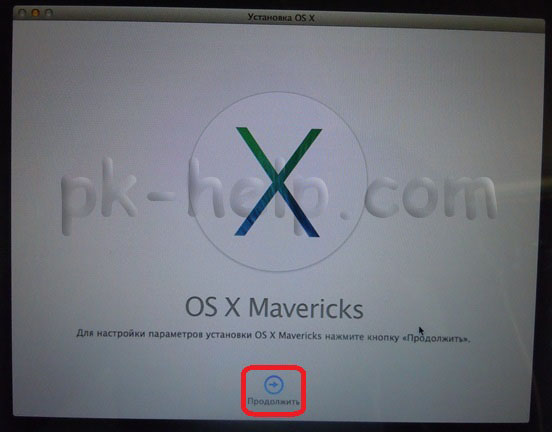
Any user may need to update the system on their Mac. However, hardly 25% of the population can boast of the ability to do this. But there are many ways that won’t be difficult to learn. This method very simple and fast. The OS can be “refreshed” in just three steps. The first step is to make sure that this system Fits your Mac model. To do this, at the top of the screen on the left side, click on the “Apple” icon, select “About this Mac”, and then “More details”. Next, personal information must be indicated. Models that are suitable for OS X Mavericks – iMac (from 2007), MacBook (2008-2009 or newer), MacBook Pro(from 2007), MacBook Air(2008 onwards), Mac mini (from 2009), Mac Pro (from 2008), Xserve (from 2009).
Step two - in the “About this Mac” item you can also find out what version of the OS is installed. Mavericks will only replace - Snow Leopard(10.6.8), Lion (10.7) or Mountain Lion (10.8), but if you have an older version, updating to the latest will allow you to use this service. Step Three – Open Mac App Store, “Download” the desired OS. Next, installation will be very simple using the built-in instructions. If for some reason you can’t handle it yourself, don’t take your device to dubious technicians. Contact consultants from stores or user support centers.
Updating MacBook OS

The second step mentioned updating the operating system to a newer version. How to do this? The Mac App Store provides notifications about programs and the system itself when they are ready to be updated. On the notification, click “Details”, after which, if the “Update/Install” buttons are available, download the program or OS. The “Reboot” button may also be active; this usually happens when installed software/OS requires a reboot to be “assimilated” by the computer.
Reinstalling OS X
Sometimes it becomes necessary to reinstall the operating system on a MacBook. An important reinstallation factor is Internet access. Restart your Mac by holding down the (⌘) and R keys. Make sure the Internet is connected. Select the reinstallation option, and then “Continue”. Detailed instructions will fully describe further actions, when selecting a disk, select the current one Mac disk OS X. Next, click on the “Install” button.
Mac OS X Lion has a built-in recovery disc that can be used to both reinstall the OS and restore hard data disk or Time Machine. In order to call this disk, you need to restart your Mac by holding down the keys (⌘) + R, as before. You also have the opportunity to create an external recovery disk, but this will be discussed in detail in another article.
This article examined in detail the most simple ways reinstalling the operating system. But it is worth recalling that if non-compliance simple rules, You may damage your MacBook. If you are not confident in your abilities, it is better to entrust the matter to professionals.
Sooner or later the day comes when you need to reinstall the Mac OS operating system on your MacBook PC. This task is no more difficult than reinstalling Windows. This is what we will talk about.
Why and how to reinstall the operating system on a MacBook
The reasons for reinstalling the MacOS operating system on a Mac computer are as follows:
- Damage or wear of the built-in storage device (HDD);
- selling or donating a MacBook to another person;
- “moving” to another MacBook (newer model, but maintaining previous version MacOS systems);
- data transfer to Apple gadgets or to another computer.
What happens when reinstalling MacOS:
Cleaning the boot volume if necessary
Then check out the articles from this article. You will be asked to select a boot volume, select the volume and click Install. . This way, you can restore your system from the recovery partition if anything goes wrong. Some users may find it helpful to take note of the contents of the Applications folder for later reference. A screenshot may be sufficient, but if not, the following steps describe an easy way to create an app list.
The process will take a few minutes to complete, so leave it running. And it's especially helpful for the new user to have a nice, clean machine that is back to its original factory condition. Most people do not have this feature enabled.
- “from scratch”, including formatting the built-in disk;
- reinstallation “on top”, preserving personal data and applications (macOS update).
For example, using the MacAppStore, you can upgrade your version of OS X Lion and OS X Mountain Lion to a newer version - OS X Mavericks.
Here are the steps to follow when selling or transferring your Mac to someone else. It deserves special mention.
But it's always better to check. But you are allowed to allow up to 5 computers. Don't worry, you don't lose any content and nothing is deleted from your computer. When you deactivate a computer, you prevent it from accessing protected content. And if necessary, you can authorize your computer later.
Don't save this step later. If you sell or give away a computer that still has one of your five authorizations, you need to deauthorize all of your computers and then reauthorize any that you are still using. That's a hell of a lot of hassle and time for something you can do now before you give it away or sell it.
- Backup personal data from a MacBook to a separate media or cloud service.
- Disabling special services and functionality that manage data copying and transfer.
- Erase all personal information from disk.
Attention! Before you start reinstalling MacOS on your MacBook PC, take the trouble to save all your data on an external drive! This will be discussed first.
Here you see the number of computers you have allowed in the past. Unfortunately, it does not list the names of these computers. So if this number doesn't agree with you, try de-authorizing your computer several times until it is no longer allowed.
Deactivate programs and remove other permissions
Additionally, select "Deauthorize all computers" to clear five permissions. Then re-authorize all your computers one by one. Many third party applications include authorization and activation of the machine, in particular programs for editing images, sound and video. Application activation is the process of connecting a specific application to a valid user license.
Backing Up Data Using Time Machine
The Time Machine application is designed to backup personal files from a MacBook and restore them back to it. But it requires external USB drives (HDD, SDD drives) formatted in MacOS Extended or Xsan - FAT/NTFS file systems designed for Windows and Android are not supported. If the disk was previously formatted in FAT/NTFS formats, the MacBook will not accept it if you refuse to reformat it “for yourself.”
You must activate your application before you can use it. On the other hand, deactivation disconnects the application from a valid user license. Once deactivated, you can reactivate this license at any time on any computer.
Therefore, check the list of applications, look for programs that require activation keys. Once you are there, go to the program menu bar and find the deactivation or deauthorization link. Its utilities allow you to completely erase the internal HDD.
Reinstalling Mac OS X and Apple programs
Once posted, download and install it from this product page. We install a lot of applications, updates and maybe even think about operating system software using terminal applications or third party developers.
The Time Machine application is launched from the MacOS system preferences in the Apple menu. When you connect an external hard drive, a corresponding notification will appear.
Do you really want to destroy all data recorded on this drive in a different format?
If external drive has already been formatted, the Time Machine application will give the go-ahead for its use. Confirm your request.
This is the actual and expected use. This is the value and price of experience. And the new owner gets a fresh start - without the clutter left over from all your previous applications, preferences, etc. Important! We have a workaround that should allow you to back up and restore your desktop message history, however we cannot guarantee that it will work. Type "Terminal" and open the application.
Copy and paste the phone number folder to another location. Follow the cleaning instructions below, reinstall. Don't forget to empty your trash afterwards. Still experiencing the same problems? So far, the malware has been fairly well described and is not viral in nature, so for any given variant it is installed in one location and launched from there to affect the system. As a result, once a variant has been identified, you must remove it from your system by following detailed instructions.
Do you really want to copy your data to this drive?
If Time Machine does not show disk selection, do the following.

How to reinstall Mac OS from an installation flash drive
The preliminary steps are as follows.
Update from App Store
This is the recommended approach; however it relies on definitions malware that have been identified for malware, which may lag behind the original malware results. If you decide that it would be better if you played it safely and wiped your system and started over by following this procedure, you should be able to do so while retaining your data.
Synchronization and backup First, make sure your system is properly synced with your cloud services to ensure that items such as contacts and calendars are saved. Doing so will allow you to restore some of these items without relying on sync services to manage them for you. When you are done with the backup, unmount and disconnect the external hard drive that you used for the backup. Do not select the restore from backup option. Restoring data from a backup. The next step is to copy the data into the system from backups. If your contacts and calendars are missing, you can re-import them from previously created backups manually. Once you've installed your apps, be sure to update them completely, then open and customize them according to your preferences. At this point, your system should be back in working order and you should be able to continue your workflow as you did before the reinstallation. In addition to syncing, make sure your system is backed up. . The final step in this process is to protect against further infection.
- Download the Mac OS X installation image from the Mac App Store or third-party sites.
- Once the download is complete, right-click on the downloaded file and select “Show package contents.”
- Go to the /Contents/SharedSupport/ folder, copy the InstallESD.dmg file to a safe location on your disk, and mount it to your MacOS desktop.
We will need the Disk Utility application included with MacOS. The next steps are as follows.
Install a reverse firewall to help detect and block programs from calling home on remote servers and consider installing an antivirus utility. While you don't need to configure your antivirus tool to thoroughly scan all files on demand, you can configure it to scan only shared folders to boot and then once a week or perhaps once a month for it to scan the entire system. For now, despite last news malware, this should be enough to prevent malware and provide you with sufficient protection.

Disk Utility will create an installation flash drive in automatic mode, and she performs this operation quite reliably. When copying is complete, Disk Utility will notify you.
Congratulations! The MacOS installation flash drive has been created! You can restart your MacBook. Preparing to install MacOS is as follows.
Feel like you need a clean slate? This means you delete all your data, everything you do on the computer, and put it back just like it was when you took it out of the box. But there are scenarios where a full cleaning and recovery session can be valuable.
No buyer wants a computer with a hard drive to fill up with someone else's data, so resellers usually work to reset the computer. But another important part is restoring factory settings. Erasing a hard drive is quite simple, but you'll need to access the factory settings again when you're done. During the reboot process, your computer will display a gray slate screen before going to the login screen. Select the reinstall option, confirm that you really want to do this, and continue.

All! MacOS installation has started. The MacOS operating system will install automatically - this will take 30-100 minutes, depending on the performance of your MacBook. After it, your PC will be immediately ready for use.
How to install the system without formatting the internal drive
Installing MacOS without erasing the disk means downloading and installing MacOS updates directly from the MacAppStore. An installation flash drive is not needed here. This reminds iOS update on smartphones and tablets over the air. This method is good for those who once bought a MacBook - and are not going to change it, but, on the contrary, will work on it for many years, because MacBook computers, like Apple iDevice gadgets, are very high quality, reliable and convenient.
Here you must connect your computer to the Internet.

Once you've been collecting data and applications for over a year, the performance differences start to show. It just doesn't run as smoothly as it once did. There are many tricks to get it back into action.
Many users are hesitant to reinstall their entire operating system. There are many benefits for new installation, especially from a performance standpoint, but it's a much bigger undertaking to start from scratch. Although it's work, it's definitely worth it in the long run, and here we'll walk you through the process from start to finish. This is a three-step event: backup, installation, and migration.
Before updating, check whether your MacBook meets the hardware requirements of the new version of MacOS - otherwise it will slow down.
Not every previous version of MacOS can be updated to the desired version. So, if your MacBook is running macOS Snow Leopard (10.6.8) and your MacBook will run macOS Sierra, first upgrade to macOS X El Capitan.
Start with cleaning
It might be best to add a hidden fourth step before we begin. Using your computer for a long time, you probably have a lot of things you don't need on your hard drive. Applications you installed but didn't continue to use and files that became redundant months ago. Take this time to sort through your data and throw out anything you don't want to keep.
If your files are disorganized, take this time to sort things out. Separate working documents from game installers and family photographs. Categorize and organize files in multiple categorized folders. Of course, this is completely optional, but it will help speed up the backup process and get you up and running on your next installation faster and faster.
The version of MacOS Sierra is taken as an example. Other copies are searched for and “installed” in exactly the same way. Your actions are as follows.

If you have OS X El Capitan 10.11.5 (or more recent), the macOS Sierra version downloads silently. You will then be prompted to install this version.
There is a difference between starting with a clean slate and starting completely from scratch. Before you reinstall your computer, make sure your data is secure. The easiest way to back up your data is to move it to an external drive. This is a good option if you only want to move a certain number of folders between two installations, or if the drive is not large enough to accommodate all your data and needs to be split into multiple parts.
You can find these app libraries in the Music and Pictures folders located in your Home folder, respectively. You can choose which folders to return after reinstalling your system. The first backup may take a maximum of an hour. Also check your settings to ensure that important folders are not missing. Alternatively, you can install the latest version right away.

Click on the install button
During the installation of MacOS, the PC restarts several times. If this version does not suit you (the performance of the MacBook has dropped), “roll back” to the previous one (for example, OS X El Capitan), with which the PC performance was very satisfactory.
Restoring MacOS from a backup
For example, we take a “rollback” from MacOS Sierra (10.12) back to OS X El Capitan (10.11) or OS X Yosemite (10.10). Let's say there are backups made in the Time Machine application before installing MacOS Sierra.
Important! Restore MacOS system from a backup can only be done on the same MacBook. Trying to transfer your copy of the MacOS system with data to another PC in this way is useless. Use other methods.
- Connect your external drive to your MacBook and save your existing files to Time Machine, naming the new copy MacOS Sierra.
- Open your previous copy of OS X Yosemite with Time Machine on a different drive after connecting it to your MacBook.
- Restart your MacBook while holding Command+R on your keyboard. The familiar MacOS recovery menu will open.
- From the OS X Utilities menu, select Restore from Time Machine Backup.
- Once in the “Recover from Time Machine” recovery window, click on “Continue”, and then specify the source - the disk with the OS X El Capitan “backup”.
- The saved copy should be: In the case of OS X El Capitan, the MacOS version should be 10.11.x. Click the Continue button. Specify installation disk to restore from a copy, click on “Restore”.
Ready! The OS X El Capitan version will be reinstalled.
Transferring a copy of the operating system and your data to another MacBook
Go to Programs/Utilities and open Migration Assistant. The structure of your files and folders will be preserved.
![]()
Click to continue
When running, the application requires closing all other running programs.
If both computers are working, but you still want to duplicate your version of MacOS and all data on the second computer, connect the computers to each other using a LAN cable, wirelessly Wi-Fi networks. Connecting directly using a Thunderbolt or FireWire cable will require running your previous Mac in backup mode, which will make the Assistant experience a little more complicated. However, both methods work clearly. You can connect an external disk with a backup copy to the new PC instead of the previous PC - in this case, the operation of the Assistant on the new PC will not change significantly.
So, the procedure is as follows. As an example, we take the normal operating mode of a previous PC with “Assistant”.

All! The copy session has started. This can take anywhere from 30 minutes to two hours, depending on the amount of data and the performance of both Macs.
Problems encountered when reinstalling MacOS
Problems when updating or “rolling back” may be as follows.
- No recent backups. You once disabled backup yourself. Copy your files now to avoid losing them by starting the process manually. Enable backup.
- An error occurred during the next backup or when restoring personal data from a previous copy. The external drive that was previously recorded is unsuitable for further use. Contact an Apple service center or certified computer repair shop to restore your data. This procedure is not free.
- Error during the next MacOS update. Your Mac PC may no longer be supported. This happens once every few years. All you have to do is use current version MacOS before replacing your Apple PC.
- The computer began to work noticeably slower than before the update. Minimum system requirements next new version equal or exceeded specifications your PC. “Roll back” to any of previous versions MacOS. Typically, Apple tries to prevent this from happening - it simply stops supporting older computers, just like installing iOS version 10.x is no longer possible.
- After several active years, your PC suddenly began to freeze despite the fact that you did not update MacOS. Maybe it's time to replace the internal HDD/SSD drive? Try to do backup copy your important data before replacing the internal disk - while something is still being read from it.
- It is impossible to “roll back” to one of the previous ones installed versions MacOS. The “rollback” must be done gradually. If there are no previous backups, download a new “image” and “roll back” to this version first, and then repeat the “roll back” to an even earlier version of MacOS.
Video on the topic
Reinstalling MacOS - “on top” or “from scratch” - is not difficult. It is only important to secure your data. This real way extend the life of your beloved MacBook for another number of years. You will succeed!
Mac OS X Yosemite is a system introduced by Apple in 2014. This is the most current and advanced Mac OS among the systems offered by the manufacturer of Apple technology. We invite you to find out how it is done installation from scratch. We will also look at the issue of reinstalling the Yosemite system itself to restore factory settings.
What is the best way to install the system?
Mac OS X Yosemite is available in the Appstore. There are two options for installing it:
- On top of the old system;
- Clean installation from scratch.
You have the option to install Mac OS X Yosemite directly on top of the old OS X Mavericks. This is advisable if you value the current state of the file system, installed programs and their settings. All data will remain in the same place, changes will only affect the operating system. But the performance of many programs may be impaired. Compatibility and update issues can cause a lot of inconvenience.
Installing from scratch eliminates a lot of systemic problems. Factory settings will be completely restored. This will help get rid of excess installed applications, unnecessary data, etc. Let's look at this process in more detail.
Installing Mac OS X Yosemite from scratch
Creating a USB flash drive

After downloading the update from the Appstore, proceed as follows:
- Launch Disk Utility;
- In the left panel, select the drive, on the right, go to the “Disk Partition” tab;
- In the "Partition Scheme" menu, select "Section 1". The disk name is "Yosemite", the format must be "Mac OS Extended (Journaled)".
- Go to "Options", select the GUID partition scheme. Click "Apply".
- Disk Utility begins formatting the flash drive.
- From the "Utilities" folder, launch "Terminal".
- To create a flash drive, run the following command:
- Enter the administrator password.
- For creating bootable flash drive it will take 10-15 minutes.
- After the procedure is successfully completed, reboot the Mac. When loading, hold down Alt.
- You are ready to install Mac OS X Yosemite.
Installing Yosemite
After creating a flash drive and rebooting the Mac, follow the instructions:
- Go to the "Downloads" menu and select "Mac OS X Installer".
- You need to open Disk Utility and select the disk with the system to format. Go to the "Erase" tab.
- In the "Format" menu, "Mac OS Extended (Journaled)" must be selected, and the name of the disk is written.
- Click "Erase", thereby starting the disk formatting process.
- Close Disk Utility and open the Install Mac OS X section.
- We specify the Yosemite boot disk and start the installation process.
Starting the installation process involves following the installer's instructions. Select the necessary parameters, the system will soon be ready for use. After installing Mac OS Yosemite, you can start using the system from scratch or transfer files from Time Machine.
Reinstalling Mac OS X Yosemite
If OS X Yosemite is already installed, you may need to reinstall it in the following cases:
- System failures;
- Errors when installing updates;
- Disk cleaning;
- The need to restore factory settings.
So, let's answer the question, how to reinstall Mac OS X Yosemite. To do this you need to erase Mac data and reinstall the system. Don't forget to back up your valuable files. To restore factory settings, you need to use the built-in recovery disk. To reinstall the system, an Internet connection is required, as well as a connected power adapter.
The procedure is simple:
- Restart your Mac. During boot (gray screen), press Command+R.
- Select "Disk Utility" and click "Continue".
- Select the disk and click "Erase".
- In the "Format" section, select Mac OS Extended (journaled), enter a name, and click "Erase".
- The disk will take some time to clear.
- Select "Disk Utility" and click "Finish".
- Go to "Reinstall OS X", click "Continue".
- Select the disk to use. In most cases it is the only one available.
- We follow the installer's instructions and finish.
- The system has been reinstalled!
Most users traditionally switch to new version OS X by simply clicking the “update” button in the App Store. Undoubtedly this is the most easy way, but at the same time, it is not always the most effective, since over time many Mac users notice that their system is no longer as fast as it was at the beginning of operation, and updating does not solve the problem.
Users who constantly change and reinstall software on their Mac are especially susceptible to this problem. The reason for the decrease in performance is precisely various system garbage and “residues” from remote programs which safely remain in place during the update. That is why many people prefer to install a “clean system”.
Things to remember before installing from scratch
First of all, be sure to back up your system. To do this, the standard set of OS X programs includes a wonderful Time Machine utility.
Also be sure to make sure that all your contacts, calendars, mail, etc. synced with iCloud (settings>iCloud)
Clean installation of OS X El Capitan step by step
2. Reboot the Mac while holding down the key option(aka alt).
3. Choose as bootable media flash drive.
4. After the Mac boots Recovery from the USB flash drive, visually it will happen like this:
open Disk Utility and format the Mac hard drive.
5. To do this, select the hard drive partition in the panel on the left, then in the top panel click erase(do not change the format and name) then click again erase(at the bottom).
6. After formatting is complete, close Disk Utility and select reinstall OS X.
7. In the next window, select only the formatted hard drive and after completing the installation process you will receive a crystal clear OS X El Capitan.
By the way, you can reinstall the system from scratch without bothering with a flash drive. True, you need to have Capitan installed on your Mac before, also from scratch, otherwise the version of the system that came “in the box” will be installed.
So, if such a need arises, then restart your Mac while holding cmd+R, open Disk Utility and format the hard drive as shown above. Then you also choose Reinstall OS X and wait for the installation to complete.
Majority Mac users are updated to the new generation of the operating system by simply pressing the " Update" in the Mac App Store, although a clean install of OS X is considered to be the most in a reliable way. In this material we will tell you how to do this.
In contact with
How to do a clean install of OS X El Capitan on a Mac by first formatting the disk?
1 . Restart your Mac and hold down the keys while turning on the computer ⌘ Cmd And R.
2 . In the loaded application, select the menu item " Disk Utility" and click the " Continue».

3 . In the left side menu, select the system drive (by default it is called " Macintosh HD") and in the main window go to the " Erase" and format it by specifying the format " Mac OS Extended (Journaled)».
Attention! All data will be deleted from the Mac.
![]() 4
. After finishing the formatting process, close " Disk Utility».
4
. After finishing the formatting process, close " Disk Utility».
5 . Select an item Install OS X in the window " OS X Utilities", if you need to download a copy of OS X El Capitan from the Internet and click the " Continue».

6 . If you plan to use a bootable USB flash drive (by creation), then close the “ OS X Utilities».

7. In the window that appears, click Boot disk...

8 . In the window that appears, select a bootable USB flash drive with OS X El Capitan that was previously connected to your computer and click Reboot.

The computer will reboot and offer installation of the system from the USB flash drive.
It is worth noting that you can also press a button ⌥Option (Alt) on the keyboard when you turn on the computer. A list of available drives will appear from which you must select a bootable USB flash drive.

Learn how to reinstall your Mac operating system to built-in or external media from the macOS Recovery partition, which makes it easy to reinstall your Mac operating system, even if you have to erase your startup disk first. All that is needed is an Internet connection. If available wireless network, you can select it from the Wi-Fi menu in the menu bar. This menu is also available in macOS Recovery Mode.
ATTENTION!
If the Find My Mac function was activated on your Mac, then after reinstallation, the system will ask you to enter the Apple ID to which the device is linked.
Run from the macOS recovery partition
To start from the macOS recovery partition, press and hold one of the following keyboard shortcuts as soon as you turn on your Mac. In general, Command + R is the recommended keyboard shortcut, especially if you've never installed macOS Sierra 10.12.4 or later.
Cmd (⌘) + R – Installs the latest version of macOS that was installed on this Mac.
cmd + Option (Alt) + R – Update to the latest version of macOS that is compatible with your Mac.
Cmd + Option (Alt) + Shift + R – Install the macOS that came with your Mac or the closest version available (available starting with version 10.12.4).
Decide whether to erase (format) the drive.
The usual reinstallation option will keep all user data in place, updating only the OS. By selecting "Disk Utility", you can completely erase the boot volume. If Windows is installed on the second system, the Boot Camp partition can be left unchanged.- Select Disk Utility and click Continue.

- Select your startup disk (usually the Macintosh HD, which is located at the very top left) and click on the "Erase" button at the top of the screen.
- In the window that appears, specify the name (optional) and APFS format (for computers with macOS Sierra or later installed old version OS select Mac OS Extended).
- Click « Erase » in the lower right side of the window.

Install macOS
- In the utilities window, select Reinstall macOS (Reinstall OS X).
- Click Continue and follow the on-screen instructions to select your drive and begin installation. If the installer asks you to unlock your drive, enter the password you use to sign in to your Mac. If the installer does not see the disk or reports that it is impossible to install on this computer or volume may be required clean disk >

- Wait for the installation to complete without putting your Mac to sleep or closing the lid. During the installation process, your Mac may restart several times and display a progress bar, and the screen may remain blank for several minutes.
If Setup Assistant appears after you restart, but you plan to sell or give away your Mac, press Command+Q to exit Setup Assistant without completing the setup process. Then click "Turn off". When the new owner starts up their Mac, they can enter their information during setup.

In this article, one of the editors of the WoW It team will share his sad, but much-needed experience of using a MacBook. One day the question arose about buying a laptop, and since I had been using Windows for quite a long time, I was pretty fed up with it. It was decided to go over to the side of evil, as they say they have livers) Considering that for quite a long time I wanted a MacBook and OS X on board, the decision to buy a MacBook Air was quite easy. And now, the happy owner of a MacBook Air 11. As befits an experienced system administrator who has never held a Mac in his hands, the tinkering began. So say check for fault tolerance, and of course inexperience won! OS X went down in just two days). Question: “What should I do, how can I reinstall OS X or can it be restored, and if so, how can I do it?” There was only one thought in my head: “It’s Apple, it’s probably all simple.”

Having come across the first article on the Internet that you need to format the screw and repartition it to an earlier file system (Error! DO NOT do this). So that later, during the installation of the new OS X, he himself would repartition it to the latest version along with the installation of OS X High Sierra. But again, inexperience only aggravated the situation, since now Recovery with data saving was also killed. Further realizing what had been done, the appeal went to a single, correct source, the official Apple website.
How to Reinstall OS X in Recovery Mode
The first thing you need to do is check Recovery; if you have a live recovery disk, you should try to recover it. To start your MacBook in recovery mode you need to:
- CMD+R.
- Next, select Recovery and go through the recovery procedure accordingly.
But if you are greeted by a picture (image below), then you have hit the jackpot of incredible experience!
 How to reinstall OS X using network recovery mode
And so, instead of disk utility, you see a network system recovery window in front of you, what to do. It's quite simple. The MacBook could not detect the system recovery disk, and there are two options: either just delete everything remotely, or, which is much worse, the HDD or SDD died, depending on the configuration. In order to try to install the system via the Internet and at the same time check whether your disk is dead, you need to:
- After loading the network system recovery, select your home Wi-Fi network or connect via wire if possible.

- Wait for all the necessary files to download and begin installing the operating system that was installed when you purchased the device by clicking on the reinstall OS X button.

Reinstall OS X from a USB flash drive
In principle, in most cases it can be stopped here, but there are also sad endings. For example, you may receive error -4403F - this may be due to a poor connection or the use of a proxy or VPN on your network. Try repeating the process or connecting to a different network. Sometimes it would start the third time.

Next, your scenario unfolds according to several strategies.
First strategy.
You have an old MacBook, you took it from your hands, which when purchased came with OS X Lion. But you obviously don't have it in your AppStore purchases. Then, when you try to install the operating system, after entering your AppleID credentials, you will be given the following - on this moment OS X cannot be installed, please try later. - Then you need to reinstall OS X from the flash drive.
How to create a USB flash drive from MacOS on Windows and reinstall OS X from the flash drive
There are a lot of manuals on how to create a bootable USB flash drive on MacOS; you can easily find them on the Internet. But, if you don’t have another Mac at hand, then you need any Windows PC.
How to burn a USB flash drive with OS X:
- You need to download an operating system image no older than Lion, everything will definitely work with it. You can download from any torrent exchanger.
- Download the program to unpack the image TransMac install and run as administrator. You can download it from the official website. The real version is available for 15 days, which is enough to create a bootable MacOS USB flash drive.

- On the left in the list of devices, select your flash drive and right-click on it Format Disk for Mac, then click Yes


- After the flash drive is formatted, again right click and select Restore with Disk Image then click Yes. Then select the image downloaded on your PC and deploy the image to the USB flash drive.


That's it, after the image is completely installed on the flash drive, you can connect it to your MacBook according to the old scheme:
- Turn off your MacBook completely by holding down the power key for 6 seconds.
- Turn on the MacBook, hold down the keys when turning it on CMD+R.
- Select a flash drive
 Click to reinstall OS X
We wait for the installation to complete, go through the first setup and update to the latest version available to you.
Full MacBook reset, PRAM and NVRAM reset.
But that's not all. It seems that I have already tried everything and have already made a flash drive 100 times trying to reinstall OS X from it and tried all possible versions of MacOS, but still it throws out some errors. Then you need to act more radically. Needed full reset MacBook settings, BIOS reset. Since the Mac was not created by stupid people and has the most secure nature of use, it has a lot of hidden parameters and settings. They are stored in any case. Sometimes this is the stone. Looking ahead, I’ll say that this is what helped. And so, to reset the MacBook, namely, reset the PRAM and NVRAM memory cells, do the following:
- Turn off your MacBook completely by holding down the power key for 6 seconds.
- Turn on the MacBook, hold down the keys when turning it on CMD+Option+P+R.
- Hold until it reboots again and there is a greeting sound.

In this particular case, everything fell into place. This manipulation helped, the strange marked disks stopped being displayed, and most importantly, the installation process continued without errors.
Reset SMS on MacBook
Although there are situations when this does not help. Then we need to hit on all fronts and flattery further into the forest. Mac has the so-called SMC System Management Controller. The stability of the entire system depends on it, and often resetting its settings cures a number of problems such as:
— constantly rotating cooler at high speeds even without heating;
— The system freezes when going into sleep mode;
— Error in the operation of external monitors, as well as other peripherals and system loading errors;
In order to reset SMS, you need to do the following:
- Turn off your MacBook completely by holding down the power key for 6 seconds.
- Connect the power adapter.
- Simultaneously press Shit + Control + Option + Power and hold until the MagSafe adapter indicator changes color.
- Release all keys and press Power.
If you have old model with removable battery:
- Turn off your MacBook completely by holding down the power key for 6 seconds.
- Disconnect the power adapter.
- Remove the battery.
- Press and hold the Power button for at least 5 seconds.
- Release the Power button, insert the battery, connect the power adapter and turn on the laptop.
But if you are the owner of Desktops (iMac, Mac mini, Mac Pro), then we will help you:
- Completely disconnect from power
- Wait 30+ seconds
- Connect power, wait 5-10 seconds and turn on the device.
Something like this will help you! If you still cannot cope with the problem, our editors and our readers are always happy to help you with your problem. Remember, you are not alone) We will be waiting for your comments and questions.
Restoring or reinstalling software
Mac OS X software
If there is a problem with your Mac software or hardware
problem, you can use recovery utilities in Mac OS X,
to avoid problems and even restore original factory settings
software. These utilities are available in Mac OS X Utilities.
even if your computer does not boot properly.
The best thing is that if you plan to save files on your external hard drive, don't transfer them to your computer unless they have a real use. In the case of applications, it is recommended to re-download and, if they are programs with costs, you should restore your purchases so that you do not have to pay for the software again.
Once you have saved your information and are sure you want to restore the system, you will have to restart your computer. These settings can be renamed depending on the language in which you have configured your system. What you need to do is select the internal hard drive.
Mac OS X Utilities lets you do the following:
restore your computer disk using Disk Utility;
Chapter 4
There is a problem - there is a solution
restore software and data from Time backup
Machine;
Clean installation of OS X El Capitan step by step
Select the drive and select “Delete” in the right window. The process time will depend on the amount of information that needs to be eliminated. The process here will take a few more minutes, but once it's completed you'll have a completely clean environment. The above guide works for those who want to clean and format your computer.
Back up everything
Here's how to do it step by step in 7 steps. A full installation of this type is equivalent to "formatting" or formatting the hard drive, which will erase everything. So the first step should be. All data must be copied. Therefore it's best. Manually copy all documents, videos, files, downloads, music, etc. to an external drive. from the group employees folder, including what may be on the desktop and in other places. When you give the "Download" button the message.
restore Mac OS X Lion and Apple programs;
restore your computer to factory settings by erasing its disk and reinstalling
Mac OS X Lion and Apple programs.
If a problem is detected with your computer, it automatically opens
Mac OS X Utilities panel. You can also open it manually by rebooting
computer.
To open the Mac OS X Utilities panel, do the following:
Why and how to reinstall the operating system on a MacBook
System 3 is already installed on this computer. Depending on the connection speed, it may take from half an hour to several hours. This is done by searching for the drive connected to your desktop, clicking on the name below and changing it to "Install".
It is important that the drive name, as already stated, is set or otherwise will not work. This process does not indicate its evolution on the screen and can take up to 30 minutes, so you need to be patient and even go for a walk.
- A terminal window will open.
- Copy and paste the following command.
- A terminal window will ask you to enter your computer administrator password.
- At the end, check “Copy full” and “Done”.
Restart your computer while holding down the (x) and R keys.
Some utilities in the Mac OS X Utilities panel require
Internet access and App Store for Mac. You may need to make sure that
The computer is connected to the Internet via Ethernet or Wi-Fi.
Connect via Wi-Fi network
Select a network from the Wi-Fi status menu in the top right corner of the screen.
At this point, it is very important to complete the data backup because it will start a process that will erase everything after a restart. From there, you can run a full uninstall and format your computer's hard drive. Removal may take several minutes.
What is the best way to install the system?
The rest of the process is automatic and can take more than half an hour. If so, the files and settings are inherited, but if you want to start from scratch, it's better to say no. There are several cases where, thanks to this process, the computer has regained its initial speed, stability and response speed, or at least very similar, since it must also be taken into account that the software increasingly requires and Hardware, if it has not been updated, are the same.
If necessary, enter a password to access the network.
To connect to a closed network, select Connect to Another Network.
Enter your network name and password.
Recovering a disk using Disk Utility
If there is a problem with your computer or when loading
computer You see the Mac OS X Utilities panel, you may need to
restore computer disk.
Running from the macOS recovery partition
From there, it will download the first piece of software to begin booting the system.
- The first one is from the recovery section.
- The second option is to use the Internet recovery option.
Chapter 4
There is a problem - there is a solution
Select Disk Utility from the Mac OS X Utilities panel and click
"Continue".
Select a drive or partition from the list on the left and open the First Aid tab.
Click Repair Disk.
But first, let's prepare everything we need. Don't worry, it can be downloaded again. The system will start loading. As we already said, there are two options. If he doesn't find it, he will ask us for its location and we will need to indicate it. We choose to create a boot disk. We accept and are ready, the application erases all content, formats and creates an installer.
The second way is to use the system tools. Once the process is complete, go to the "Recover" tab. Now we click on the "Restore" button located in the lower right corner and the process begins. But in some cases, some people choose to do things differently.
If Disk Utility can't fix the disk, try as much as possible
save the information in a backup copy and follow the instructions in the section
“Reinstalling Mac OS X and Apple Software” on page 97.
Information about Disk Utility and its settings can be found in the Help
center, or you can open Disk Utility itself (in the Utilities folder
in Launchpad) and select Help > Disk Utility Help.
In addition, it brings back a new, clean computer feeling, ready to be refilled with the products of your new activities and their inseparable content. It is also a good guide for accessibility in case of maintenance or problems. Not only for the installation process itself, but also for reorganizing your environment after completion. Currently, the easiest way is to use the recovery features built into the operating system, but options for creating recovery and installation disks are also available.
Installing Mac OS X Yosemite from scratch
In the list on the left, the boot disk in the machine is available for selection. By default, the drive will be formatted as quickly as possible; Any choice beyond this could make the process take hours, so only use these options if necessary.
Restoring information using a backup copy
Time Machine
If you have previously created Time Machine backups, you can use
"Recovery" utility restores all the contents of the computer
to the state in which it was at certain moment time
in past.
Use a Time Machine backup only for recovery
information on the computer from which the backup was created.
To transfer information to a new computer, use the Assistant
migration.
The process time will depend on your broadband connection and the machine will restart during the process. After downloading the utility, open it from the disk image itself and select one of the available disks to make your media. Or, alternatively, don't want to update?
- First, you need to download.
- Now it's time to install the system, this step is also very simple.
As a rule, developers release automatic updates, but this is not the rule. Do this at least on the software that is most important to you. This is important to avoid losing productivity. This is because you will still have software updates after installation.
If the backup is on a Time Capsule, make sure your Mac Pro is connected
to the same Ethernet or Wi-Fi network. (To connect to a Wi-Fi network, follow
instructions on page 95).
Chapter 4
There is a problem - there is a solution
In the Mac OS X Utilities panel, select Restore from Time Backup
Machine" and click "Continue".
Old operating system = Bad thing
Unfortunately, this is very common. In the next lesson you will see step by step to do this safely and automatically. What do you think happened? Moreover, many third parties have stopped providing software updates that are compatible with older operating systems.
Browsers and plugins are commonly used as a means of infecting computers, so it is extremely important that these programs, along with the operating systems that run them, are not updated. Using this update path will allow you to save the contents of your hard drive.
Select the drive where the Time Machine backup is located, and then
follow the instructions on the screen.
Reinstalling Mac OS X and Apple programs
There are times when you need to reinstall Mac OS X and Apple programs.
When reinstalling the system, you can save all files and settings.
Important.
You can also reinstall and restore from the Mac OS X Utilities panel
If not, let them know that it's time to seriously consider purchasing a new computer. You will be prompted to select a boot drive. . If you have before reinstalling or if you do so, your computer will restart and display the installation assistant.
Indeed, on these models, the recovery partition is present on the source disk, and many cloning programs do not take it into account. The first two are used to restore your system and data. The first method is recommended if the recovery partition is already on the drive or you have a high-speed Internet connection. The second method is recommended if you do not have access to the Internet.
Mac OS X Lion Server software, if installed on your
Mac Pro.
Make sure your Mac Pro is connected to the Internet via Ethernet or Wi-Fi.
"Continue".
When prompted to select a drive, select the current Mac OS X drive
(in most cases this is the only option available).
To install additional software, click
"Tune".
Method two: Recovering from the recovery partition
Attention.
Choose between two systems at startup
If necessary, here is the procedure for installing the utilities. Everything for a successful migration. You don't lose your data, your passwords, or your apps. In about half an hour you will be at home with a new interface! This may happen because a hard drive structure error will cause the update to fail and therefore require a full format.The installation said correctly
Here you are in your new home! To retrieve data from your old computer or back up after a clean install.Click Install.
You can install Mac OS X without deleting the entire contents of the disk (and
existing files and settings are preserved) or clear the disk first (if
this erases all your data) to prepare the computer for reinstallation
Mac OS X and programs.
Reinstall the latest system
This page is “illustrated” with a video. It therefore depends on independent updates other than the evolution of the operating system. Paste it and follow the instructions below. First, disable some accounts and services first.
Reinstall the original system
These explanations also apply when you want to do some spring cleaning and head out onto a brand new foundation.Internet connection, if nothing
Then, are you ready to reinstall the machine "like new"? This first condition is not exclusive, but we prefer to have the latest version and simpler process first. Release him as soon as the apple appears. Enter your name boot disk and click "Clear". Prepare some coffee or hot chocolate and let it go.
Chapter 4
There is a problem - there is a solution
After reinstalling Mac OS X, you can go to the Mac App Store and reinstall
Download the programs that came with your Mac and other programs
that you purchased from the Mac App Store.
before proceeding with software recovery. Apple
is not responsible for possible loss of data.
Finally available to the general public starting today. This release marks a turning point for the system, which becomes completely free. After downloading, a window will automatically open asking you to begin installing the system. Once you've made sure you've backed up, you can continue.
You will need to accept the new license agreement associated with it, select the hard drive to install the update on, and enter the administrator password for your computer. After this preparation step, the computer will automatically restart and begin installing the system. This is the longest step as it will take about 40 minutes during which the machine will not be used. New reboot, and here you are at the last step.
Restoring your computer to factory settings
Restoring your computer to factory settings deletes everything on it.
yes (accounts, network settings, files and folders). Before recovery
be sure to create a backup copy of the files you need: copy
them to another disk. Make a note of your network settings so that after you reinstall Mac OS X
it was easier to reconnect with her.
As with any maintenance operation, follow the instructions carefully. Everything will be erased and you will start with the factory configuration. If successful, you will see “Launch Internet Recovery” on the screen. This may take a while or in French, as in this case there may be "Running Internet Recovery". This may take a long time. This is probably the most difficult step! You must wait for the original operating system to load.
Installing from the recovery partition
Logically, you must select the installation language. It will be French without hesitation that you select using the trackpad or keyboard arrows. Finally, close the format window. The technical difference between the two models is the lack of access to the battery and hard drive on the new model, and Bottom part completely screwed. Why change your hard drive?
Make sure you are connected to the Internet via Ethernet or Wi-Fi.
(To connect to a Wi-Fi network, follow the instructions on page 95.)
In the Mac OS X Utilities panel, select Disk Utility and click
"Continue".
Select the drive in the list on the left and open the Erase tab.
From the Format pop-up menu, choose Mac OS Extended (Journaled)
enter the drive name and then click Erase.
After erasing the disk, select Disk Utility > Finish
Disk Utility."
In the Mac OS X Utilities panel, select Reinstall Mac OS X and click
"Continue".
Chapter 4
There is a problem - there is a solution
Follow the instructions to reinstall Mac OS X and Apple programs
Mac OS X installer.
After restoring Mac OS X and Apple programs, you can, at your discretion,
Restore necessary files and programs from a Time Machine backup.
Most Mac users have made the transition to the new macOS Sierra operating system without any problems, but there are some who have encountered problems. If your computer has problems at the software level, it makes sense to reinstall the OS. This article will discuss a method for reinstalling macOS Sierra that does not involve completely formatting the Mac and deleting user data. That is, this is not a “clean” installation of the system, in which all data is deleted.
Even though this is simply a reinstallation of macOS Sierra and won't affect anything else, theoretically there could be problems along the way. Therefore, we highly recommend that you back up your Mac.
How to reinstall macOS Sierra
Step 1: First of all, back up your data on your computer.
Step 2: Restart your Mac, press and hold COMMAND + R at the same time right after you hear the boot sound. This will put the computer into recovery mode.

Step 3: In the macOS Utilities window, select Reinstall macOS.
Step 4: Click Continue and follow the onscreen instructions.

Step 5: In the drive selection window, select your hard drive on which macOS will be installed and click “Install.”

Once the macOS Sierra reinstallation process starts, the screen will turn black and a white Apple logo will appear with a progress bar and the amount of time remaining until completion.

When finished, macOS Sierra will automatically launch into normal mode. Your account, data, applications and settings will remain in place. The reinstallation is on a storage device, which may affect performance, but when completed, the Mac will work as before.
Some users have noted that reinstalling macOS Sierra helped solve many problems that arose after the update. Therefore, there is absolutely no need to resort to extreme measures and perform a clean installation.
