How to boot the system from a flash drive. Installing an operating system from a flash drive: Step-by-step instructions. Preparing the distribution for installation from a flash drive
A “hot” boot from a flash drive or setting the BIOS so that the PC automatically boots from a portable media may be necessary when installing the OS on a hard drive or when launching a recovery Live CD. Read on to learn how to configure the BIOS to boot from a USB drive.
Preparing a flash drive
This procedure boils down to burning an installation image or Live CD onto media, for which there are quite a large number of methods, the description of which is the topic of a separate article. Let us only note popular programs created specifically for this purpose:- Rufus;
- UltraISO;
- WinSetupFromUSB;
- WinToFlash;
- UNetbootin;
- Universal USB Installer;
- WiNToBootic;
- Win7 USB/DVD download.
Booting through the Boot Menu
As a rule, during installation or Windows recovery there is no point in interfering with the BIOS settings; it is enough to boot from the flash drive once through the Boot Menu. This option (unless it is blocked by the device manufacturer) is present in most models of the modern fleet of computers and laptops. Boot Menu is an integral part of any BIOS or UEFI BIOS.Using the boot menu, the user can quickly switch to one or another module, but the next time the computer is started, the computer will still be booted from the default boot media.
You can boot from a flash drive via the Boot Menu as follows:
 The Boot Menu interface of your computer or laptop may differ from the one shown in the example, it all depends on the device model and BIOS type. The login key (or key combination) may also be different, for example:
- many devices with system Asus boards- F8 button;
- Lenovo laptops ( additional option) - a separate button on the body with an arrow symbol;
- some Acer laptops and all-in-one PCs - go to the BIOS via F2 and activate the “F12 Boot Menu” option in its settings;
- laptops and all-in-one computers from HP - F9 button, or the sequence of Esc + F9 buttons.
We activate booting from a flash drive in different BIOSes
As in the case of entering the boot menu, you can get into the motherboard BIOS by pressing a certain key (less often a combination of several keys) when the computer starts. The most common buttons are Delete or F2. Other options depend on the computer model and BIOS type, for example:- outdated BIOS from Award - combination Ctrl + Alt + Esc;
- Phoenix - F1 (F2) button;
- Microid Research - Esc;
- IBM - F1;
- some Lenovo devices - blue ThinkVantage button;
- some Toshiba laptop models - combination Esc + F1;
- HP/Compaq - F10 button.
AMI
First of all, we connect the prepared flash drive to the computer, start it and enter the BIOS, as described above. Next you should proceed according to the following scheme:
Award (Phoenix)
This is one of the most common and oldest BIOS. We configure booting from a USB flash according to a typical scheme:
H2O
This BIOS is found on laptops different manufacturers. Moving, selecting and other actions here are carried out using keyboard buttons. We configure booting from a flash drive in H2O BIOS according to the following scheme:
Booting from a flash drive to a PC with UEFI
The latest motherboards have a convenient graphical interface BIOS UEFI. The change in the order of load modules has also become clearer. It is important that most of these motherboards have the ability to control a mouse.
Is it possible to boot without BIOS?
This method works on devices running Windows control 10 s and motherboards with built-in UEFI BIOS. Boot from a flash drive using standard tools:
Possible problems when entering BIOS
Currently Windows system configured in such a way that it may be impossible to get into the BIOS due to the fast boot option being activated by default. The problem is solved quite simply: Loading personal computer USB flash drive may be needed during installation operating system or its restoration in case of any problems. The method is also used to launch a Live CD in for various purposes. You can boot from a flash drive either through the Boot Menu or by specially setting up the BIOS.
Every System Administrator should know how boot computer from USB flash drive. Most often, this skill is needed when installing an operating system. After all, the Windows distribution does not have to be located on a CD. And, for example, it won’t even be possible to install Windows on a netbook any other way, because... it usually does not have a disk drive.
Today I will tell you how to set boot from a flash drive in the BIOS of various manufacturers. Regardless of which version you have, the procedure will be as follows:
1. We insert our bootable USB flash drive into the USB connector of the computer. It is advisable to insert it into a port located directly on the motherboard, i.e. from the back of the system unit.
2. Turn on the computer and press the key Delete(or F2) to get into the BIOS. Depending on the manufacturer and BIOS version, other keys (Esc, F1, Tab) may be used, so you need to carefully watch the prompts on the screen.
In Bios, we can navigate through tabs and lines only using the keyboard.
Next, I will describe this process in detail using the example of different BIOS versions.
Setting up Award Bios to boot from a flash drive
Award Bios: First, let's check if the USB controller is enabled. Let's go to “Integrated Peripherals”. Use the arrow on the keyboard to move down to the “USB Controller” item. Press the “Enter” key and select “Enable” in the window that appears (also using “Enter”). Opposite “USB Controller 2.0” there should also be “Enable”.
  Exit this tab by pressing “Esc”.
Then go to “Advanced BIOS Features” – “Hard Disk Boot Priority”. Now in my example the hard drive comes first, but the flash drive should be there.  We stand on the line with the name of our flash drive (Patriot Memory) and raise it to the very top using the “+” key on the keyboard.
  We leave here by pressing “Esc”.
Now on the line “First Boot Device” press “Enter”. We selected “CD-ROM”, but we need to set “USB-HDD” (if suddenly loading from a flash drive does not work, come back here and try setting “USB-FDD”). Let the second device be “Hard Disk”.  Exit this tab by pressing Esc.
Now exit the BIOS, saving the changes. To do this, click “Save & Exit Setup” – press the “Y” – “Enter” key. 
Settings AMI Bios to boot from a flash drive
If, after entering Bios, you see such a screen, it means you have AMI Bios: First, let's check if the USB controller is enabled. Go to the “Advanced” – “USB Configuration” tab.
 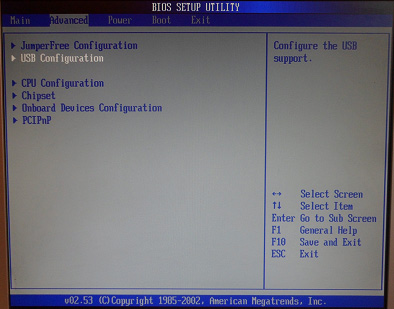 Opposite the items “USB Function” and “USB 2.0 Controller” should be “Enabled”.
 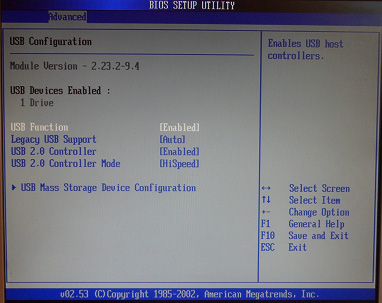 If this is not the case, go to this line and press the “Enter” key. From the list that appears, select “Enabled” (also using “Enter”).
Then exit this tab by pressing “Esc”.
Go to the “Boot” – “Hard Disk Drives” tab. 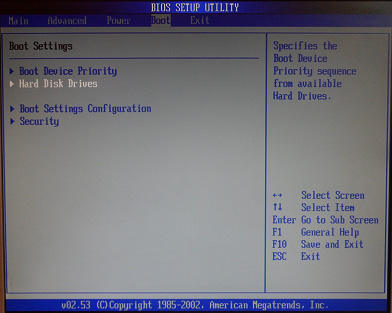 Now my hard drive is in first place, but I need to put a flash drive here. We go to the first line, press “Enter” and in the window that appears, select our Patriot Memory flash drive.
  It should be like this:
  We leave here via “Esc”.
Select “Boot Device Priority”. Here, the first boot device must be a flash drive.  Press Esc.
Then we exit the Bios, saving all the settings made. To do this, go to “Exit” – “Exit & Save Changes” – “OK”. 
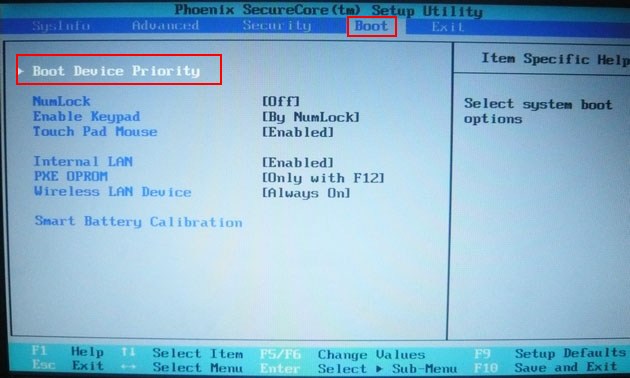
Setting up Phoenix-Award Bios to boot from a flash drive
If, after entering Bios, you see such a screen, it means you have Phoenix- Award BIOS
: First, let's check if the USB controller is enabled. Go to the “Peripherals” tab – opposite the “USB Controller” and “USB 2.0 Controller” items there should be “Enabled”.
  Then go to the “Advanced” tab and opposite “First Boot Device” set “USB-HDD”.
  After that, exit the Bios, saving the changes. To do this, go to “Exit” – “Save & Exit Setup” – press the “Y” – “Enter” key
  That's practically everything you need to know in order to boot from a flash drive. In my article, I described the process of setting up the BIOS of the most popular versions: Award And AMI. The third example presents Phoenix-Award Bios, which is much less common.
IN different versions The BIOS procedure described may be slightly different. But the main thing is that you understand the principle of setting itself.
By the way, I would also like to add: in order to choose which device to boot your computer from, it is not necessary to change the settings in the BIOS. You can call immediately after turning on the computer special menu to select boot devices (this can be done by pressing F8, F10, F11, F12 or Esc). In order not to guess with the keys, look carefully at the monitor immediately after turning it on. We need to have time to see an inscription like this: “Press Esc to selest boot device.” In my case, it was necessary to press “Esc”.  If on your computer BIOS UEFI, and you need to boot from a flash drive - you can check it out.
If you need reset forgotten password user using a bootable USB flash drive - how to do it.
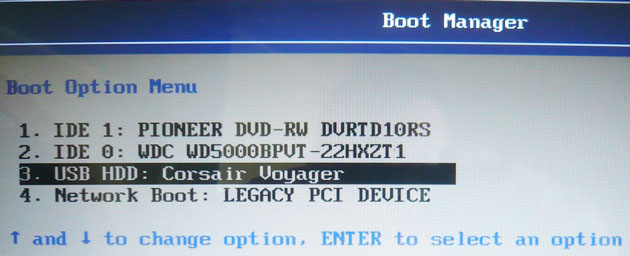
Friends, in this article we will find this very boot menu for laptops Acer, Sony, Samsung, MSI, Toshiba, HP, ASUS, Packard Bell and load the above devices from my Corsair Voyager flash drive, which contains the Windows 7 operating system. Don’t forget, if you want to install on a new Windows laptop 7 or Windows XP, then connect the USB flash drive to USB port 2.0 (black), if you connect a USB flash drive to a USB 3.0 port (blue), the system installation will fail, since there is no Windows 7 in the installer USB drivers 3.0.

We will also analyze the BIOS of these devices in detail. Let's look at how to change the boot priority on these laptops, in case you and I are unable to enter the boot menu. There is no need to be afraid of the BIOS; if you configure something in it incorrectly, you can always reset the settings to default.
Very important note: This note will be useful to you if you have new laptop any manufacturer (2013, 2014 with UEFI BIOS). If you have such a laptop and you are reading these lines, then you want. To do this, of course, the laptop needs to be booted from .
Almost all laptops currently sold have a UEFI BIOS; such a laptop cannot simply be booted from a flash drive, since the UEFI BIOS has special protection - the secure boot protocol." Secure Boot"based on special certified keys (available only in Windows 8). The Secure Boot protocol will not allow your laptop to boot from any boot disk or flash drives other than installation Windows disk 8. In order to boot your laptop from a flash drive, the Secure Boot protocol needs to be disabled in the BIOS of your laptop; this is done very simply, read our article or.
Let's return to this article. I think the information will be useful to many owners of laptops and netbooks. This article will also help if you want to boot from a disk and don't know how to do it.
Let's start with Acer laptop, first of all, we connect our Corsair Voyager flash drive to the laptop, then press F12 when loading,

Then you need to select our flash drive in the boot menu that appears and click
If you are unable to enter the boot menu of your Acer laptop using the F12 key during boot, then the Boot Menu option is disabled in the BIOS and needs to be enabled.
When loading, press F2, the initial Information tab, go to the Main tab, see the F12 Boot Menu parameter, set it to Enabled,

Next, press F10 to save the settings, reboot, press F12 when loading and our boot menu appears, select our flash drive in it and press Enter, it boots from the flash drive.
If the boot menu of the Acer laptop still does not appear, then go to the BIOS again (when loading F2), Boot tab. We select our flash drive and put it in the first position using the F6 key, then press F10 to save the settings, reboot and boot from the flash drive.


When loading the laptop, press F12 and get into the boot menu, select our flash drive here, if you connected a flash drive to the laptop, its name will be here. Press Enter and if your flash drive is bootable, it will boot from the flash drive.

If for some reason you cannot boot your laptop from a flash drive using the boot menu, then you can enter the BIOS and change the boot device priority there. We often press F2 when booting a Toshiba laptop and get into the BIOS of this laptop. The initial Main tab, go to the Boot tab (responsible for loading the laptop) and see our Corsair Voyager flash drive in sixth position. We select it using the keyboard and press F6, thus moving our flash drive to the first position, then press F10 to save the settings we changed, the reboot occurs and the laptop boots from the flash drive.
Friends, if you have a new Samsung laptop, for example 2012-2013, then read this article “”, for all others this instruction is also suitable.
When loading, press Esc or F10, get into the boot menu and select our flash drive. If the boot menu does not appear, then go to the BIOS, press F2 or DEL when loading. In the BIOS Boot tab, select the first parameter Boot Device Priority
And we enter it, here we select our flash drive and using the F6 key we put it in the first position. Next, press F10 to save the settings and reboot, reboot, then boot from our flash drive.


and we get to the boot menu. The first device is now the disk drive, if your flash drive is connected to the laptop, then its name will also be present here, select our flash drive here and press Enter or F10, a reboot occurs and further loading from the flash drive.

If you cannot enter the boot menu of an HP laptop, then go to the BIOS, press ESC when loading, then F-10, get into the BIOS,
Go to the System Configuration tab, then Boot Options, press Enter


As you can see, the first device is set to HDD laptop Notebook Hard Drive. If your flash drive is connected to a laptop, then its name will be here, select our flash drive and use the F6 key to move it to the first position. Next, we save the settings we changed, press F10 to save the settings, the reboot occurs and the laptop boots from the flash drive.


If the boot menu is not available, press the DEL key during boot and enter the BIOS, then go to the Boot tab, select our flash drive and, without releasing Shift, press +, thereby moving our flash drive to the first position. Press F10 to save the settings, the settings are saved and the laptop boots from the flash drive.


Then go to the Boot tab, and set the Fast Boot option to Disabled,


Once again we enter the BIOS and go to the Boot tab, set the Launch CSM (advanced boot) option to Enabled,

We go down to the Boot Option Priorities and Boot Option #1 option and enter it by pressing Enter, in the menu that appears, using the arrows on the keyboard, select the name of our flash drive and press Enter. Here we also put our Corsair Voyager flash drive in first place.


We press F10 to save the settings, reboot and our Asus laptop boots from the flash drive.
Also you can use boot menu Asus laptop, to do this, in the initial phase of booting the laptop, frequently press the key Esc, you will be taken to the boot menu, use the arrows on the keyboard to select your bootable USB flash drive and press Enter.

How to boot a Packard Bell laptop from a flash drive

Press the button when loading F12 and we get into the boot menu of the laptop, there we simply select our flash drive and boot the laptop from the flash drive.
If F12 does not work when loading, then click F2, less often F6 and get into the UEFI BIOS of the laptop,

here we go to the tab Boot.
If before turning on the laptop you connected a flash drive to it, then it may not decide immediately in this menu.
Set the Boot Mode option to Legacy BIOS.
And the option Secure Boot set to position Disabled.
Now the flash drive should determine. Place the flash drive in the first position, save the settings and reboot. If the bootable flash drive is made according to our articles, then the download will be successful.
You have a bootable USB flash drive with a distribution of the operating system, and you want to do the installation yourself, but when you insert the USB drive into your computer, you discover that it does not boot. This indicates the need to make the appropriate settings in the BIOS, because this is where the hardware configuration of the computer begins. It makes sense to figure out how to properly configure the OS to boot from this particular storage device.
First, let's figure out how to enter the BIOS in general. As you know, the BIOS is located on the motherboard, and each computer has a different version and manufacturer. Therefore, there is no single key to enter. Most often used Delete, F2, F8 or F1. Read more about this in our article.
After going to the menu, all that remains is to make the appropriate settings. Its design differs in different versions, so let's take a closer look at a few examples from popular manufacturers.
Award
There is nothing complicated about setting up to boot from a flash drive in Award BIOS. You just need to carefully follow the simple instructions and everything will work out:

AMI
In AMI BIOS, the setup process is slightly different, but is still simple and does not require additional knowledge or skills from the user. You are required to do the following:

Other versions
The algorithm for working with BIOS for other versions of motherboards is similar:
- Start the BIOS first.
- Then find the menu with devices.
- After this, enable the item on the USB controller "Enable";
- In the order in which the devices are launched, select the name of your flash drive as the first item.
If the settings are completed, but booting from the media fails, the following reasons are possible:
- The bootable flash drive is written incorrectly. When you turn on the computer, the drive is being accessed (the cursor blinks in the upper left part of the screen) or an error appears "NTLDR is missing".
- Problems with the USB connector. In this case, connect your flash drive to a different slot.
- Incorrectly executed BIOS settings. And the main reason is that the USB controller is disabled. In addition, older versions of BIOS do not allow booting from flash drives. In such a situation, you should update the firmware (version) of your BIOS.
More details about what to do if the BIOS refuses to see removable media, read our lesson on this topic.
You may have configured the USB drive itself incorrectly to install the operating system. Just in case, check all your actions according to our instructions.
And these instructions will be useful to you if you are recording an image not from Windows, but from another OS.
And don’t forget to return the settings to their original state after you no longer need to log in from the bootable USB flash drive.
If you cannot configure the BIOS, it will be enough to simply go to "Boot Menu". Almost all devices are responsible for this different keys, so read the footnote at the bottom of the screen, it's usually indicated there. After the window opens, select the desired device to boot. In our case, this is USB with a specific name.

We hope that our article helped you understand all the intricacies of setting up the BIOS for booting from a flash drive. Today we examined in detail the implementation of all necessary actions on BIOSes from two of the most popular manufacturers, and also left instructions for users who use computers with other BIOS versions installed on them.
Hi all! Today I want to tell you how to set boot from flash drive in BIOS. Why this might be needed, for example, you made a bootable USB flash drive and want, for example, to install Windows 10. It may also be useful: when necessary, install the download from DVD and CD in BIOS. Many administrators who are just encountering this for the first time, for example, when restoring a system, may lose a lot of time due to ignorance, not understanding what they are doing wrong. I hope that this instruction will be useful to you and you will once and for all understand the principle of this action,
Via Boot Menu to boot from a flash drive
In most cases, booting from a flash drive into the BIOS is required for some one-time task: installing Windows, scanning the computer for viruses using LiveCD, resetting Windows password.
In all these cases, it is not necessary to change the BIOS or UEFI settings; it is enough to call the Boot Menu when you turn on the computer and select the USB flash drive as a boot device once.

For example, when Windows installation, you press the desired key, select the connected USB drive with the system distribution kit, you begin the installation - configuration, copying files, etc., and after the first reboot occurs, the computer will boot from hard drive and will continue the installation process as normal.
I wrote in great detail about entering this menu on laptops and computers of various brands in the article How to enter the Boot Menu.
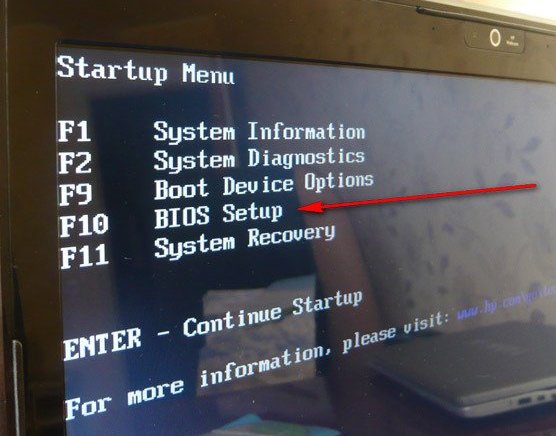
How to get into the BIOS to select boot options

In different cases, in order to get into the BIOS setup utility, you need to perform essentially the same actions: immediately after turning on the computer, when the first black screen appears with information about installed memory or the logo of the computer or motherboard manufacturer, press the desired button on the keyboard - the most common options are Delete and F2. Usually this information is available below home screen: “Press Del to enter Setup”, “Press F2 for Settings” and similar. By pressing the right button at the right moment (the sooner the better - this must be done before the operating system starts loading) you will be taken to the settings menu - BIOS Setup Utility. Appearance This menu may vary, let's look at a few of the most common options.
I would like to give you a summary table of all the buttons for entering BIOS of different manufacturers.

Changing the boot order in UEFI BIOS
On modern motherboards, the BIOS interface, or more precisely, the UEFI software, is usually graphical and, perhaps, more understandable when it comes to changing the order of boot devices.

In most options, for example on Gigabyte (not all) or Asus motherboards, you can change the boot order simply by dragging the disk images accordingly with the mouse.

If this is not possible, look in the BIOS Features section, in the Boot Options item (the last item may be located in a different place, but the boot order is set there).
Setting up booting from a flash drive in AMI BIOS

Please note that in order to perform all the described steps, the flash drive must be connected to the computer in advance, before entering the BIOS. To set boot from a flash drive in AMI BIOS:
- In the menu at the top, press the “right” key and select “Boot”.
- After that, select the item Hard Disk Drives ( Hard disks) and in the menu that appears, press Enter on 1st Drive (First drive)
- In the list, select the name of the flash drive - in the second picture, for example, it is Kingmax USB 2.0 Flash Disk. Press Enter, then Esc.

Menu for settings BIOS boot

Next step:
- Select “Boot device priority”
- Select “First boot device”, press Enter,
- Again, specify the flash drive.

If you need to boot from a CD, then indicate DVD drive ROM. Press Esc, in the menu at the top from the Boot item, move to the Exit item and select Save changes and exit or “Exit saving changes” - when asked if you are sure that If you want to save the changes you have made, you will need to select Yes or type “Y” from the keyboard, then press Enter. After this, the computer will reboot and begin using the flash drive, disk, or other device you selected to boot.
Booting from a flash drive into BIOS AWARD or Phoenix

In order to select a device to boot into Award BIOS, in the main settings menu, select Advanced BIOS Features, then with First Boot Device selected, press Enter.

A list of devices from which you can boot will appear - HDD-0, HDD-1, etc., CD-ROM, USB-HDD and others. To boot from a flash drive, you must install a USB-HDD or USB-Flash. To boot from a DVD or CD - CD-ROM. After that, go up one level by pressing Esc, and select the menu item “Save & Exit Setup”.
Setting up boot from external media in H2O BIOS

To boot from a flash drive into the InsydeH20 BIOS, which is found on many laptops, in the main menu, using the “right” key, you need to go to the “Boot” item. Set the External Device Boot item external device) to the Enabled position. Below, in the Boot Priority section, use the F5 and F6 keys to set External Device to the first position. If you need to boot from DVD or CD, select Internal Optic Disc Drive.
After that, go to Exit in the menu at the top and select “Save and Exit Setup”. The computer will reboot from the desired media.
Boot from USB without entering BIOS (Windows 8, 8.1 and Windows 10 with UEFI only)
If your computer has one of the latest Windows versions, A motherboard with UEFI software, then you can boot from a flash drive without even entering the BIOS settings.

To do this: go to settings - change computer settings (via the panel on the right in Windows 8 and 8.1), then open “Update and Recovery” - “Recovery” and click the “Restart” button in the “Special boot options” item.

On the “Select Action” screen that appears, select “Use device.” USB device network connection or DVD."

On the next screen you will see a list of devices from which you can boot, which should include your flash drive. If suddenly it is not there, click “View other devices”. After selection, the computer will reboot from the USB drive you specified.
