The removable disk is defined as local. What to do if the computer does not see the removable device? “No media” - reasons and methods for solving the problem. External HDD is not detected via USB - update drivers
In this article we will show you how to make sure that USBflash drive or SDthe map was determined in Windows system
like a regular local HDD
. You might ask, why is this necessary? The fact is that Windows by default defines USB flash drives and memory cards as removable drives, which cannot be divided into several partitions using Windows standards. And even if you split the flash drive into two or more partitions using third-party utilities (in the same Linux), then in the OS Windows family Only the first of them will be available (by the way, built-in appeared in Windows 10 1703). Those. Windows supports normal operation with multi-partitions only for HDD drives, which are defined in the system as local (i.e. non-removable).
RMB bit and USB media
Windows operating systems recognize USB flash drives as removable/removable devices due to the presence of a special bit descriptor on each device R.M.B.(removablemediabit) . If, when polling a connected device through the StorageDeviceProperty function, the system determines that RMB=1, it concludes that the connected device is a removable drive. Thus, in order to convert a USB flash drive into a hard drive from the system's point of view, it is enough to modify this descriptor. This can be done directly (which is quite risky due to differences in hardware implementations specific devices, and not always possible), or indirectly, by replacing the response of a USB device using a special driver that allows you to filter information in the device response.
Advice. Some manufacturers produce special utilities to flash the controller of your flash drives. First of all, try to find such a utility and/or firmware on the manufacturer’s website. This is the most correct way. If you don’t find such a utility, follow the recommendations from this article.
Let's connect to any free port computer USB flash drive, then open Disk Management Manager ( diskmgmt.msc) and make sure that its type is defined in the system as Removable(Removable device) .
You can also see the device type on the Volumes tab in the disk properties (as we see here Type: Removable). 
Or using the diskpart command:
List volume

In this article we will look at two ways to change the RMB bit on a USB flash drive - by using the Hitachi filter driver (changes are made only at the driver level on a specific computer) and changing the bit in the controller firmware using the BootIt utility from Lexar (more universal method, but there are a number of restrictions and are not applicable to all models of flash drives and SD cards). Although both of these methods are quite old and I originally tested them on Windows 7, they continue to be relevant and work equally well in modern Windows 10.
Lexar BootIt utility
Recently I came across a rather interesting utility - LexarBootIt. This is a free, portable program that can change the RMB of a removable drive to make a removable USB device fixed (or vice versa). Even though the Lexar BootIt utility is designed for Lexar devices (Micron, Crucial), it can also work with flash drives from other manufacturers. BootIt utility supports everything Windows versions, starting with Windows XP and ending with Windows 10.
Important. The utility is guaranteed to work for Lexar drives. Judging by the reviews, the “Flip removable bit” function does not work on fast USB 3.0 flash drives. In addition, when flashing the controller, you will lose the warranty on the flash drive and can make it inoperable.
You can download BootIt on the Lexar website (lexar_usb_tool) or from our website ().
- Run BootIt.exe with administrator rights
- Select your flash drive from the list of devices
- Click on the button Flip Removable Bit
- Save your changes by clicking OK.

Reconnect the device and use Device Manager to make sure that its type has changed from Removable to Basic.

If the BootIt utility did not help change the RMB bit on a removable drive, try using in the following way, based on the Hitachi Microdrive filter driver
Filter driver for Hitachi Microdrive flash drives
In order for a USB flash drive or SD card to be recognized in the system as a hard drive, we need a special filter driver that allows us to modify the data transmitted through the system stack of the current device driver. We will use a filter driver to USB flash drives from Hitachi ( Hitachi Microdrive driver), which at the OS driver level allows you to change the type of flash drive device from removable to fixed (USB-ZIP -> USB-HDD). Thanks to the use of this driver, you can hide from the system that the connected device is removable. As a result, the system will consider that it is working with a regular hard drive, which can be divided into partitions that will be simultaneously accessible in the system.
Archives with Hitachi Microdrive driver:
- 32 bit systems - (3.0 KB)
- Hitachi Microdrive version for 64 bit systems - (3.8 KB)
You need to download the driver version for your system according to its bit capacity. Both archives have the same structure and consist of two files:
- cfadisk.inf– installation file, with driver settings
- cfadisk.sys- Hitachi driver file
The next stage is identifying the device code of our flash drive. To do this, in the disk properties on the tab Details in the parameter Device Instance Path select and copy ( Ctrl+C) device instance code. 
In our example it would be:
USBSTOR\Disk&Ven_Linux&Prod_File-CD_Gadget&Rev_0000\0123456789ABCDEF&0
Let's say we plan to install the driver on 64 bit system. Using any test editor, open the file for editing cfadisk.inf. We are interested in the cfadisk_device and cfadisk_device.NTamd64 sections.
%Microdrive_devdesc% = cfadisk_install,IDE\DiskTS64GCF400______________________________20101008 %Microdrive_devdesc% = cfadisk_install,IDE\DiskTS64GCF400______________________________20101008
We change the value DiskTS64GCF400______________________________20101008 to the code of our device.
Important! In the device instance code, it is necessary to discard the part after the second “\” (in our example we discard 0123456789ABCDEF&0).
We get:
%Microdrive_devdesc% = cfadisk_install,IDE\USBSTOR\Disk&Ven_Linux&Prod_File-CD_Gadget&Rev_0000 %Microdrive_devdesc% = cfadisk_install,IDE\USBSTOR\Disk&Ven_Linux&Prod_File-CD_Gadget&Rev_0000
Save the file.
If the driver is installed on a 32 bit system, you need to download the recommended archive, unpack it and open the cfadisk.inf file for editing. Let's find a section :
%Microdrive_devdesc% = cfadisk_install,USBSTOR\Disk&Ven_LEXAR&Prod_JD_LIGHTNING_II&Rev_1100 %Microdrive_devdesc% = cfadisk_install,USBSTOR\Disk&Ven_JetFlash&Prod_TS1GJF110&Rev_0.00 %Microdrive_devdesc% = cfadisk_install,USBSTOR\DI SK&VEN_&PROD_USB_DISK_2.0&REV_P
Then we change the data in the last line, indicating the code of the instance of our flash drive, i.e. in our example we get:
%Microdrive_devdesc% = cfadisk_install,USBSTOR\Disk&Ven_LEXAR&Prod_JD_LIGHTNING_II&Rev_1100 %Microdrive_devdesc% = cfadisk_install,USBSTOR\Disk&Ven_JetFlash&Prod_TS1GJF110&Rev_0.00 %Microdrive_devdesc% = cfadisk_install,USBSTOR\Di sk&Ven_Linux&Prod_File-CD_Gadget&Rev_0000

Advice. If necessary to USB flash drive was displayed in the device manager with a specific name, you need to edit the value of the Microdrive_devdesc variable, for example like this:
Microdrive_devdesc = "Transcend 64GB DIY SSD"
Installing the Hitachi Microdrive driver instead of the native USB drive driver
All that remains is to replace the driver used by the USB flash drive.
Important! If USB driver Hitachi Microdrive is installed on a 64-bit system, because... There is no digital signature for this driver, you will have to either.
Open the Drivers tab and click the button Update Drivers. 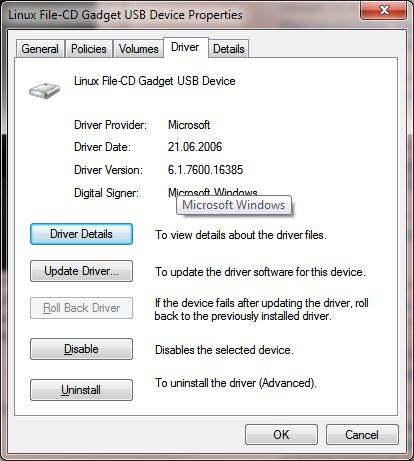
Let's indicate the folder to the directory into which the downloaded archive with the Hitachi driver is unpacked: 
Let's select a new driver. 
We ignore the warning about missing digital signature drivers. 
Advice. In Windows 10 and Windows 8, when installing the driver, the following error appears:
Windows found drivers for this device, but an error occurred when trying to install the drivers.
Hitachi Microdrive
Third party inf does not contain signature information

To disable driver digital signature verification, run the following commands:
bcdedit.exe /set nointegritychecks ON
bcdedit.exe /set TESTSIGNING ON
Restart your computer and try to install the driver again.
All that remains is to restart the computer and, by opening the disk manager, make sure that your flash drive is now recognized as a regular hard drive ( Type: Basic), and the Hitachi driver is used as the driver.

By opening Explorer, you can also make sure that the icon of the flash drive has changed; it is now displayed as a hard drive, a regular drive. 
Now you can work with this flash drive like a regular HDD: create partitions, specify the active partition, create dynamic disks, install software that does not work from flash drives, etc.
Important. On others Windows computers Without this driver, the second partition of the device will not be accessible.
To remove the Hitachi Microdrive driver, open the disk properties and on the Driver tab, click the Update Driver button - the system will install the native driver itself.

Advice. If after installing the Hitachi driver the system stops booting with BSOD, you need to boot the computer from the installation Windows disk/Live CD and manually delete the following files:
- cfadisk.sys in the %windir%\System32\drivers directory
- Directory "cfadisk.inf_amd64_..." from %windir%\System32\DriverStore\FileRepositoty
Restart your computer
You need to understand that this solution will only work on the system on which the appropriate driver is installed.
Hello, dear site visitors!
It so happened that I needed to format it. It’s just that this hard drive is from a laptop, and when I gave the laptop in for warranty repairs, instead of an SSD drive I installed a HDD back. Yesterday I picked up my laptop from repair and put the hard drive back in my pocket.
I connected it to the computer on which the information was stored in order to upload it to external HDD, but it is not determined. Or rather, it is detected, Windows signals that a device is connected, an icon appears on the notification panel that a USB device is connected, and there is even an option to remove it.
In the device manager, the external HDD is also displayed and works properly. But the whole problem is that the disk does not appear in Windows Explorer. You go to my computer, but it’s not there.
I connected this external hard drive to the laptop, still the same. It is detected, but it is not visible in the explorer. Yeah, that means it's the disk itself.
I thought a little, then I googled it and realized that the disk was simply not allocated and it was necessary to create a partition on it. We will create standard means Windows for working with hard drives, which I wrote about.
This could have been the end of the article, but I took a few screenshots, so I’ll show and tell you everything using a real example and how you like it – with pictures :).
We need to open the Disk Management tool. To do this, open Start and right click on Computer. Select Control.
On the left, select Disk management. And this is the picture I saw (screenshot below). Disk 0- This is my SSD drive, there are created sections there. A Disc 1, this is already my external hard drive, which was not displayed in Explorer. It says Not distributed. Now we'll distribute it :).
Right click on it and select Create a simple volume...
We need to specify the size for the partition we are creating. If you want to create one section, then you can not change anything, but simply click Further. The simple volume size field is already specified maximum size for the section we are creating.
In the next window you need to assign a drive letter. I advise you to just click next and not change anything.
Formatting a volume. I advise you to leave everything as is. You can change the volume label (this is its name). Click Further.
After that everything worked for me. You may have noticed (in the screenshot above), the Explorer folder for tasks has already appeared there. This is a suggestion to open the content hard drive in Explorer.
And here is the HDD itself in My Computer.
That's all. All the best!
Apr 11 2013
The computer does not see the flash drive - there is a solution
Hello. Your The computer does not see the flash drive, memory card or hard drive and you are wondering what to do? Surely every computer user has experienced a similar situation, or even more than one.
Today I will help you with solving issues if your computers do not see flash drives and other similar devices. I’ll tell you what problems there are with displaying usb devices and how to solve them.
Display problems
By the way, the last article was about data recovery from a flash drive. If you are interested in this, then replenish your knowledge.
Your computer does not see or detect the flash drive, hard drive and memory card. let's consider possible reasons the situation. At the end of the article, do not forget to watch a visual video lesson on how to make a flash drive or hard drive work.
A short outline of the article
- Device Definition
- Power indicator
- Front usb ports
- Not enough food
- USB disabled in BIOS
- USB device not recognized
- Outdated drivers
- Viruses
- Different file systems
- Conclusion
Determining the device
The first step is to determine exactly how the computer does not see your usb drive. From this answer it will be clear whether it is possible or not.
To do this you need to go to the dispatcher Windows devices.

In order to enter it, you need to right-click on the my computer shortcut on the desktop or in the start menu, go to properties, click on device manager.

After that, select disk devices.

We got to the device manager and the disk devices tab. If your flash drive or memory card appears in this list, then it is highly likely that you can recover data on it. If there is no flash drive there, then the memory card controller is most likely burned out. I recommend trying to connect your USB device to other computers.
If nothing changes and the flash drive is still not visible, then the problem is probably a faulty controller. It’s unlikely that you will extract data from such a USB device; you can, of course, contact special institutions that do this (they are not in all cities), but they will charge you a tidy sum for the work. So think about whether you need it or not.
Your flash drive is visible as a device, but it does not appear in my computer or Explorer, or asks to be formatted. To do this you need to go to disk management. To get into it you need to perform the following steps. Here are screenshots for clarity:
Right-click on my computer and go to management.

Go to disk management.

The device is displayed, writes its volume and file system - it is ready for use and functions normally.
The device is displayed, shows its capacity, but does not display the file system and writes “not defined”. In order to use it, you need to right-click in the Not Defined window and select Format.
You can check the box quick formatting and click OK. After the device is formatted, it should work in normal operating mode.

Displayed as a removable device, says no media and does not show the file system. All these parameters indicate that this device is not working properly, there is internal or external damage to the controller. You can hardly read information from such a flash drive without special expensive equipment.
Power indicator
When you connect the flash drive to the computer, a small indicator on the USB device should light up. If it lights up and starts blinking, then everything is fine with the flash drive, but not with the operating system, you need to look for the reason in it. If the flash drive indicator does not light up, then the problem may be in the device itself or the connected port of the computer.
Front USB ports
There have been cases when a flash drive is connected to a computer via the front USB ports, but the flash drive does not work. Perhaps these front usbs are turned off or they forgot to connect them to the motherboard.
Not enough power
Power shortages mainly occur when connecting hard drives through the front USB ports of the computer, hubs and hubs. It is best to connect such devices directly to the USB connectors on the motherboard, that is, at the back of the computer. If you use a usb hub or hub, then disconnect unnecessary devices, this may help. The reason may also be a low-power computer power supply.
USB disabled in BIOS
This problem is rare. Mainly in computer clubs and similar entertainment establishments. What is it for? To prevent a person from introducing viruses and downloading different programs and unnecessary information to the computer. This is more of a protective measure. If this home computer, then you need to go to the settings and check the box to enable the launch of usb devices in the motherboard.
USB device not recognized
The usb device is not recognized and when you connect a flash drive, the operating system gives it an already used letter (volume label in use). This does not always happen; there are other cases. In order to fix this you need to go to the computer control panel.

I showed how to enter it above, or you can open the Run window - keyboard shortcut Win + R (checkbox between Ctrl and Alt plus the letter R) and type the command diskmgmt.msc. Go to disk management, find required device- flash drive, right-click on it and select Change drive letter or drive path. In the window that appears, you can add or change this letter.
Outdated drivers
It is possible that your drivers are outdated - update them. To do this, you need to find out what manufacturer and model of your motherboard. Usually written on the packaging box, if you saved them, of course. If not, then use Everest program or Aida.
Using them you can find out the model of your motherboard and much more. useful information about your computer. After you have found out everything, you need to go to the official website of the manufacturer and find the desired system board and download drivers for the chipset and usb device, if there are any.
Viruses
There have been cases when the computer does not recognize the flash drive due to viruses that have appeared in your operating system. For this I recommend using good antivirus programs and do a full virus scan at least once a month. If you don't have it, you can use free antivirus, or purchase a paid product.
Different file systems
This happens, but very rarely. Your computer does not see the flash drive due to a conflict between the computer’s file systems and USB devices. Most flash drives work in two file systems FAT and FAT32, and hard disks to NTFS.

You can try formatting your flash drive in a different format such as FAT32 or NTFS. Maybe after this everything will work fine.
Helpful information. On a flash drive in FAT and FAT32 format, you can upload information in one file of no more than 4 Gigabytes, and on a hard drive much more. Therefore, if you encounter such a problem, be prepared for it and keep it in mind.
And for dessert, watch a short video tutorial on how to make your computer see a flash drive and hard drive. For convenient and enjoyable viewing, I recommend watching this video in full screen, that is, in full screen mode.
The computer does not recognize the flash drive and hard drive
Conclusion
And I also have some news. Yesterday my email account was hacked. I tried to restore it, but to no avail. I filled out the form to the support service, the answer should be sent within 3 working days, I will wait for news. If everything goes well and I can restore my mail, I will definitely write a separate article about it. After all this problem Happens to many Internet users.
Perhaps you have any questions or questions - your computer does not see the flash drive. You can ask them below in the comments to this article, and also use the form with me.
Thank you for reading me on
