Team Win Recovery Project: instructions and recommendations. How to Install TWRP Recovery in Different Methods Why You Should Use TWRP
For those who do not yet know what CWM or TWRP Recovery is, they can find out on the pages below:
Download CWM or TWRP Recovery and Create
Download CWM for your Android - clockworkmod.com/rommanager
Personally create CWM for your Android - builder.clockworkmod.com
Download TWRP(alternative recovery) - twrp.me/Devices/
Download Philz Recovery(based on CWM) - philz_touch
Installing CWM or TWRP Recovery
After you have downloaded or created CWM or TWRP recovery, we move on to the flying stage - install custom Recovery.
Installing CWM or TWRP Recovery on Samsung
For manufacturer's devices Samsung installation occurs using firmware via Odin (if recovery has an IMG extension, then it is needed).
For Huawei you need to initially unlock the Bootloader
For Nexus you need to initially unlock the Bootloader
For Sony you need to initially unlock the Bootloader
For Motorola you need to initially unlock the Bootloader
Then put the downloaded file recovery to the Adb folder and flash it using the fastboot utility
fastboot flash recovery Imja_file.img(where Imja_file.img is the name of the file to be flashed):

Or you can use the ADB RUN utility with which you can very easily install Recovery:

Installing Recovery on Mediatek chips
1. Computer (OS Winwods XP/Vista/7 - preferable; 8/8.1 - problematic)
5. Undamaged MicroUSB cable
6. Recovery file that you personally found on the Internet for your Android device
7. Scatter file previously prepared (taken from the firmware) or created by you manually
How to flash Recovery on Android with MTK chips
1. Unpack SP Flash Tool and go to the folder with the program
2. Launch SP Flash Tool via the Flash_tool.exe file


4. Place a checkmark at the top next to DA DL All With Check Sum

5. In the list that appears below, click on Recovery

6. Select the Recovery file

7. Click the Download button and agree with the error

8. Android device switch off
9. Connect in off android state, after which the firmware will begin, when finished the device will boot, and a window with a green circle with the caption Download OK will appear in the SP Flash Tool

Installing CWM or TWRP - Recovery X Project
- Installed Root rights
- Unlocked Bootloader ( HTC, Huawei, Nexus, Sony)
- Install from store Google applications Play- Recovery X
- Launch the application, select your model and click the button to install Recovery
Installing CWM and TWRP - Recovery Tools
For this method it is necessary that Android smartphone or the tablet had Root rights and an unlocked Bootloader.
Open the Recovery Tools - Flasher application and select the required installation menu to install (TWRP or CWM)


Installing TWRP - TWRP Manager Project
All you need to install Recovery on your Android smartphone or tablet is:
- Installed Root rights
- Unlocked Bootloader (
TWRP is an advanced Recovery Manager. It is an analogue of another popular recovery called CWM. Its advantage is very simple and intuitive control with support touch screen. Usually it is installed instead of the standard “recovery menu” in order to get much more options for working with the device.
All applications that seriously change the Android system require installation through the TWRP or CWM menu. The standard one does not allow such actions. That is why, in cases where you need to change files in operating system, you need to download TWRP Recovery for your Android device. It is recommended to do this in advance so as not to waste extra time on installation in the future.

Main functions
- Installation of custom firmware, updates and modifications;
- Receipt Root rights without using third-party software;
- Connection to PC for debugging via ADB;

- Creating a backup of all system partitions;
- Work with external drives data.
Owners mobile devices based on Android, who want to use their capabilities to the maximum, very often try to hack and customize them for themselves. It is even possible to install a custom recovery, for which you can download TWRP Recovery for Android. But how to do it correctly and what are its features?
Key Features
Installation
To install Team Win Recovery Project on your smartphone or tablet, you need to follow these steps:
- Go to the Play Store and download the official TWRP application from there.
- It is advisable to obtain superuser rights on your device.
- Unlock Bootloader (this action is required for HTC, Sony, Huawei and Nexus models).
- Launch the application.
- Go to the TWRP Flash section.
- Select your model from the list and download the recovery file.
- Now you can install it.
After installation, you can start using the program, and to confirm any action you do not need to press a button, but move your finger from left to right along a certain part of the screen.
Formatting
Before installing using TWRP new firmware on your device, you need to delete all files from it previous system, i.e. format it.
To do this we need a menu item called Wipe. After entering it, the user can either delete files that are marked for this by default, or mark the desired sections for cleaning. To do this, click on the Advanced Wipe button, where you can select the following for formatting:
- Cache – cache;
- Dalvik Cache – cleaning Dalvik Cache (if the Android version is 4.4 and ART is enabled, there is no need to clean this partition);
- Factory Reset – complete cleaning of all partitions;
- System – cleaning the system partition;
- External Storage – external memory;
- Internal Storage – internal memory;
- Android Secure – cleaning the partition of the same name;
- Wipe Battery Stats - delete battery statistics.
Stitching
To be able to install new firmware or some kind of patch on your phone, you need to:
- First, download the .zip archive with the necessary files;
- then go to the main menu of TWRP;
- find the Install item and go into it;
- Folders and files of the device appear on the screen, among which you need to find the desired archive (at the top there is a button that allows you to select internal or external memory);
- Click on the archive, then swipe your finger to the right to confirm the action.
Backup and recovery
An important function is to create a backup copy of the device system, especially before uploading new firmware. To make a backup, you need to go into recovery and select the Backup section in the main menu, then:
- select from the list and mark the required sections to copy;
- select the final copy storage folder;
- confirm the action;
- if necessary, in the settings you can enable copy compression or validation (guarantee that a copy with bad sectors will not be used for further recovery).
When there is a need to restore previous version system, you will need to enter the Restore item. In it, the user will see all copies created using TWRP, which can be sorted by name, creation date or size. Once you select the version you want, you can either restore the system or simply rename or delete the copy.
Working with device partitions
Also in this recovery you can mount partitions, i.e. enable/disable them. To do this you will need the Mount menu item:
- Mount System – system partition;
- Mount Data – section /data;
- Mount Cache – cache;
- Mount SDCARD – memory card;
- Mount USB Storage– a drive connected via an OTG connector.
Other settings
If you go to the settings item, Settings, you can change the following parameters:
- examination ZIP file(his signature);
- archive checksums;
- the ability to delete files while cleaning the partition (instead of formatting);
- reaction to errors in file size during backup;
- time zone;
- reset to default settings;
- screen brightness;
- language.
In addition to the usual functions, there are also options here that may be useful to those who are not new to working with recovery, Advanced:
- the ability to make a copy of the record of all transactions in separate file to a memory card;
- the ability to correct file access rights;
- function of creating partitions on an external drive;
- file manager;
- ABD console (used to solve problems when errors occur, unlock devices, etc.);
To restart your device, you can use the Reboot menu item. In total there are 3 types of reboot:
- System – the most common reboot, after which user mode will load;
- Recovery – after such a restart, the user will again be in recovery;
- Download/Bootloader – a reboot designed to start working with Fastboot.
Advantages and disadvantages
This modification of the standard recovery has the following advantages:
- it can be downloaded and installed absolutely free;
- the developers provided the ability to select software specifically for each model (there are quite a few of them on the list);
- the functionality does not differ from the standard one, but at the same time everything is located more conveniently;
- allows you to work even with flash drives that are connected to the device.
The downside is that without superuser rights, the number of possible actions very limited.
It is no secret that when releasing a variety of different devices on Android based, manufacturers in most cases do not include or block in the software part of their solutions all the capabilities that could be implemented by the consumer of the product. A large number of users do not want to put up with this approach and turn to customizing the Android OS to one degree or another.
Anyone who tried to change even a small part in a way not intended by the manufacturer software Android device, I heard about custom recovery - a modified recovery environment that has big amount functions. The generally accepted standard among such solutions is TeamWin Recovery (TWRP).
With the help of a modified recovery created by the TeamWin team, the user of almost any Android device can install custom and, in some cases, official firmware, as well as a wide variety of corrections and additions. Among other things, an important function of TWRP is the creation of a backup of the entire system as a whole or individual sections of the device’s memory, including those that are not readable by others. software areas.
Interface and management of TWRP Recovery
TWRP was one of the first recovery systems that introduced the ability to control using the device’s touch screen. That is, all manipulations are carried out in a way familiar to users of smartphones and tablets - by touching the screen and swiping. There is even a screen lock available, allowing you to avoid accidental presses during long procedures or if the user is distracted from the process. In general, the developers have created a modern, attractive and understandable interface, when using which there is no feeling of “mystery” of the procedures being carried out.

Each button is a menu item that, when clicked, opens a list of options. Support for many languages has been implemented, including Russian. At the top of the screen, attention is drawn to the presence of information about the temperature of the device’s processor and battery charge level - important factors that need to be monitored during the process of flashing the device and identifying hardware problems.
At the bottom there are the usual buttons Android user – « Back», « Home», « Menu" They perform the same functions as in any version of Android. Unless by pressing the button " Menu", it is not the list of available functions or the multitasking menu that is called up, but information from the log file, i.e. a list of all operations performed in the current TWRP session and their consequences.

Installing firmware, patches and additions
One of the main purposes of the recovery environment is firmware flashing, i.e., writing certain software components or the system as a whole into the appropriate sections of the device’s memory. This opportunity is provided after clicking on the " Installation" The most common file types supported for firmware are * .zip(default) and * .img-images (available after clicking on the “ Img installation»).

Cleaning partitions
Before flashing the firmware, in case of certain malfunctions during the operation of the software, as well as in some other cases, it is necessary to clear individual sections of the device’s memory. Clicking the " Cleaning"reveals the ability to delete data from all main sections at once - Data, Cache, and Dalvik Cache, just swipe to the right. In addition, the button “ Selective cleaning", by clicking on which you can select which partition(s) will/will be cleared. There is also a separate button for formatting one of the most important sections for the user - “ Data».

Backup
One of the most notable and important features of TWRP is creating a backup copy of the device, as well as restoring system partitions from a backup created earlier. When you press the button " Backup» a list of partitions for copying opens, and the button for selecting the media for saving becomes available - this can be done as in internal memory device, and to a microSD card and even to a USB drive connected via OTG.

In addition to the wide variety of possibilities for selecting individual system components for Reserve copy, available additional options and the ability to encrypt the backup file using a password – the “ tab Options" And " Encryption».

Recovery
The list of items available for modification by the user when restoring from a backup copy is not as wide as when creating a backup, but the list of options called up when you click on the " Recovery", is sufficient in any situation. Just like when creating a backup, you can select from which media the memory partitions will be restored, and also define specific partitions to be overwritten. In addition, to avoid errors during recovery when you have many different backups from different devices or to verify their integrity, you can check the hash sum.

Mounting
When you press the button " Mounting» opens a list of sections available for performing the operation of the same name. Here you can turn off or turn on the USB file transfer mode - the “ button Enable MTP mode" - extraordinary useful feature, which saves a lot of time, because in order to copy files necessary for work from a PC, there is no need to reboot into Android from recovery, or remove the microSD from the device.

Additional features
Button " Additionally» provides access to advanced features of TeamWin Recovery, used in most cases by advanced users. The list of functions is very wide. From simply copying log files to a memory card (1),

before using a full-fledged file manager directly in recovery (2), obtaining root rights (3), calling a terminal to enter commands (4) and downloading firmware from a PC via ADB.

In general, such a set of capabilities can only cause admiration for a specialist in firmware and recovery of Android devices. A truly complete toolkit that allows you to do whatever your heart desires with the device.
TWRP Settings
Menu " Settings"carries more of an aesthetic component than a functional one. At the same time, the concern of the TeamWin developers about the level of user convenience is extremely noticeable. You can customize almost everything you can think of in such a tool - time zone, screen lock and backlight brightness, vibration intensity when performing basic actions in recovery, interface language.

Reboot
When performing various manipulations with an Android device in TeamWin Recovery, the user does not need to use physical buttons devices. Even rebooting into various modes necessary for testing the performance of certain functions or other actions is carried out through special menu, available after clicking on the "" button. There are three main reboot modes, as well as the usual shutdown of the device.

Advantages
- Full-featured Android recovery environment - virtually all the features that may be needed when using such a tool are available;
- Works with a huge list of Android devices, the environment is practically independent of the device’s hardware platform;
- Built-in protection system against the use of incorrect files - checking the hash amount before carrying out basic manipulations;
- Excellent, thoughtful, friendly and customizable interface.
Flaws
- Inexperienced users may have difficulty installing;
- Installing a custom recovery means losing the manufacturer's warranty on the device;
- Incorrect actions in the recovery environment can lead to software and hardware problems with the device and its failure.
TWRP Recovery is a real boon for users who are looking for a way to gain complete control over the hardware and software components of their Android device. A large list of capabilities, as well as relative accessibility and a wide range of supported devices, allows this modified recovery environment to claim the title of one of the most popular solutions in the field of working with firmware.
Download TeamWin Recovery (TWRP) for free
Download latest version TWRP Recovery programs from the official website you can >>>
TWRP Recovery is the most popular modified recovery environment for Android. Recovery is intended for installing firmware, creating backup and recovery, obtaining root rights and many other functions.
Or experiment with something else Android system, then custom TWRP recovery is what you need. If you are wondering how to install TWRP recovery on Android, then this article is definitely for you.
Your phone's "recovery environment" is a piece of software that you rarely see. It is used to install Android updates, restore to factory settings, and also perform other tasks. Google's default recovery environment is very simple, but third-party developers offer their own solutions, for example, Team Win Recovery Project (or TWRP) - allows you to make backups, install custom firmware, gain superuser rights, and much more useful. So if you want to change your smartphone, then you will need TWRP. You can also read what custom recovery is on Android and why it is needed. Today we will tell you how to install TWRP recovery on Android.
Step 1: Unlock your device and make sure it's compatible
You must be sure that your bootloader is unlocked. So, if you have not done this yet, we recommend reading the article on how to unlock the bootloader on an Android smartphone. When you're done, let's go back to installing TWRP. If your phone's bootloader is not unlockable, then you will have to install TWRP in another way.
Also, make sure TWRP is available for your device and check out the TWRP and XDA Developers website to make sure you don't encounter any problems along the way. For example, Nexus 5X phones are encrypted by default, but when TWRP first came out for the Nexus 5X, it did not support encrypted smartphones. Therefore, Nexus 5X owners had to either decrypt their smartphone themselves in order to install TWRP or wait for an update, after which TWRP began to support encrypted smartphones. Make sure you know all the quirks of your device before proceeding.
Also create backup copy everything you want to keep. This process will not delete your data from your smartphone, but creating a backup before changing the system is a good habit.
Step 1: Enable USB Debugging
Next, you will need to enable several options on your phone. Go to your phone settings and select "About phone". Scroll down to Build Number and click on this item 7 times. A message should appear indicating that you are logged into developer mode.
Return to home page settings, you should have a new item “For Developers”. Enable “OEM Unlocking” if this option exists (if it doesn't, don't worry - only some phones have this option).
Then enable “USB Debugging”. Enter a password or PIN if required.
Once you do this, connect your phone to your computer. You will see a window on your phone asking “Do you want to enable USB debugging?” Check the box next to “Always allow on this computer” and click OK.
Step 2: Download TWRP for your smartphone
You need to go to the TeamWin website in the devices section. Find your device model and click on it to download TWRP.

This page usually contains Important information about the device that you should know. If you don't understand something, you can find more information on the XDA Developers forum.
Go to the “Download Links” section and download the TWRP image. Copy it to the folder where ADB is installed and rename the file to twrp.img. This is necessary so that the installation command can be written more quickly.
Step 3: Enter Bootloader Mode
To install TWRP recovery on Android you need to enter bootloader mode. This is done differently on all phones; perhaps a search on Google or Yandex will help you to find out how this is done on your device. On many devices, this method helps: turn off the phone, hold down the power button and volume down key for 10 seconds, then release them.
You have entered bootloader mode if you see an image similar to the following:
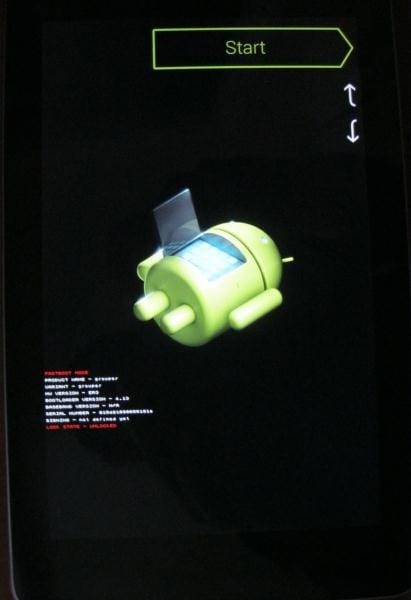
Your phone's bootloader may look slightly different (in HTC on a white background, for example), but, as a rule, it contains approximately the same text.
Step 4: How to install TWRP Recovery on Android
Once you enter bootloader mode, connect your phone to your computer using USB cable. Your phone should show that the device is connected. On your computer, open the folder where you installed ADB and press Shift+right mouse button on an empty space and select “Open Command Window”. Then run the following command:
fastboot devices
The team must return serial number of your device, showing that it is recognized. If the serial number is not found, then return to the first step and make sure that you did everything correctly.
If your device has been recognized, then it's time to install TWRP. Run the following command:
fastboot flash recovery twrp.img
If everything goes well, you will see a success message on the command line:

Step 5: Boot into TWRP Recovery Mode
Disconnect the phone from the computer and use the volume down key to navigate to the “Recovery” item. Press the Volume Up button or the Power button (depending on your phone) to select it. Your phone will boot into TWRP.
If TWRP asks for a password, then enter the password or PIN code that you use to unlock your phone. This is necessary to access memory.
TWRP may also ask if you want to use it in Read Only mode. This mode means that all changes will be deleted after a reboot. If you are not sure, then click on “Keep Read Only”. You can always repeat step 3 and 4 this manual to reinstall TWRP when needed.
When you're done, you'll see the TWRP main screen. You can use it to create a Nandroid backup, restore a previous backup, install custom ROM and much more.

The most important thing now is to back up your phone before making any changes.
Click on the "Backup" button in the TWRP main menu. Select "Boot", "System", "Data" and swipe the slider at the bottom of the screen. You can also change the name of the backup by clicking on it.
Please wait while the backup is created. When the process is finished, return to the backup menu. Uncheck all options and scroll down. If you have a special partition after "Recovery", such as WiMAX, PDS, or EFS, then check them and make another backup. This section usually contains your EFS or IMEI information, which is very important. If this information ever becomes damaged, your data transfer will not work, and with a backup copy you can restore everything.
Lastly, if TWRP asks if you want to gain root privileges and install SuperSU, click “Do Not Install”. It is better to install the latest version of this application yourself than the one offered by TWRP.
Once you've made a backup, you can start exploring TWRP, gaining root privileges, installing custom ROMs, or booting into Android OS. Remember: Make a backup before making any changes to TWRP, it will help you restore your phone if something goes wrong.
