Windows network drive as a folder. How to map a network drive in Windows. How to share a folder on a local network
Instructions
Mount an arbitrary folder as a virtual disk in Windows operating systems. Launch cmd command processor. To do this, display the Start Programs dialog by selecting Run from the Start menu, typing cmd in the Open text box, and clicking OK.
Use the subst command to mount the folder. Enter in the console:
subst/?
Press Enter and check out brief information on team work. Mount the folder using a command like:
subst<Буква целевого диска>: <Путь к папке>
For example, to create virtual disk X with the contents of the D:\Temp folder, you would run the command:
subst X: D:\Temp
On Windows, mount the remote network share folder as a drive. Open the My Computer folder window. To do this, use the corresponding shortcut on your desktop. You can also run Windows Explorer by entering explorer in the Start Programs dialog and clicking OK, then selecting the appropriate section in the right pane.
Display the Mount Network Share dialog. Expand the “Tools” section of the main menu and click on “Map network drive”.
Perform installation. In the “Drive:” drop-down list, select the item containing the preferred letter of the drive you are creating. In the “Folder” field, manually enter the path to it or click on the “Browse” button and select it. Check the “Recover at logon” checkbox if the resource is going to be used for a long time. Click the "Done" button. If necessary, enter the credentials to access the remote folder and click the OK button of the displayed dialog.

Mount an arbitrary folder as a directory with a different name in operating systems Linux family. Use the mount command with the --bind (or -B) switch. Launch a terminal emulator or switch to a text console. Run a command like:
mount --bind<путь-1> <путь-2>
As parameters<путь-1>And<путь-2>you should specify full or relative paths up to two existing catalogs. For example:
mount --bind /home/develop /mnt/test
After executing this command, the contents of the /home/develop folder will be displayed in the /mnt/test directory.

Mount a remote network folder to a local directory in a Linux operating system. Use the mount command with the -t switch to specify the type file system. For example, to mount the remote Temp folder on a Windows machine with IP address 10.20.30.40 to the local directory /mnt/test, you can run the command:
mount -t smbfs //10.20.30.40/Temp /mnt/test
A password to access the resource will be requested. If you need to specify credentials on the command line, this can be done using the additional parameters username and password specified after the -o switch. In a similar way (using curlftpfs) you can mount FTP folders.

Hello.
Let me outline a typical situation: there are several computers connected to a local network. Required to do general access to some folders so that all users from this local network.

To do this, you need:
1. “share” (make public access) the desired folder on the desired computer;
2. on computers on the local network, it is advisable to connect this folder as a network drive (so as not to search for it every time in the “Network Neighborhood”).
Actually, how to do all this will be described in this article (the information is relevant for Windows 7, 8, 8.1, 10).
1) Opening public access to a folder on the local network (folder sharing)
Before you can share a folder, you must first configure Windows accordingly. To do this, go to the panel Windows management at the following address: “Control Panel\Network and Internet\Network and Sharing Center” (see Fig. 1).
Then click the "Change advanced sharing settings" tab.
Rice. 1. Network and Sharing Center
- private (current profile);
- all networks;
- guest or public.
You need to open each tab in turn and set the parameters as in Fig.: 2, 3, 4 (see below, clickable pictures).
Rice. 2. Private (current profile).
Rice. 4. Guest or public
Now all that remains is to allow access to the required folders. This is done very simply:
- Find the desired folder on the disk, right-click on it and go to its properties (see Fig. 5);
- Next, open the “Access” tab and click the “Sharing” button (as in Fig. 5);
- Then add the “guest” user and give him rights: either read only or read and write (see Fig. 6).
Rice. 5. Opening public access to a folder (many people simply call this procedure “sharing”)
Rice. 6. File Sharing
By the way, to find out which folders are already shared on your computer, just open Explorer, then in the “Network” tab, click on the name of your computer: then you should see everything that is open for public access (see Fig. 7).
Rice. 7. Shared folders (Windows 8)
2. How to map a network drive in Windows
In order not to climb into the network environment every time, not to open tabs again, you can add any folder on the network as a disk in Windows. This will slightly increase the speed of work (especially if you often use a network folder), and will also make it easier for novice PC users to use such a folder.
And so, to map a network drive, right-click on the “My Computer (or This Computer)” icon and in the pop-up menu select the “Map Network Drive” function (see Fig. 8. In Windows 7, this is done in the same way, only the icon "My Computer" will be on the desktop).
Rice. 9. Windows 8 - this computer
After this you need to select:
- drive letter (any free letter);
- indicate the folder that should be made a network drive (click the "Browse" button, see Fig. 10).
Rice. 10. Connecting a network drive
In Fig. Figure 11 shows folder selection. By the way, after making your selection, all you have to do is click “OK” 2 times - and you can start working with the disk!
Rice. 11. Browse folders
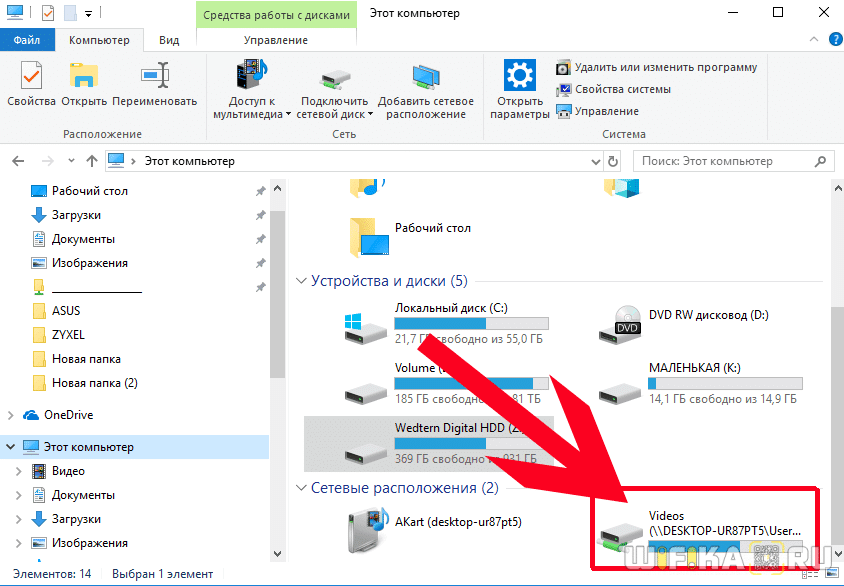
If everything was done correctly, then in “My Computer (in this computer)” a network drive with the name you selected will appear. You can use it almost the same way as if it were yours. HDD(see Fig. 12).
The only condition: the computer on whose disk the shared folder is located must be turned on. Well, of course, the local network must work...
Rice. 12. This computer (network drive connected).
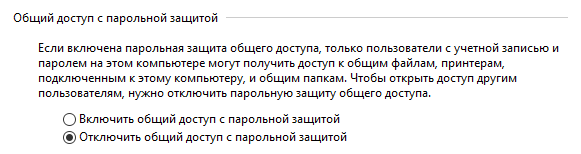
Very often people ask what to do if they cannot share a folder - Windows writes that access is impossible, a password is required... In this case, most often, the network was simply not configured appropriately (the first part of this article). After disabling password protection, problems, as a rule, do not arise.
Many users, when administering their home local network, are faced with the need to map network drives. If you are also interested in this issue, then this article should help you. Here we will talk about how to connect a network drive, as well as correctly open access to a folder for a network drive.
Step No. 1. Open access to the folder (preparing the first computer).
The first thing to do is to open access to the folder that should be used as a network drive on another computer. It's not difficult to do, but there are a few details you need to be aware of.
First you need to configure the network correctly. To do this, open the “Network and Sharing Center” and click on the “Change advanced sharing settings” link (screenshot below).
In the window that opens, you need to enable “Network discovery”.

Also here you need to disable “Password protected sharing” (if you don’t need it).
So, how to map a network drive on Windows 10? We already know how to create it, but it’s not very convenient to search for the required shared folder in the network environment, especially if there are a lot of computers. It is much easier to have it appear as a separate drive that appears along with your “C” drive when the system boots.
To connect the network hard drive On Windows 10, the first step is to allow sharing of files and folders on your computer. To do this, right-click on the “Start” menu and go to “ Network connections»

Here in the left column click on “Change sharing settings”

- Enable network discovery
- Enable file and printer sharing
- Let Windows manage the connection home group

Mapping a network drive Windows 10
This was the preparatory stage - now let’s move on to the main question, how to connect a network drive in Windows 10?
To do this, you need to open Explorer and in the left column, where the tree of drives and folders is, find the “My Computer” link - right-click on it and select “Map network drive...”.

In the window that pops up after this, select the letter for our future network Windows disk, for example "X".


After selecting the folder, leave the “Restore at logon” checkbox so that you don’t have to create it again every time you turn off the computer. And click “OK”.
Now, when you go to “Computer” in Explorer, among other system hard drives we will be able to see the “Z” drive in the “Network Location” section. You can get to it provided that the computer on which this network drive-folder is located is turned on.

Mapping a network drive on Windows XP
The technique for connecting a network drive on Windows XP is similar to that already described above. Therefore, we will describe here the connection method directly from the “Network Neighborhood” section.
Go to “Start > Network Neighborhood” and find the one we need shared folder on one of the computers on the local network. Right-click on it and select the “Map network drive” menu item. You can also simply top menu select “Service” and select the same section.


Now if you go to “My Computer”, you will see hard disks, as well as network folders connected as network drives, indicated by separate icons.

That's all. For those who have not yet understood what it’s like, here’s a video:
To get to any folder, we have to click a lot in Explorer, unless, of course, you have placed the folder shortcut on Desktop. A desktop shortcut is, of course, good. But filling the desktop with shortcuts is also not nice, especially since an empty desktop is not bad. And some people may not like labels at all. In this case, to facilitate access to local folder, you can turn the folder into a virtual one logical drive. In other words, your desired folder will be located in the window My computer together with others local disks. And then you only have to make two clicks to get to desired folder. Our article is entirely devoted to how you can create a virtual disk from any folder on your computer.
Create a virtual disk
Before creating a new virtual disk (not to be confused with), we need to get a free letter that is not used by other disks. To do this, open a window My computer and using your knowledge of the English alphabet, choose a letter that is not used in this moment. Let's say this is a letter Y. After this you need to open the window command line Windows and run the following type of command:
subst Y: c:\dir\seconddir\
The only thing that needs to be adjusted to your needs is the path of the folder that we turn into a virtual logical disk. After executing this command, you can check the quantity logical drives in the window My computer. I'm sure there are more of them there. In this simple way you can create a virtual disk from a folder.
The Other Side of the Virtual Disk Coin
The other side of the coin is that the created virtual logical disk will last only as long as you do not turn off your computer. After a reboot, this logical drive will disappear. Therefore, the above command must be executed at every boot. To accomplish this, you can create .bat-file based on the above code. The creation of such a bat file was discussed in detail in the article, I suggest you read it. After this, created .bat-the file must be copied to the folder located at
C:\Users\Username\AppData\Roaming\Microsoft\Windows\Start Menu\Programs\Startup
If everything is done correctly, then with each new boot operating system will execute the given command, the result of which we have already examined.
In addition to the above method, which will always work, I can suggest another method that may not work in the case of network folders. In this case, in order for the created virtual disk from the folder to appear in its place every time the computer boots, you need to open the Registry Editor (use the commands quick launch) and go to the section
HKEY_LOCAL_MACHINE\SYSTEM\CurrentControlSet\Control\Session Manager\DOS Devices
In this node you need to create a String Value parameter and give it a name in the form of a letter virtual disk. For our example, you will need to specify the name Y:
for the created parameter. The value of this parameter should be as follows:
\??\c:\dir\seconddir\
With these simple steps you can create a virtual disk from a folder on your computer.
