Yandex disk takes up a lot of disk space. Files on your computer take up a lot of space - now this is not a problem. Transferring data to a memory card
Hello admin! I read your article and it became interesting, because in fact, Yandex. The disk is given 10 GB of disk space for free, in Google Drive 15 GB, in Dropbox, which is popular abroad, 3 GB, in, and in the Mail.ru Cloud all 100 GB!
Accordingly, you might be wondering whether it’s worth using Yandex Disk at all? And then I thought and decided that even 10GB for free from Yandex Disk could be useful, especially since “Yasha” will most likely not sit and watch his clients being taken away from him, most likely he will take some steps in the future, for example, he will take 1TB as a gift to his users .
What do you think, Admin, which of all the clouds listed is still more convenient to use? It is clear that the size of the mail.ru cloud matters, but still, Yandex Disk has a very convenient function - Copy public link!
How to use Yandex Disk
Roman through your mouth! For example, I have long chosen the Yandex Disk service and adapted it to store all the necessary computer stuff that I might need during the day at work: driver assemblies, antiviruses, programs, LiveCDs, free operating systems, and so on, because my portable hard drive does not infinite.
But naturally, the free 10GB on Yandex Disk was not enough for me and I had to purchase an additional 100GB of disk space for 150 rubles per month. But they also began to be missed as soon as I adapted Yandex Disk for storing operating system backups, because in many data backup programs you can configure backup directly to the Yandex Disk cloud and I began to think about 1TB of Yandex Disk for 900 rubles per month, but here the Mail.ru cloud appeared with 100GB and I decided to use it for now.
Well, God be with him, with Mail.ru, we have an article about it and whoever is interested will read it, today we are talking about Yandex Disk, because many users have long chosen this service from Yandex and are still interested in the intricacies of its work.
Yandex Disk
Friends, use Yandex Disk It's very simple, first you need to register.
and register
We indicate the First Name, Last Name, Login, Password, repeat the password, and also indicate our number mobile phone. Click Get code

We receive a code on our phone, enter it in the input field and click Confirm,

Now we click Register and 10GB is ours.

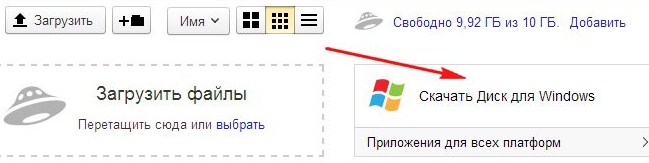
This will open an offer to download Yandex. Disk for our precious Windows.

In other words, we will install Yandex Disk as a program in our operating system and a folder will be created in our Windows that will be synchronized with Yandex Disk. Everything that we copy into this folder will automatically be sent to the Yandex Disk cloud. I suggest installing this application a little later, since many users may not want to install an unfamiliar application on their computer. So let's see how to use Yandex Diskdirectly online.
To upload the files you need to Yandex Disk you just need to drag them from your computer into this window.

For example, I will drag several photos from the Images folder to Yandex Disk. I select the photos with the left mouse and drag them into the Upload files window.

That's all, my files are on Yandex Disk.

Or click Download or Select

And an explorer window will open, select the files you need in it and click Open, the selected files will be sent to Yandex Disk.

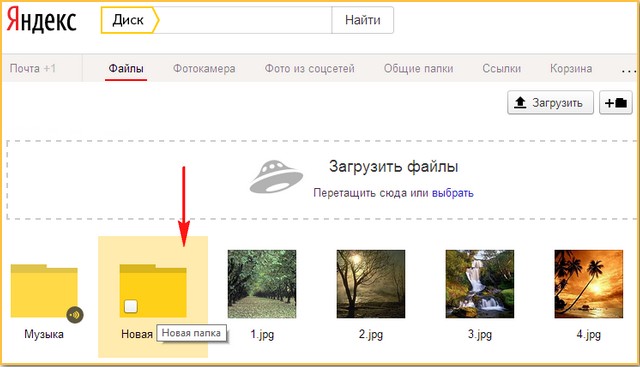
You can create a new folder and name it whatever you want

Double-click with the left mouse on the desired photo and a preview will open.


To download the photo or file we need from Yandex Disk, we need to tick the desired object and select Download.

Mark the desired photo with a checkmark and share it on social networks.

For example, users constantly send me links from Yandex Disk to screenshots of their computer problems so that I can look and give my advice.


How to share your files with friends on Yandex Disk
Mark the required file with a checkmark and click on Enable button,


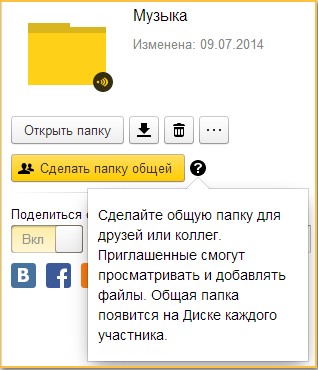
For example, let's let our friends download the Music folder containing music files. Celebrating folder with a tick,


To download a folder, just paste the link into address bar any browser and press Enter, in the window that opens select necessary files and click Download.

We can also make any of our folders public and all invitees will be able to view this folder and add files to it, a shared folder will appear on Yandex Disk of each participant.
You can also delete unnecessary files, mark it with a checkmark and click Delete.

How to use the Yandex Disk application
Click Download Disk for Windows.
We start the installation of the downloaded application.


You can uncheck the boxes and click Finish.

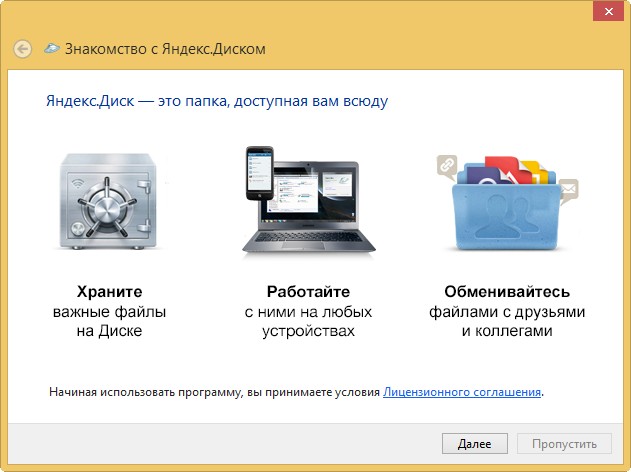
If you want to take the young fighter course, click Next, otherwise Skip.

The Yandex Disk icon appears in the tray.

Enter your username and password and Login.

If the Yandex Disk icon is green, it means we can work, synchronization has occurred.

Everything would be fine, friends, but the default Yandex Disk folder is located on our C: drive,

The full path to the folder is C:\Users\Username

change the location of the Yandex Disk synchronization folder to any other partition of the hard drive.
Right-click on the Yandex Disk icon in the tray and select Settings,

We indicate the new location of the Yandex Disk folder, for example, I will place it on the D: drive, I have a lot there free space. I click the Change button

I indicate drive D: ( You can’t stupidly specify drive D:) and click Create Folder
Each of us stores many files on our computer. Some users need them for work, while others need them for entertainment. And over time, we are faced with such a nuisance as a lack of free space on the hard drive.
There is a way out - using Yandex Disk cloud storage.
Its advantage is that it works via the WEBDAV protocol.
That is, cloud storage provides the ability to store your files on your server, and also stores copies of them on your computer, but they do not take up space on your hard drive, and you can do whatever you want with them.
Advantages of Yandex Disk using the WebDav protocol
All files posted on the service will be accessible from any device with Internet access;
Folders and files stored on Yandex Disk can be easily transferred to other users;
Flash drive and HDD may break, which will lead to the loss of information, and files stored on the remote service will not go anywhere, even if you reinstall the operating system.
So, how to connect a Yandex disk using the WebDav protocol?
To work with cloud storage, we do not need to download the program. It is enough to perform the following functions:
1. Click the “Start” button. In the left panel, select “Computer” and right-click on it.
From the context menu list, you must select the “map network drive” option.
2. In the window that opens, in the “Folder” field, enter the address: https://webdav.yandex.ru and check the box next to “restore at login” and click “Finish”.
3. Then enter the password and login from account on Yandex Disk. Click "Ok" and then select "map folders as network drive". If you go to “My Computer”, you will immediately see the folder network drive.
You can open it, and there you will find the files that you uploaded to Yandex. Disk. At the same time, you can edit, open, save, delete unnecessary ones and add new ones. At the same time, they will not take up space on your computer.
Mapping a network drive in Windows 8
1. Go to Explorer. Select “computer” and click on the computer tab at the top.
2. Click on the “Map network drive” tab that opens.
The problem of lack of free space on the phone is relevant despite the fact that the capacity of the built-in storage is constantly growing. After all, along with it, the size of programs, photos and videos increases, which high resolution weighs several gigabytes. However, there are tricks that will help you free up space without deleting applications, and your device will start working much faster. Read the article before you free up space on your Android phone, and in 10 minutes you can destroy the “garbage” in your gadget and optimize the performance of the drive.
Deleting cache
Cache - components that carry additional application data, such as page thumbnails, photo previews, and other materials that the software needs for more fast work. The other side of the coin is that it weighs a lot and does not always help the system work faster, sometimes even the opposite. Therefore, it can be safely destroyed without harming its performance.
- Go to “Settings - Storage”.
- Select “Cache Data” there and you will be prompted to permanently delete all content.
- Agree.
After a couple of moments, the process will complete.
You can also erase the cache of an individual program.
- Go to "Settings - Storage - Applications".
- Select something there that takes up a lot of space, see how much the cache weighs.
- If it weighs a lot, then click “Clear cache”.
Third-party programs on Android help to do this in automatic mode, but at the end we will explain why you should not use them.
Uninstalling unnecessary software
There are probably a lot of programs on your phone that you never use. But they take up space in the system, their processes hang in the background, loading the processor, which can cause slowdowns.
In general, this is already enough, but open “Applications” and look through them all. Try to remove as much unimportant software as possible. Pay special attention to games that take up a lot of space and instant messengers, which often “wake up” the smartphone and leave services in random access memory. Do not hesitate to remove such components.
If you have root rights
Vendors like to put their own software on smartphones, but usually it takes up a lot and hangs in the RAM, so it needs to be demolished.
This can greatly improve work speed and free up internal memory devices.
Transferring data to a memory card
If your phone supports it, we recommend storing music, videos and images on MicroSD. Almost all programs, such as Camera, browsers, services for listening to podcasts, etc., can store data on a flash drive or in the device’s memory. Don’t be lazy, go to the software settings, look for the item where you can choose which memory to save to, and install MicroSD.
Transfer information from your computer directly to a flash drive so you don’t have to deal with transposition later. Documents already saved in the internal memory can be transferred very easily.
- Open the built-in file manager or download Total Commander, ES conductor.
- Launch it, open the folder with videos and photos, usually called “DCIM”.
- Highlight necessary components and click "Cut", go to the directory where you want to move them and click "Paste".
Do the same with other large documents.
Transferring applications to a memory card
Most programs can be transferred to MicroSD. But some software is not adapted for storage on it, for example, system applications. Also keep in mind that the speed of removable storage is lower, so games may run slower, and messengers may not send notifications correctly after the drive is freed like this.
- Go to Applications.
- Select the program you want to transfer, tap on it.
- Click on “Move to memory card”.
You can also reset all data from any mobile devices to the card, including music, videos and photos.
This solution is suitable if you want to seriously clean the ROM.
How to expand internal memory?
Starting with Android 6.0 and higher, it became possible to combine internal memory with a flash drive to expand storage.
- As soon as the card is in the smartphone tray, swipe the notification shade down.
- Click "Customize".
- There you can choose to either consolidate the memory or leave the flash drive as a portable storage device.
Attention! If you choose the second path, the phone will format the memory card and change it file system. So don't forget to make a backup.
Use of third party services
IN Play Market you can download many “magic” services to free up memory on Android. However, most of them are more harmful than beneficial, for example, CleanMaster indiscriminately kills necessary processes, shows how much space has been freed, but constantly hangs in the background even after you clean up the “garbage”.
The Android version of CCleaner performs better, which cleans up space in system memory, but built-in utilities replace it well. Among the useful ones, it is worth noting Google Drive, Yandex Drive and Google Photos. They allow you to transfer information to cloud storage to clear your mobile phone memory and have access to data.
In Telegram, you can create a private channel and upload files there. Not a bad alternative cloud drives. From there you can always download components from any device.
Google Photos deserves special attention, allowing you to store photos and videos in the cloud, which are instantly loaded if you want to view them. Extremely convenient program, which greatly saves space on the phone. You can upload an unlimited number of photos to high quality and 15 GB in original size. Also deleted files They don’t disappear immediately, so what you erased can still be restored.
The program can be shared with just one Disk, which can be assigned to one specific account. If you log in with a different login, a new Yandex.Disk folder will be created for synchronization. "Yandex.Disk - another login". A copy of the files from the previous recording will be saved.
What happens if you move the Yandex.Disk folder?
If you transfer the Yandex.Disk folder without specifying the new location in the settings of the programs, the program will create the folder again in the first place. To move your copy of the Disk, click the Disk icon, select the Setup item from the menu, click the button and select a new path to the folder: the program will automatically transfer the files to the new location.
Can you trust the work with Disk to third-party programs?
Is it possible not to trim the files that are saved to Disk on your computer?
The Yandex.Disk 3.0 program allows you to synchronize not all files from your Disk with your computer in order to protect space on your computer. For example, if you often work with the “Documents” folder, enable synchronization for it - this folder is saved on your computer. The decision to save folders is only in the dark, and will not be available to the program.
You can set up sample synchronization using the instructions for Windows and for macOS.
You can also transfer files without importing them using either the WebDAV protocol.
What happens if I see files from the Yandex.Disk folder?
When you delete files in the program, the stench disappears until Koshyk and is stored for another 30 days. After this, the stench is automatically removed from the server. It is impossible to renew files deleted from the server. You can only update files from Koshyk in the Yandex.Disk web interface.
Respect. Files moved to Koshyk and then take up space on your Disk. If the place is bad for you, clean the Koshik.
If you want to delete the file from your computer rather than save it on the server, set up selective synchronization following the instructions for Windows and macOS.
Is it possible to limit access to the Yandex.Disk folder?
If you want to close the folder, for example, from other devices on your computer, you can restrict access to it using standard Windows methods. Keep in mind that restricting access may interfere with robotic programs.
What happens if I delete the program or reinstall the operating system?
Disk files may be lost on your computer and will not be synchronized. To automatically synchronize files from the server, install the program and log in.
How can I select a different folder to synchronize with the server?
Press button Nalashtuvati roztashuvannya folders.
Designate another folder for synchronization with the server.
How can we find out how much free space on Disk has been lost?
How to set up a robot program through a proxy server?
Click on the Disk icon in the notification area.
Select the menu item Settings.
Go to the Proxy tab.
Select item Manual configuration of the proxy server.
How to add the Disk icon to the Dock on macOS?
Click on the Disk icon in the notification area.
Select the menu item Settings.
Go to the Dodatkovo tab.
Depress option Add an icon to the Dock.
