Disabling startup programs on 7. Disabling programs from startup. Using the Startup folder on the system drive
To begin with, let's figure out what auto startup is, or, as it is also called, autoloading programs. This is a process that allows applications to load on their own after Windows is turned on and running. There are situations when you accidentally or out of necessity downloaded some program and you need it periodically, but there is no need for it to start every time after the operating system starts, and turning it off all the time is tedious. Also, an important advantage of disabling programs from autorun is that they will not eat up your RAM while being in constant action. In this article we will look at how to exclude programs from startup/autorun in Windows 7, Windows 8 and using additional universal utilities.
Disabling autorun in Windows 7
This method may already be familiar to you; if you have been using a computer for a long time, you could accidentally discover it yourself without any additional information, but for beginners the information may still be new.
Go to the Start menu > All Programs and find the Startup folder.

Everything that is there starts when the computer is turned on. To prevent these programs from running, simply remove them from there.
We use the standard Windows 7 utility - MSConfig
This utility, MSConfig, is already on your computer by default and you don’t need to install it, you just need to run it and use it.
And it’s very simple to launch it:
Open the Start menu again and type msconfig in the search bar.
It will be found immediately, all you have to do is click on its shortcut to launch it.

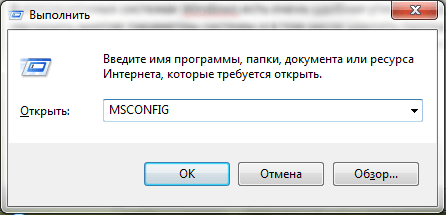
If for some reason you don’t have a search bar in the Start menu, you can simply press the Win+R key combination and the following window will open:

Enter msconfig there and click OK.
As a result, the msconfig utility should start. It looks like this:

Go directly to the Startup tab. By unchecking the boxes you will disable unnecessary programs. But if you don’t understand what each of them is responsible for, then it’s better not to disable it.
After you click OK, you will be prompted to restart your computer, but you don't have to.

This utility is very convenient, but it is also not functional enough, because... is not able to provide us with the ability to disable absolutely all (any) programs from startup.
So we'll look at a few more ways.
Manual removal from the Windows 7 registry
Launch the registry editor. To do this, press the usual key combination “Win + R” or again in the search bar in the “Start” menu we type the words “regedit”.
A very scary, incomprehensible window opens with many folders that look more like gobbledygook than names.

But we are not afraid, but calmly understand everything and gain knowledge!
Among these folders, in the distant wilds, there are two autorun sections of the “seven”:
general (local registry), which is used for all users, the address is:
Computer\HKEY_LOCAL_MACHINE\Software\Microsoft\Windows\CurrentVersion\Run
personal register - for the current user, at the following address:
Computer\HKEY_CURRENT_USER\Software\Microsoft\Windows\CurrentVersion\Run
That is you need to go to the Run folder, expanding the folder tree one by one.
They contain files that run along with Windows and you can easily delete them as usual - by right-clicking and selecting “delete”.

You can first go to the first address, clean it there, and then start on the second.
Disabling autorun of programs using third-party software
Now we will talk about the third-party program Autoruns, which is distributed completely free of charge (freeware), but at the same time is very powerful and functional - in just a couple of clicks it can disable absolutely everything that can automatically start when you turn on the computer.
At the office The website has an English version, but we can easily understand it, even without knowledge of this foreign language.
The downloaded archive has a .zip extension and can be unpacked with any archiver.
There are 4 files in the folder. We are interested in “autoruns.exe”, which we launch.

When we first launch, we will be asked to accept the license agreement, which we will do by clicking on the “Agree” button.

The program looks like this:

We immediately see the “Everything” tab, which is a list of absolutely all startup objects.
But in order not to get lost there, there are tabs in which all this is broken down separately: Winlog, Drivers, Explorer, etc.
If you uncheck the box, we will disable autorun. If you click on a line, below you can see a description of the object: the version of the program, where it is located on the computer, size, etc.

In the “Logon” tab there is a list of programs that we could disable using the previous methods described in the article.
You may notice that some lines are highlighted in pink - these are simply objects that do not have a detailed description, and those whose files are deleted and can no longer be loaded, but are simply listed, are marked in yellow. Those. they may not be deleted.
Again, be careful when disabling something you know nothing about. Perhaps this is necessary for the main operation of Windows 7 and after disabling these services, the computer will not work as it should.
For the laziest we provide video tutorial of the whole process:
Disabling autorun in Windows 8
To disable auto-launch of applications in Windows 8, you need to perform slightly different operations. Call "Task Manager". This is done using the key combination Ctrl + Alt + Delete, or right-click on the taskbar and select the appropriate line in the menu that appears.


In Windows 8, unlike the earlier version of Windows 7, there is now a new column that will show you how much the program affects the performance of your computer.
Click on the line in the Impact on startup column in order to sort applications by download to the system and you can more easily analyze and disable unnecessary, more resource-intensive programs. After sorting the application, left-click on them and in the same window click on the “Disable” button.
Just as in the case of Windows 7, after disabling unnecessary programs, you will need to restart Windows.
Disabling autorun using special programs.
In this case we will use CCleaner. It is multifunctional and has proven itself well for a long time! Using it, you can not only set up startup on your computer, but also increase the performance of your PC, clean the OS registry, increase hard drive space and many other pleasant little things.
After downloading the CCleaner program, launch it from the shortcut on the desktop and in the left menu of the program, select the “Tools” menu, and then go to the “Startup” section.

Programs will be displayed as tabs; to disable them, just click on them and in the right menu of the program click on the “Turn off” button. Also, after all the startup cleaning procedures, it would be advisable to reboot the system.
- This is the automatic loading of programs after starting the operating system. As a rule, startup starts those programs that must run constantly while the computer is on. But many program developers abuse the ability to autoload their programs. As a result, programs appear in startup that should not be there. Over time, the number of programs that load automatically grows and the computer begins to work much more slowly, wasting most of its performance on useless work. From this material you will learn how to remove a program from startup in Windows 7 and solve this problem.
We use the settings to remove a program from startup in Windows 7
There are several ways to remove programs from startup in Windows 7. The easiest way is to open the program settings and disable the startup feature. In most cases, this will be enough to ensure that the program no longer loads when the operating system starts.
For example, in order to remove it from startup, you need to open the “Settings – Program Settings” menu.
And, after the program settings window opens, go to the “General” tab and uncheck the “Run uTorrent with Windows” function.

That’s it, after that all you have to do is save the settings by clicking on the “OK” button. These simple steps will be enough to work in Windows 7 or any other version of Windows. The next time you restart your computer, uTorrent will no longer download automatically.
How to remove a program from startup in Windows 7 using MSCONFIG
The Windows operating system has a great utility called System Configuration. It allows you to manage startup, services, and other operating system parameters. In order to open this utility, you need to run the “MSCONFIG” command. This can be done through the Run menu or through the search bar in the Start menu or on the Start screen with tiles if you are using Windows 8.
So, press the Windows + R key combination. After this, the “Run” menu should appear in front of you. In this menu you need to enter the command “ ” and press the enter key.
After this, the “System Configuration” utility will open in front of you. Here you need to immediately go to the “Startup” tab.

On this tab you can. To do this, just uncheck the box next to the corresponding program. After you uncheck the box, do not forget to save the settings by clicking on the “Ok” button.
You can also disable unnecessary services using the System Configuration utility. After all, services can also be used to autoload programs. Go to the Services tab and check the box next to Hide Microsoft services.
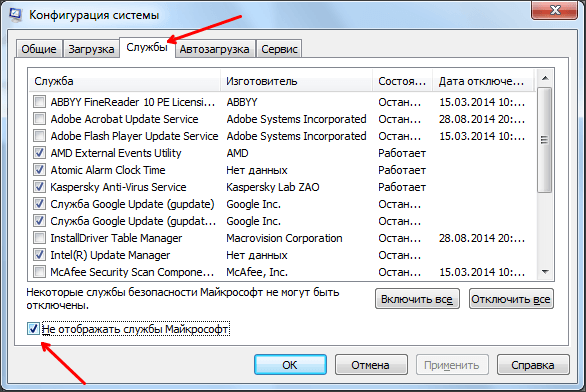
After this, you can examine the list of programs that load as services and, if necessary, disable some of them. This is done in the same way as on the “Startup” tab: uncheck it and save the settings.
Using Autoruns to remove programs from startup in Windows 7
Also, in order to remove unnecessary programs from startup in Windows 7, you can use third-party programs designed specifically to solve such problems. One of the most advanced programs of this kind is.
Autoruns is quite easy to use. All you need to do is uncheck the box next to the program that you would like to remove from startup.

Most programs that are in startup are available on the “Logon” tab. And services can be disabled on the “Services” tab. After unchecking, the settings are applied immediately. So there is no need to save anything.
As many may have noticed, when you turn on the computer, some programs start automatically. This fact has a double meaning. On the one hand, this is good, because you don’t have to start programs manually, especially those that must be turned on all the time, such as antivirus or.
But on the other hand, when you turn on the computer, programs for which there is no such need may be launched, and this also slows down the computer boot. After all, the more programs that are launched when you turn it on, the slower it loads.
In this article you will learn how to disable startup programs using Windows 7 as an example, although the method works on Windows OS.
System Configuration - the best way to disable startup programs in Windows
So, to disable automatic loading of programs through the operating system configurator, you need to type the service word in the Start menu search or through the Run window msconfig.
Running msconfig on Windows 7
In the search results, click on the icon msconfig(System Configuration) right-click and select “Run as administrator” from the menu. By the way, the same.
The system configurator window will open. We are interested in the ““ tab.
Here you will see all the programs on your computer or laptop that load automatically when the operating system boots.
In Windows 10, there is a special section in the task manager to manage startup programs, which will be written about in the startup tab in the configurator. A link to it will also be provided.
In order to disable the automatic launch of a particular program, you just need to find it in the list of the “” tab and uncheck the box next to it.

Disabling autorun programs in Windows 7
After all editions of the list of startup programs, press the button " Apply" And " OK"at the bottom of the window.
After this, the programs you marked will not automatically load with Windows.
Share the article on social networks! Help our site!
Join us on VK!
How to disable startup - this question is asked by many users, including those who have “seven” on their PC. It often occurs due to reduced computer performance. This happens for one reason - a large number of installed Windows programs, which turn on immediately after the entire system starts. As a result, the computer begins to slow down, and starting Windows can take several minutes or even more. To avoid this problem, you need to understand how to disable autorun programs in Windows 7.
Such situations arise not only among ordinary users, but also experienced ones. For greater productivity, to limit resource consumption and speed up the operation of the hardware, you need to disable unnecessary programs in the program startup menu in a timely manner. The bottom line is that almost all programs are turned on as standard after switching on. You can usually find a special "window" where the user is prompted about this, but it is so small or in a far corner that most people simply don't notice it. Setting up autorun or autoloading programs is a matter of minutes, but most people simply don't know how to do it.
When disabling programs, you need to be very careful and not try to turn off everything. Some utilities are directly related to the operation of Windows 7; you can cause irreparable damage to the system and only make it worse.
Method one: removing programs from the startup folder
How to remove a program from Windows 7 startup. This is the simplest and most common method that is familiar to almost every user. To implement it, you need to go to the menu “ Start", then to all programs and click on the folder "".
This folder is the starting point for enabling programs on your computer. Everything located in it starts when the system is turned on. How to limit their auto-on. The simplest and most crude method is to simply delete all the utilities that are located in the “” folder. Almost every user has done this at least once in their life. But the problem is that you want to limit their launch, but not completely delete them. But you will no longer be tormented by the autostart of Skype or other similar programs.
Method two: using the standard MSConfig utility
This method is for those who need installed utilities and can't just go ahead and uninstall them. But disabling still remains in your tasks; in this case, you need to use the standard program. It is standardly built into Windows 7 and is available on every computer without exception; you do not need to install anything or download anything from the Internet.
To launch the utility, you need to open the menu " Start"and click on the search bar, enter the following name into it.

Sometimes a search may show that it is not on your PC. Then we look for it at the address in the screenshot and launch it by double-clicking. Next, a window opens, all the settings of which are in the upper corner. We need to click on the “” tab and uncheck all the boxes next to unnecessary programs. This way, they will no longer start automatically when you turn on the computer and cause you inconvenience.

If you don’t know what this or that utility is responsible for, it’s better not to change anything, turn off only those with which you are personally familiar. Click OK after we have excluded all unnecessary programs from the list. You will be prompted to restart your computer. It's up to you to decide, the process will not affect our settings in any way. The main advantage of this utility is its simplicity, but the disadvantage is its limited functionality. It does not provide the ability to disable all existing programs. This is a problem for some users, so it's worth considering other options.
Method three: disabling programs manually
To carry out this process, we need to open the Registry Editor. To do this, press the key combination Win + R or separately go to the menu “ Start" There you need to type the word “in the search” regedit».

A registry editor will appear in front of us; it looks scary, but in reality it’s nothing like that. Of course, it is better not to change anything in it, so that no changes occur in the system. But if you know what you are doing, then there is no need to be afraid. In our case, we need to find the following address " Computer\HKEY_LOCAL_MACHINE\SOFTWARE\Microsoft\Windows\CurrentVersion\Run».
Folder " Run" - what we strive for. If we launch it, a large number of new folders will unfold in front of us. Here is a list of all files that are launched when the system is turned on. Select any of them, right-click and delete. This is a fairly simple, but also not effective method, which can bring some complications or future malfunctions in Windows 7. However, anyone can carry out this procedure; it is its ease that makes this option one of the best.
Fourth method: disabling the program using downloaded utilities
This is the most popular method. You just need to install a program that can help you disable any software on your PC. The advantage is that to do this you just need to go to the desired tab and uncheck the boxes, that’s all. But first you need to choose exactly the program that can perform its functions 100%. In modern conditions, this is a difficult task, because there are thousands of similar utilities on the Internet, most of them are of low quality.
Experts suggest using the program Autoruns, its main advantage is that it is completely free. At the same time, the utility is very powerful and has a lot of functionality. With it, you can disable absolutely any program in just a few clicks. This will allow advanced users to turn off all that Windows software that they simply do not need.
Before using any programs that work with the registry, even the most tested and recommended ones, always.
We download the program from the official website, the only negative is the English language, although you can also find a Russified version. Control Panel Autoruns very simple, so everyone can understand it. Unpack the archive and click on autoruns.exe. The program does not require installation and will start immediately.
 « All" or " Everything"- the necessary tab where you can see lists of absolutely all programs, services, drivers, and so on that are turned on during system startup. The remaining tabs allow you to see the same thing, but in an ordered and filtered form. You can disable startup programs from any tab.
It is possible to click on any of the entries, so you can view the software version, its size and location on the PC at the bottom of the window.

It is also of interest to double-click the mouse pointer on the entry line. This will open the corresponding Windows system program (utility), which is responsible for launching the corresponding entry file. For example, by clicking on the line SunJavaUpdateSched you will see the following window that opens:

To disable autorun of a specific program, you just need to uncheck the box next to it.

As you can see, Autoruns very easy to use and also does not require installation. All that remains is to disable the truly unnecessary software. And don't forget to make restore points before making significant changes.
So, we hope that you have received a comprehensive answer to the question of how to disable autorun programs in Windows 7, and now you can significantly speed up your PC.
Video on the topic
Many of the installed programs during installation write their parameters into startup and try to start along with the operating system. Sometimes this is quite convenient. But often this is completely unnecessary, and the user has to intervene to correct the situation to suit his requirements.
Let's try to briefly describe the main sequence of actions in order to remove a program from startup.
First of all, you need to open the menu “ Start" and among the list of all programs installed on the system, find the folder "". All applications whose shortcuts are in this folder will start with Windows. That is, they are included in autorun. If among them there is a program whose autorun you are trying to disable, then feel free to delete its shortcut from this folder. It is done.
If her icon is not there, then we move on. Launch the program itself and carefully review its settings. Among the options and parameters, try to find something similar to " Run with Windows», « Boot with operating system" and so on. similar in meaning. If you manage to find it, turn it off.
These are the very first, basic steps to remove a program from startup. But with their help it is not always possible to resolve the issue. Only when its developer has provided for such a possibility in the program itself. Therefore, we will consider other, slightly more complex ways to remove programs from startup.
How to remove programs from startup using standard Windows tools
Let's go to the menu " Start", click the mouse on the command " Execute"(you can use a hotkey combination instead) Win+R). In the small window that opens, type the command
msconfig
A window with settings for system administration will open. We are interested in the “” tab in it. We find our program in it and disable it (just uncheck it). Click “Apply” and close the window with “Ok”. All.

ATTENTION. In the system settings window you need to be extremely careful and careful. Careless actions can render Windows inoperable. Here, as nowhere else, the rule “If you don’t know, if you’re not sure, don’t touch it!” is relevant!
How to remove programs from startup using third-party programs
To facilitate the process of managing system startup, you can use various third-party utilities. There are a great variety of them for this purpose, choose the one that is more convenient for you.
As an example, let's look at how to manage startup using a very popular system cleaning program CCleaner .
You can read about how to install, configure CCleaner and how to use it in the corresponding manuals on our website. Well, a little more about its capabilities.

In the program window we are interested in the “” section. On the " Windows"This lists all the programs that are included in autorun. The status of each of them is visible in the leftmost column. Label " Yes " means that program autoloading is enabled.
To change something, you need to select the line with the desired application with the mouse. Then the buttons “ Switch off" And " Delete" When you click on the “Turn off” button, the program’s autorun will be disabled, and it will no longer start along with the operating system (which is what we needed). But at the same time, its entry will remain in the autorun parameters, and if necessary, it can always be turned on again. When you click the “Delete” button, the program line is completely removed from autorun. And subsequently, restoring its autoloading using simple means may turn out to be very difficult or even impossible.
Let me remind you once again that in addition to CCleaner, there are a lot of other utilities in which you can also quickly and conveniently manage autorun.
It is also necessary to mention that you can also remove programs from startup by editing the system registry. But any work with the registry is intended only for fairly experienced users who know exactly what they are doing. Since any error in the registry is fraught with serious problems with the operating system.
How to remove a program from startup in system services
 There are programs that register their individual modules as system services. This is sometimes the case with Java programs, for example - all kinds of automatic update or quick launch modules, some applications from Adobe and Apple, etc. This is not always advisable, and the user has to correct the situation.
To do this, you need to go to the system services tab in the management console. This can be done either through Control Panel In chapter Administration, or do it a little easier - find the “Computer” icon (on the Desktop or in the Start menu - it doesn’t matter, the result will be the same), right-click on it and select the line “ Control" Here in the management console in the section " Services and applications" and the menu we need is located " Services».

To view in full size, click on the picture
On the right, in a large window, all system services are listed (including those installed by various third-party programs), their status and startup type are indicated. If you managed to find the desired program among them, you should double-click on the line with its entry. A small window that opens will provide us with all the options for managing this service. Buttons " Start" And " Stop»start or stop it in real time. And the section " Startup type" indicates whether this service will start at the same time as the operating system. To change, click on the small triangle on the right and select the one you need from the three options offered. Type " Auto" means that the service will start with Windows, " Disabled" - the service is completely disabled and will not start at all, and the type " Manually" means that the service will be started only when it is needed by some program. This is the safest option if you are not confident in your actions.

All changes made here and saved will take effect after restarting Windows.
It must be remembered that any work in the management console, including with system services, must be carried out very carefully and accurately. Any errors here will certainly lead to various failures in the system or even to its complete inoperability. And any actions here should be taken only if you have the necessary knowledge and experience.
One more necessary note.
When working with programs responsible for various aspects of system security, for example, antiviruses, firewalls, etc., you should remember that you most likely will not be able to control their startup using the methods described above. This class of programs reliably protects its files, settings and settings to resist the actions of malware and intruders. Therefore, the only way to disable such a program from startup is to try to find the appropriate option in its settings. If, of course, it is provided for there at all. Which doesn't always happen.
