How to insert a new font. How to download and install fonts on your computer. Native font installer
If you are looking for how to install a font, then most likely you know why it is needed. Let me take a guess - you're making a card for a wedding, and you want the greeting to look exotic, and not in the standard Times New Roman font. (or worse - Comic Sans). Or maybe you are creating a resume and need to highlight the title in a special font. One way or another, two questions arise in connection with fonts:
- Where to download a beautiful font;
- How to install a font.
Where to download a beautiful font
Here are several services where you can download a variety of fonts:
What’s convenient is that on these services you can immediately see what the font looks like.
How to install a font
In fact, installing the font is a simple matter. In general, fonts are stored in the folder C:/Windows/Fonts(it is hidden by default). But, the system provides a standard way to install fonts through the interface.
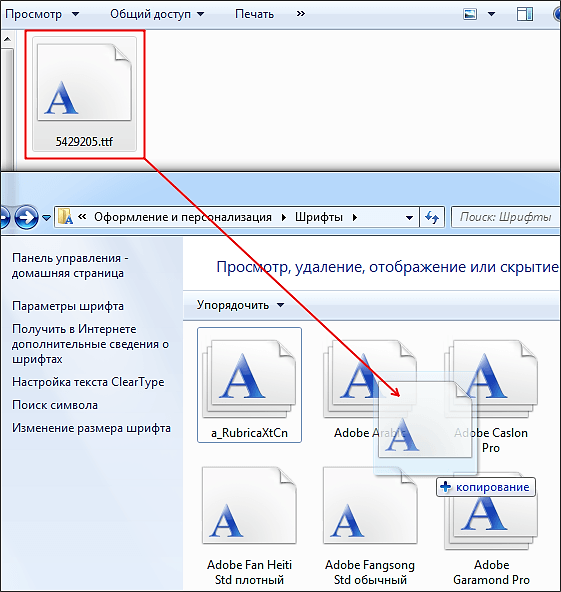
There is a separate section in the control panel "Fonts". By dragging any downloaded font (file in ttf format) into this “folder”, you will see it in the list of fonts, for example, in Photoshop. Below I showed this whole “process” on.
And as you can see, our font has successfully appeared in the list of Microsoft Word fonts
Lesson topic: how to install fonts in Photoshop. The lesson is based on the CS6 version, but it can be applied to CS5 and other versions.
To add fonts to the editor, you need to have them on your computer. Just download them from any site that provides this option. But be careful when choosing - not all fonts support the Cyrillic alphabet, that is, the Russian alphabet.
In order for fonts to be displayed correctly in Adobe Photoshop, you should select them with the extension .ttf (TrueType) or .otf (OpenType), of which the first is the most common.
Methods for installing fonts
Fonts are installed in the system folder of the computer, sometimes in the program itself. There is conflicting information about where it is better to add them. Some argue that you should not add it to the system folder, as it becomes full and all editors with text support will become slow. Others believe that you shouldn't overload Photoshop with new settings to make it work faster. Both are right - both the editor and the OS become heavier with a large volume of files. To prevent this from happening, you can use special programs. Let everyone choose the best option for themselves.
In any case, the archive downloaded from the Internet must first be unzipped.
Native font installer
The method works flawlessly on Windows and Vista systems.
Option 1. Open the file with the font - at the top there is an Install button. Click it - the font goes to the system folder and becomes available to all text editors.
If the button is inactive, then this font already exists in the folder.
Option 2. Without opening the file, select it and right-click to call up the context menu. In it, select the Install command. It will download to the system folder.

These methods are good when you need to insert 1 – 3 fonts. If there are more of them, it is better to use other methods.
To the OS system folder
In the XP system, go to Start → Control Panel → Fonts. In the window that opens: Menu → File → Install font. It becomes possible to find the required file on your computer. We find and install.
On Windows, the font library is located in the Fonts folder, which can be accessed in two ways. Along the way:
- Start → Control Panel → Appearance and Personalization → Fonts.
- My computer → Drive C → Windows →Fonts.
If your computer is running MAC OS, you should look for the Fonts folder in the Library directory.
On Linux systems, a folder with the same name is located one level lower - in the share directory in the usr folder. The path will be like this: /usr/share/fonts.
The folder was found. Open it and insert the fonts.
By dragging. Next to the Fonts folder, open the folder with fonts. Select the desired file or several, hold it with the mouse and drag it to Fonts.

Copying. Select the required files, copy them using the Ctrl+C keys or right-click on the selection and select Copy in the context menu. You can also select the Cut command if you do not intend to leave these fonts in this folder.
Then go to the Fonts folder, right-click on the white field between the files (not on the file!), select the Paste command.

How to Install Fonts in Photoshop Editor
You can insert files of other formats into Photoshop itself, not just TrueType.
You can use the copying method described above, with the difference that you need to paste them into the system folder of the editor itself. It is located along the path: drive C → Program Files → Common Files → Adobe → Fonts. They will work in Photoshop, but will remain unavailable for other programs.
Tip: after installation, the fonts will appear in Photoshop immediately. If this does not happen, restart the editor.
Using manager programs
There are various programs that make it easy to activate a large number of fonts of different, even non-standard formats, and deactivate them when they are no longer needed.
The main advantage is that they do not create a load on either the operating system or Photoshop. Here are the names of some of them:
- Adobe Type Manager;
- Hpfonts;
- Adobe Type Manager Deluxe;
- Fonts Expert.
If you need to use an additional font that is not included in the standard Windows system, it can be installed very easily.
To do this you need:
Why install new fonts?
There are a number of reasons for installing new fonts, as well as areas of professions for which the classic set will not be enough.
Main reasons:
- inability to open a file if it uses individual parameters. In this case, the system will automatically select the font, but errors may occur during conversion and the translation will be crooked;
- The customer or instructor has specified design requirements that are not included in the Windows package;
- if you want to stand out and make an original signature;
- When designing a congratulatory message in this way, you can add individuality.

Who may need:
- students;
- photoshoppers;
- graphic editors;
- teachers;
- designers;
- to any person.
Where to get
There are a lot of sources. The first and most popular is on the Internet.

To do this you need:
- enter the corresponding query in the search bar;
- follow the link you like;
- choose a suitable font;
- click on it to download;
- save on your PC.
Important! Use trusted sources to avoid downloading a virus to your computer.

Additional options:
- create it yourself using graphic editors;
- ask a friend to send it by mail or put it on a medium;
- buy in the store.
The next step is installation; there are several options here.
Methods
There are two ways to install a font on your computer. Both of them are correct and simple. Everyone chooses the best one for themselves.

It is worth noting that these files have the format:
- .fon;
- .ttf;
Important! When installing files with the same names, Windows cannot distinguish between them. This may cause the font type to change.
Typical installation
This is the simplest and most popular method. It does not require unnecessary transitions and knowledge, and it takes a minimum of time.
Algorithm of actions:

All is ready. You don't need to do anything else. You can open Microsoft Word and see the list of fonts you just installed.
Installation in the Fonts folder
All Windows system fonts are stored in the Fonts folder, and new ones should be installed there.
Important! The more fonts are installed, the longer it takes to launch programs using them. Therefore, if not used, it is better to remove them immediately.
To install:


Important! The name of the installed file may differ from the name specified in the program. In order to find out this name, you need to right-click on the file and select View.
Now you can use the new letter design. It is worth noting that Photoshop and similar programs may require additional steps to install.
Note. It happens that the user cannot find the Fonts folder. In this case, it may simply be hidden. You need to go to any folder, find the Arrange menu item, and in it the Folder and Search Options line. Next, go to the View tab and in the additional options find “Show hidden files, folders and drives”. Click Ok or Save.
Video: finding and installing a font
Font check
In order to make sure that everything is done correctly, you need to launch Word or any graphic editor. Next, in the font tab, find the newly installed one. Select it and write something in the text input field.

Compare the font, if it is the same, continue working. If not, there may be a conflict due to the same name, or the file itself may have an error.
How to properly install fonts in Windows 7 through the Control Panel
In Windows 7, you can add fonts using the Control Panel. For some this is the best way.
Algorithm of actions:

Important! If such a line is not visible, you can select Small icons in the View item (located at the top right).


From a variety of methods, everyone chooses the one that suits them. It should be remembered that on the Internet there are many viruses that can infect a PC and damage it or spy on its owner. Therefore, only reliable sources should be used.
If something doesn’t work out, the reason is most likely a non-working file or a system conflict.
Fonts automatically appear in all programs where there is an option to select them. However, it may not appear in Photoshop, in which case additional installation will be required.

If you have installed an inappropriate font, it is better to remove it immediately so as not to clog up your memory and speed up loading of programs.
To do this you need:
- open the WINDOWS folder, it is located on drive C;
- find the \Fonts folder;
- select an object to delete;
- right-click;
- select Delete from the context menu;
- confirm deletion.
Important! This operation should be carried out carefully, since there are fonts necessary for the operating system to operate normally.
The Windows operating system comes with a wide variety of fonts. Thus, in Windows XP with the Microsoft Office 2003 office suite installed, approximately 250 fonts are available. With newer versions of Windows and Office, the number of available fonts is even greater. But, despite the number of fonts installed in the system, a situation often arises when the user needs to install new fonts. In this article we will talk about how to install fonts and solve this simple task.
Installing fonts is quite easy. First, fonts need to be unpacked before installation, since most fonts are distributed as archives. Once the font is unpacked, you can install it in several ways.
Method number 1. Open the font with a regular double-click with the left mouse button. After this, a window will open in front of you in which you can see what this font looks like.
Method number 2. Right-click on the font and select “Install”.

In this case, the installation will start immediately and the font preview window will not open.
Method #3: Open Control Panel. In the window that opens, go to the “Design and Personalization – Fonts” section. You can also open a window with fonts using the command %windir%\fonts, which must be entered in the “Run” menu.

After this, a window will open in front of you with a list of installed fonts. To install a font, simply drag its file into this window.
After dragging the file, the process of installing the font on the system will begin.
How to remove an installed font
In some cases, it may be necessary to remove previously installed fonts. This is done in the Control Panel from the “Fonts” section. Here you can remove and hide installed fonts. To do this, select the desired font and click on the “Delete” button.

In addition, the font can be hidden. To do this, select the desired font and click on the “Hide” button.

Hidden fonts will not be removed from the system, but they will not be visible in the font list in other applications. You can also delete and hide fonts using the context menu, which is called up with the right mouse button.

It should be noted that deleting installed fonts should be approached with caution. Many fonts are required by the operating system to function properly. These fonts include: Courier New (including variants: Bold, Italic, Bold Italic), Times New Roman (including variants: Bold, Italic, Bold Italic), Arial (including variants: Bold, Italic, Bold Italic), Symbol, MS Serif, Wingdings and MS Sans Serif.
If you often work in Word, Photoshop, or other programs where you need to deal with text, then it is likely that you will need different types of fonts. From this article you will learn how to install them and where.
First, a couple of tips:
1. Fonts have the extension .TTF (the last three letters after the name). Any other file is not a font, always check what you download and install.
2. Even if you find a beautiful font, do not rush to install it, because it may simply not suit you. The fact is that the fonts may not be suitable for Cyrillic, i.e. for writing Russian letters. Yes, they look great with English ones, but alas, they only work with them.
How to install a font on your computer
The method of installing fonts is suitable for users of Windows XP; for other operating systems, in particular “seven”, 8 and vista - in principle everything is the same. I have no idea how to install a font on Linux and similar Unix-like systems. Let's get started.
Having found suitable fonts so that they appear on the computer, in particular in the programs you need, perform TWO operations.
Go to the Windows folder (usually on the system drive C:\), open the fonts folder there and put your fonts there.
Control Panel -> Fonts. Click on the File menu, click “Install fonts”, look for them in the menu that opens, and install them.
For a faster and simpler installation process, if there is more than one font, you can install them all at once by holding down the Ctrl key.
To make it easier to work with fonts, there is special software that will help you view them, select new ones, and install them. We're talking about Fontonizer.
aswin.ru
How to install a new font
In this lesson:
Installing Windows XP fonts
Installing fonts in Windows 7
How to download Russian fonts
Installing Windows XP fonts.
If you have a font on your computer that you want to use, then all you need to do is install the font in Windows. After that, it will be available in any program, be it Photoshop, Sony Vegas or any other program that uses fonts.
To install the font, click “Start/Control Panel”. If you entered the control panel for the first time, the window will look like this (Fig. 1):

Figure 1. Windows XP Control Panel.
Now in the “Control Panel” window (classic view), find the “Fonts” icon (Fig. 2) and click on it. A window will open containing all the fonts installed in Windows.

Figure 2. Fonts in the Control Panel Windows XP Control Panel.
However, an easier way is to simply copy the desired fonts to the “Fonts” folder using Explorer (Figure 3).

Figure 3. Installing a new font in Windows XP.
Installing fonts in Windows 7.
Installing fonts in Windows 7 is almost no different from installing them in Windows XP, except in appearance. As in the first case, we need to click “Start/Control Panel”. In the window that opens, you need to click “Category” (Fig. 4) and select “Large icons”.

Figure 4. Windows 7 Control Panel.
Then find the “Fonts” icon (Fig. 5), open it, and by simply copying the fonts to this folder, install new fonts in Windows 7.

Figure 5. Installing a new font in Windows 7.
How to download Russian fonts
And so, in order to install new fonts on your computer, you first need to get them somewhere. There are many fonts on the Internet, but to find those that support the Russian language, the query should look like this: “Russian fonts” (you can add the word download), or “Cyrillic fonts”.
When searching for fonts, you may find sites where you can see what it looks like before downloading a font. I consider this option the most convenient and I advise you to look for just such sites (Fig. 6).

Figure 6. Preview the font before downloading
But there is another option, which is to download fonts in entire collections, for example “2000 Russian fonts in one archive.” It seems that this option is much more convenient since you do not need to search for fonts one by one. However, as practice shows, after downloading such a package of fonts, most users “don’t bother” and install all these fonts into the system.
Thus, firstly, they create additional load on the system, which can significantly affect overall performance.
Secondly, searching for the right font among so many becomes much more difficult.
And thirdly, I personally doubt that anyone will use all these fonts in their work.
Therefore, if you download so many fonts, it is better to install only those that you definitely need.
To see what the font looks like before installing it, you need to open it using Notepad, which takes a lot of time. That is why I once again advise you to download fonts one at a time, carefully selecting only the ones you need.
And most importantly, do not forget that the font, first of all, should be “readable”, and then beautiful.
sdelayvideo.ru
This article will discuss how to install a font on a computer.
- Where to download a beautiful font
- How to install a font
If you are looking for how to install a font, then most likely you know why it is needed. Let me guess - you're making a card for a wedding, and you want the greeting to look exotic, and not in the standard Times New Roman (or worse, Comic Sans) font. Or maybe you are creating a resume and need to highlight the title in a special font. One way or another, two questions arise in connection with fonts:
- Where to download a beautiful font;
- How to install a font.
Where to download a beautiful font
Here are several services where you can download a variety of fonts:
fonts-online.ru fontov.net fontsquirrel.com
What’s convenient is that on these services you can immediately see what the font looks like.
How to install a font
In fact, installing the font is a simple matter. In general, fonts are stored in the C:/Windows/Fonts folder (hidden by default). But, the system provides a standard way to install fonts through the interface.
There is a separate Fonts section in the Control Panel. By dragging any downloaded font (file in ttf format) into this “folder”, you will see it in the list of fonts, for example, in Photoshop. Below I showed this whole “process” in screenshots.
 Download the font file in ttf format
  This is what the font file looks like
  A list of all font files can be seen in the Control Panel, section "Fonts"
  We drag the font here and immediately see it in the list
  And as you can see, our font has successfully appeared in the list of Microsoft Word fonts
 PCgu.ru
How can you install new fonts on your computer without any problems?
When working with text files, you quickly begin to get bored with the monotonous design using standard fonts like Times New Roman. You come across them at work, in school, in personal correspondence, and everywhere else you can. Boredom and nothing else! So why not add some originality to your daily computer work? Why not add a touch of personality to your text projects? In this case, the only thing you need to do is pay attention to how to install new fonts for documents on your Windows PC.
Method No. 1: On-demand installation
For those who have decided to decorate their text documents with fresh fonts, it is simply impossible not to offer this original selection, which contains more than 175 original font design options and “weighs” only about 5 MB. How to use it? Simple enough! You just need to download the archive with the fonts, unpack it on your computer or on an external drive, and then double-click on the icon of the appropriate file and click the “Install” button in the document that opens:

In addition, you can install the font “on demand” through the administrator. In this case, the procedure will be slightly different: after downloading and unpacking the archive, right-click on the appropriate font file, and then click “Install” in the list that appears:

As a result, the selected file will be installed on our computer in a matter of seconds.
Method No. 2: Hotkey system
Both novice users and those who have long said goodbye to the “teapot” label simply cannot refuse the pleasure of installing fonts on their computer using hot keys. In this case, however, it is also worth stocking up on a set of suitable font files in advance. If you want, download the proposed package; If you don’t want to, select suitable options on the Internet. One way or another, after downloading the font files to your PC you will have to act like this:

In principle, this completes the installation of fonts, since with the last action, in less than a couple of seconds, the selected font files will be successfully installed on the PC. Moreover, if the font suddenly does not live up to expectations, it will be no less easy to remove it. Just open the Fonts folder again, select the unnecessary option and press Shift+Del, and then Enter:

Not difficult, right?
Method No. 3: Software “things”
When answering the question of how to install a new font for Windows, one cannot help but pay attention to the software method: fortunately, there are plenty of all kinds of utilities today.
In particular, a program such as FontMassive Light is designed to transform the font design of documents. What's good about her? For example, the fact that this utility is absolutely free, easy to use, Russian-language and does not require installation on your hard drive. At the same time, the program allows you to view installed fonts, install new ones, and, if desired, remove them from your PC:

So, to install a new font using FMLight, you just need to drag a font file from a folder or explorer into the central field of the utility.
Another free program that undoubtedly deserves attention is FonTemp.

What's special about it? For example, the fact that with its help you can install the necessary fonts on your PC temporarily. So, while the program is open, all fonts added to it through the Edit tab are available in all applications, but as soon as you close it, all temporary files will disappear without a trace.
Of course, if you wish, you can also find advantages in such utilities for installing fonts as NexusFont, Font Expert, FontLister, etc. In any case, the choice is yours!
WindowsTune.ru
How to install fonts on Windows
Many users are faced with situations where a familiar document on the monitor screen or in a picture has little in common with the document that the user opens on his screen. Some graphic files or documents may use special fonts that are not available by default in Windows. Sometimes you just need to install a new font to customize the display of text elements in the OS graphical shell.
What fonts are installed on the operating system?
Sometimes a user needs to find out whether the required font is available in the windows of his computer. Some design programs, in addition to built-in fonts, use fonts installed in the OS. And I’m just curious what typeface options are available to the user. Finding out the list of installed fonts and their number is very simple. Just go to the control panel, and then to the “Fonts” folder.
Why are additional fonts needed?
Microsoft has given users the ability to install custom fonts in the OS, expanding the design capabilities of the operating system shell. In addition, various unofficial assemblies and distributions of Windows OS may contain already installed packages with fonts of all kinds. Designers and graphics workers often use non-standard fonts to design graphic elements of posters, leaflets, booklets, business cards and other products. There may be a problem with displaying inscriptions made in such fonts if these fonts are not available on the Windows system.
How to install a font in Windows XP?
First, you need to download the font file in .ttf format to your computer. If the font files were in the archive, then unpack the archive. Next, open the computer control panel and open the “Fonts” item. In the folder menu bar, select “File”, “Install font”. In the window that opens, you need to select the font files in the folder where you downloaded and unpacked them. Make sure the “Copy fonts to Fonts folder” checkbox is selected and click OK. If everything is done correctly, new fonts will be installed on the system.
How to install a font in Windows 7?
Installing fonts in Windows 7 is practically no different from the procedure for Windows XP. Everything is very simple. You can simply drag the desired font from the folder where it was downloaded into the Windows fonts folder.
You can select several font files at once and install them in batches by dragging them into the fonts folder. If one of the fonts you want to install is already present on the system, Windows 7 will display a dialog box asking you to replace the existing file.
Alternative way to add fonts in Windows 7
There is a method that is even simpler than those described above. Open the folder with downloaded fonts, select the required fonts, right-click on one of the selected font files, and select “Install”. The installation process of the font in Windows 7 will begin.
Installing fonts in Windows 8 and Windows 10
The procedure for adding new fonts to a computer running Windows 8 or Windows 10 is similar. Click on the new fonts, select “Install” or drag them into the fonts folder opened from the control panel.
That's all. I hope that this operation of adding fonts to Windows has not become something complicated for you. Adding fonts to Unix operating systems, as well as MacOS, is in one of the following articles.
http://gliphmaker.com/htms/howinstall.htm
