Is it possible to install ios. How to return the old version of iOS. way. Firmware installation
Greetings! Today’s article is from the series “Every owner of an Apple smartphone should know this.” I would even say, I simply have to. Why? Because to be able to change correctly account Apple ID or iCloud in iPhone can be useful to you almost always. And even if you don’t need it now, you will need it someday... Believe my little personal experience. Believe me, believe me, it won’t hurt! :)
In general, as a rule, for the time being the user does not even think about this operation. After all, the smartphone works? Works! Are there any problems? Apparently not! Then why bother with any settings at all? But nothing lasts forever and a variety of things can happen. Which? There are plenty of examples.
- Selling the device.
- Buying a new or not new gadget.
- Someone became aware of your Apple ID, password, iCloud - the right way protect yourself, change your account completely.
- Just start your iPhone life from scratch :)
In general, it is clear that this is the right thing to do. So let's learn how to completely log out of the Apple ID and iCloud accounts linked to the iPhone, and log in with new data. Forward!:)
Important! It is necessary to understand that for those people who for some reason do not know (do not remember) the password and login of the identifier, this method won't work, they should do .
How to change iCloud on iPhone
Since iCloud is a more important account (here is the Find My iPhone function, etc.), let's start with it. Briefly point by point:
- Open Settings.
- We look for the iCloud menu item and go into it.
- Scroll to the bottom of the screen and see the “Exit” line.

- Click and see the first warning: “If you sign out of your account, all Photo Stream and iCloud Drive photos stored in iCloud will be deleted from this iPhone.” What does it mean? This means that when changing your account iCloud recordings, the above data associated with it will be deleted from the iPhone. No need to worry, they will remain in the “cloud” itself and can be accessed from the website www.icloud.com. We agree with this.

- The second warning pops up: “All iCloud notes will be deleted from the iPhone.” Relevant for those who have used the notes application and with cloud storage, computer, etc. Again, you need to understand that they are not deleted entirely; access to them will remain through the site.

- Another question is “What do you want to do with calendars, Safari data, contacts and reminders?” I choose to leave the iPhone on this one. If something happens, you can delete them yourself later.

- We are asked to enter the iCloud password - we do it. That's it, we're signed out of this iPhone.

- We enter new data - iCloud is changed.

2 ways to change Apple ID
Now you can change the second identifier on your iPhone – Apple ID. There are two ways here:
- In the case when you have already logged out of iCloud (how to do this is written above), then you can simply and then it will be completely new and clean “like from the factory.” Naturally, there will be no information left on it! Next, simply enter your Apple ID account and indicate it directly.
- Or change Apple ID through the menu. What’s convenient is that in this case all games, applications, music, ringtones, etc. will remain on the device. downloaded using a previous account.
How to do it?

As you can see, all manipulations occur exclusively in the settings and do not take much time.
Despite the fact that I tried to describe in as much detail as possible the process of replacing accounts on an iPhone, it may well be that something remains unclear. Maybe? Certainly! Therefore, don’t be shy and write your questions in the comments - I will try to answer everyone.
P.S.S. Okay, you can do without “likes” - I’m just kidding :) Although, frankly speaking, I would be very pleased to see such activity from you. Thank you!
Probably, many users have always dreamed of installing iOS on Android and evaluating it in action, enjoying the beauty and outlines of the Apple operating system. Or have you noticed that not all applications from App Store are available in the open spaces Google Play. Of course, there are a large number of analogues of such programs, but I still want to try the software from the Apple store. True, the Apple device is quite expensive. That's why the question arises: is there a way with Apple's operating system on Android? It will not be possible to completely port the Apple OS, but thanks to the so-called emulators, a unique opportunity to install iOS on Android still exists.
What is an emulator?
Before you begin the installation process itself, you need to familiarize yourself with the initial terms. So, the emulator is computer program, which allows you to recreate (emulate) the operation of another operating system or environment so that it can be launched on an existing device. For example, there are Android emulators for personal computers that allow PC users to run games and applications from Google Play. Now a similar opportunity has become available to users of Android gadgets who want to install iOS on them. Let's look at everything existing methods launching or emulating iOS on Android devices.
1 way. Project Cider (Cycada)
The Cider project was presented at the Computer Science Research Conference at Columbia University. It allows iOS programs to adapt to the Android kernel and programming library. It uses binary compatibility methods to discover not only one’s own, but also “alien” ones. software on one gadget. That is, it becomes possible to run iOS apps on Android.

Cider exercises the right to perform some trick with the code of an iOS program, making it possible to perceive it as based on the XNU Kernel. This does not use an emulator or virtual machine - the code changes in real time, allowing the application to manipulate the Android kernel and libraries. The platforms are built on ARM. To unite them, an Android program called CycadaPress is used, which receives information about various types of actions (text input, notifications from applications, etc.) and transmits them to iOS. It convinces the system that the CycadaPress program window is the display of an Apple device. This allows you to perform other actions with the screen.
The video shows that many iOS applications run on Android, including the iOS version of the Yelp and iBooks programs. However, as the creators note, the speed and smoothness of the software leaves much to be desired. But this is to be expected, because Cycada is in the testing and development stage. It is unknown whether the project will be released in full. Perhaps after a while it will appear Final version for a large market that will create a real sensation.
It is also unclear whether the project will be interesting now, since most games and applications are released for all existing platforms. There are, of course, isolated cases, but mostly these are unique programs like Garage Band, Pages, iMovie. If you want to use them, why buy an Android device? That is why there is a distinction between operating systems, since each manufacturer tries to offer the user a new unique service.
Method 2. Firmware installation
This method is more suitable for extreme sports and enthusiasts, since it involves complete removal operating room Android systems and installation of special firmware on the device. Such manipulations can lead to dire consequences. In case of failure it will be necessary. If this does not help, hurry to service center. And in the worst case scenario, you risk getting a “brick” - a completely inoperative device, without the ability to turn on and further operate. If you still decide to change the firmware, follow the instructions below.
Apple computers are strong competitors for all other platforms. But unlike a PC running an operating system Windows systems, these devices cost several times more. Because of this, few users can . However, anyone, with due desire and availability detailed instructions, to your personal computer and use the original OS from the Apple company. What awaits you next step by step guide about how to install Mac OS on a PC, what pitfalls may be encountered along the installation path and what additional software is needed for this.
Hackintosh or CustoMac
Just a few years ago, operating room users Windows systems and couldn't afford to install Mac OS. Today, every user can not only test, but also fully use the Apple OS on their device. Such PCs are usually called Hackintosh. You are installing software from Apple on a computer from another manufacturer. Many, of course, will be concerned about the legal aspect in this situation. Installing Mac OS on a computer – how legal is it? Apple constantly sues the creators of such custom computers, but does not take any serious measures against them.

Later in the article we will talk specifically about full installation. That is, you will be able to use the treasured OS on a PC without using Windows. Also on our website you can find instructions for installing mac OS using virtual machine. Let's start preparing with the hardware requirements for Hackintosh, without which you will not be able to install Mac OS on a laptop or personal computer.
System requirements

The main rule when choosing a configuration: the more similar your system is to the configuration of the original MacBook or iMac, the fewer problems you will have during and after installation. This rule is absolutely true, since OS differences lie in the support of different interfaces and so on. Let's figure out which configuration is suitable to install mac os x on a PC:
- 2-core processor (minimum) from Intel;
- separate internal drive with AHCI support;
- minimum 2GB of RAM.
To eliminate various suspicions and fears that installing this operating system on a regular PC will lead to any hardware malfunctions and so on, it is worth saying that the procedure is quite harmless and simple. To install Mac OS Sierra on a Windows PC or laptop, you will need the following components:

- the personal computer itself, suitable for its characteristics;
- Mac OS operating system distribution;
- bootable flash drive;
- Unibeast program.
Since the description is suitable personal computer presented above, you need to go to the operating system distribution for installation on your PC.
Where can I get Mac OS?
You have two options to choose from for obtaining a distribution kit for installing the operating system:

- downloading a hacked installer with the required assembly;
- downloading the official installer via the App Store.
The first option will have to be used by those who want to install this OS on a PC with AMD processor. In this case, it is advisable to download modified distribution (Snow Leopard) and install it.
Everyone else can use the original installer. However, you can't get it for free. You will need either an Apple ID account with the purchased operating system, or the MacBook itself. You can borrow a laptop if you don't have your own. To install mac os x on windows pc, download the OS image from following instructions:
- go to the App Store and log in with using Apple ID;
- go to the OS page and click the “Download” button;
- wait for the download to finish;
- the distribution package will be saved in the “Programs” folder.
Now you need to create bootable media from which you will install a clean OS. The simplest and most affordable option is a regular flash drive.
Creating a bootable USB flash drive

Before installing mac os x on your PC, let's create bootable media:
Option if you have a MacBook
- connect the flash drive to your MacBook. Its volume must be at least 16GB;
- open disk utility. To do this, go to the Programs folder and go to the Utilities section;
- then go to the Erase tab;
- To install mac os on windows 10, you will need to format the flash drive in OS X Extended format.
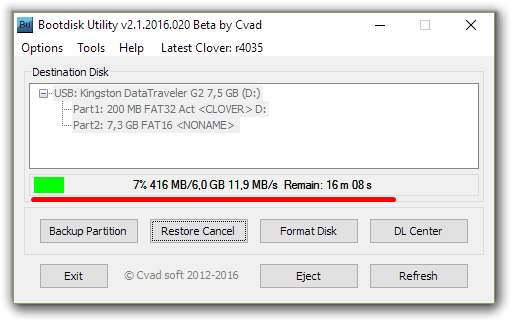
Now let's move on to working with the BootDisk utility, which we will need when working in Windows:
- We insert our flash drive into the computer and press Format Disk

- After formatting is completed, the flash drive will be divided into 2 sections

- Click Restore Partition

- Select a system image in .hfs format
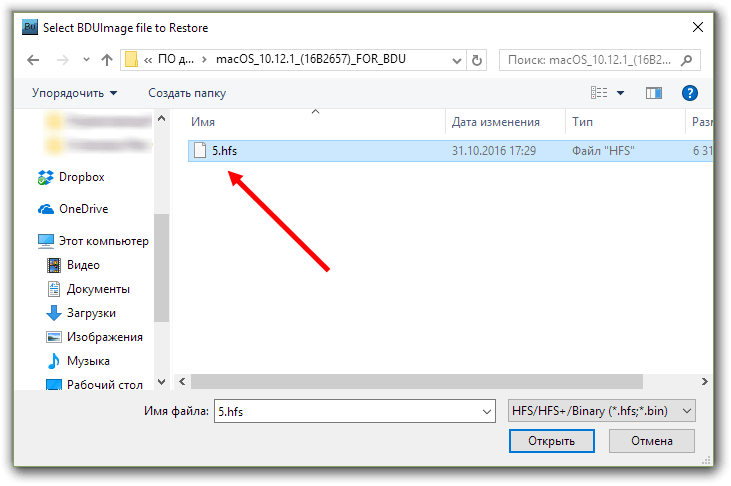
- Click OK

- We are waiting for the bootable media to be created
The whole process will not take more than 10 minutes. After that, download the MultiBeast program to the flash drive, which will be useful later to install os x on a laptop or PC.
PC preparation
Now we need to produce BIOS settings. Set the operating mode hard drive AHCI, and the BIOS operating mode is Optimized Defaults. After this, restart your computer. 
How to install mac os sierra on windows pc: installation process

Connect the flash drive to your computer via USB port 2.0 and boot from it when you turn on the device. Clover Boot will appear on the screen. Select Boot Mac OS X from USB. Next, follow the steps described:
- Choose language future system;
- disable sending diagnostics to Apple. Remember that this method is unofficial,
- therefore, developers may not “appreciate” your initiative;
- Erase all information from your hard drive using Disk Utility. It is recommended to use separate media so as not to uninstall Windows (in case the installation fails);
- select the partition where you want to install the OS;
- wait until the process finishes and restart your computer.
How to install mac os x instead of Windows on a laptop or PC: post-installation

When you turn on your computer, go to the startup menu again and select the USB flash drive. Complete the system installation and install MultiBeast. In the program menu, click the Quick Start button. Next, select sound options and network card. To save your settings profile, click the Save button. Finally, click the Build and Install button. Now restart your computer.
Ready! You have received a working Mac OS on your PC.
How to make a Mac OS from Windows?
If you cannot install Mac OS on Windows 7, but want to change appearance your system, then use special program to change themes.
You can make Windows look like a Mac OS using themes. Themes are downloaded from various thematic sites. For example, wingad.ru or http://7themes.su. The mac theme for windows 7 makes Microsoft's OS as similar as possible to its competitor, without changing the very structure of the software. Great option for those who are only interested in appearance Apple products.
Updating your mobile phone operating system is an important process. But it is not always necessary to install the latest version of the OS. Sometimes it is preferable to stay on the old build. Most often, the issue of updating the system to mobile device iPhone owners are puzzled. After all, with new operating systems come the latest and most interesting features that attract almost everyone. Today we are going to find out how to install iOS 8 on iPhone 4. Is it necessary to do this at all? What process features might you encounter? The answers to all these questions will be given below.
Is it possible to install iOS 8
The first step is to understand how feasible the idea is. Can I install iOS 8 on iPhone 4?
The answer to this question will not be long in coming. Yes, you can indeed install the latest version of the operating system on your iPhone. But is it worth doing this?
By itself, the iPhone 4 is not very powerful. Therefore, installing "eight" on it is not recommended. The thing is that when working with a smartphone on iOS 8, slowdowns and delays appear.
But owners of the iPhone 4S can easily bring their idea to life. It is noted that in this case the delays are not too large, they are practically unnoticeable. Accordingly, there is no clear answer. Everyone must decide for themselves whether they really need iOS 8.
Update methods
If you want to work with the latest build of the Apple OS, you can do this without much difficulty. How to install iOS 8 on iPhone 4? Exactly the same as in the case of any other Apple gadget. Apple's software update principles are always the same.
Among them are the following methods:
- using iTunes;
- working with the Internet.
How exactly to proceed? Everyone decides for themselves. It all depends on the preferences of the smartphone owner. You can install iOS 8 on iPhone 4 either through a specialized program or simply using a smartphone and an Internet connection. Next we will talk in more detail about each scenario.

iTunes Help
Let's start with the most common method - working with iTunes. Every owner of an Apple gadget should have this application. With its help, you can quickly restore data, download information, or update software.
How to install iOS 8 on iPhone 4? You just need to follow a few instructions. It looks something like this:
- Install on computer iTunes latest version for the gadget you are using.
- Connect iPhone to PC. It is recommended to use a USB cable for this.
- Launch iTunes. Wait for the devices to synchronize.
- Click on the name of the connected phone on the left side of the window and go to the “General” tab.
- On the right side of the application, find the “Update” button. Click on it and wait a bit. The smartphone will be checked for updates.
- Explore information about the upcoming update. Agree with the operation and click on “Download and update”.
From now on, it’s clear how to install iOS 8 on iPhone 4. After these steps, you’ll have to wait a little. The operating system will be updated, after which the smartphone will reboot. Fast, simple, easy!

Via Wi-Fi
But this is only one of the update options. In addition to the proposed algorithm, you can use the wireless Internet to implement the task. This solution greatly simplifies the process.
Can I install iOS 8 on iPhone 4? Easily! Especially if the user has access to Wi-Fi at hand. This option is the simplest, but it is not reliable. There is no guarantee that the software update will be successful.
To download a new operating system on iPhone 4 when Wi-Fi assistance, required:
- To plug wireless Internet to the device. To do this, go to “Settings” - “Network” - “Wi-Fi”, and then switch the switch lever to on mode. Next, the user will be asked to select the network to connect to. If necessary, enter an access password.
- Go to "Settings" - "General" - "Software Update".
- In the list that appears, click on the line that says “Download and install.”
- After the download is complete, click on “Install” and wait a bit.
At this stage the whole process ends. The update will be installed, after which the device will reboot. Next, the smartphone owner will be offered to restore information via iTunes or iCloud.
Features of working with Wi-Fi
It’s clear how to install iOS 8 on iPhone 4. It should be noted that updating the operating system via Wi-Fi has a number of features. If you do not take them into account, you can fail the OS initialization process.

Every owner of an Apple smartphone should adhere to these recommendations:
- Before starting the software update, you need to charge your phone. It is better that it has at least 50% charge.
- Sometimes the Wi-Fi update may not be completed successfully. In this case, you are prompted to either try again or use iTunes.
- The operating system starts loading at iOS 8. It weighs about 1 GB. Accordingly, you will have to wait a little. At this time it is not recommended to work with mobile phone. You can't turn it off either.
- Updating via Wi-Fi is only possible on a jailbroken iPhone.
Remembering all this is not so difficult. If none of the update methods help, you need to contact the service Apple support or take the device to a service center.
If you have been using iOS for a long time, then you probably know that after updating the system, unpleasant bugs and jambs often appear over the air. This material will tell you how to properly prepare for the update and clean your gadget from the garbage that has accumulated during use.
Following Apple's recommendations and personal experience, I highly recommend doing backup copy data on your smartphone, because problems always appear at the most inopportune moment. Backup will not take much time and will allow you to avoid loss important information. So before "cleansing" be sure to go to Settings → iCloud → Backup and create a copy of your data.


The same procedure can be done through iTunes- open the application, click on the device icon in the upper left corner and you will see the backup window.

After copying all the data, the most crucial moment comes - installing the firmware. There are two ways to do this. The first one is in fully automatic mode, you only need to press Restore iPhone on iTunes. In this case, the program will start downloading the latest firmware release and install it on the smartphone independently. All data will naturally be lost. You can restore them in the backup window, which is located just below.


After downloading the firmware, launch iTunes, click on the device icon in the upper left corner and in the window that opens, click on Restore iPhone with the key held down option (alt) on Mac or Shift on PC. The combination will open an explorer window, in which you need to find the image of the previously downloaded firmware and click Open.

Be sure to disable the function before the procedure Find my iPhone, otherwise iTunes will not allow the installation and will issue a warning.
Next, the program will do all the dirty work for you - just wait until the installation is complete and set up the device for further use. This method is also suitable if you forgot your screen lock password or want to sell your iPhone - the activation lock is removed before installation, so the new user will not have to enter your data to use the device.
iPhone 4s (A1387, A1431)
iPhone 5 GSM (A1428)
iPhone 5 CDMA (A1429, A1442)
iPhone 5c GSM (A1456, A1532)
iPhone 5c CDMA (A1507, A1516, A1526, A1529)
iPhone 5s GSM (A1453, A1533)
iPhone 5s CDMA (A1457, A1518, A1528, A1530)
iPhone 6 (A1549, A1586)
iPhone 6 Plus (A1522, A1524)
iPhone 6s (A1633, A1688, A1691, A1700)
iPhone 6s Plus (A1634, A1687, A1690, A1699)
iPad 2 Wi-Fi (A1395)
iPad 2 Cellular (A1396)
iPad 2 Cellular CDMA (A1397)
iPad 2 Wi-Fi Rev-A mid 2012 (A1395)
iPad Mini Wi-Fi (A1432)
iPad Mini Cellular (A1454)
iPad Mini CDMA (A1455)
iPad 3 Wi-Fi (A1416)
iPad 3 CDMA (A1403)
iPad 3 Cellular (A1430)
iPad 4 Wi-Fi (A1458)
iPad 4 Cellular (A1459)
iPad 4 CDMA (A1460)
iPad Air Wi-Fi (A1474)
iPad Air Cellular (A1475)
iPad Air China (A1476)
