Clone a disk to a smaller ssd. Features and rules for completely cloning hard drive data from HDD to SSD. Clone a disk over a network to a remote computer
Often, users of computers and laptops have a situation where the old hard drive must be replaced with a new one, faster or with greater capacity. Therefore, there is a need to copy existing information from one disk to another. Then it becomes relevant to simply clone the old hard drive.
Computer hard drive
Hard drive cloning
Cloning process hard drive is an operation in which all data from one hard drive is transferred to another. Since cloning a hard drive is a procedure for low-level sector-by-sector data transfer from one storage medium to another storage medium, the clone hard drive will be completely identical to the original hard drive.
In this case, transferring all user files, personal photos, films, documents may take you a lot of time. It is also worth knowing that if you transfer files operating system manually, then it will not be copied on the new hard drive in working condition, that is, you will need to go through the installation process again. The cloning process allows you to copy the hard drive partition structure, a working active operating system, and installed programs and saved settings.
Hard drive cloning
Hard drive cloning programs
In order to quickly and efficiently copy all data from one hard drive to another, while keeping the operating system in working condition so that after copying it can be easily launched, you should use special cloning programs hard drives.
Quite a lot of programs, both free and paid, have been developed for the purpose of creating clone disks. Among this variety of software, there are highly specialized programs that work only with hard drives of a certain brand, but there are also universal programs that allow you to clone any HDD and SSD drive And.
Programs that include the hard drive cloning function include Paragon Hard Disk Manager, Acronis True Image, AOMEI Backupper, EASEUS Disk Copy, etc. But the most popular program among users is Acronis True Image.
Acronis True Image program
Acronis True Image program
True Image is a modern software product from Acronis. It is compatible not only with old Windows versions such as Windows XP and 7, but also with the new OS Windows 8, 10. Acronis True Image can be called a panacea for all problems with Windows because, in addition to the cloning function, the program has a lot of additional advantages such as:
- creation of reserve copies of Windows;
- it acts as a system cleaning tool;
- allows you to test Windows operation in trial mode with the ability to cancel changes made;
- saves backups in cloud storage;
- disaster data recovery.
In addition, when cloning a hard drive using Acronis True Image, it is possible to exclude individual unnecessary files. At the user's request, you can configure cloning not only the entire disk, but also separate files or sections. Other programs do not offer this option. This program not only is it multifunctional, it also has high speed work, convenient interface in Russian, automatic and manual mode work.
Acronis True Image 2016 program interface
The disadvantages of Acronis True Image include only a paid license. It can be purchased on the official website of the developer. But, despite this, Acronis True Image remains the most popular program for cloning hard drives.
Features of Acronis True Image terminology
Before cloning disks, you need to familiarize yourself with some features of the Acronis True Image software package. So, in the process of preparing to clone a hard drive, you will come across the concepts of “source” and “destination” disks. The source disk in Acronis True Image is the disk from which important data is transferred, that is, this is the disk from which the clone is created. The target drive in this program is considered to be a hard drive that will become a clone of the source drive, that is, a drive to which user data, system files and software are transferred.
Identification of hard drives in Acronis True Image
When cloning a hard drive with Acronis True Image, the discrepancy between the disks in terms of volume is not critical. With the ability to exclude unnecessary files from the cloning process, the target drive can be much smaller in size than the source drive. The main thing is that there is enough free space for the necessary information from the source disk.
Cloning a hard drive with Acronis True Image
Let's look at the process of cloning a hard drive using the Acronis True Image 2016 version as an example. To do this, follow the instructions below step by step.
Step 1. Launch the program, this version prompts you to log in account To use Acronis cloud storage, the login window can be closed.
Login cloud storage Designation of hard drives in Acronis
Step 2. In the side ribbon of the interface, select the “Tools” tab, then in the menu that opens, select the “Clone disk” item.
Acronis True Image interface
Step 3. Follow the prompts of the Disk Cloning Wizard, at the point where you need to select the cloning mode, click “Automatic”. It is always selected by default as a preset mode, click on the “Next” button.
Selecting a cloning mode in the Disk Clone Wizard
Step 4. After this, a window for selecting the source hard drive opens in front of you. In this window, you need to left-click on the disk from which we will transfer data. Disk names in Acronis True Image differ from disk names in the built-in Windows utility. In this case, it is better to navigate by the volume or model of the disk. Having selected the hard drive to transfer data, click the “Next” button.
Selecting the source hard drive
Step 5. In the window for selecting the target disk that opens, left-click on the name of the hard disk to which you want to transfer the data, Windows OS and partition structure. Click on the “Next” button.
Selecting the target hard drive
Step 6. Since in this case the target disk is not new disk with unallocated space with information stored on it, the program displays a warning window with information about the possible loss of important data. If all the most necessary files have been saved, you can click on the “Ok” button.
Acronis True Image warning window
Step 7. After this, a window for selecting a recovery method opens. By default, the checkbox “Copy partitions without changes” is checked, change this setting no need, just click “Next”.
Selecting a recovery method
Step 8. The Disk Clone Wizard enters the final stage of the data transfer process and displays the Summary Window. This window allows you to start cloning your hard drive by clicking the “Proceed” button, but this is relevant if there are no files that need to be excluded, so as not to take up space on the target disk with unnecessary data and not increase the time required to complete this procedure. If you chose the method of cloning the source disk not in full, then click on the “Exclude files” button.
Summary window in the Disk Clone Wizard
Step. 9. In the File Exceptions menu that opens, we see a tree structure of the entire contents of the hard drive. Thanks to this structure, system files that cannot be excluded are immediately visible. In our example, we exclude non-system video files from section E by checking the appropriate boxes next to their names. You need to wait a little while for the process of excluding these files to complete.
File exclusion window in Disk Clone Wizard
Step 10. We exclude partition F of the source disk in its entirety by checking the box next to its name, and all included files and folders are then selected automatically. After the cloning operation is completed, this partition will be created on the target disk, but will not contain any data. When all partitions and files that we do not need on the target disk are excluded from cloning, we can start the whole process by clicking on the “Proceed” button.
Excluding source hard drive partition when cloning
Step 11. After all preparatory actions Acronis True Image will ask you to reboot the system. And it carries out the cloning process in preload mode of the Windows operating system. In Acronis True Image preboot mode, you can see the default function of shutting down the computer immediately after the cloning process is completed.
Cloning is carried out in pre mode Windows boot
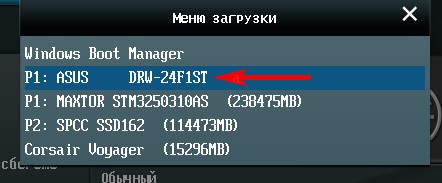
The next time you turn on the computer, you will be taken directly to the BIOS menu, where you can set the priority of loading the operating system from the created clone disk. In addition, this window shows the remaining time until cloning is completed and the progress of the task.
Hard drive cloning progress window
Step 12: Once cloning is complete, you can boot from the target drive.
Selecting boot from target disk
Moving your desktop to another drive in Windows 7, 8, 10
Copying the desktop along with shortcuts and files to a non-system drive is a very beneficial solution from all sides. After all, this will not only preserve the previous appearance of your desktop after reinstalling the operating system, but will also allow you to save it in the event of a sudden system failure resulting in the inoperability of your OS. In addition, on system disk There is a lot more free space for your documents. When your computer is infected malware most often the damage is caused to the system partition, and since the desktop directory will no longer be on the system disk, it will be completely protected from this kind of sabotage.
In order to copy the “Desktop” folder in such major operating systems as Windows 7, 8 and 10, there are two ways - through Windows Explorer and using the editor Windows registry.
Worker Windows table
Copying desktop in Windows 7, 8, 10 via Explorer
In order to copy the desktop with all the files and folders it contains to a non-system local drive, you need to follow the instructions below step by step.
Step 1. Create a folder to store data from the desktop on a local drive with user data (in our case, drive D).
Creating a new folder on drive D to store desktop data
Step 2. Then open the user's folder. In Windows 7, click on the “Start” button and in the left column, select the user name and left-click on it. For Windows 7 users, follow the path Drive C:\Users\*username*. A package opens with the following data.
Opening the folder of the user whose desktop you want to move to another drive
User folder on drive C
Step 3. Right-click on the “Desktop” folder and thereby open the folder properties.
Calling the context menu of the Desktop folder
View of the Desktop Folder Options window
Step 4. Left-click on the “Location” tab and then click “Move” in this tab.
Folder Location tab Desktop
Step 5. Find and select the “Desktop” folder that we created in step 1 and click on the “Select folder” button.
Selecting a folder to move the desktop
Applying the changes made
Step 7. In the dialog box that opens, agree to transfer the “Desktop” folder to another local drive by clicking the “Yes” button. Next, a progress window for moving the desktop appears.
Dialog box that pops up when moving a desktop to another drive
Progress window for copying desktop to drive D
Step 8. All files and folders have been successfully copied to local drive D. For the changes to take effect, you need to completely restart the computer.
All desktop files and folders were successfully transferred to local drive D
Video tutorial on transferring a desktop to another drive
Copying the desktop in Windows 7, 8, 10 using the Registry Editor
Transferring your desktop using the Windows Registry Editor in any version of the operating system is much easier to do than through Explorer. To this end, we perform the following steps.
Step 1. To call the registry editor, press the Win+R keys on the keyboard at the same time, in the window that appears in command line enter “regedit” without quotes. Next, click “Ok”.
Calling the Registry Editor in Windows
Step 2. Go sequentially along the path HKEY_CURRENT_USER\Software\Microsoft\Windows\CurrentVersion\Explorer\Shell Folders. You need to find the Desktop parameter in the displayed list.
Registry Editor window in Windows
Step 3. Double click left mouse button to open the parameter and in the “Value” line change the path, directing it to the folder in which we plan to save the desktop data. Click on the “Ok” button below.
Changing the desktop path
Step 4. Reboot your computer or laptop for the changes to take effect.
This is how you can quite easily copy your desktop along with all the files stored on it to another partition of your hard drive.
Transferring operating system memory from HDD to SSD
Copying operating system memory from a hard drive to an SSD creates an exact image of the system partition on the SSD. This action is performed to increase the performance of the operating system.
After transferring memory from HDD to SSD, loading the operating system when you turn on your computer or laptop will last only 10-15 seconds.
SSD vs HDD
Benefits of rewriting OS memory to SSD
Transferring operating system memory from a hard drive to solid-state drives has a number of advantages:
- During operation, a lot of operations are performed to read information from the system partition of the hard drive against the background of a small number of operations to write information to the disk; in this case, it is the SSD that provides the fastest process of reading data from the disk;
- the amount of information stored on the system disk is usually small and can rarely be changed significantly, so for ordinary computer or laptop users, a solid-state drive with a capacity of about 20 GB will be sufficient, and only in quite rare cases an SSD with a capacity of more than 30-40 GB may be needed;
Internal SSD and HDD device
Copying operating system memory from HDD to SSD with third-party programs
In order to transfer OS memory to SSD, they also use special programs. Such programs include Acronis True Image, Clonezilla Live, Paragon Migrate OS to SSD, Handy Backup Professional. They already have built-in functions for creating an image of the operating system and cloning it to another medium. It is worth remembering that the volume of the solid-state drive must be no less than the volume of the system partition on the hard drive.
Paragon Migrate OS to SSD program
Conclusion
Above, we looked in detail at cloning a hard drive using the Acronis True Image program for Windows 7, 8, 10. We found out various ways moving the desktop to another local drive on the computer. Learned options for transferring operating system memory from hard drive HDD to an SSD.
In addition, we looked at programs designed specifically for cloning hard drives and copying data. system files OS. Among the proposed methods, choose the best option remains with the user.
With Solid State Hard Disks (SSD) being smaller in size then the old mechanical hard disks (HDD), it can be difficult to clone the disk. Especially with manufacturers having recovery partitions can make this more difficult. I have come across software which can only clone to Hard Disks the same size or smaller. There are few softwares which can clone to a smaller hard disk drives.
Important Note: If the size of your data on your old hard disk is greater than the total size of your new hard disk then you will have to delete some data.
In order to clone the HDD from a larger HDD to a smaller HDD (e.g. SSD), you will require 2 peices of software:
- Partitioning Software
- Cloning Software (which supports cloning from large HDD to a small HDD).
Partition Master Free
Partition master free by EaseUS is a free utility software for partitioning. This software is easy to use and allows to do most of the tasks required with hard disk volumes and partitions. Partion master free only works with basic disks. It allows to resize, move, merge and split partitions. It supports MBR, GPT and RAID disks. The software can be installed on XP, 7, 8 and 8.1. It works on both 32-bit and 64-bit platforms. If you have a dynamic disk then you will need to download the trial version of Partition Master Professional. Checking the type of disk (basic or dynamic) can be done in disk management by running diskmgmt.msc from Windows Search.
Disk Copy Home
Disk Copy Home by EaseUS is a disk or partition cloning tool. It enables sector level cloning which makes sure that the destination hard disk is exactly the same as the original. Disk Copy Home only allows the cloning of basic disks. Disk Copy Home runs at boot and requires a USB drive. Disk Copy Home is a free software. If you require cloning dynamic disks then Todo Backup Workstation is . Todo Backup Workstation is not free but does have a trial. Downloading Disk Copy Home or a trial of Todo Backup Workstation requires leaving your email and download link will be emailed to you.
Steps to cloning a larger hard disk drive onto a smaller hard disk drive
I have used the above softwares many times and they excel in ease of use and reliablity, and therefore reccomend them to anyone with similar cloning tasks.
This is the transfer of all data from the old drive ("donor") to the new one ("recipient"). Everything is copied without exception: the operating system with drivers, installed programs, photos, music, and so on. After cloning and replacing the disk, there is no need to remember passwords, all files will be in their usual places.
Why clone your hard drive?
This operation is carried out for the following purposes:
- To use a new and faster drive. A typical case is replacing a slow HDD with a modern SSD. This will significantly speed up the responsiveness of Windows, and due to cloning, upgrading your computer will be as comfortable as possible for the user. All shortcuts and settings will remain unchanged, but the system will become faster.
- To avoid reinstalling the operating system. For example, after buying a new computer, you want everything to be the same as on the old one and without reinstallations. This will happen when transferring information from the “donor” to the “recipient”, and the procedure itself will require relatively little action and attention on the part of the user.
- To synchronize work different computers. Becoming increasingly common distant work. Cloning a hard drive will allow you to deploy a full workplace where it is convenient and there can be as many such places as you like.
- To do backup copy data. You can lose information on a storage device at any time - nothing lasts forever. Thanks to cloning in a few clicks, you can be protected in case of force majeure and have a fully working “cast” of all data.
It is important that the “donor” is free of viruses - clone the drive only after a thorough scan for malware.
Utilities and programs for cloning
There are many cloning apps available. Some are specially designed to perform such an operation - suitable for inexperienced users who value the simplicity of the process. Other programs have broader functionality. In them, creating a disk clone is just one of many available options.
Before using any application, connect the new drive to your computer. To do this, it is convenient to use the external hard drive pocket
Renee Becca
A simple utility that everyone can understand. With its help, you can clone a storage medium in a few clicks. The algorithm of actions consists of the following steps:
- download, install and launch the application;
- select the item in the left panel "Clone". Using "Renee Becca" you can also clone only certain local disks or transfer only the operating system to a new drive. The corresponding items are located below in the initial window of the program;
- indicate “donor” and “recipient”. To get a full copy of the “donor”, check the box “Make the target disk bootable...” at the bottom of the window. On the left, expand the “More” list and check the box next to “Clone all sectors...”. Then start the operation by clicking on “Clone”;
A functional program that costs a lot, but the demo version is also suitable for cloning. To download it, follow the link and enter your e-mail. After launching the application, do the following:
- select "donor". It is important to specify not just a local drive, but the entire drive. To do this, right-click on the line with this drive and click on “Clone basic disk”;
- indicate the "recipient". When choosing this disk, remember that the data on it will be overwritten, and its volume cannot be less than the size of the occupied information on the “donor”;
- so that the “recipient” is exactly the same as the “donor”, check the box next to the “One to One” line in the next window;
- in Acronis Disc Director, any manipulations with drives must always be confirmed separately. To do this, at the top of the window, click on “Apply pending operations” - only after this the cloning will begin;
If you do not use the program for commercial purposes, then you do not need to pay for it. You just need to go to the developer’s website, click on “Home Use”, specify your e-mail and confirm it - you will receive a corresponding letter. After downloading, installing and launching Macrium Reflect, follow these steps:
- on home screen click on “Clone this disk”;
- In the next window, check all local disks on the "donor";
- at the bottom, click on “Select a disk to clone ...” - a selection window will appear where you specify “donor”;
- at the end of the operation, click on “Finish”;
Paragon Drive Backup Personal
A free utility with enough capabilities for cloning. It is available for download on this page, and after downloading, installing and launching, do the following:
- create your own account in the application. This is done in a few clicks - you only need to specify your e-mail and personal data. After that, on the left, click on “My new backup”. On the right, indicate the “donor” in the “Backup source” field and the “recipient” in the “Destination” field;
- start cloning by clicking on “Back up now”;
Simple and free application. To download, go to the developer’s website and select the version with Russian localization.
After installation and launch, follow these steps sequentially:
- indicate "donor". If you need to clone not the entire drive, but only one of the local drives, then check the “Show partitions” line and select the required local drives. Then click on “Next”;
- Specify the “recipient” and click “Next” again.
- The settings window will appear. You don’t have to change anything and click “Next”;
- A window for setting the sizes of the “donor” and “recipient” will appear. Just check the box “Resize partitions proportionally” and click on “Next”;
- in the last window, confirm the start of the operation by clicking on “Start copying”.
A good utility that has a demo version, the capabilities of which are enough for one-time disk cloning. After downloading, installing and launching the application, follow these steps:
- V top panel click on “Clone” - unfortunately, the program does not have a translation into Russian;

Hello admin. I want to clone the Windows 8.1 operating system from a regular hard drive to an SSD in Acronis True Image 2015, I think this method is much simpler than all others, first I specified the Source disk, then the Destination disk and that’s it. The capacity of a 500 GB hard drive is naturally larger than the capacity of a 120 GB solid state drive, but in the cloning settings you can exclude unnecessary disks, folders, and even just files?
Of course, I can do everything myself, but I’m afraid, since I have little experience working with the Acronis True Image program, and I see that this is the only way you are “fiddling around” with it!
How to clone the Windows 7, 8, 8.1 operating system from a regular hard drive to an SSD solid-state drive (drive sizes vary) using Acronis True Image 2015
Hello friends! If you often work with Acronis True Image, you probably noticed that in the program settings there is an option called Cloning, and as our reader correctly noted, this option is very finely configurable.
As an example, I suggest you clone my Windows 8.1 from a regular 250 GB hard drive to a 120 GB SSD. Simple HDD 250 GB is almost filled with files and naturally all the information from it will not physically fit on the SSD, but when cloning we can exclude unnecessary folders, files and even entire disks, as a result of the cloned information there will be exactly 120 GB left, that is, as much as the volume of the SSD. But we need to do everything correctly, because the Windows 8.1 operating system cloned onto another hard drive should start for us!
First, let's connect to system unit the second device is an SSD solid state drive
For the success of this serious operation, you must be well versed in Disk Management; pay attention to this window on my computer and you will immediately understand what’s what.
Disk 0
Simple hard SATA drive volume 250 GB.
1 . The first hidden section (we will clone) System Reserved, has a capacity of 350 MB. The main purpose of the hidden partition is to store Windows 8.1 download files. If you have Windows 7 installed, then this partition will be 100 MB in size.
2 . The second partition has the letter (C:) (we will clone) Volume 105 GB, Windows 8.1 operating system installed.
3 . The third section under the letter (E:) volume 127 GB, with data files: music, movies, etc., occupied by 100 GB. We can't clone this partition completely, we'll just exclude large files when cloning. Or we can completely exclude this partition from the cloning operation and instead, at the end of the process, an empty partition is formed on the SSD.

Disc 1. Solid state drive SSD, when cloning all information on it will be deleted
Acronis True Image 2015
For cloning, it is better to use the Acronis True Image 2015 boot disk, since this version works without errors with SSD solid-state drives and has UEFI support. It is better not to install Acronis True Image on Windows and work with boot disk this program, this way you will avoid many mistakes.
A bootable USB flash drive with Acronis True Image 2015 can be made in the program itself or using this article of ours .
So, we boot from a disk or flash drive with the Acronis True Image program. Who doesn’t know how to boot from a disk or flash drive, read our article - .
For example, I enter the boot menu of my computer from the motherboard ASUS board Often pressing the Delete key when turning it on, then selecting the “Boot Menu” and in it selecting the drive or flash drive.
In the main window of Acronis True Image 15, select
Tools and Utilities

Disk cloning


With the left mouse, select the Source disk (the disk from which you want to clone the Win 8.1 operating system), in our case a simple hard disk 3 MAXTOR STM 3250310AS and click Next.

Select with the left mouse the Target disk (the disk to which you want to clone the Win 8.1 operating system), in our case a solid-state drive SSD Silicon Power and Beyond

Acronis displays a warning "The selected target hard drive contains partitions on which data can be stored. Click OK to confirm deleting all partitions on the target hard drive." Click OK and Next.

Window Exclude by files and folders.
In this window, Acronis True Image 15 tells us that in order to clone information from the Source disk to the Target disk, we need to exclude 23.72 GB of files on the Source disk. You cannot exclude files from the first section (System Reserved) because it contains Windows 8.1 download files. It is also undesirable to excludefiles from disk with installed Windows 8.1. Disk with installed operating system Windows system 8.1 is assigned the letter (D:), if you click on it with the left mouse, the operating system files will open.


This means we will exclude files from disk (E:).
Attention : Friends, you can simply exclude this entire drive (E:) from cloning, as a result Disk C: will be cloned onto the solid-state drive.(System Reserved) containing download filesoperating systemand another disk (D:) containing Windows files 8.1, but you can choose a more complicated option. Let's open the disk(E:) and select on it unnecessary file or folder. For example, on this disk the virtual hard disk NewVirtualDisk1.vdi has been an eyesore for me for a long time, I haven’t needed it for a long time and its capacity is about 50 GB, let’s exclude it from cloning and mark this virtual disk tick. Program

As you can see, after excluding the file, we still have 30 GB left free space. Click Next

If you click Proceed now, the cloning process will begin exactly as shown in this window.
Before - what is available on solid state drive now all this will be deleted.
After - what will be on the SSD after cloning, that is, two small partitions.
I want to say that I personally do not need this state of affairs. I need a hidden partition on the SSD disk (Reserved by the system) containing the operating system boot files and another disk (D:) containing the files of Windows 8.1 itself

So I'll go back to the window Excluding files and mark the entire disk with a tick
(E:). Acronis True Image 15 starts recalculating the space for cloning.

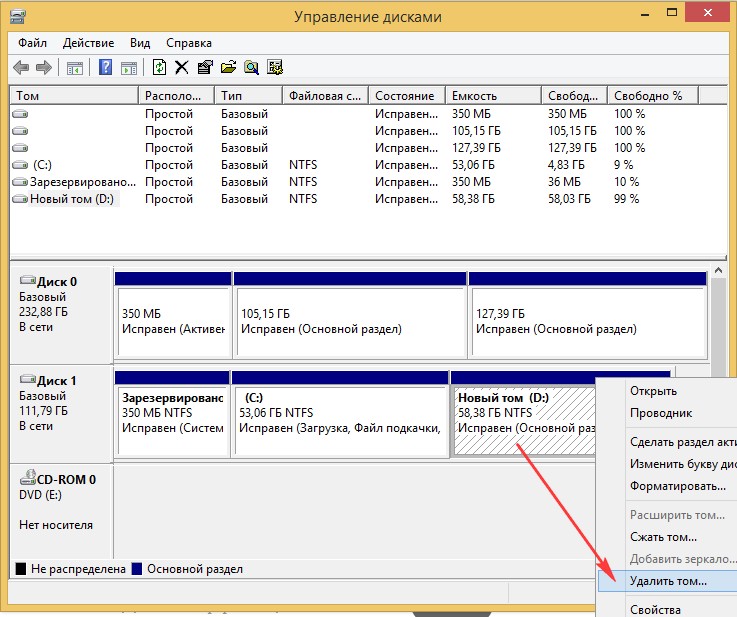
Friends, pay attention to the disk (E:), it will be created early, since this is a drive cloning operation, but the disk (E:) will be completely empty. After cloning, we will simply delete it in Disk Management, and the resulting unallocated space will be attached to the C: drive, that’s all.
Get started. The cloning process begins.


The Disk Cloning operation has completed successfully.

We restart the computer and enter the boot menu, select the SSD solid-state drive to boot and boot from it.

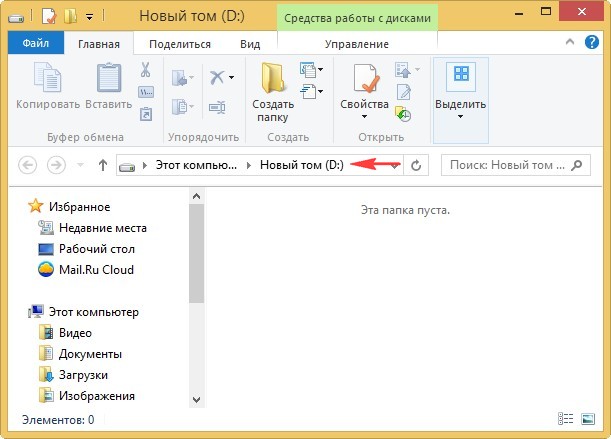
Cloned Windows 8.1 boots perfectly. Activation from Windows did not work. We go to Disk Management and see this picture.
The drive letters have disappeared from partitions on a simple hard drive, but you can simply assign them and that’s it.
As intended during cloning, the SSD has three partitions. The first one contains the operating system boot files. Second drive C: with cloned Windows 8.1. Third disk D: completely empty.

We remove the D: drive and attach the unallocated space to the C: drive.


I would be glad if I could help.
