Error connecting to the Apple ID server - how to fix the failure? What does a server error mean? The server has failed, how to configure it?
Most programs on your computer require many routines and drivers to run, which run a complex system of workflows.
Failure at any stage of execution leads to the fact that the program does not start, about which the user is notified by a special notification.
Such notifications vary depending on the reasons that caused the failure, e.g. this material We'll look at what an error means when running a server application.
Contents:
How does it manifest?
This problem occurs at the stage of opening certain files, but it occurs quite rarely when launching programs.
Moreover, the file format often does not matter - it can be a picture, music or video file.
The prevalence of such problems is quite high and can occur more or less regularly on some computers.
Which one appearance has such an error and how to find out about its occurrence?
When you double-click on a particular file to open or run it, nothing happens.
A few seconds later, a small window with a traditional Windows design appears, in which it is written about problems when running the server application and indicates the address of a file that the computer could not open.
Such a window can be closed by clicking on the cross in the upper right corner, or on the OK button in the window itself - regardless of this, the file will not run.
Sometimes the window appears in the background, at other times some initial startup signs appear on the screen, but after closing the error message they disappear.
This problem can occur simultaneously in several files (of different or the same type), or in one - and this problem will not go away on its own.
Advice! It is extremely rare that restarting a file after such a notification does occur. This is due to the fact that sometimes the system crashes temporarily or makes an error that is mistakenly recognized as a server application failure. But in most cases you can't count on this.
An interesting feature of this error is that although it can occur when opening files of any type, most often it can be observed when starting a video.
And it is precisely those users who do not have any functional video player installed, and who use a standard one, the parameters and capabilities of which leave much to be desired.
What's happening?
What specific processes occur on the computer when a file is launched, and a failure at what stage and of what nature can lead to the appearance of such a notification?
There are several reasons for this problem:
1 Incorrect operation, which cannot play certain types of videos for one reason or another, including those specified in the notice in question;
2 The activity of viruses can lead to the same result, blocking some work processes on your device;
3 A conflict with one or another program installed previously can lead to the following consequences;
From a technical point of view, the appearance of such a notification means that the firmware responsible for launching this file cannot receive a response from the server application, which is also responsible for launching it.

Algorithm for finding the cause
In order to fix a problem in your device, you must first identify it accurately.
This is not so simple, since there can be many reasons, but To find the most probable one, you can follow this algorithm:
- Run a deep or full system scan for viruses– if any virus is detected in the system, then most likely it is the problem. If the problem occurs only when opening one specific file, then the file itself may be infected with a virus;
- Please note if the problem occurred after installing any program. This indicates a conflict between the application and the file. This is especially noticeable if all files of this type no longer open;
- When you are sure that updates and the program have been installed in Lately, and no viruses were found, then Check if there are any updates for your drivers and codecs, designed to open files of this type.
Sometimes the reasons may be unexpected errors and system failures. They are usually one-time in nature and disappear on their own. But if this does not happen, then you can eliminate them using command line.

Algorithm for solving the problem
If the problem occurs when starting a video, while other types of files open normally, and the video format is not one of the most common, then we can say that the problem is in the player operating system.
To update drivers, do the following:
1 Follow the path Control Panel\Hardware and Sound\Device Manager and open this application (you can press the button Start and print "Device Manager"

2 In the window that opens with a list of devices, find the section Video adapters and click on the arrow to the left of this word in order to expand the list of devices responsible for playing video on this PC;

4 In the drop-down menu that expands after such actions, there is an item Update driver– click on it;
5 A request window will open about how exactly you want to search for the necessary notifications - choose automatic search;

6 Wait while the search is in progress;

7 If an update is found, it will be displayed in the window after the search is completed, and you only need to click the button Download or Install, if there are no updates, a notification will appear informing you about this;

8 After the driver installation is complete, restart your computer.
Remember that the automatic search for drivers is performed on the Internet. Therefore, before performing this procedure, make sure that your computer is connected to the network and that the connection created is sufficiently stable.
Command line
If the methods described above did not help, try using the command line:
1 Simultaneously press Win+R;

Now the problem will no longer occur. If such an operation still does not help solve the problem, then open it again and type another command - sfc /scannow and press Enter. Restart your computer again.
Hello! Not long ago my site went dark and the message appeared on the screen - 500 internal server error. As a person already more or less experienced in these matters, I quickly restored everything, immediately found the cause and eliminated it. It is important to always be aware of what you are doing, whether you understand what you are doing, whether you have enough necessary information, etc.
Of course, all this does not come immediately, but with experience and for this you need to constantly learn and practice. And you must understand that the site does not just go down. Before the site goes dark, certain actions occur, you or someone else makes some changes to the site. It is these actions that become decisive. Here is a list of the main and most common reasons causing the 500 error:
500 internal server error
– Have you made any changes to source site, most often this is done out of ignorance and thoughtlessly. Something was accidentally deleted or the wrong thing was added, or part of the code was accidentally hooked.
– Have you added any code to configuration file htaccess which is located on the server. The htaccess file is a very common cause of the 500 error. Any wrong action performed in this file will instantly disable your site.
– You installed a plugin on the site that automatically made changes to the htaccess file. The same thing often happens, there are plugins that add certain code to the htaccess file. On WordPress these are popular plugins – All In One Seo Pack, Jetpack, Akismet, WP Super Cache, Yoast SEO, etc. The error may occur due to incompatibility.
– You installed a plugin on the site and it turned out to be incompatible with your site or with a separate part of it. This often happens on WordPress and the problem is resolved very quickly. You need to go to the hosting panel and just delete installed plugin.
– You installed a theme or template on your site that turns out to be incompatible with your site or with a separate part of it. The incompatibility may be due to an outdated version of your site or the template you are installing. Incompatibility can be caused by anything, since templates are created by different webmasters and using different approaches and styles. Any part of the code can cause conflict and incompatibility.
– The most common reason for a 500 error is when you yourself start messing with the site’s code and tinker with something, add, correct, try to change something, although you absolutely do not understand what you are doing. This is precisely the reason that is the most dangerous, if after this you still don’t remember where you climbed and what you changed.
– Engineering works hosting on a server that you were not warned about. This is also possible, but usually high-quality hosting companies warn their clients about upcoming technical work on the server. But it also happens that the hosting company itself cannot predict such events, since they unfold spontaneously due to server failures or doos attacks. This rarely happens on high-quality hosting.
How to identify a 500 error and quickly fix it
On every server, and first of all this concerns Apache server, since it is the most common, there is an Error log file in which all site errors are recorded. After the site issues a 500 error, this error will immediately be displayed in the error log file and, most importantly, the reason for this error will be indicated. The location of the error will be indicated (file name and path to the file), and the line number in the file in which the error was made will be indicated.
Therefore, first of all, you need to go to your panel on cPanel hosting or any other panel. The path to the error log file basically goes like this: File Manager– Public html –. You need an error log file that is located in the root directory of your site, where all the main files of your site or CMS system are located.
Open this file to edit and change, if the file does not open, then simply download it to your computer by double-clicking on it with the mouse. The file cannot be opened for editing if it has grown in size more than 1 megabyte, in which case you need to download it to your computer and that’s it.
Next, open the error log file on your computer using a notepad in regular txt format. Scroll the page to the very bottom, we are interested in the very last lines, which indicate today's date at that time. The line will indicate the location of the file where the error occurred and the line number in the file.
The screenshot shows a fragment of the error log file from a site using the WordPress CMS. Therefore, it immediately becomes clear that the error occurred due to the site’s theme, which is located at wp-content/themes/theme name/theme file in which the error occurred, on line 423 – the line number in the file where the error, conflict or incompatibility occurs .
Look at which section of your site and in which file the error occurred, so you can understand in which part of the site the error occurred and how to fix it.
– If the error is due to your theme or template, then it is very easy to solve. Open the folder containing all the themes or one theme and reinstall the theme. That is, you delete the theme, and then upload it again, having first downloaded it from the official website. You can only replace one theme file that is causing the error.
– If the plugin name is displayed in the error log file, then everything is very simple, delete the plugin and you're done.
– If the error points to the htaccess file, then in this case, if you do not understand anything in this file, it is better to contact your hosting support service so that this file can be restored to its original values.
– If the problem is not in the plugin, not in the theme or in the htaccess file and you don’t remember and don’t know where you climbed and what you changed, then of course the error log file is unlikely to help you. In this case, there are two options: 1 – contact a specialist, 2 – restore the site using backup copy, if there is one. You may need to replace just one file, the name of which will be indicated in the error log file and everything will be resolved quickly.
Remember! Before making any changes to the site code, if you do not understand what you are doing, MAKE A COMPLETE BACKUP COPY OF YOUR SITE!
Sometimes in Google Play Market there is some kind of glitch due to which the user cannot log into his account, download the application or update it. What is the cause of the server error, and how to fix it; how to prevent? Let's try to understand the main problems and find their solution!
Why there may be a problem with the Play Market
Google Play Market is a voluminous application that integrates almost all programs installed on an Android device. The main function of the Market is the timely updating of these programs. Thus, the user does not need to waste time visiting developer sites to get the “latest” version of their product. You just need to configure automatic update.
 Google Play Market application
Of course, this level of integration requires an account to store data about installed applications. Since the Play Market belongs to Google, the account is linked to it, and accordingly, Google. And if any problems arise with it, then they are transferred to the “Market”, and therefore to installed applications. Conversely, malfunctions in the Market can lead to errors in the entire account. However, don't panic right away. Perhaps in your case everything can be solved “in two clicks”.
What could be the reasons for Google Play Market not working properly? Below is a list of the most common ones.
This list lists problems in order of decreasing likelihood of occurrence. Before we jump straight into solutions, let's look at what types of errors may appear.
Types of errors
 Error Play servers Market
There may be several Play Market errors. Although each is technically different in nature, the reasons are usually similar for all. This article is intended to help solve only those errors that are listed below.
The occurrence of any of the presented errors is the result of failures of the Google account or the entire system. Some of them may appear when installing applications, others when updating them. Whenever they arise, a set of actions must be carried out to solve them. It is impossible to single out a specific method for solving a particular error, since they all appear in different cases and for different reasons.
So, if you receive a message about any of the presented errors, check out the solutions to solve them.
How to fix server errors in the Play Store
As already indicated, the root cause of a particular error is difficult, almost impossible, to identify. Therefore, to solve any problem you need to take several mutually exclusive steps. They are presented below in order of execution.
Checking some parameters
Before you begin the following steps, make sure that:
Despite the ridiculous banality, it is often the restoration of these simple factors that helps restore normal work Play Market. If everything is in order here, go to “Step 1”.
As simple as it may sound, sometimes a simple reboot really helps. The fact is that when you turn off the device, part of the cache is automatically deleted. So, by rebooting your phone or tablet, you can get rid of erroneous files or data.
To reboot, hold down the device unlock key. In the window that appears, select “Restart”. If you don’t have it, click “Turn off power”, and then turn on the device manually by holding down the same key.
 Reboot your device
Reset settings and clear cache files
 Erase residual data and clear the cache
In most cases, these actions are quite sufficient. If they didn't help, move on to the next step.
Uninstalling all Play Market updates
Play Market updates can sometimes bring disruption to the system, especially if you have relatively new model devices. Removing them can help deal with the problem of errors. However, please note that in this case, the settings of the Play Market itself will be reset to their original settings.
To remove updates, go to the Google Play Market application settings, as we did in “Step 2”. Now click the “Uninstall updates” button.
 Uninstalling Play Market updates
Clearing data from Google Play Services
This application is responsible for correct work basic Play Market functions, such as updating or installing programs. Sometimes clearing the cache and contents of “Services...” helps to fix the mentioned errors. To carry out “Step 4”, find “Google Play Services” in the list of programs installed on your device (as we did with the Play Market). Then click “Erase data” and “Clear cache” in sequence.
 Cleaning up Google Play Services
Activating the Download Manager program
The Download Manager application is responsible for the device’s hardware ability to download programs from the network and install them. Sometimes the “Manager...” functions may be disabled. To enable them, do the following:
If the “Download Manager” was indeed disabled, you must enable it, even if this did not help fix the errors. Otherwise, you will not be able to download programs at all.
 Enable the “Download Manager” functions
Deleting your entire Google account
Often errors occur due to problems synchronizing your Google account with the Play Market. To fix this problem, you will have to delete your account.
Deleting your account without first synchronizing will result in the loss of personal data. To avoid this, you must use the data backup function.
Backup is carried out as follows. Go to the “Settings” of the device and find the “Accounts” item. Then select your Google account by clicking on it.
 Find "Accounts" in "Settings"
Click on your name mailbox to enter the synchronization (backup) menu.
 Click on your Google account name
In the menu that opens, you will see several items and sliders next to them. When the slider is on, it means that backup the corresponding data will be executed. We recommend leaving all sliders turned on. Now press the Options hard key on your phone or tablet (usually touch button to the left of the Home button). In the window that appears, click “Synchronize”.
 Click "Sync"
After synchronization is complete, you can delete your Google account with peace of mind. The delete button, as you probably noticed, is located in the same place as the “Synchronize” button.
Reboot your device and sign in to your Google account again (just go to Play Market or Gmail). The device will prompt you to restore your account data from the Google server. Now all applications from the Play Market installed on your device are normalized and synchronized. But if this step did not help you, move on.
Removing incompatible programs
If you have previously installed any programs not from the Play Market, there is a high probability that they are harming your account. It is especially worth highlighting applications for working with the functions of the Market itself. For example, those used for free receipt paid bonuses from games.
Running malicious applications disrupts data synchronization across the entire device and can lead to serious problems. Often such programs are equated to viruses. Therefore, they must be removed immediately. If you did not install them yourself, we recommend using an antivirus, for example, “Dr. Web". Install it and scan and then clean the device.
 Install antivirus "Dr. Web"
Reset Android OS settings
This step is, of course, quite radical. Resetting the OS settings will result in loss of application data and will also restore the phone (tablet) to factory settings. However, quite often this method allows you to get rid of all potential problems. Perhaps even from those you didn’t even know existed. You can also do a factory reset if you don't want to go through the steps above.
Eliminating errors through software intervention
This method can be very effective, however, it requires minimal knowledge of the Android OS, as well as some IT skills.
We do not recommend that you attempt the following unless you are confident in your abilities. Responsibility for implementing the proposed actions will remain with you, because, as a result, the device may completely break down.
So, first, download a file manager for Android devices. A good example in this case is " Root Explorer" After downloading, follow these steps:
 Using "Root Explorer"
Now you just need to restart your device and try to go to the Play Market.
Correct Google work Play Market, in essence, means the normal operation of the entire operating system. Therefore, even if you do not need to download or install applications from the Market in the near future, but any of specified errors occurs, it needs to be corrected urgently. This will help nip potential problems in the bud, and therefore save both your personal data and the device itself.
Android is one of two popular systems mobile gadgets. And although the platform’s support is very good and prompt, there are often cases when malfunctions occur, including in the store Google applications Play Market, where almost all applications for the device are downloaded. “Unable to connect to the server” is one of the most common errors.
Server error in Play Market: causes of the problem
Server connection problem may occur due to incorrect installed update systems or Google Play. This is the most common problem. Also one of possible reasons- problems due to a full application cache.
It is possible that there are no problems with Google Play, but there is simply no connection to the Internet. Check if it's on Mobile Internet or Wi-Fi.
Also, there may be no connection to the server if the date and time on the device is incorrect, for example, after the user removes the battery or completely discharges the device, this data is automatically reset.
It affects the operation of the Play Market and synchronization with the Google account that all Android users have. The problem may have arisen due to the installation or removal of an application downloaded from the store.
The connection problem may occur if you have installed a hacked application or are using cracks for games.
And one last thing. Oddly enough, not all Android devices support the application and web version of the store. This is because some smartphones and tablets simply do not meet the compatibility requirements. You can view the list of models on the Google Play website in the help section.
Clearing cache
A connection to the server cannot be established, although the Internet on the device is stable and the date is set correctly. The first thing you need to do is clear the cache of Play Store and Google Play Services applications.
To do this, go to the system settings in the “Device” item and select “Applications”. Find the Play Market and click sequentially:
We carry out the same actions for the Google Play Services application.
We reboot the device and try to go to the Play Market. If the connection to the server still cannot be established, try the next step.
Disable synchronization
Due to a synchronization error, the app store also cannot connect correctly to the server. To disable it, go to the device settings again, move to the “Accounts” item, select Google.
Disable all synchronization and reboot the device. Log into your account again and turn synchronization back on. An error may appear, but we don’t pay attention to it and try to go to the Play Market.
It is important to turn synchronization back on. Due to its absence, problems with the Market may also occur.
If there is still no connection to the server, proceed to the next step.
Deleting a Google Account
This step may help in some cases, and if games and other applications are not linked to it, you can try using this method to fix the server communication error.
In order to delete an account you need to:
Reinstalling Play Store
If the problem persists, you can reinstall the Play Market. For this:
The application should work.
Important. Since the Market is built into the system and is not supposed to be removed, it is not available on the official Google Play website, so you will have to download it from third-party sources. Use only reliable and safe sites to protect your device. Latest version The play market can be found on the resource w3bsit3-dns.com and similar ones.
What else can you do
If a connection to the service has not been established, despite all the steps taken, you can download applications remotely. Go to the Google Play website from any browser and log in with your account.
The interface is almost no different from the application by selecting the desired program, click install, after a while it will appear on your device. You can access the site from a computer, phone or tablet. The main thing that Accounts in the device on which you want to install the application and on the website matched. That is, if you use several accounts, for remote installation you need to make one active.
And the most radical option is to reset the device to factory settings. But at the same time, all user data will be deleted: downloaded applications, photos, music, contacts, etc., the smartphone or tablet will return to the same state as when purchased.
Video: Play Market - server error, what to do
If there are problems with the Play Store, first restart your device; this helps with most problems. If the error remains, then one of the above methods will definitely help eliminate it. Do not forget to clear the application cache; due to its overcrowding, not only the Play Market, but also the system as a whole cannot work correctly.

Internal server error is an HTTP protocol status class that means that the user's operation/request failed and the server itself is to blame.
More videos on our channel - learn internet marketing with SEMANTICA
![]()
You've run out of food. You need to go to the grocery store. There is a sign on the door - “Accounting”. You are without food.
The user wants to visit the site. A request is sent to the server. And if there are any problems on the server, then the person will see an error message in the browser window.
What are the server errors?
As we've learned, internal server errors constitute a class of HTTP statuses.
- . Indicates a wide range of server errors, if they do not belong to the following problems of the class in question.
- 501. Means that the server does not have the necessary capabilities to process the user request. Typically, a 501 error appears when the server cannot recognize the request method. If the server recognizes the request method, but it cannot be used on this Internet the resource displays error 405 (it was due to the user’s fault).
- . Occurs when the server acts as a proxy or gateway. The error indicates that the upstream server is sending an invalid response.
- . Displayed when the site is unable to process user requests. This may be due to overload, maintenance problems, technical problems, and so on. Most often, when a 503 error is displayed, the Retry-After field indicates the time when the user needs to repeat the request.
- 504. Here again the server acts as a gateway or proxy server. It forwards the request to the upstream server, but does not wait for a response, and therefore cannot complete processing of the request.
- 505. Indicates that the request version is not supported by the server.
- 506. This means that the current version of the server has an incorrect configuration. In this regard, the binding process does not reach completion and is interrupted all the time.
- 507. There is no space on the server to complete the request and process it. Problems of this kind may be temporary and easily fixed.
- 509. If an Internet resource has spent all the traffic that was allocated to it, this error occurs. To resolve the problem, you need to contact your hosting provider.
- 510. This error can be encountered in cases where the client makes a request and wants to use a certain extension, but the server does not use and cannot provide this extension.
- 511. This error does not come from the server itself, which the user is accessing, but from an intermediary, which can be a provider. Typically, the problem occurs when the client needs to log in to global network(specify the password for the paid access point). In this case, a special field for authorization is displayed in the response form.
- 520. Indicates that there is an error, but the CDN server cannot correctly process the error and display it to the client.
- 521. Occurs in situations where the server rejects the content delivery network connection.
- 522. Displayed when the data communication system cannot connect to the server and is timed out waiting for a server response.
- 523. The server cannot be “reached”; when accessing the server, serious obstacles arise, overcoming which is difficult. this moment is not possible.
- 524. Connection timed out required server and a content delivery network server.
- 525 If errors occur during the handshake between the server itself and the CDN server, code 525 is displayed.
- 526. Indicates that there is currently no way to validate the encryption certificate.
What to do if they write “Server error”
The listed errors usually arise due to the .htaccess file, themes and plugins. Let's consider options for solving the problem.
So you liked it new topic design and you installed it. Everything would be fine, but then an internal server problem arises. To restore the server's functionality, select one of the following methods:
Via FTP
We go into it and look for a folder with themes. Open the folder and correct/delete the theme that is currently posted on the site. We go to the site and see a blank page without errors.
Open the WordPress admin panel, then the theme, and receive a notification that another theme has been activated. A little advice: do not delete standard themes, they serve as a standard and can be activated after the site is restored.

Via PhpMyAdmin
If you have deleted/edited the standard theme, you need to download and install it again. This can be done from the following resources: TwentyTen, TwentyEleven, TwentyTwelve. After downloading, open PhpMyAdmin, then the database.
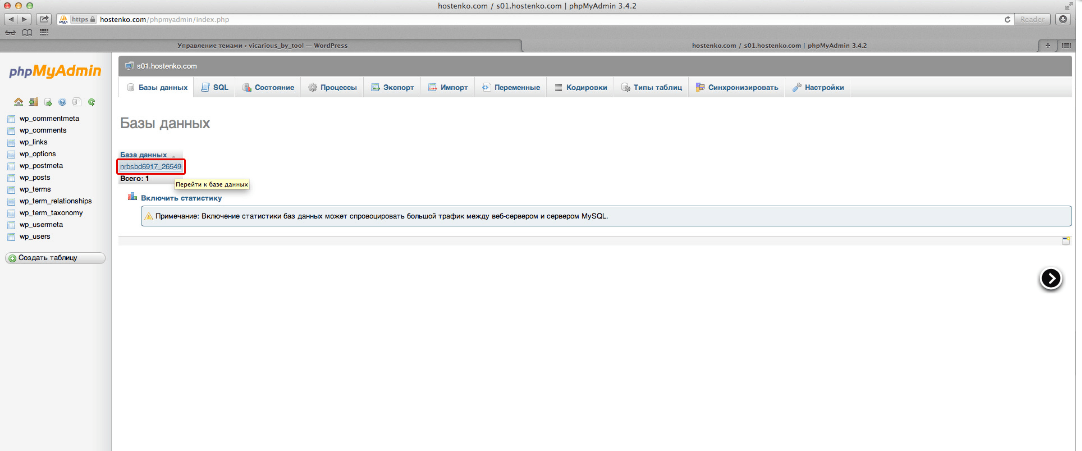
Go to the SQL tab and copy the code below into it.
Please note that the topic name must be specified correctly. Then the site will work as usual.
If the problem is with plugins, the server does not work correctly and the site is displayed differently. At the same time, access to the console is preserved, which allows you to disable this or that plugin. Sometimes an installed plugin may conflict with other plugins that are already installed and activated on the resource. Then it crashes and generates an internal error. You can disable the plugin in 3 steps:
- Open the FTP resource.
- Open the folder with existing plugins.
- Delete/change the name/edit the plugin.
If the errors are problems with the .htaccess file, you need to do the following:
1. Open FileZilla, “Server” menu and check the box next to “Display hidden files forcibly." We update the list of files and find our .htaccess file.

2. Open the file through notepad/text editor. A text is displayed in front of you - a list of instructions and rules for the functioning of the web server. Review the file and correct any errors. Alternative option- delete the file completely and then write with using WordPress new file (open the admin panel, then Options, then Permalinks. Select the right option, click "Save").

If the above measures do not give the desired result, you must contact a qualified programmer.
As you can see, the list of errors is quite wide. If identified, they must be eliminated as early as possible.
