Installing apache mysql and php server on windows 7. Installing Apache on Windows
There are quite a lot of articles on the Internet where the authors give detailed instructions with screenshots, thanks to which not a single user was able to install the Apache server for PHP and DBMS MySql. But most of them leave the user with many questions to which he cannot find an answer for a long time. Let's look at what Apache, MySql, PHP are, what they are needed for and how to install these products.
A little theory
Apache is a free http server named after the North American tribe of Apache Indians. It is widely used on all platforms, including Windows, and has become a de facto standard in the development of web applications and services. In addition to it, we will need to install the MySql DBMS, which is also a standard in its field, and one of the most common and universal scripting languages - PHP.
Apache (as users call it) differs from other servers in that all applications and services are guaranteed to run on it, without requiring the user to perform additional settings. Compared to its analogues, Apache is not characterized by high performance and low consumption of computer resources, but any application is guaranteed to function on its basis. Here you can also add ease of setup, work on virtually everything modern platforms and excellent documentation.
Now let's look at how to install Apache on a computer running Windows control 7 (in later editions the process is almost identical), so that the server is installed on a real hosting.
Installation Apache
- We go to the official Apache support resource and download its latest edition.
In fact, there is practically no difference between the versions of the product for the developer, unless the old Apaches are supported by the latest versions of the PHP scripting language.
- Run the downloaded installation file.
- We fill out the first two fields as in the screenshot: enter “localhost” in both lines.

- We set absolutely any mailbox.
- the first is responsible for installing the product as a Windows service, which will use port number 80;
- the second will connect the server to port number 8080, after which you will have to automatically start it every time.
Product developers recommend choosing the first option, so let’s look at it a little lower. When installing Apache, pay attention to the path where its files are stored. It is best to install in the “public” directory, located in the “users” folder on the system partition of your hard drive.
After closing the installation wizard, make sure Apache is running. To do this, go down to the tray and check for the presence of the icon shown below.

If it doesn't work, run it command line. This is done by entering “cmd” into the text form of the command interpreter (Win + R).

On the command line we write “net start Apache2.2” to start the server.
This entry is valid only for product version 2.2; in other versions the numbers will be corresponding.
The server is stopped by typing a command with the following parameters: “net stop Apache2.2”.

Let's look at a few more methods for starting, shutting down, and rebooting Apache. For regular work, using the command line to manage the server is ineffective - it will take a lot of time. The way out of the situation is to use the context menu of the tray icon: right-click on it and select what action needs to be performed.

The same is done by managing the service of the same name through the appropriate utility that provides access to Windows services, or the Services snap-in. It starts through search bar or “Administration” in the “Control Panel”.
Setting up Apache
When choosing the first server installation method, you can specify the method for starting it. At regular use and if you have free resources on your PC, use Apache autostart. Otherwise, select to start it manually through the service context menu.

After manually or automatically starting the server, open a convenient browser and go to the address: //localhost. will appear empty page with the same address.

To get started, do the following.
- We go to the “htdocs” directory, located in the folder with the software product files.
- We delete the html file from it and create a directory with the name of the site (mysite).
- You can go to the future site by entering //localhost/mysite.
- Go to the “conf” folder and open the “httpd.conf” file in a text editor (preferably with syntax support).
- Go to line number 227 and replace “none” with “all”. The resulting value should be “AllowOverride All”.
Doing this will allow the "htaccess" document to be used. It is an advanced Apache configuration file.
- We look for the line with the text “#LoadModule rewrite_module modules/mod_rewrite.so” and remove the “#” symbol.
This action activates the module responsible for the creation and operation of CNC links.
- We save the changes made and be sure to restart Apache.
Installing PHP
- We go to the PHP download page and download the latest stable version of the scripting language.
Attention! You will have to download not an executable file in msi or exe format, but a biz archive.

- We create a directory and decompress the archive into it using 7zip or Winrar.
- Open “httpd.conf” if you closed it and add next text In the end:
"LoadModule php5_module "C:\Users\Public\php\php7Apache2_2.dll"
AddType application/x-httpd-php .php"
The numbers in the first line and the address will change depending on the versions of the products used and the directory paths and PHP.
- Again, save the changes and restart Apache.
When an information dialog box appears indicating an error during the operation, restart Windows.

All PHP configuration parameters, when installed, are stored in the "php.ini" file. Instead, there are documents whose name begins with “php.ini”.
- Rename any one to “php.ini” to create a configuration file.
- Then copy this document to the Windows directory, for example, “C:\Windows”.
- We restart the server through the context menu of its icon.
This completes the installation and configuration of PHP. All that remains is to check the functionality of the server. Go to “htdocs” and create a file in the folder with any name (preferably Latin) and php extension(for example file.php). We open it with text editor and enter the following piece of code:
Now open or maximize the browser window and enter the path to the created file in the address bar. In our case it is: //localhost/mysite/file.php
If everything went well and without errors, you will see a similar image.

Pay attention to the line “Loaded configuration file”. The path to the “php.ini” configuration file should be specified there.
This completes the installation of Apache with PHP on a Windows computer. If you need to install any CMS, the DBMS is installed.
DBMS installation
- Download the current version of MySql for your version and bitness of Windows.

- After clicking on the “Download” button, click on the link highlighted in the screenshot to download MySql without registration.

- We launch the installer, the functioning of which will require the .NET Framework library version 4.5.
- We accept the terms using MySql on Windows.
- Move the switch to the “Server only” position.

- Click on the “Execute” button to start the MySql installation after checking the requirements.

- We set a password for MySql, which will be used to provide access to the database.

- Click “Next”.
The server installation with scripting language and MySql is complete. All that remains is to connect the last two components so that they can interact.
To do this, open the already known configuration file “php.ini” and delete the “;” symbol. in lines with the following data:
extension=php_mysql.dll
extension=php_mysqli.dll.
Find the text “; extension_dir = “ext”” and replace it with the following “extension_dir = “C:\Users\Public\php\ext””, where after the “equals” sign we set the path to the directory with PHP.
We continue to build a local server on our local machine. In this article we will get acquainted with the installation of the local server component on Windows platform 7, Apache web server.
Note that for manual installation the later version of Apache 2.4.18 works.
 Apache version 2.4.18
 Before running the installer, decide on the location of the local server. Local server with him components placed on system disk your computer. Moreover:
- Install Apache in the directory: .
- Install PHP in the directory: [C:\php]
- MySQL default:
I described how to install the MySQL server as a Windows service in the article: . I will write how to install the PHP interpreter in the article: Installing PHP.
1. Launch the Apache MSI installer. installing Apache MSI first window 2. Get acquainted and agree with the Apache license

- Server Domian: localhost;
- Server Name: localhost;
- Admin email: any.

Important: For all users, specify port 80.
5. On this page switch to


In the system tray we get and see the Apache button.

How to check if Apache is running on your computer
Checking the operation of the Apache server. To do this in address bar write the address: http://localhost and we see the inscription “It work!”, which means “It works.”

How to turn off Apache on your computer
Apache is not always needed and there is no point in keeping it open. To turn it off, go to the tray and on the right button of the Apache icon, we see three control buttons:
- Apache monitoring;
- OpenServers;
- Exit.
The last one, of which it turns off.

That's all! Apache MSI installation is complete. Remember the Apache installation folder, this will be needed when setting up a local server.
Dictionary of the article:
- Distribution– a form of distribution of programs and software.
- Release— software version.
This article - step-by-step instruction on creating a local web server. It describes the installation of the Apache 2.4 web server on the Windows OS platform. The installation was tested on Windows XP SP3.
Web server composition: 
- Apache 2.4 (version 2.4.10);
- PHP 5.4 (version 5.4.34);
- MySQL 5.5 (version 5.5.23).
This workspace will suit:
- experienced webmasters to test their projects;
- for beginning webmasters to create their first websites.
Apache 2.4 and PHP 5.4 distributions are compiled in VC9 (Visual Studio 2008).
Apache 2.4 VC9 version works with almost all current Windows versions(7/8/Vista/XP SP3).
For VC9 applications to work, you first need to update the Visual C++ libraries.
Installing the Visual C++ library update package
Download the vcredist_x86.exe update distribution from the Microsoft website, run the file and perform the update.

Installing and configuring Apache 2.4 server

The Apache distribution does not have an installation file. Therefore, the installation will be done manually.
Create a folder and unpack the archive httpd-2.4.10-win32-VC9.zip.
In the configuration file httpd. conf default routes are C:\Apache24. Therefore, there will be much fewer edits in the configuration file if you unpack the archive into this folder.
We will unpack the distribution into the C:\TestServer folder.
We make changes to the configuration file C:\TestServer\Apache24\conf\httpd. conf. When writing paths, instead of the "\" (backslash) character, use the "/" (forward slash) character. This is how paths are written in operating rooms Linux systems and Unix. But Apache was originally developed specifically for these operating systems.
We perform a group replacement of the text C:/ Apache24 with C:/ TestServer / Apache24.
Set the value of the ServerName parameter. 
ServerName localhost:80
Set the value of the ServerAdmin parameter (administrator's e-mail).
ServerAdmin [email protected]
Set the value of the DocumentRoot parameter (location of site documents).
DocumentRoot C:/TestServer/Apache24/htdocs
You may want to store site documents separately from the server. For example, in the C:\MySites folder. Then this parameter can be changed.
DocumentRoot C:/ MySites
Executable Apache files are located in the C:\TestServer\Apache24\bin folder. Add this value to the Windows PATH environment variable.
PATH = C:\TestServer\Apache24\bin ;
Install Apache as a service.
httpd.exe -k install
 If enabled Windows firewall, then when installing the service a message will appear indicating that the program is blocked from external connections. For the service to work, you must give permission to unlock.
Let's start the Apache server.
httpd.exe -k start
We check the performance of the server. In the browser command line, type the address: http://localhost. If the Apache installation was successful, the text It works! . Otherwise we will see a blank screen.

If the server does not start, you should check whether port 80, which Apache uses by default, is busy.
This is done using the command
netstat –anb
Most often this port is used by Skype or Firefox. In this case, you should either release the port or move Apache to port 8080.
To do this, in the httpd file. conf we change the values of the ServerName and Listen parameters. ServerName localhost:8080
Listen 8080
After this, restart the service with the command
httpd.exe -k re start
and again we try to go to http://localhost
For ease of working with the Apache server, you can install it in the startup menu Windows shortcut, indicating C:\TestServer\Apache24\bin\ ApacheMonitor.exe
Installing PHP 5.4
 We go to the developer’s website http://windows.php.net/download/. Find the PHP 5.4 distribution in the VC9 x86 Thread Safe section and download the php-5.4.34-Win32-VC9-x86.zip archive.
Create a folder on local computer, let it be C:\TestServer\PHP54, and unpack the archive.
We return to the site with the Apache distribution kit. In the Additional + VC9 section we find the archive php5apache2_4.dll-php-5.4-win32.zip with Apache PHP modules and download it.
In the archive we find the folder with the latest version of the php5apache2_4.dll module and place it in the C:\TestServer\PHP54 folder.
In the httpd configuration file. conf add the lines:
LoadModule php 5_ module « C :/ TestServer / PHP 54/ php 5 apache 2_4. dll"
AddHandler application / x - httpd - php . php
# configure the path to php . ini
PHPIniDir "C:/TestServer/PHP 54/php"
In folder C:\TestServer\Apache54\htdocs create a file test.php.
echo "Hello Apache!";
?>
Restart Apache.
In the address bar of the browser we type http://localhost/test.php. If the text Hello Apache! , then the PHP installation completed successfully.
Setting up php.ini
To work with the MySQL database, we need to configure php. ini – PHP configuration file.

In the C:\TestServer\PHP54 folder there are two templates: development and php.ini-production.
Rename the php.ini-production template to .
Libraries for working with the MySQL database are located in the folder C:\TestServer\PHP 54\ext. This path must be specified in the extension_dir directive of the php.ini configuration file.
We find this parameter, remove the comment character at the beginning of the line (this is a semicolon) and write the path.
extension_dir = "C:/TestServer/PHP 54/ext"
There are two libraries for working with the MySQL database in PHP: php_mysqli. dll is newer and is recommended to be used in work; php_mysql. dll is old, but most sites use it.
It is better to include both libraries in the php.ini file.
extension = php_mysql. dll
extension = php_mysqli. dll
After completing the edits, be sure to restart the Apache server.
Installing and configuring MySQL
![]() Go to the page http://www.mysql.ru/download/. Select the version for Win32 or Win64. We will be downloading the mysql-5.5.23-win32.msi installation package.
Go to the page http://www.mysql.ru/download/. Select the version for Win32 or Win64. We will be downloading the mysql-5.5.23-win32.msi installation package.
Run the file mysql-5.5.23-win32.msi.
We agree to license terms, select the installation type Typical.
Let's move on to setting up the MySQL server.
Select Detailed Configuration – detailed configuration settings.

Select the server type with minimum requirements to memory – Developer Machine.
Now we need to decide which databases (InnoDB, MyISAM) our server will work with.

Multifunctional Database – InnoDB and MyISAM are supported.
Transactional Database Only - InnoDB supported.
Non-Transactional database Only- myISAM is supported.
When choosing InnoDB support, the next step is choosing where to store the InnoDB tables.
For the maximum number of simultaneous connections, it is better to select Manual Setting and accept the default value (15).

At this step, the Enable TCP/IP Networking parameter enables support for TCP connections and selects the port through which these connections will be made. The Enable Strict Mode parameter is also set – the mode of strict compliance with the MySQL standard.
Now you need to select the default encoding. The best option- UTF-8 encoding. Therefore we choose Best Support For Multilingualism.
In order for MySQL to run as a Windows service, install Install as Windows Service. If you need to autostart this service, install Launch the MySQL Server automatically.

Now set the administrator password and turn off the Modify Security Settings option.
After clicking the Next and Execute buttons, the MySQL installation can be considered complete.
To check the functionality of MySQL, click the Windows Start button, find the utility for working with MySQL (MySql Server 5.5 MySQL Server Command Line) and run it.
After entering the administrator password, we are taken to the MySQL command line.
Enter the command
show databases;

If we see a list of databases, this will mean that the server is working correctly.
Exit command line mode:
exit;
This completes the server installation. Good luck!
This description is suitable for any edition of Windows 7/8/8.1.
Installing Apache Web Server
First of all, download the Apache distribution from the site: http://www.apachelounge.com/download/. In the list of distributions Apache 2.4 binaries VC11, we need to download "httpd-2.4.7-win64-VC11.zip".
After downloading, open the archive httpd-2.4.7-win64-VC11.zip
Extract the Apache24 folder from it to the C:\ drive partition

Now we need to tweak the config a little before installing Apache. Open the httpd.conf file (located here: C:\Apache24\conf), preferably through a convenient editor, such as notepad++. Find the line (217) ServerName www.example.com:80 and change it to ServerName localhost:80


Here we need to specify the full path to the httpd.exe file, which is located in the Apache folder. In our case, this is C:\Apache24\bin\httpd.exe. Type the command C:\Apache24\bin\httpd.exe -k install and press Enter.

If when running the program you get the following error: failed to open the winnt service manager perhaps you forgot to log in as administrator, go to the following folder: C:\Users\Your_user_name here\AppData\Roaming\Microsoft\Windows\Start Menu\Programs \System Tools, run the command line as administrator

And repeat the installation command.
Installation completed. Open the bin directory (full path: C:\Apache24\bin\) and run the file: ApacheMonitor.exe. The Apache icon will appear in the system tray, with which you can quickly start/stop the Apache service, click start:

Now let's check the functionality. Open the browser and write http://localhost/ in the address bar (you can just localhost). If the installation was successful, a page should open that says It works!

PHP installation (manual)
Do we need Apache without PHP? Of course not, this is nonsense! Therefore, next we will look at manual (without using an installer) installation of PHP.
Download PHP (Zip archive) from the site: http://windows.php.net/download/. We need version: VC11 x64 Thread Safe.
We unpack the contents of the archive into the C:\PHP directory (we create the PHP folder ourselves). Next, in the C:\PHP folder we find two files php.ini-development and php.ini-production. These files contain basic settings. The first file is optimized for developers, the second for production systems. The main difference is in the settings: for developers, error display is allowed, while for production systems, error display is prohibited for security reasons.
Let's do a few things before we continue with the PHP installation. Open Control Panel → Appearance and Personalization → Folder Options → View tab, find the line “Hide extensions for known file types”, and if there is a checkmark there, uncheck it and click “Apply”.

We continue with the installation. And so, select the file you need (I chose php.ini-development). The selected file will just need to be renamed a little. Right click on the file → Rename → erase “-development”, leaving only php.ini
Now open php.ini, we need to make a few changes (be careful when making changes, if there is a semicolon at the beginning of the line, it will need to be removed):
- Find the extension_dir option (line 721) and change the ext folder path to match the path PHP installations. For me it looks like this:
extension_dir = "C:\PHP\ext" - Find the upload_tmp_dir option (line 791). Here you need to specify the path to the temporary folder. I chose c:\windows\temp. Together:
upload_tmp_dir = "C:\Windows\Temp" - Find the session.save_path option (line 1369). Here you also need to specify the path to the temporary folder:
session.save_path = "C:\Windows\Temp" - In the Dynamic Extensions section, you need to uncomment several lines (remove the semicolon at the beginning) corresponding to the PHP modules that may be needed for work: 866, 873, 874, 876, 886, 895, 900
Save the changes and close.
Now let's go back to Apache settings. We will have to edit the Apache config a little. Go to the C:\Apache24\conf folder and open the httpd.conf file.
Go to the end of the file and add the following lines at the very bottom:
# Charset AddDefaultCharset utf-8 # PHP LoadModule php5_module "C:/PHP/php5apache2_4.dll" PHPIniDir "C:/PHP" AddType application/x-httpd-php .php
Specify the path to the php folder that you selected during the installation process (if you installed in a different directory).
In the same file we find the following lines (lines approximately 274-276):
Before index.html we add index.php separated by a space. The result is:
For the changes to take effect, restart the Apache service (the tray icon is Apache monitor). If the service restarts, that's a good sign. If not (an error will pop up), look for errors in the configuration files. Check all paths especially carefully.
To make sure PHP is working, open the C:\Apache24\htdocs folder (this contains the default website files). Create a file index.php in this folder with the following content:
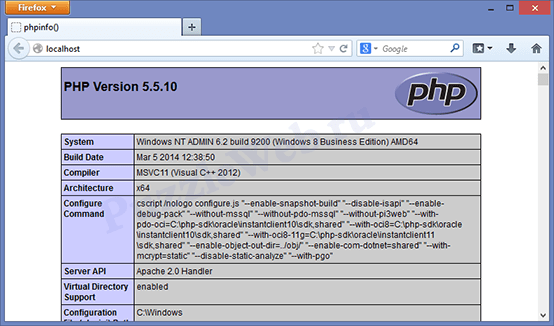
Now open http://localhost/ (or just localhost) in your browser. If everything went well, you will see a page similar to this:
If instead of a page with information about php, you see a page with the inscription “It works!”, then just click refresh page.
Installing MySQL
Open the distribution download page: http://dev.mysql.com/downloads/installer/5.6.html and download Windows (x86, 32-bit), MSI Installer 5.6.16 250.8M. After clicking on the Download button, you will see a registration form, you can skip it by clicking on the link below (“No thanks, just start my download!”).
We launch the installer, after a short download we see the following window:

Click Install MySQL Products, the following window appears in which we accept license agreement(check the box) and click Next >

The next window asks us to check if there are more a new version MySQL, check the Skip... (skip) box and click Next >

In the next window we are asked to select the installation type, select Custom and click Next >:

In the next window we are given the opportunity to select the necessary components: uncheck MySQL Connectors, in Application uncheck MySQL Workbench CE 6.0.8 and MySQL Notifier 1.1.5, in MySQL Server 5.6.16 uncheck the Development Components and Client C API library (shared) and click Next >


The next window tells us what exactly will be installed, just click Execute

After successful installation, click Next >

The next window informs us that next we will configure our server a little, click Next >

In the first settings window, check the Show Advanced Options box, leave the rest as is and click Next >

In the next window we are asked to set an administrator (root) password. It's better not to lose this password! Set a password and click Next >

In the next window, erase the number 56 in the input field, leave the rest as is and click Next >

Click Next >

Click Next >


All that remains is to check whether the installation was successful. (win 8): Go to the start menu → go to applications (down arrow) → find MySQL5.6 Command Line Client (a terminal for working with MySQL on the command line) → open it. Next, enter the administrator password (root). If the password is correct, you will be taken to the command prompt (mysql>). Enter the command: show databases; (a semicolon at the end is required). As a result, you should see a list of databases (at least two - information_schema and mysql). This means the server is working correctly. Close the command line by executing the exit command.
Add the line to the file C:\Windows\System32\drivers\etc\hosts: 127.0.0.1 localhost. In the same file, delete or comment out (put a # sign at the beginning of the line) the line::1 localhost (if it was initially commented out, then you do not need to do anything with it).
Installation and basic setup of phpMyAdmin
Open the download page http://www.phpmyadmin.net/home_page/downloads.php and select to download the archive ending in *all-languages.7z or *all-languages.zip (at the time of writing latest version was phpMyAdmin 4.1.9). Create a phpmyadmin folder in C:\Apache24\htdocs and extract the downloaded archive files there.
Let's check how it works. Open the browser and go to the address http://localhost/phpmyadmin/. The following window should open:

Now we need to create a configuration file for MySQL. Go to the phpmyadmin folder and create a config folder there. Open the following address in the browser: http://localhost/phpmyadmin/setup/

Now, to configure the connection parameters to MySQL, click on the button “ New server", a new window opens for us; in the "Server Host" column, localhost must be replaced with 127.0.0.1:

We save the settings (click Apply) and we will be automatically returned to the previous page. Select the default language - Russian, default server - 127.0.0.1, end of line - Windows. At the bottom, click Save and then Download.

We save the resulting file (config.inc.php) to the root of the phpMyAdmin installation (C:\Apache24\htdocs\phpmyadmin). We close the page, we won't need it anymore.
That's all. We return to the page http://localhost/phpmyadmin/. Now you can log in to the system as the root user (enter the password you specified when setting up MySQL for the root user). Testing connection to MySQL. If everything went well (you were able to log into phpMyAdmin), delete the config folder from the phpmyadmin folder.
The Apache web server is quite popular. This is free and open source software source code. It is usually installed on computers with an operating system UNIX system families, but it is possible to install on operating system Windows family.
I found Apache version 2.4.25, and installed it on windows 7 x64 httpd-2.4.25-win64-VC11.zip. There is a 32-bit version and a 64-bit version. On Windows 7 x64 you can install both versions; on 32-bit Windows 7 only the 32-bit version will work. So choose according to your capabilities. I will also note that executable files compiled in Microsoft Visual Studio 2012, they require installation of the Visual C++ Redistributable Package for them to work. You can download it from the Microsoft website vcredist_x64.exe. And choose a package of the appropriate bit size
Let's start the installation. If not installed Microsoft package, then install. It's not difficult, everything is done automatically. Then from zip archive extract the Apache24 folder and move it to “C:\Program Files”. If you have Windows x64 and the server is x86, then go to the folder "C:\Program Files (x86)".
I saw advice on the Internet that you need to create a folder in the root of the C: drive and unpack the contents of the archive into it, but I have a different opinion. For programs there is a folder "C:\Program Files". For those who object that the configuration files are deeply buried and you will need administrator rights to edit them, I answer: there is no problem. Create a shortcut for notepad ("C:\Windows\notepad.exe"), in the properties of the shortcut after the notepad path add in double quotes full path to the configuration file ("C:\Program Files\Apache24\conf\httpd.conf"), and in the additional properties check the box "run as administrator". Place the shortcut in a location convenient for you, and when you click it, a notepad with administrator rights will be launched and it will open the server configuration file. Once you open it, you need to adjust it a little.
After editing httpd.conf you need to create batch file, write into it
"C:\Program Files\Apache24\bin\httpd.exe" -k install and run it as administrator. This command is for the server to register itself as a windows service, which will automatically start when the system starts. You can also place a small assistant program “C:\Program Files\Apache24\bin\ApacheMonitor.exe” into startup. It is located in the tray, shows the status of the service, and allows you to start, stop, restart the Apache service. You need to restart the apache service after each edit configuration files for the changes to take effect.
If the batch file is completed successfully and the apache service is running, then you can type http://127.0.0.1 or http://localhost in the browser, the browser will open the file “C:\Program Files\Apache24\htdocs\index.html”, in which single line " It works!"If the browser was able to display this, then the server is running.
Of course, the default location for HTML documents that will be processed by the web server is not very convenient, but that doesn’t matter. The fact is that apache can contain many virtual hosts, each of which can be individually configured. Denver's supporters take credit for Denver's ability to host several different sites, but that is due to the apahce server that is built into Denver. We have a full-fledged server that works like windows service. And now it’s time to start creating
