Why did the computer stop connecting to Wi-Fi. We solve the problem when the laptop sees Wi-Fi, but does not connect. What to do if the laptop does not see the Wi-Fi network
A very common situation: a user tries to connect to Wi-Fi from his phone, but nothing works. After reading the information below, you will learn why this is happening and how to solve the problem.
Initial phone check
Manufacturers are actively working to improve the stability of mobile operating systems, but from time to time any program crashes. That is why it is recommended to start solving the problem by checking the functionality of the phone. For Android, iOS and Windows Phone (Windows Mobile) the recommendations in this case are identical. Follow the sequence below.1. Restart your device and try connecting to Wi-Fi again.
2. Evaluate the number of connection signal strength indicators. If there are less than 3, try moving closer to the router or other wireless Internet source you are using to improve the quality of the connection.
3. Make sure Battery Saver mode is turned off. If necessary, connect the network adapter.
4. Turn off Bluetooth. Wireless connections may operate in the same range, which causes interference.
5. Turn off Airplane mode, if active.
6. Try to activate access to information about your location and connect to Wi-Fi - the legislation of some countries blocks connections via wireless networks when this option is inactive.
If the WiFi connection worked previously
If you have successfully used the currently problematic network in the past, delete the connection from your phone's memory. To do this, go to the list of networks, click on the problematic connection for a few seconds (until the context menu appears) and delete the connection.If all else fails, try connecting from your phone to any other available connection. Failure in this case will most likely indicate a breakdown of the radio module - only service center employees will help correct the situation.
Check if the connection is working. To do this, try connecting to it using any other device that has Wi-Fi functionality. If the connection does not work, change the router settings.
Important note! The procedure for entering the router settings varies depending on the manufacturer and model of the equipment. In most cases, to gain access you need to enter the address 192.168.0.0 or 192.168.0.1 into the address bar of your browser. The standard login and password are admin. If this doesn’t work, check the manufacturer’s instructions for the information relevant to your router.
First, try simply rebooting the router - quite often they freeze, which is why access to the Internet is blocked.
The further procedure is as follows.
First, you must ensure that the security key you entered is correct. Try entering the password to connect to the selected access point again, but more carefully, with the “Display symbols” (show password) option activated.
If you don't remember the password, check it in the router settings.
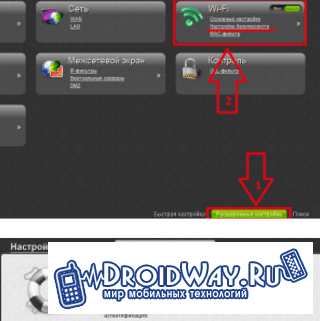
As an example, the procedure for interacting with a D-Link router is shown. In your case, everything will be almost the same; minor changes may only affect the interface, menu item names and other little things.
Once on the router settings page, do the following:
click the “Advanced settings” button;
in the Wi-Fi window, open the “Security Settings” link;
in the “PSK encryption key” line, look at the password and make sure that this is the combination you enter when trying to connect to Wi-Fi from your phone.
Secondly, make sure your router settings are correct - you need to check if DHCP technology is enabled. If it is turned off, the phone will not be able to obtain an IP address, which is why the connection will not work.
On the router settings page, click “Advanced settings” again and in the “Network” window, find the “LAN” category.
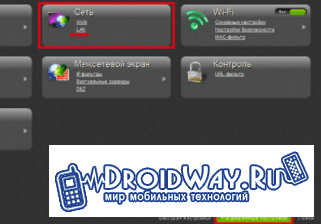
Enable DHCP if the function is disabled by changing the “Mode” line to the “Allow” state.

Save the changes, restart the router and try connecting to Wi-Fi from your phone.
If this does not help, there are 3 options left:
call the provider’s support service and find out whether the Internet works at all and whether any changes have been made to the connection settings;
submit your phone for repair;
have your Internet router repaired/replaced.
If our instructions did not help solve the problem, then write in the comments and we will definitely look into your problem.
This article will talk about typical problems when connecting your phone to a wireless Wi-Fi network, the most common of which are Android stuck at “obtaining an IP address” or an authentication error when connecting. Less common, but it occurs when your Android phone or iPhone simply does not see the Wi-Fi network.
The step-by-step instructions will discuss the following problem options in order and what to do in each case.
- Authentication error (or phone says Saved WPA/WPA2)
- Endlessly obtaining an IP address on Android
- The phone does not see the Wi-Fi network
Wi-Fi authentication error on Android
If your Android phone or tablet reports “authentication error” when connecting to Wi-Fi, or writes “Authentication” for a while, and then still does not connect to the wireless network (when Android writes Saved WPA/WPA2 - this is usually the same situation) , then in most cases the problem is the Wi-Fi password, and the problem can occur even when you enter it correctly (but, of course, this is what you should check first, the article can help with this, you can also just look into router settings).
But it’s not always a matter of incorrect input: it happens that you are guaranteed to enter the password correctly, but an authentication error still occurs.
The first thing you should try here:
- Delete the Wi-Fi network (forget it) in the phone settings, try connecting to it again by entering the password.
- Reboot the router (unplug it and plug it back in).
If none of this helps, go to the router settings (any of the instructions for setting up a router on this site will help with this, they all start with how to go into the router settings), and then into the Wi-Fi network settings and try the following ( after each change, save the settings, delete the previously saved network on the phone and try to connect again):
If even these points do not help, make sure once again that in the Wi-Fi network security settings in the router settings, WPA/WPA2 (Personal) authentication is set, and not some other type (this option should be supported on any Android phone). It also sometimes helps to change the network operating mode from b/g/n or auto to 802.11 n only or 802.11 b/g.
Android constantly writes Obtaining an IP address and does not connect to Wi-Fi
The second most common problem with connecting a phone (specifically Android) is endless attempts to connect with the text “Obtaining an IP address.”
What could be causing the situation:
- The DHCP server is disabled in the router settings.
- Just an Android glitch.
If you don’t know exactly about the first point, then first just reboot the router, perhaps this will solve the problem. If this does not help, then the following steps:
- Check if DHCP is enabled on the router; if not, enable it.
- If it is enabled, but still “Obtaining an IP address,” then try setting a static IP address on the phone.
And now more about how to do both.

To enable the DHCP server, you will need to go to the router settings (any instructions for setting up D-Link, Asus, TP-link, Zyxel routers begin with a description of how to enter its settings) and make sure that the DHCP server is enabled (usually , there just needs to be a check mark like this): on almost all router models this option is located in the LAN or LAN (local area network) section:
- On ASUS routers - LAN - DHCP server tab
- On TP-Link routers - Additional settings - DHCP settings
- On Zyxel Keenetic routers - In “Home Network” - Networking, enable “Server” for the DHCP option. Or, on Keenetic Lite, in Home Network - Segments, check that DHCP is enabled.
- On D-Link - in the “Network” or “LAN” section, the “DHCP Server” item or tab
The second option is to set a static IP address on Android, to do this:

Save the settings and try connecting to the Wi-Fi network from your phone again.
Android phone or iPhone does not see Wi-Fi network
If your phone does not see the desired Wi-Fi network, but sees other networks, then in most cases the problem is in the Wi-Fi channels used. The fact is that by default in the router settings in the wireless network parameters it is usually set to “Region: Russia” and channel: auto, which forces the router to select channels from 1 to 13. But: some devices do not support channels more than 10. (On this topic there is a separate instruction :)
Thus, the first thing you should try is to go into the router settings, go to the wireless network settings settings and change one of two things:
- Region - set to USA, supported by almost all devices, only 10 channels.
- Change the channel manually (set within 10).
After that, save the settings and check if your phone can see the network now. If this does not help solve the problem, then it makes sense to also try changing the channel width in the router settings, and for older phones, try also changing the network operating mode to 802.11 b/g.
A laptop today is an excellent alternative to a desktop computer. It has smaller dimensions and, most importantly, mobility. Long gone are the days when you had to carry an Internet cable with you to move around your apartment with a laptop. Wireless networks have made life easier for users around the world. But it is not always easy to get them working. When a laptop does not connect to wifi, it turns from a mobile computer back into a stationary one due to its constant connection to the cable.
Let's try to find out together the reasons for this problem and the main ways to solve it.
Let's start by listing the most common ones. In 90% of cases, the owner of a laptop experiencing difficulties with wifi is faced with the following:
- It is not possible to turn on wifi on the laptop at all (it does not see any available connection);
- The laptop refuses to connect to the desired network, but at the same time communicates with others without problems;
- The wireless network is detected, but the computer cannot connect to it (or has stopped connecting);
- The computer connects to the network, but web pages are still inaccessible.
This is the “bouquet” of the most common problems due to which a laptop may refuse to connect to the network. Next, we will look at each in more detail, with practical tips for eliminating them.
Complete lack of wifi
If you have a laptop in your hands, this does not mean that it can connect to wifi networks, or that it can see them at all. It was only a few years ago that having a wireless network module in laptop computers became the norm. Are you sure your laptop has it? If yes, it’s time to check whether this very module is enabled. This procedure is especially relevant if the laptop was previously connected to the network, but then stopped. You can do this in the following ways:
1. Using a wifi adapter switch
It is located in different ways: both on the sides of the laptop and on the back, near the keyboard (see Fig. 1).
Fig.1 Wifi switch on the left side of the laptop.
2. Using a separate button that activates the module
In modern models it is found much more often than a switch. If your laptop suddenly stops connecting to the network, but it didn't cause problems before, it's possible that you accidentally pressed this button. Finding it is generally not difficult, but if you have problems finding it, open the device’s instructions, where on the very first pages the solution to this simple “puzzle” will be waiting for you. A hint can be a schematic image of the antenna drawn next to the button or directly on it (see Fig. 2).

Fig.2 Key that activates wifi in a laptop (using the example of HP Probook 4540s)
3. Using a keyboard shortcut
Sometimes manufacturers refuse to provide space for a separate button responsible for wifi operation. Then the function key combination takes over its task. Usually, this is “Fn+F2” (see Fig. 3). The first is located near the left “Ctrl”, the second is above the numeric area of the keyboard (in the row of the so-called “F” function keys).

Fig.3 Key combination used to connect wifi.
- Not on all laptops this role is performed by F2 (this is a basic setting that can be changed by user settings);
- Additionally, if you recently reinstalled Windows but haven't yet taken care to install all the basic device drivers, the function keys may not work.
4. Through the operating system (using Windows 7 as an example)
In addition to activating the wifi adapter using buttons, there is also a software method.
To do this, go to the “Network and Sharing Center” (for example, from the Control Panel). Then select “Change adapter settings” (menu item in the left panel). A list of all available connections that your laptop sees will open. Among them there should be a “wireless network” (if it is missing, immediately skip this chapter and go to the next one, which describes in detail the process of installing drivers). The network icon can be gray (“Disabled”) or blue (“Active”). If you see a gray icon, right-click on it and then select “Enable” (see Fig. 4).

Fig.4 Enabling wifi through Network Control Center in Windows 7.
We looked at the main reasons for the lack of wifi connection on a laptop. There is only one nuance left:
If you recently reinstalled Windows, but did not bother to download drivers from the official website of the laptop manufacturer, many of its functions may not work. The operation of the wifi module will not be an exception. And, even if there are no comments in the “Device Manager” next to the adapter, its correct operation is not guaranteed. Therefore, go to the official website and get drivers for your laptop. Quite often this can be the only correct solution to a connection problem.
Now that we have made sure that the computer has a working wifi module, we move on to the next two chapters of the article.
The network is detected, but the laptop does not connect to it
In most cases, this behavior of the laptop is due to the lack of necessary drivers for wifi. This mainly happens as a result of incorrect completion of Windows reinstallation, when not all equipment “receives” its software.
And do not rush to consult the “Device Manager”. Often he does not even see the slightest inadequacy of the installed software or any malfunction. Therefore, to fix this problem, you should make sure that you have the latest drivers for the wifi module. You can get them for free from the manufacturer’s official website, where they are always available.
Where to see which wifi driver is currently installed
Regardless of the Windows version, hold down the Win and R keys at the same time, then (in the window that opens) type devmgmt.msc and press Enter. This will launch the device manager (see Figure 5).

Fig.5 Wifi module in Device Manager.
If this is your first time here, you may find that all devices are divided into groups. The module we are interested in, with which the laptop connects to wifi, will be in “Network adapters”, where we go. Then we find it and right-click, then left-click on “Properties”.
In the next window, find the “Driver” tab and go to it. Look at the lines “Driver Supplier” and its “Development Date” (see Fig. 6).

Fig.6 Information about the module driver.
And if the supplier is not “native” for the laptop (does not match the name of the laptop brand), and the date is several years out of date, run to the manufacturer’s official website. There, as mentioned above, you can easily find the current version of drivers and download it.
After successful driver installation, you may need to start the wireless network. All the nuances of performing the driver update procedure were described in the first chapter.
The network is connected, but the sites are still unavailable
In this case, instead of the normal network icon on the taskbar, you can find this:

rice. 7. Restricted connection.
All the reasons why the user sees this icon can be divided into 3 groups:
- Malfunction or incorrect settings of the router;
- Incorrect settings in the laptop, or its hardware malfunction (which happens much less frequently), due to which it does not connect;
- Problems are on the side of the provider, which temporarily stopped supplying the signal in full (for example, due to repairs to equipment on the line).
Let's first try to figure out why the network has limited access in your case. In other words, who should you suspect of the problem: the router or the laptop?
If the router is at fault
Try connecting to the network using another device (tablet, mobile phone). If they cannot establish contact with the router, either it or the work of the provider is to blame. To discard the last option, we call the service provider and find out how things are going on your line. If everything is in order, we continue to “interrogate” the router. You need to go into its settings (you can use the web interface, the entrance to which was described in detail in the corresponding article) and find out if everything is in order there.
You can also call specialists, but often their arrival takes longer than setting it up yourself.
Option two - laptop malfunction
If at least one other device connects to the network, then incorrect laptop settings are limiting access to wifi.
There are a number of explanations for this, some of which we will consider below.
1. Blocking the network with a standard program in a laptop
If you use a laptop with a pre-installed operating system, in the vast majority of cases it may have a system utility installed on it that is responsible for the operation of the wireless network. You can find this application either in the Start menu, in All Programs, or in Accessories.

Fig.8 Wireless network manager window (a standard utility in most laptop models).
And, if wifi is turned off here, then you are unlikely to be able to fully connect to it, even if the laptop sees the necessary network and connects to it.
2. Outdated drivers
The most common problem due to which the network does not connect. We discussed in detail the actions that need to be taken to eliminate it in chapter “2.3” of this article.
3. Incorrect wireless connection settings
These settings could have been lost due to an incorrect exit from Windows, or they were simply forgotten when creating the connection.
Go to “Change adapter settings” (this item is located in the “Network and Sharing Center”, and the last one is in the Control Panel). Then find the wireless connection among the available connections and right-click on it. In the drop-down list, select the bottom item “Properties” (see Fig. 9).

Fig.9 Network connections.
Here select “Internet Protocol Version 4”, then go to its “Properties” (see Fig. 10)

rice. 10 Select the desired protocol for setting up the network.
In the next window, you need to set automatic IP selection by placing black circles opposite the corresponding items (see Fig. 11)

Fig. 11 Automatic IP selection.
In most cases, this should solve the problem (especially if the addresses were entered manually). If, after doing all of the above, the laptop does not see the network as it should, we recommend contacting specialists (preferably from your provider).
Other reasons
While you wait for the technician, you can try some more manipulations that can solve the problem:
- Check the router settings to see if the network name (SSID) contains Cyrillic characters. It’s better to set a new name using only numbers and Latin characters.
- Set (in the settings) USA as the network region.
- Bring your laptop closer to the router. Perhaps the problem is only in the long distance to the router, due to which the laptop does not see the network.
We hope that the tips from this article will be useful in quickly finding the reason why the laptop stopped seeing wifi and no longer connects to it.
This instruction contains step-by-step information on what to do if the Internet does not work on a computer with Windows 10, 8 and Windows 7 in various scenarios: the Internet disappeared and stopped connecting for no reason via the provider’s cable or via a router, the Internet only stopped working in the browser or certain programs, works on the old one, but does not work on the new computer and in other situations.
Note: In my experience, about 5 percent of the time (and that's not a small number) the reason the Internet suddenly stops working is with the message "Not connected. There are no connections available" in the notification area and "Network cable is not connected" in the list of connections indicates that the LAN cable is really not connected: check and reconnect (even if visually it seems that there are no problems) the cable both on the side of the computer's network card connector, and from the LAN connector on the router, if the connection is made through it.
If the first option does not suit your situation, then I recommend following these steps to check your Internet connection:

Let's stop at point 6 - the local network connection shows that everything is fine (on, there is a network name), but there is no Internet (this may be accompanied by the message “No access to the Internet” and a yellow exclamation mark next to the connection icon in the notification area) .
LAN connection is active, but there is no Internet (no Internet access)
In a situation where the cable connection works, but there is no Internet, there are several common causes of the problem:
- If the connection is made through a router: there is something wrong with the cable in the WAN (Internet) port on the router. Check all cable connections.
- Also, for the situation with the router: the Internet connection settings on the router have gone wrong, check (see). Even if the settings are correct, check the connection status in the router’s web interface (if it’s not active, then for some reason the connection cannot be established, perhaps the 3rd point is to blame).
- Temporary lack of Internet access on the part of the provider - this does not happen often, but it does happen. In this case, the Internet will not be available on other devices via the same network (check if possible), the problem is usually fixed within a day.
- Problems with network connection settings (DNS access, proxy server settings, TCP/IP settings). Solutions for this case are described in the article mentioned above and in a separate material.
For the 4th point of those actions that you can try first:

If these two methods do not help, try more sophisticated methods of solving the problem from the separate instructions given above in paragraph 4.
Note: if you have just installed a router, connected it to your computer with a cable, and there is no Internet on the computer, then most likely you simply have not configured your router correctly yet. Once this is done, the Internet should appear.
Computer network card drivers and disabling LAN in BIOS
If the problem with the Internet appeared after reinstalling Windows 10, 8 or Windows 7, or in cases where the local network connection is not listed in the list of network connections, the problem is most likely caused by the fact that the necessary network card drivers are not installed. Less often - because the Ethernet adapter is disabled in the BIOS (UEFI) of the computer.
In this case, you should perform the following steps:

Perhaps in this context it will be useful: (if there are unknown devices in the list in the task manager).
Network card parameters in BIOS (UEFI)
Sometimes it may turn out that the network adapter is disabled in the BIOS. In this case, you definitely won’t see network cards in the device manager, and local network connections in the list of connections.
The parameters of the computer's built-in network card can be located in different sections of the BIOS; the task is to find and enable it (set to Enabled). This might help: (also relevant for other systems).
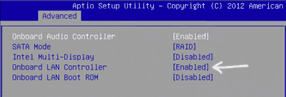
Typical BIOS sections where the required item may be located:
- Advanced - Hardware
- Integrated Peripherals
- On-board device configuration
If the adapter is disabled in one of these or similar sections of the LAN (may be called Ethernet, NIC), try turning it on, saving the settings and restarting the computer.
Additional Information
If by now you have been able to figure out why the Internet is not working, as well as making it work, the following information may be useful:
- In Windows, Control Panel - Troubleshooting has a tool to automatically fix Internet connection problems. If it does not fix the situation, but provides a description of the problem, try searching the Internet for the text of the problem. One of the common cases: .
- If you have Windows 10, look at the following two materials, they may work: , .
- If you have a new computer or motherboard, and your ISP restricts Internet access by MAC address, you should tell them the new MAC address.
I hope that one of the options for solving the problem with the Internet on a computer via cable was suitable for your case. If not, describe the situation in the comments, I will try to help.
Before you begin to find out why Wi-Fi or the Internet does not work, you should know (especially for those who have just purchased a Wi-Fi router) that it is not enough to just connect the provider’s cable to the router, you also need to configure it (set up the Internet and Wi-Fi network ). All of the methods described below are valid if Wi-Fi and the Internet were working for you before, and then suddenly stopped or you cannot connect a new device to Wi-Fi. For convenience, I divided the article into two parts, the first is devoted to the inability to connect to a wireless network, the second part will answer your questions if you are connected to a Wi-Fi network, but there is no Internet.
Cannot connect to Wi-Fi network.
Reboot the router.
The first thing you need to do if you have problems connecting to a Wi-Fi network is to restart the router. To do this, simply disconnect the power supply from the router and connect it again after a few seconds. After 1-2 minutes. The device will boot, then try connecting to the wireless network again. To avoid such situations in the future, I recommend updating the router firmware (perhaps the manufacturer knows about the problem and fixed it in the new firmware).
Enabling the Wi-Fi module on the laptop.
Check if Wi-Fi is turned on on your laptop, I won’t bother, I described all the ways to turn on Wi-Fi in the article How to turn on Wi-Fi on a laptop .
Change the wireless network mode.
If you are trying to connect a device (laptop, smartphone) that is more than 5-7 years old, you must take into account that it may not support the modern Wi-Fi mode - n. Therefore, you need to switch the router to an operating mode that is supported by the device or enable mixed mode b/g/n. More details about Wi-Fi operating modes are described. In order to switch the wireless network mode, you need to go to the router’s web interface, go to the Wi-Fi settings and select the appropriate mode.
Removing a duplicate network SSID.
One of the possible problems of not being able to connect to Wi-Fi is a duplicate Wi-Fi network name (SSID). Suppose you come to your friends, their Wi-Fi network is called “Home”, you successfully connected to it. Time passed and you came across the same network name with other friends or at home. The laptop (this also applies to tablets and smartphones) tries to connect to the network using the previously saved password, but it fails because a new password is used for this name. To solve this problem, you need to remove the matching network from the list of saved Wi-Fi networks.
To do this, right-click on network icon in the lower right corner of the screen and select "Network and Sharing Center."

After this, you will see a list of saved wireless networks. If you see that the network you are trying to connect to is in this list, you need to remove it from this list. Select the network and click the "Delete" button. After this, you will need to enter a password to connect to the wireless network.

No Internet via Wi-Fi.
Internet payment check.
The simplest thing that can happen when the Internet is not working is that it’s time to pay for it or the provider is working on it. To clarify the situation, call your provider and find out if you have a debt for the Internet and whether work is being done on the line.
Static IP address.
One of the problems with the Internet not working may be that the registered static address does not have the network settings that are necessary. In this case, I recommend using automatic network settings retrieval. To do this, you need to go to the Network and Sharing Center. One way to do this is to right-click on network icon in the lower right corner of the screen and select "Network and Sharing Center".

Another way is to use hotkeys

It doesn’t matter which method you used, the result will be the same - the Network Connections window will appear on the monitor. Next, you need to double-click on the wireless connection. In the status window that opens, select “Properties” in the properties window “Internet Protocol Version 4 (TCP/IPv4)”


Problem with the router.
The Internet may not work due to a router failure; the simplest thing you can do is reboot it. There are situations when the router resets the Internet settings, in this case you need to connect to it via the web interface and re-enter the Internet settings, in order to experience fewer problems with the router in the future, I recommend updating its firmware.
Conclusion
In this article, I described all the ways I know to solve problems with Wi-Fi and the Internet. If these methods do not help you, you can describe the problem in detail in the comments and I, together with the readers of this site, will try to help you.
