How to make new firmware for your phone. How to assemble your own from ready-made firmware. Android, DIY firmware mod. What does “Firmware” and “Reflashing” a phone mean?
Today we will talk to you about how to independently reflash a smartphone to Android via a computer. The procedure is not easy, and the firmware of each gadget has its own nuances, which you will have to clarify on specialized forums. But in general terms, you will understand that with the right approach, you can restore the device at home, install third-party firmware on it, or update the stock one to new version.
Firmware for an Android smartphone using a computer
To begin with, we will warn you that in this way you can “kill” your gadget. In the language of people who understand, turn it into a “brick”. In this case, without going to service center you won't be able to get away with it. You shouldn’t even bother flashing NoName firmware for gadgets from China; if you break it, they may not be able to be repaired at the service center.Be that as it may, we live in the age of technology, the age of the Internet - world wide web, where, if you wish, you can learn literally everything: even the firmware of Android phones. Actually, what are you doing now? Well, let's get started....
Finding and installing the software required for firmware
It's no secret that for different manufacturers devices require different drivers. Fortunately, they can also be downloaded on the Internet. For example, you have a smartphone from Samsung - drivers for its subsequent firmware can be found on the official website. There are also Alternative option without searching for drivers - just connect the phone to the computer, after which the operating system will independently select and download them (applies to Windows owners 7 and newer versions of window OS).The next task is to download the firmware itself. The most popular Russian-language resource with official and custom firmware is 4pda.ru. Go to the forum, look for your device and firmware there. Choose the one that is most interesting to you and download it to your computer.
Then you need to assign Superuser rights to the program, that is, give Root access. How exactly to provide it, see our previously written article.
Now we return to the already familiar website 4pda.ru, or more precisely, to its forum and download the CWM-recovery file for your gadget (it is important that it is specifically for your device, otherwise you risk turning it into a “brick”).
We write a zip archive with the firmware and Recovery downloaded earlier into the device’s memory, or better yet, onto an SD card.
We return again to installed program Mobileuncle MTK Tools, launch it and it’s in automatic mode will find CWM-recovery on your smartphone, you will only need to confirm the update process by pressing the “OK” button.
Preparing for firmware
Without a backup copy - nowhere! It will be useful to us in case of unsuccessful firmware to restore the device’s functionality. Go:
So, the backup has been created. To restore it, go to installed application CWM recovery, tap on the “Backups” item and select the recently created one there.

You should also save as a backup copy all data that may be erased during the firmware update of the device - contacts, photos, etc.: 
To restore data from a backup copy, use the nearby “Restore” button - that is, “Recovery”. You will only need to indicate the path to the previously created backup and confirm its installation. As you can see, absolutely nothing complicated.
Installing firmware on an Android smartphone
So, the new Recovery is installed, now you need to log into it. First, fully charge your device. Turn it off and, using the combination of the Power and Volume Up buttons, go into Recovery. Depending on the device manufacturer, the combination may differ.

Here we select “Wipe cache partition” and confirm our actions;
Now let's move on to the most interesting part - installation. operating system. Click on “Install from sdcard”, then on “Choose zip from internal sdcard” and find the file with the firmware downloaded earlier;

We confirm our consent;

We wait for the installation process to complete, after which we reboot the device and wait for it to boot. Don't be alarmed if the first download takes longer than usual - that's how it should be.
What to do if the phone does not start after flashing the firmware
If the startup process of the smartphone has not progressed beyond the logo, it makes sense to reboot it again. Didn't that help either? Then reflash again. Otherwise, we need to roll back to the standard firmware and restore the Backup. How to restore backup copy You already know, but how to roll back to earlier installed version firmware? There is only one answer - no way, it will have to be installed via a computer.Let's look at the process using Samsung devices as an example:
If the method does not work, and this happens, the road to the service center is paved. We warn you: the names of the programs and drivers are different for all programs, but in general the installation process is similar, so it will not be difficult to figure it out. We hope everything worked out for you!
Provides active customer support, releasing updates and upgrades for its gadgets with varying degrees of success. In practice, the developer delivers official firmware mainly “over the air” (via OTA updates), as well as by posting a special firmware image file on its website or portal.
You can flash the image using a set of special software:
- CWM Recovery.
- TWRP Recovery.
- Using a computer and a special set of programs (Fastboot, KDZ Update, Odin and other utilities).
As a rule, firmware images before updating are packaged in special archives with the extension ZIP, ISO and others.
Besides official firmware, very often users and the gadget community form support for devices by releasing custom firmware versions and posting them on amateur forums and portals. Such updates can provide expanded or reduced functionality of official images, adding or removing unnecessary aspects from them.
To begin with, before the flashing process, be sure to take care of your data on internal memory devices. When updating, all files are erased, which means you need to make a backup in advance and save important files on external media.
On question how to flash android We won’t stop at OTA updates “over the air”, but rather, let’s concentrate all our attention on other update methods.
Flashing your phone using CWM Recovery
The rich functionality of CWM Recovery allows you to perform many manipulations with the device, including updating the firmware. By default, devices have stock Recovery installed, which means that first you need to install the ClockWorkMod Recovery utility itself.
The general flashing process described below concerns ZIP files. Instructions:
- Go to Recovery. To do this, you need to completely turn off the device, and then hold down a certain sequence buttons on the body of the device. The set of keys may vary depending on the device manufacturer. Each combination may be different. Additional information You can find out thanks to search engines by asking the appropriate question. A universal option is to set the following keystrokes:
- Volume up button + power key
- Volume down button + power key
- Volume up/down buttons + Power key + Home key.
- Simultaneously hold down the volume up+down keys and the power key.
Once in recovery, you will see a central menu, which you can navigate using the volume up and down buttons, and the power key will function as an action selection.
- Before starting the device, you must complete full reset gadget to factory settings. To do this, go to the “wipe data/factory reset” item and confirm the action by clicking on the line that says “Yes – Wipe all user data”.
- Returning to the main lobby, select “Install zip”.
- Next, click on the “Choose zip from /sdcard” item and in the Explorer tree, select the file with the previously saved firmware.
- Confirm your choice by clicking on “Yes – Install...”.
- The process of flashing the device will begin. At the end of the process, the user will see the message “Install from sdcard complete” on the screen.
- All that remains for the user to do is return to the main CWM Recovery lobby and complete the process of rebooting the gadget by clicking the “reboot system now” line.
After these steps, the firmware installation will begin. Don't panic, because the installation algorithm can take up to 10 minutes.

How to flash an Android phone using TWRP Recovery
For those who prefer working with a utility in the form of TWRP Recovery, we offer next instruction step-by-step installation updates in the form of a ZIP archive:
- Upload the file with the firmware image to the device memory.
- Go to TWRP recovery. This is done by analogy with CWM.
- Perform a factory reset by clicking on the “Wipe” option in the main menu. Drag the lever to the right. When you finish cleaning the gadget, return to the original lobby by pressing the “Back” button.
- In the main lobby, select “Install” and find in the tree file system previously downloaded image. Click on it by dragging the slider to the side.
- After this, the firmware process will start. According to the standard, it does not exceed 2-3 minutes.
- Upon completion, the utility will automatically display a message indicating successful flashing. By clicking on the “Reboot System” item, reboot the device.

Installing updates using ROM Manager
With help this application, you can not only flash the firmware, but also create a backup copy of the system. Use this option so as not to lose important data and quickly restore all the functionality of your smartphone.
To get started, you will need special devices on your device that allow you to access the system at the system level. internal files your device. To do this, you can use any of the presented programs.
The second important aspect when working with ROM Manager is custom recovery. All firmware operations take place directly in the Android launcher itself, and ROM Manager serves as a visual add-on to Recovery.
To get started, download the firmware file for your gadget and follow the instructions below:
- Transfer the firmware archive, in a ZIP extension, to the memory of your device.
- In the utility menu, go to “Install ROM from SD card.”
- Among the folders and files, select your image and click on it.
- In the new lobby, select “Reboot and Install”. Don't forget to check the "Save current ROM" checkbox. In this case, you will have the opportunity to restore the system at any time.
- By clicking “OK” your gadget will go into Recovery mode and the firmware update process will begin.
Thanks to the advanced functionality of the ROM Manager application, users can directly download images for their device from it. You can do this by clicking on the “Download firmware” item. Access to some ROMs is only available in the paid version of the program.

How to flash Android via computer
A universal tool for flashing Android devices using a PC is the Fastboot utility. It is part of the SDK Platform Tools, which means it is suitable for a large number of devices.
The second step before starting the firmware is gaining access to the system kernel. Very often, many manufacturers block this system parameter, not wanting users to change it themselves system files images of their firmware. Such manufacturers include HTC, the Nexus line of devices, Sony and others. To do this you need to unlock Bootloader. To do this you need to study detailed instructions for setup and management command line. Before you start flashing the firmware using a computer, do not forget to enable device debugging via USB in engineering settings device
Brief instructions for installing ZIP firmware using Fastboot
- First, copy the .zip archive with the image and place it in the folder with “ADB”.
- Put your smartphone or tablet into fastboot mode and write the request on the command line: fastbooflash zip filename.zip, where filename.zip is the name of your firmware.
- Wait until the installation is complete and reboot the device.
How to reflash an Android phone via a computer at home - that’s what this article is about! When nothing works on your Android phone or everything slows down and lags, and the usual tips (clearing the cache or freeing up phone memory) don’t help, it’s time to resort to radical measures, such as flashing Android. Flashing an anodroid phone is not a difficult task; you can flash your phone at home, by yourself, today we will tell you in detail how to do it!
- The Android core itself;
- Drivers that ensure the coordinated functioning of the components of a specific device model, that is, hardware.
The verb “Flash” the device refers to the platform installation procedure. However, the process of installing an operating system for a computer and for a mobile gadget on the Android platform is significantly different. The reasons for this are the huge variety of implementations of this most common OS in mobile devices. Much software is created individually for certain models of smartphones and tablets. Therefore, installation of new firmware often ends unsuccessfully for inexperienced users due to lack of information and the lack of correct action algorithms before their eyes.
The guide below will help you reflash Android at home, and will also introduce you to the possible risks of the procedure and ways to minimize them.
Why do you need to reflash your Android phone?
People make and program gadgets, so no device is completely immune from errors. If a problem occurs in your Android smartphone (tablet), the drastic way to get rid of the problem is to flash it.
Arguments for reinstalling the OS
Thanks to the openness of this operating system, manufacturers are free to improve and customize it to suit their gadget models. Many of their advanced software have already won the love and trust of users. In this regard, owners of smartphones and tablets often take risks and decide to reflash their electronic friend. This is also facilitated by some developers who eventually stop releasing updates for their gadgets. Users from various sources of information learn about new software modifications that can allow optimal use of the device’s hardware capabilities and, of course, wonder how to reflash Android.
Even very well-known companies that produce smartphones and tablets often sin by installing their own software, which for obvious reasons is not suitable for most users. In addition to the unsuccessful external design of the shell, these proprietary software significantly slow down the functioning of the device. At the same time, pure Android, not stuffed with unnecessary marketing tricks from the developer, often amazes with its high performance and job stability. Therefore, the answer to the question posed is to install custom software, which does not contain pre-installed “junk” from the manufacturer.
Arguments against reinstalling the OS
If there is a lack of experience or insufficient care, there is a high risk of getting a non-working and useless piece of microcircuits and plastic after the procedure, or as specialists used to call this failed device - “Brick”.
If firmware is installed with software taken from unofficial sources, the warranty on the device will be void.
Not all drivers included in the software package from a third-party developer work correctly with the gadget’s components. It happens that after flashing the GPS module refuses to search for satellites, and the camera takes low-quality images. Also, not optimally selected software can cause the battery to drain quickly.
How to flash an Android phone yourself and what do you need for this?
The success of any event depends on how thoroughly the preliminary preparation has been carried out.
Preparatory activities include the following main points:
- Be sure to fully charge the device before starting the procedure;
- Through the gadget settings menu, find out the name of the device and modification of the current software(it is recommended to write them down to the last character and sign, otherwise if you flash the firmware with an inappropriate assembly, you may end up with a “brick”);
Each user must independently decide which version of the software to give preference to:
a) official;
b) third party.
Having completed all three points of preliminary measures and, most importantly, having precisely decided on the software modification, you should proceed directly to the installation procedure.
There are the following ways to do this:
- Update (When the device has already been released updated version Software, then a convenient method for all users is “Auto-update”. In order to find out if a new firmware version is available, you need to open the “About phone” section through the settings and go to the “System update” subsection).
- Manual installation (For models from different manufacturers, different firmware methods are used using different software, which are called “Flashers”. For example, for gadgets from Samsung the Odin program is used, for Nexus, Sony and HTC - “Fastboot”, “Lenovo” - “Flash Tool”, “LG” - “KDZ Updater”, etc.).

List of stages of the flashing procedure using the ROM Manager program:
- Get root rights to your Android gadget;
- Install the ROM Manager utility;
- Create a copy of the current OS;
- Find and save suitable firmware;
- Install it;
- Test the new software and if you are dissatisfied with the results, return to former version using the created copy in step “3”.
You can find and install the “ROM Manager” utility from the Google Play Market. Then, by opening the main application window and clicking on the top line, you can install “ClockWorkMod” (CWM), and using the second line – “Load Recovery Mode”.

In order to save a copy of the OS, you will need to install “CWM”.
Important aside: During installation of "CWM", the gadget should not be connected to the PC.
By clicking on “Install CWM” you will need to specify the exact name of the gadget and wait for the installation procedure to complete.


Where can I get firmware for Android?
They are available for download on the official resources of the smartphone and tablet developers themselves. If the user has sufficient experience, then by the name of the model he can find many versions of the software on third-party sites, from which the appropriate one is selected and its archive file is saved in the computer memory. Then you can write it to a memory card without unzipping the file.
If you use the “ROM Manager Premium” utility, the user can click the “Download firmware” line. After this, the application will display a list of software suitable for the device. This useful program saves you from wasting time searching for software in online resources of third-party developers, of which there are currently a huge number.
Why do you need non-official (custom) firmware for Android?
Non-official software is developed to provide more fast work device, and some can be added to it useful features and good design.
Custom firmware sometimes continues to be improved by developers even when an already outdated gadget has been discontinued. Therefore, the user receives a device with updated software that optimally meets modern requirements.
For some users, it happens that the decisive criterion for deciding in favor of installing a third-party product is saving battery power and a more attractive interface.
By installing non-official software, you can immediately provide yourself with root rights, which means you can increase your security by installing a powerful firewall. The owner of the gadget, at his own discretion, will be able to install any fonts he likes, as well as increase the speed of the GPS module, etc.
You can get rid of unused system utilities that not only take up memory space, but also waste mobile traffic, this is especially true if the user does not have access to an unlimited Wi-Fi network.
How to flash an Android phone via a computer at home?
If the owner of the device is interested in the question of how to flash an Android phone via a computer, then the following will be necessary:
- Install drivers on the PC to work with the device;
- Download the firmware corresponding to the gadget model;
- Create a backup copy of the current OS in the device;
- Install the firmware application (flasher).
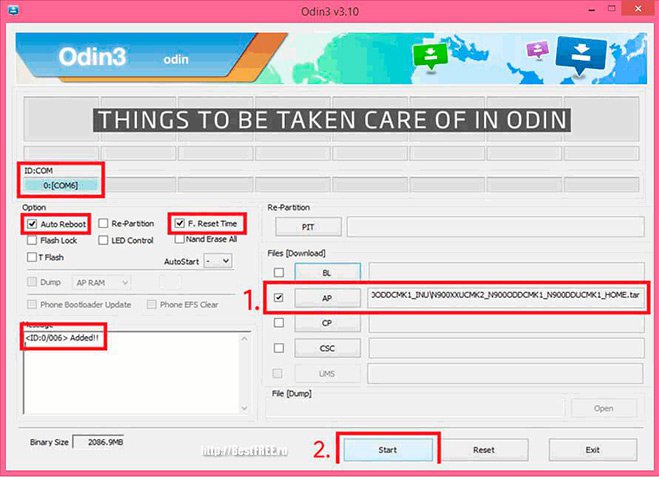
The essence of the actions is the same for various models devices. Below is an example of working with the Odin flasher from Samsung:
- Connect the device to the PC in download mode. To do this, you should turn off the gadget and simultaneously press the keys: “Home”, “On/Off.” and “Increase sound.”
- Next, “Odin” will see the device;
- Then, in the “AP” column, indicate the location of the downloaded software;
- Place marks in columns “F. Reset Time" and "Auto reboot";
- Click “Start”;
- Wait for the process to complete.

The sequence of actions consists of the following steps:
- Launch “ROM Manager” and click “Install ROM from SD card”;
- Specify the location of the OS distribution package copied to the card;
- In the menu that appears, check the boxes that interest the user and click “Ok”;
- Wait for the installation procedure to complete.

How to reflash Android via Recovery yourself?
To install software using Recovery, you must first save the firmware file on the device card. Next you will need to complete the following steps:

- Turn off the device;
- Simultaneously press the keys: “On/Off.” and “Increase sound level” (on some models the button combination may be different);
- In the window that appears, specify “Recovery Mode” (the transition between columns is made by using the buttons to increase and decrease the sound level);
- Next, specify “apply update” from external storage" and click the "On/Off" button;
- Wait until the process completes.

The question of how to flash an Android tablet already has detailed answers in the above paragraphs of this guide. All actions in gadgets on Android will be identical. For example, consider the procedure using a PC in relation to a model from popular company"Lenovo".
The following steps must be followed:
- Fully charge the tablet;
- Install the application " Software Update Tool" and drivers. Save an archive with a distribution of suitable firmware in memory;
- Disable the mobile gadget;
- Simultaneously press the keys: “On/Off.” and “Lower volume” (the device should vibrate);
- After “Fastboot USB” is displayed on the display, connect the gadget to the computer;
- Open the installed application and specify the location of the saved distribution;
- Next, in the program menu, specify the type of software;
- Click “Erase user data”;
- Click “Start” and wait until the process is completed.

Programs for flashing Android
Many applications have already been developed for this purpose. Here are the most successful utilities that have proven their reliability and earned positive user reviews.

This utility is installed directly into the device itself. The firmware is installed from the gadget's CD card.
A universal utility that is suitable for almost all devices on the Android platform. Installation is carried out only through a computer, so you will definitely need a USB cable. An intuitive interface allows even novice users to cope with the difficult task of reinstalling the system

FastBoot
This is one of the most difficult applications for beginners. The actions in it are a little confusing. The installation procedure is carried out through the console of the Windows operating system.
How to flash a phone if it won't turn on?
It will be possible to successfully resolve the issue only if the integrity of the bootloader is not compromised. To find out this, you can hold down the “On/Off” button. When a response appears from the device in the form of a robot or some icon, for example, “!”, then we can conclude that the OS has failed. You can also try to connect the device to a PC via a USB cable and press the following keys on the device: “On/Off.” and "Volume". When the PC then finds the gadget, resuscitation will not be difficult and will be successful in 95% of cases. Next, you can use one of the above methods and install new software. It is not uncommon for incorrectly executed firmware to break the recovery partition, after which the gadget can only be restored by installing the correct OS modification.
The algorithm of actions is as follows:
- Install the firmware utility on the PC;
- Download and save the firmware file;
- Open the utility;
- Connect the device to the computer and press the keys (combinations vary for different models);
- Indicate in the utility the location of the distribution kit with the new OS;
- Click “Start”;
- Ready. You just need to wait for the installation procedure to complete and restart the device.
What to do if the flashing fails?
You can resort to system recovery. To do this, you will need a saved copy of the system.

TouchScreenTune app optimizes sensitivity and responsiveness touch screen. It will be especially useful in the following cases:…
But before flashing, you should definitely make a dump (backup copy) of the firmware that is currently installed on your phone or tablet. This is necessary because if there is an error during creation, the device can be turned into a brick or it may become unstable, and therefore you will need to return it to its previous working state.
Android Kitchen
The easiest way is to log into the Android Kitchen website. Here, even a non-professional can create the firmware himself based on a ready-made file, while gradually choosing certain settings for icons, volume, fonts, screen and much more.
Once the choice of changes has been made, the user can only select the firmware version that is used in this moment(it’s important not to make a mistake here), in the “Summary” tab, check the list again and click on the “Submit Work to Kitchen” button. Now you need to wait for your turn to create an archive with the firmware file, which can then be uploaded via Recovery.
One of the most popular, if not the most popular, operating system for mobile devices, be it smartphones, tablets or other devices, is undoubtedly Android. There are a great many mobile gadgets running on the basis of this software, and even more - firmware versions, both official from the manufacturer and unofficial, collected by amateurs or fans of a particular device. But it happens, it happens that one or another firmware does not suit you. The reasons can be very different, from performance to interface, and many other small nuances. What to do in this case? Create the firmware yourself!
You can customize the firmware of your own device as desired, change many elements, animations, icons, performance and energy saving settings, and so on. The scope for imagination is undeniably great, and it is impossible to predict what will seem like the ideal choice for a particular person. After all, everyone strives to customize everything exactly for themselves.
Create Android firmware
We will look at a way to create your own firmware, which is great for not the most experienced users, but who are fully charged with enthusiasm. It is not always necessary to go into low-level programming to achieve the desired changes, very often required functions or appearance can be changed much easier. Just visit the specialized Android Kitchen website. The process of “cooking” the new version of the software will take place in this “kitchen”. The only caveat is that the new firmware will be based on an existing version created by someone else, but seasoning it with all sorts of improvements, changes and other “spice” will not be difficult.
After visiting Android Kitchen, you can choose what you need to change - the battery indicator, system icons, status bar, various animations, volume dialog box, separators and progress bar, lock screen, fonts. By choosing certain functions in the “kitchen”, you can immediately, in real time, preview changes made in order to evaluate them. After all the necessary changes have been made, go to the File Upload tab. There are some settings available here, but they are optimal by default - don't change them unless you're sure what you're doing. In the “Select your ROM from Kitchen`s list or upload your own files” section, select the “Kitchen`s list” option. From the drop-down list, select the firmware used. Be careful - if you specify the wrong software version, there is a high probability of an error, after which, at best, the patch will not be applied at all, and at worst, the system will stop booting and you will have to completely reflash the device.
It often happens that some Android users do not like the standard firmware of their smartphone or tablet. For example, due to unnecessary software, due to which it is rapidly declining, or simply do not like the functionality of some programs and want to replace them with others. Intensified searches for custom firmware begin, but they do not always give the desired result. What to do?
Any firmware can be modified for a specific user
Not everyone knows that the firmware can be modified to suit your personal needs. There are several ways this can be done, each with a different level of complexity and necessary set tools. And, if you don’t know how to build Android firmware yourself, this article is for you.
Build from source
One of the most correct ways is to use the source code published by the Google or Cyanogenmod development teams. But at the same time, this method is the most difficult, because in order to assemble Android firmware from source code, optimize it and make it work on a specific device, you need to have fairly deep programming skills and understand all the intricacies of the mobile operating system and device hardware. This knowledge is not acquired in a day, so in this article we will not describe this method in detail.
Changing an existing file
If you are not too versed in all the intricacies of the OS, but want to change something in your firmware, the best solution will correct it already. You can change both the native, built-in firmware, and already changed by someone else. There are a lot of customized firmware on the Internet, and you are unlikely to lack their quantity. So, we present step-by-step instructions for assembling your own firmware based on an existing product.
Editing using a computer
Required Software
We will need a computer, a device, a firmware file and a special program called Android Kitchen (also known as kitchen). The firmware file can be found on specialized forums, the most famous are the English-language XDA Developers and the Russian-language w3bsit3-dns.com. In the section for your device model, you can find links to the most popular and proven firmware, both official stock and unofficial custom ones.
Next you need to install the kitchen on your computer. It is best to work under Linux, but the necessary libraries can also be installed on Windows. In this case, you can get out of the situation by installing Cygwin. and follow the step-by-step instructions included in the archive. Before this, you will also need to install the Java Platform (JDK) from the official website (http://www.oracle.com/technetwork/java/javase/downloads/index.html for Windows) or find and download OpenJDK Java 6 in the Ubuntu Application Center Runtime or similar (for Linux). The second use case is to install Linux on a virtual machine and manage the process through it.
Firmware modification
Firmware is most often distributed as a file with the extension .img, less often as a ZIP archive. In both cases, you will need the firmware in the installed kitchen folder so that it can import it and start working with it. Kitchen should be installed to the path c:/cygwin/home/user/ (when installing via Cygwin) or Filesystem/home/user/ (when installing via Linux).
- Start the kitchen via Cygwin or a Linux terminal using the command cd kitchen, then ./menu.
- Unpack the archive into the kitchen, as described above.
- After the program menu appears, go to section 0. Advanced Options.
- After this, a list of commands for modifying the firmware will be presented. Choose exactly the one you need. You can add Busy Box, Root, Apps2SD, replace stock applications, various animations, free up device memory and much more.
- After completing the manipulations, run command 99. Build ROM from working folder in the main menu and take the ZIP archive from OUTPUT_ZIP.
Device firmware
You can flash the device either through a computer or without it. In the first case, you need to download the firmware program, usually Flash Tool or Odin, drivers for your device model and prepare an already corrected archive.
When flashing firmware via Recovery, you will need to copy the file to the root of the memory card, boot the device in Recovery mode, format the device and cache, and then install the firmware from the archive. After the reboot, you will have the firmware that you personally modified.
Editing on device
The simplest way of all. No additional devices or manipulations are needed. All you need is a rooted device, an application for creating backup copies (Nandroid backup is best) and a file manager with the function of changing the system partition.
Changing your own firmware
- If your device is not yet rooted, get it. You can read how to do this on specialized forums in the section dedicated specifically to your device. The fact is that they are supported by a small number of devices and most of them have an individual procedure.
- Install Nandroid backup (https://play.google.com/store/apps/details?id=com.h3r3t1c.onnandbup&hl=ru) and use it to backup your device’s system. Save it in a safe place, for example, in cloud storage. Why create a copy? If something goes wrong or you accidentally delete something you need, you will be able to return everything as it was.
- Install a file manager that works with the system partition to remove unnecessary software and add your own applications. The gold standard is Titanium Backup.
- Select the apps you want to remove and remove them through the file manager.
- Install the applications you want to replace the deleted ones with, and use Titanium Backup to make them system applications.
- Reboot your device and enjoy your progress.
Changing third-party firmware in a ZIP archive
- Download the firmware file you are interested in in .zip format.
- Install a file manager that can work with archives, for example, ES Explorer or Total Commander, and unpack the contents of the archive.
- Remove unnecessary or add missing applications, then pack the archive back and move it to the root of the flash card.
- Using Nandroid backup (https://play.google.com/store/apps/details?id=com.h3r3t1c.onnandbup&hl=ru) create a backup copy of the system and copy it to a cloud drive.
- Flash the device from Recovery mode.
Conclusion
As you can see, assembling Android firmware with your own hands is not necessarily very time-consuming and requires deep knowledge. It is clear that creating a modification from scratch will be much more difficult, but almost everyone can correct or replace something and remove unnecessary programs. We hope our instructions helped you with this.
Have you compiled Android firmware yourself? What did you change in it and how did you do it? It will be interesting if you share your feedback.
Has it ever happened to you that you installed fresh new custom firmware. And it seems to be just perfect from all sides. Fast, with the latest version of the system, terribly beautiful. But suddenly a friend boasts that he also upgraded yesterday, and you realize that someone else’s product is more beautiful, faster, tastier, more desirable. What to do?
The answer is simple - you can take and redesign your firmware as needed. Replace various elements in it, add some of your own animations or other things. For example, do you want a waiting animation, a charge indicator or a progress bar, like in the screenshot, with the ability to change colors and shapes to suit your needs? Then under the cut I will tell you how this can be done.
To change your firmware, the first thing you need to do is go to the kitchen website http://uot.dakra.lt/kitchen/. This is where the whole process will take place. In fact, it is impossible to build the firmware from scratch. You’ll have to take someone else’s creation as a basis, but it’s easy to season it with your own spices.
Follow the link, and then everything is simple. We choose what we want to change: the battery indicator, system icons and emoticons, status bar, appearance of pop-ups, waiting animation, glow effect when scrolling lists, volume change dialog, separators in lists, progress bar, lockscreen, transition animation windows, fonts, butanimation, etc.
Moreover, when choosing some options in the kitchen, it is possible to create a real-time preview of the changes to see what the output will be.
After selecting the changes you need, you need to go to the file upload tab. There is no need to change anything from the settings unless absolutely necessary. Only in the "Select your rom from kitchen"s list, or upload your own files" section, select the "Kitchen"s list" option. A drop-down list will appear in which you will need to specify the firmware used. If you specify something other than yours, then there is a high probability that the generated patch will not be applied, or even worse, you will have to reflash it because the system will not be able to boot.
After all these manipulations, go to the “Summary” tab, check the list of changes that have been planned and press the “Submit Work to kitchen” button.
Next, we go to the page http://uot.dakra.lt/pickup/, where we wait for our turn. As soon as it arrives, the site will give you a zip archive with a freshly prepared firmware patch, which must be flashed through recovery.
Attention, before flashing the firmware, do not forget to backup your system!
Happy customization!
If you are interested in news from the IT world, subscribe to the site's materials at,.
This inspires us to write new materials. Thank you;)
And just below you can read or leave comments. Will you scroll the page? Have something to say?
Comments:
Teutonic: And yet I am skeptical about such things. Looking at how many problems people have with regular flashings, sometimes even between two stock versions, installing such a Frankinstein on just anyone, IMHO, is unsafe =) I personally have never tried it... so I won’t say anything specific, just observations
Any Android user has his own idea of what the operating system should look like, what functions it should perform, and what set of software should be installed in it by default. However, not everyone knows that creating your own firmware is not so difficult. To do this, it is not at all necessary to understand the Linux kernel, be able to compile Android sources, or understand how a smartphone works.
Introduction
There are three ways to create your own firmware for an Android communicator: 1. Finishing and compiling the operating system from sources published by Google or the CyanogenMod command. 2. Modification of the communicator's stock firmware. 3. Modification of third-party firmware created using the first or second method.
The first method is the most correct and flexible, but it often requires a fairly deep knowledge of the features of Android and the ability to edit system sources so that they then work on the device. This topic is beyond the scope of our article, so we will not consider assembling Android sources, but will focus on the other two methods, or rather the third.
Third-party firmware (so-called mods) exist for almost any Android device that has been on the market for at least a week. Usually they already include all the necessary modifications necessary for the correct operation of the firmware on the communicator, and therefore represent an excellent platform for experimenting with the system. They can be modified almost beyond recognition, include any software into the OS, change its appearance, create many low-level settings using a simple text editor and file manager. These steps do not require deep OS knowledge and can be performed by any log reader.
Choosing a test subject
So, let’s assume that our communicator is already rooted and the ClockworkMod recovery console is written to the boot area, which allows you to install any firmware on the device without any restrictions (we wrote about how to do this in the article “Total Subordination”, published in the October issue of ][ ). Now we want to install another firmware on the device, and not just any firmware, but with our own modifications, settings and software set. Therefore, we need a framework, namely someone else’s firmware that works stably on our device. Where can I get it?
The main habitat of all romodels is, of course, the xda-developers.com forums. There you can find everything you need for communicators running iOS, Windows Mobile, Windows Phone and Android. Open the site in a browser, click on the Forums section and look for your communicator in the forum lists. Next, go to the appropriate section of Android Development and carefully look through the list of topics containing the word “” in the title. It's better to find some clean firmware with a name like "Pure Android 2.3 Rom" or a port of CyanogenMod, although, in essence, any other will do (although you may have to undo the author's changes). Open the topic, scroll through the first post, find the download link somewhere at the end and download the ROM to your computer.
Now the firmware file needs to be opened. This is done using the most common unzip:
$ mkdir ~/rom; cd ~/rom $ unzip ../path/to/firmware.zip
General directory structure and important files
The set of files and directories formed as a result of executing the previous command is, in essence, the Android operating system, and exactly in the form in which it will be located in the NAND memory of the device. Depending on the version of Android and the imagination of the author, it may contain different sets of directories and files, but it always contains three required objects: META-INF, the boot.img file and the system directory.
The first directory contains meta-information about the firmware, including author certificate files, a manifest with a list of files and their checksums, as well as an update script that can create new files in NAND memory, change access rights and display a progress bar that users see during firmware installation.
The boot.img file contains boot image, which includes the Linux kernel and initrd image. It can be unpacked, but it is not particularly useful for us, since almost any system parameters can be changed using settings files and the /proc file system. If you need a kernel built with special parameters, for example with an activated BFS scheduler or NFS support, then you can almost certainly find it on the same xda-developers and flash it using ClockworkMod.
Finally, the system directory is what it's all about. The contents of this directory represent the Android operating system without the Linux kernel. It contains everything that is needed for the OS to work, and therefore it is simply necessary to know its structure. She looks like this:
- app- pre-installed applications: phone, calculator, calendar, etc.
- bin-analogous to the /bin and /usr/bin directories in Linux. Contains various system components used by higher-level system components. For example, this is where the dalvikvm virtual machine is located.
- etc- settings files. A complete analogue of /etc in Linux, used, however, only by system components. Android Applications store settings in the /data/data directory.
- fonts- fonts. By default, it contains only Droid-branded fonts (or Roboto in Android 4.0).
- framework- sets of Java classes used by the system and Android software. There is also a file framework-res.apk containing a complete description of the operating system interface, including all graphic files.
- lib- Linux libraries used by low-level system components. An analogue of the /lib and /usr/lib directories in Linux, includes the following standard libraries, like libc (though Android uses its own Bionic instead of Glibc), libz (gzip encryption), libssl and others.
- media- media files: ringtones, notification sounds, interface sounds and OS boot animation files.
- tts- files necessary for the speech synthesizer to work.
- usr- an optional directory that usually contains files necessary for the software to work from the bin directory. Essentially an analogue of /usr/share.
- vendor- files supplied by the device manufacturer. Usually contains binary firmware for various hardware components, for example a Wi-Fi module.
- xbin- an optional directory that contains everything that is not included in bin. As a rule, it is used to store useful utilities, however, not necessary for the operation of the system (top, text editor). CyanogenMod uses it to store administration tools: bash, ssh, powertop, busybox, etc.
- build.prop- a file containing information about the assembly, as well as various low-level settings.
setprop command
The build.prop settings given in the article can also be applied to an already running system using the setprop command:
# setprop debug.sf.nobootanimation 1
Own set of software
The /system/app directory contains all the software preinstalled in the firmware. By removing and adding packages to this directory, we can change the set of applications available out of the box. For example, it’s no secret that the standard Android launcher (and ADWLauncher in CyanogenMod) is slow and has numerous shortcomings. OK, let's replace it with LauncherPro:
$ rm system/app/Launcher.apk $ wget goo.gl/U9c54 -o system/app/LauncherPro.apk
And it's all. You don’t need to install anything, you don’t need to poke around anywhere, just drop the desired application into the directory - and you’re done. Even the name doesn't matter, Android itself will find the application you need and set it as your home screen. In the same way, you can put any other program into the firmware or remove it from there.
It is useful to put one of the applications in the firmware for finding a lost smartphone (for example, prey), then even if you reset it to factory settings, it will remain in the OS and will work. You can also replace some system software, for example, add Dialer One instead of the standard Phone.apk or Go SMS instead of sms.apk.
What about Linux system applications like ssh server or mc? Everything is simple here too. You can build software for Android and ARM processor using the NDK kit from Google, but most required applications already collected before us. For example, we want to preinstall mc into our firmware. Go to xda-developers and search for the request Midnight Commander. On the first page we find the apk package with the installer and unpack it using the same unzip:
$cd/tmp; unzip ~/NativnuxInstaller_1.1.apk
We see assets/kits/mc-4.7.5.4-arm.tar.jet in the list of unpacked files. This is a tar.gz archive, which is unpacked to the root of the system after installing the apk package (or rather, after installing the apk, launching the application and clicking the Install button). We can immediately unpack it into our firmware and get a pre-installed mc:
$ cd ~/rom $ tar -xzf /tmp/assets/kits/mc-4.7.5.4-arm.tar.jet
Now to start file manager On the device, just open a terminal and type mc. Other applications can be distributed in zip archives for flashing using ClockworkMod Recovery. It’s even easier to place them in your mod; to do this, just go to the root of the firmware (in this case ~/rom) and unpack the archive using unzip.
Appearance
Custom firmware is most often created in order to change the appearance of Android to your liking. Performing this operation in Android is, again, very simple. All Android GUI settings are stored in the framework/framework-res.apk file. It can be unpacked using the apktool utility:
$cd~; wget goo.gl/hxz5l $ tar -xjf apktool1.4.1.tar.bz2 $ cd ~/rom/system/framework $ java -jar ~/apktool.jar d framework-res.apk
As a result, a framework-res directory containing all the package files should appear in the current directory. The most interesting subdirectories within it are res/drawable-* and res/layout-*. The first contains all graphic elements in the form of png files for different resolutions and screen positions. For example, drawable-land-mdpi is a directory with graphics resources for medium resolution screens that are in a landscape position (when the screen is rotated, the OS switches to using other files). Of course, any file can be edited or replaced with another.
The layout directories contain descriptions of graphic elements in XML format (they are actually stored in binary AXML format, but apktool converted them to regular XML). The description format is quite simple and understandable, but it’s difficult to figure it out quickly, especially if you don’t know where everything is. Therefore, we will again turn to the services of the inhabitants of the xda-developers forum, who have already managed to come up with a lot of different modifications for the Android graphical interface. They can be easily found using the search query “framework-res mod device_name”.
Typically, such mods are distributed in the form of a ready-made framework-res.apk file, which you can simply put in your firmware. If you want to find specific differences in the content, then the mod can be unpacked and compared with your framework-res using diff:
$ diff -R ~/framework-res \ ~/rom/system/framework/framework-res
Unfortunately, within the framework of one article we cannot consider at least part of the internal structure of framework-res, so for more information please refer to the corresponding forum topic w3bsit3-dns.com.
After making modifications, you can build framework-res.apk using the same apktool. However, this operation requires the aapt utility from the Android SDK, which apktool uses to finally package the apk file. It can also be obtained separately:
$ cd ~/bin; wget goo.gl/tC7k8
Now you can build the file:
$ cd ~/rom/system/framework $ java -jar ~/apktool.jar b framework-res $ cp framwork-res/dist/framework-res.apk . $ rm -rf framework-res
The next step is changing the loading animation. It is stored in the form of regular png files, packaged in the system/media/bootanimation.zip archive. Let's unpack it:
$ cd /tmp $ mkdir bootanimation; cd bootanimation $ unzip ~/rom/system/media/bootanimation.zip
Inside there is a desc.txt file that describes the animation in the following format:
Width Height FPS p Order Pause Catalog...
The standard form of this file is:
480 800 30 p 1 0 part0 p 0 0 part1
This means that the image has a size of 480 x 800 and the frame rate (FPS) is 30 fps. The following is a description of the first part of the animation, the files of which are located in the part0 directory. It is played once (number 1 after p). The next part (part1) is played an infinite number of times until the device boots. Typically the part0 directory contains the images corresponding to the first part of the animation, and part0 contains all the other images that are played in a loop. The images themselves must be the same size, and their names must contain numbers in ascending order, for example 0001.png, 0002.png, etc.
Since the loading animation has a very simple format, it is quite easy to make. It is enough to convert the video into png images using mencoder (in desc.txt you need to set the FPS value to 24):
$ mplayer -nosound -vo png:z=9 video.avi
But this will also be unnecessary. Members of the xda-developers forum have created so many animations that there is no need to work with your hands at all. Links to interesting animations are provided at the end of the article.
Low Level Settings
The last thing I would like to talk about in this article is editing low-level settings. In Android, there is a file for this: system/build.prop, which stores information about the firmware build and settings for specific devices. By adding certain lines to this file, you can change the functioning of Android, speed up its operation or reduce battery consumption. Below are the most interesting settings.
- Prohibition of unloading the desktop from memory: ro.HOME_APP_ADJ=1
The option allows you to make working with the device more convenient due to instant access to the desktop at any time. Not recommended for devices with low memory.
- Improving the quality of saved JPG files: ro.media.enc.jpeg.quality=100
Allows you to make camera images clearer, but significantly increases the load on the CPU.
- Disable boot animation to speed up loading of the operating system: debug.sf.nobootanimation=1
- Assigning part of the interface rendering work to the GPU: debug.sf.hw=1
Allows you to make the interface faster and smoother.
- Blocking notification of active debugging mode (when connected to a computer with via USB): persist.adb.notify=0
- Fixing the problem with a black screen appearing after a call ends: ro.lge.proximity.delay=25 mot.proximity.delay=25
- Turn on the control key backlight immediately after turning on the screen: ro.mot.buttonlight.timeout=0
In addition to all this, many users also recommend using the following combinations of flags:
- Reducing touch screen response time: debug.performance.tuning=1 video.accelerate.hw=1 windowsmgr.max_events_per_sec=150
- Increasing battery life: wifi.supplicant_scan_interval=180 pm.sleep_mode=1 ro.ril.disable.power.collapse=0
- 3G module tweaks: ro.ril.hsxpa=2 ro.ril.gprsclass=10 ro.ril.hep=1 ro.ril.enable.dtm=1 ro.ril.hsdpa.category=10 ro.ril.enable. a53=1 ro.ril.enable.3g.prefix=1 ro.ril.htcmaskw1.bitmask=4294967295 ro.ril.htcmaskw1=14449 ro.ril.hsupa.category=5
- Improved network performance: net.tcp.buffersize.default=4096,87380,256960,4096,16384,256960 net.tcp.buffersize.wifi=4096,87380,256960,4096,16384,256960 net.tcp.buffersize.umts= 4096,87380,256960,4096,16384,256960 net.tcp.buffersize.gprs=4096,87380,256960,4096,16384,256960 net.tcp.buffersize.edge=4096,87380,256960,4096,1 6384.256960
All these lines just need to be placed in the system/build.prop file and saved.
Assembly
OK, we have made the necessary changes, implemented our applications, tweaked the system and now we must create an OS image ready for firmware. The testsign utility will help us with this. First you should pack the firmware using zip:
$ cd ~/rom; zip -r my-rom.zip *
Now you need to sign the archive so that Recovery can install it:
$ wget goo.gl/OyBBk $ java -classpath testsign.jar testsign \ my-rom.zip my-rom-signed.zip
After that, upload the my-rom-signed.zip archive to the device’s memory card and turn off the device. To get into Recovery, turn on the device while holding down the volume down key (the procedure may differ for some devices).
Now go to “Install zip from sdcard”, and then to “Choose zip from sdcard”, find my-rom-sign.zip on the SD card and select Yes. After the installation is complete, select “Reboot system now”.
conclusions
Android is a flexible platform, and this article does not describe all the possibilities for modifying it. A deeper modification may include replacing the kernel, changing the lock screen and standard applications, activation of features such as automatic installation of applications on the memory card, implementation of the boot script mechanism (/etc/init.d), and much more. We will talk about all this in the following articles.


Reflashing a smartphone is usually considered by users whose gadgets are not pleased with the speed and stability of their work, as well as the “lucky ones” who have encountered a virus attack. Usually people go to specialists for help. If there is no way to contact a service center, users begin to look for ways to reflash Android via a computer themselves.

The concept of “firmware” appeared in the middle of the last century and was used by specialists regarding computers that used memory on magnetic cores. With the entry of smartphones running Android OS onto the market, the term somewhat changed its original meaning and began to be used en masse.
Firmware, or Firmware, is the contents of the volatile memory of any electronic device: computer, mobile phone, GPS navigator, etc. Includes the firmware necessary for the correct operation of the gadget. Sometimes this term also refers to a ROM image intended for recording into the memory of the corresponding device in order to update its firmware, as well as the process of entering information into a smartphone or tablet.
Flashing is a change in the contents of memory by physically replacing the chip or installing special software designed for a specific gadget. It should be noted that manufacturers of most devices prohibit users from performing any actions with the firmware. Therefore, unauthorized replacement of software usually terminates the company's warranty obligations.
h2>Types of firmware
Flashing a smartphone is a more complex process than installing other software (in particular, the same reinstalling Windows), and is associated with many risks. However, in some cases (for example, if there are viruses on the device), replacing the software becomes the only correct option.
Android firmware can be divided into two types:
| Firmware type |
Description |
| Official or stock | Produced by smartphone manufacturers for specific models devices. Updated versions of stock firmware are most often sent to the gadget by the manufacturer itself, and their installation does not require special skills from the user - just follow the instructions on the phone screen. Official Firmware can also be downloaded from the manufacturer’s website or on specialized forums. Stock firmware, as a rule, is stable and has been tested many times for the absence of various bugs, so it is better to use them. |
| Custom or custom | Developed by small companies or the owners of Android devices themselves, they are open source and are an alternative to the pre-installed Android versions. Often used on Chinese phones and in little-known gadgets whose manufacturers do not care about technical support for their products. Using custom software is always associated with the possibility of installing a low-quality update, which will further aggravate the user's problems. Therefore, only people who are confident in their knowledge should download such firmware. One of the most popular is CyanogenMod (now LineageOS). |
Installation Methods
It is necessary to understand that single instructions with firmware that would fit everyone mobile devices, does not exist in principle. Each phone or tablet has its own characteristics that should be taken into account. Installing the wrong software version or disrupting the update process can result in the gadget turning into a so-called brick. Therefore, before you start flashing, you should carefully read all the available information about the model of a particular gadget and methods for reinstalling software on it.
Install on device new firmware can be done in several ways:
|
Flashing technique |
Description |
| Through stock (installed by the manufacturer) recovery | The method is only relevant if the user is going to perform an official software update. |
| Through custom (CWM, Philz or TWRP) recovery | Suitable for installing custom updates and firmware in .zip format. When used correctly, the method is almost universal, but not every device can have a ready-made custom recovery. There is a possibility that you will have to port it yourself. |
| Using a PC and a special utility | To install firmware on a phone via a computer, the user will need to download all the necessary drivers and use a special flashing program, for example, SP Flash Tool (for devices with an MTK processor), Research Download (for smartphones on Spreadtrum) or ADB. Some manufacturers produce special utilities designed for their phones, for example, Kies for Samsung and KDZ for LG. |
Preparation for the process
If the user has read all the necessary information, weighed the risks and is ready to start flashing the gadget, then in order to successfully complete the procedure, it is necessary to carefully prepare for it.
When flashing your device using custom recovery, you must first download and install it. If you have root rights, you can do this using special android applications, for example, Rashr. If the device does not have superuser rights, the recovery in .img format will have to be downloaded from specialized forums and installed using a flash driver.
If the user is going to flash the phone through a computer, he will need to download the appropriate program, as well as drivers designed for specific device. Sometimes the flasher itself installs the missing utilities when connecting the phone to the PC, but more often the user still has to search for them manually. Some can be downloaded through special online services such as DriverPack Solution.
In addition, you will need to find suitable firmware. If your device has Root, you can do without a PC by installing it on Android program ROM Manager and downloading the desired software version from it. But this method is not suitable for all smartphones; in the case of little-known budget models and Chinese gadgets, it is useless.

When all the necessary files have been found, you can proceed to the second stage of preparation:
- Charge your phone completely. If the battery runs out during the firmware process, the device will turn into a “brick”.
- Make a backup copy of important data. When reinstalling the software, all information located on the smartphone will be lost.
- Create a backup of the system to be able to restore the phone’s functionality in case of unforeseen problems.
Update from recovery
Custom recovery allows you to flash a smartphone without a computer by first downloading the firmware or backup file in .zip format to the device (or better yet, to an SD card). The interface in different recovery systems may differ slightly, but the principle of installing the software is the same for all.
For example, to flash your phone using TWRP you need to do the following:

The first launch of Android after flashing may take up to 10 minutes, this is absolutely normal and nothing to worry about. However, if after the specified time the system still does not boot, we can talk about a “bootloop”, that is, a cyclic restart. In this case, you should reboot into recovery and restore from the previously created OS backup.
If your phone makes sounds and responds to touches, but there is no image on the screen, installed firmware not suitable for of this type display. You need to find and download another version of the software.
It’s even worse if, after unsuccessful firmware, the device starts to heat up so much that back cover impossible to touch. Here we are talking about a more serious problem - failure of the processor or flash memory. The only thing that can be done in such a situation is to contact a service center for help.
Replacing software via computer
There can be several ways to flash a phone using a PC, depending on the device model and the processor installed on it. However, in any case, the user will need a high-quality USB cable, preferably the one that came with the phone. Losing the connection to the computer during the flashing process will end disastrously for the smartphone, so you should not neglect this detail.
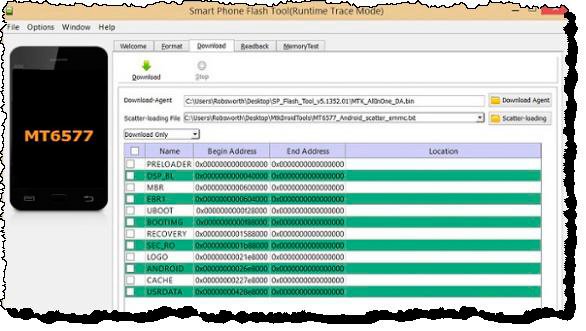
Devices on the MTK processor are flashed as follows:
- Unpack the firmware archive into a folder on drive C (the name of the latter should not contain Cyrillic characters).
- Launch the SP Flash Tool program, press the Scatter-loading key and indicate the path to the file of the same name, which is located in the folder with the unpacked firmware.
- Uncheck the Preloader line. This item is mandatory: if something goes wrong during the firmware installation, a working preloader will allow you to restore your smartphone even from a “bricked” state. If the file is overwritten incorrectly, the user will have to spend a lot of money on repairing the phone.
- Click on the Download button.
- Connect the switched off phone to the computer and wait for the process to complete, which will be notified by the appearance of a window with a green circle.
- Disconnect the smartphone from the PC and turn it on.
The first launch may take 5-10 minutes, but no more. If the flashing is completed successfully, the device will boot with the new system.
Firmware for smartphones on Spreadtrum is somewhat more complicated. To carry out this procedure you must:
- Download the firmware file in .pac format and move it to the root of drive C (no need to unpack).
- Open Research Download, click on the gear icon in the upper left corner and specify the path to the firmware. After this, the program will freeze for a while - this is normal.
- Press the Play button, putting the flasher into device standby mode.
- Turn off the phone, remove the battery from it (if it is removable) and insert it back.
- Press the volume down key and connect your smartphone to the PC.
- If the firmware has started successfully, you should wait for it to finish, that is, the Passed inscription. It is better not to release the volume key until the process is completed. If the program produces errors or does not respond to connecting a smartphone, you should make sure that all the necessary drivers are installed on your computer and visit the Research Download developer’s website to find out the cause of the problem.
- Upon completion of the firmware, click on the “Stop” button in the flasher and disconnect the phone from the computer. If the battery is removable, remove it, insert it back and turn on the device.
Smartphones for which they are designed special utilities(Samsung, HTC, LG, etc.) are flashed according to the instructions included with the specific program.
Using Android Debug Bridge
ADB is a console application for PC that allows you to debug devices under Android control(including emulators). If you use ADB commands correctly, you can flash almost any smartphone. The program is supplied as part of the Android SDK.
With ADB you can do the following:
- view the list of connected devices that support working with the utility;
- remove and install applications on Android;
- clear and overwrite the data section;
- install firmware and custom recovery;
- record logs;
- change control scripts;
- make backups.
The program requires the user to have certain skills (in particular, the ability to work with the command line) and knowledge of console commands. Therefore, before you think about flashing the device’s firmware using it, you need to read the instructions. The latter is presented on the developer's website.
Reflash your phone for free with my own hands is possible for almost every person who has at least a basic understanding of the principle Android work. But you need to understand that replacing software is a responsible and time-consuming process that can result in a breakdown of the smartphone.
