Nvidia Shield TV set-top box: media player and game console. NVIDIA Shield TV - the ruthless executioner of the Android box market Nvidia TV set-top box
This is a subtype of expansion boards that dock with Arduino like a sandwich.
In our opinion, expansion boards can be divided into two types:
Passive
They do not carry any special meaning and are created largely for the convenience of users. A striking example of this are:
Serves for convenient connection various sensors and modules using
Expanding functionality
Significantly expand the capabilities of Arduino. Notable examples are:


Allows you to connect Arduino to a phone supporting Android, as well as connect various devices with a USB interface

Shields that expand functionality, just like Arduino modules ( ), have on board a specific element (motor driver, ethernet controller, display, etc.) with all the necessary hardware for its operation. Unlike modules that can be connected to arbitrary Arduino pins, the shield pins, in most cases, are rigidly tied to Arduino pins. This is the price to pay for a very simple and convenient connection. If you want to assemble your project in the form of a sandwich of shields, then you need to pay attention to this in advance and check that the boards do not use pins of the same name.
These boards significantly expand the functionality of the Arduino board. Among the most striking examples are
adds the ability to connect motors to Arduino
Allows you to control the Arduino board via a local network or the Internet
Board for outputting information to a 1602 text display, additionally equipped with buttons
Allows you to connect Arduino to an Android phone, as well as connect various devices with a USB interface
Shield is an add-on board. I propose dividing shields into full-size and separate modules. Full-size ones repeat the shape of the Arduino board, be it UNO, Nano or MEGA. Individual modules are free-form boards designed to perform a specific set of functions. Both of them can be both universal and for performing narrowly focused tasks.
In stores you can find a great variety of shields, and with certain qualifications, you yourself can lay out a printed circuit board that replicates the Arduino in shape and location of pins and assemble your own unique one. The picture shows it with a set of shields.
Let's start with the shield, which does not carry any special functions, but was created for ease of installation of your projects. So, the first one in our review will make it easier to install projects with an Arduino Nano board, although the small size of the “NANO” in this case is of zero use.
The board contains a connector for connecting a plug from the power supply, a voltage stabilizer, as well as terminal blocks. They are signed and correspond to the conclusions of Nanka. In addition, there is a “reset” button and a “Power” LED.

The second shield is for the Uno board. It contains a solderless breadboard for assembling the project and pins that duplicate those on the Arduino itself - a convenient solution.

Any analog sensor needs power and a negative contact; when there are many of them, there are so many jumpers that it will be very difficult to understand the circuit. Therefore, designers came up with shields for such solutions. All inputs and outputs are displayed in them, and the power contacts are duplicated and placed nearby.
Here is an example of such a board for Arduino Mega version.

Wired and Wireless
Using these boards, you can organize control of the microcontroller over a network via an Ethernet cable, for example, or wirelessly via a GSM connection by inserting a SIM card.

This board is called w5100 - it contains an Ethernet module and an SD card reader module. This means that you can store data, for example, a log of sensor measurements on a memory card and control the system via a web interface. To connect Arduino with it, use the following libraries:
Ethernet library;
Please note that outwardly it repeats the concept of the Arduino UNO R3, in addition, it is suitable for Mega.
If the W5100 seems too large to you, then the ENC28J60 will take up less space. Unfortunately, it no longer has an SD module.

The downside is that it cannot be mounted on a board, but is made as a separate module.
W5500 is another Ethernet shield option. At its core, it is a modified version of the W5100, optimized in terms of speed and energy efficiency.

Please note that on full-size shields all pins are duplicated by the terminal block. Unfortunately, shields use ports. This particular one uses MOSI, MISO, SCK, and pin 10 for the CS (communication destination selection) signal.
If you need wireless communication, your choice is Wi-Fi shields, if you have the Internet and a router, and if you don’t have this, GSM modules or GPRS Shields.

The photo shows the official shield. It has a slot for a Micro SD memory card, and it communicates with the microcontroller via SPI protocols; you can update its software via Mini-USB. Supports 802.11b/g.

You can see the GPRS shield from Amperka above. You can replace the antenna with a more powerful one. Closer to the viewer the slot for the SIM card is visible, a little further there is a slot for the CR1225 battery. The battery on the board is needed to run the real time clock, and this is an important addition to the capabilities of the GPRS shield. You can send SMS to and from it.
Using this board, you can control and give commands (or any other project of your implementation) from any distance. It is important that you are within cellular reception range.
How to store data on Arduino?
In projects, not all information fits into the microcontroller memory. Sometimes it is necessary to store certain amounts of information. The first thing that comes to mind, as has already been said, is recording information from sensors in order to further study how the environment changes over the course of hours, days, years. An excellent example is - home weather station. This is useful not only for research scientists, but also for amateurs for general education and development.

This is more likely not a shield, but a module. It is miniature and easy to repeat; by the way, here is its diagram.

There is also a full-size data storage shield. Works with SD memory cards, there is a real-time clock module on board, which is powered by a 3 V CR1220 battery, which is a good bonus.

We control a powerful load from a microcontroller
The first thing that might come to mind is a relay. With their help, you can switch both DC circuits and a 220-volt household power supply, they can cope with a bang.
Specifically, the module shown below can switch 1 kW 220 V load (or 5A) for each channel; to increase power, you can either parallelize several channels or turn on this relay. In this case, the relays from the shield will play the role of intermediate amplifiers.

Of course, you can switch the relay as I described in the article, through a transistor and you need to select a relay according to the current, but using a ready-made board will be more reliable, more convenient and looks better.
The relay has one drawback - a limited number of operations - this is a consequence of contact burnout. This happens due to the occurrence of an arc when a powerful load is opened (especially of an inductive nature - a motor, etc.). You can make such a shield according to the following scheme:

And here's what it looks like assembled:

Poem to turn on the load alternating current You can use thyristors and triacs. One problem is that they cannot be connected directly to the Arduino; if the pn junction of the control electrode breaks down, 220 V can end up on the microcontroller board and burn it out. The way out of this situation is to use an optosimistor.
Since this task often faces inventors, a ready-made solution was developed - a triac shield, its full name is ICStation 8 Channel EL Escudo Dos Shield for Arduino. It was originally intended to control the glow of “flexible neon”.

It has 8 channels to which the AC mains and load are connected.
Engine shields
Controlling an electric motor is not always an easy process. In some situations, you may not have enough pins to implement the task, or the control algorithm is quite complex. With such boards you will complete your robot project much faster.
Motor-SHIELD for Arduino can control DC motors (4 pieces) or two stepper motors.

It is built on the basis of two L293. This microcircuit is an assembly of two H bridges, this allows you to control, with the possibility of reverse, two DFCs, or 1 stepper bipolar motor. Connection diagrams accordingly:

And in the upper left corner of the board there are two blocks for servos (plus, minus and control signal). The red circle circles the place where the jumper jumper is installed. If it is, then this board is powered from the Arduino base board, and if not, from an external 5 V source.

Using this module from a domestic manufacturer, you can control two DC motors; it also has a jumper that connects the microcontroller power lines or disconnects them - for power from a separate source.

You can control motors that are designed for a voltage range from 5 to 24 Volts. Instead of 2 DC motors, you can use 1 single-phase stepper or parallel the channels and connect 1 powerful DC motor with a current of up to 4A, and this is not small - 48 W with a supply voltage of 24 V.
To connect a servo you need three wires - plus, minus and signal, but what if you have a lot of servos? Your board will turn into a mess of jumpers. To avoid this there is a Multiservo Shield.
Here, too, it is possible to separate the power circuits, as was the case in the previous version. In total, you can connect 18 servos (numbered on the board from 0 to 17).

Everywhere has its own specifics, shields for unusual tasks...
Atmega328, the heart of our board, has an ADC. The main problem is that on the Arduino Uno board we see only 6 analog inputs. What if we have more analog sensors?
You can assemble two Arduinos into a single network. Use one as the main one, and the second auxiliary for changes, and from the first one send measurement signals to the server or display them on the screen... But this is difficult: you need to waste memory on additional lines program code to implement such a system.
What if you multiply each input by 16? In total, we can have up to 16*6=96 analog inputs. This is possible using a multiplexer. It simply switches 16 analog channels in turn to one analog output, which you connect to the same input of any worldcontroller.

It is very difficult to release a voice recognition function using the Atmega microcontroller, but Arduino engineers can not despair, there is a special solution - EasyVR Shield 3.0.
This is a ready-made, but expensive solution; at the time of writing, it costs almost $100 in Russia. First, the shield will write down your command, then compare it with what is written in memory, determining the number, and execute it.
You can have a “dialogue with the computer”; it can reproduce what is recorded in it. Without additional amplifiers, it is recommended to “communicate” with this board from a distance of no more than 60 cm.

Displaying the image
LCD Keypad shield is real panel management. It contains an LCD1602 display (16 characters in two lines) and a set of buttons. Because of them, quite a lot of ports are used, for example A0 and D4 to D7 for the keyboard, and port D10 is a PWM backlight brightness control. D8 and D9 - reset and enable.

In fact, there are many Arduino compatible displays. Or rather, those about which the most information has been written and you can easily launch them on your system. The display from NOKIA 5110 is quite popular in DIY circles; there are OLED and TFT screens that work via I2C to choose from. But they are not in the “shield” version.

Self-powered
Quite an unusual shield in this collection, which performs a common task. Power shield - this comes with all the necessary protections and a charging connector. It doesn't seem like much, but it will give your project a finished look without having to place the power circuits next to the main boards.

Conclusion
Using shields for all project tasks will avoid an excessive number of jumpers and connections, and this will reduce the number of errors and unnecessary jumpers. After assembly, you will receive a multi-story sandwich of factory-made circuit boards. This approach is sometimes called "modular design." By the way, this will facilitate the maintenance, repair and adjustment of equipment.
Enthusiasts practice designing, wiring and assembling unique modules. This is one of the reasons for the high popularity of Arduino, not just as a platform for homemade products, breadboards and prototypes, but also as a platform for ready-made solutions.
Over the past year, I told you about almost all the key players in the Android box market: Xiaomi Mi Box (Amlogic S905X-H), MINIX Neo U9-H (Amlogic S912-H), Ugoos AM3 (Amlogic S912), Zidoo X8/X9S /X10 (Realtek RTD1295DD). All that remains to talk about is HiMedia Q10 Pro on HiSilicon HI3798CV200 and NVIDIA Shield TV on NVIDIA Tegra X1. I should have already reviewed the HiMedia Q10 Pro, but there were problems with the delivery service, and the box is flying back to HiMedia. He will definitely return a little later. Well, today I will tell you about NVIDIA Shield TV. No, of course, I knew that NVIDIA Shield TV was a cool Android box, but for it to be so... This is in reality a diabolical barrel organ for a wide range of consumers (from “I don’t know anything at all and can’t do it, I just want to turn on the box and receive pleasure" to "what are you telling me about autoframe rate, uniformity, HD audio output and firmware, I know everything without you"). I even experienced professional deformation - now I don’t know how to pick up other boxes without making a face, but I’ll try. Any company that makes Android boxes should distribute NVIDIA Shield TV to all of its key employees so that they clearly understand which product they should look up to.
Specifications
| Model | NVIDIA Shield TV (2017) P2897 Kit without gamepad |
| Housing materials | Plastic |
| SoC | NVIDIA Tegra X1 4 ARM Cortex-A57 cores + 4 ARM Cortex-A53 cores up to 2 GHz GPU GeForce 6 ULP (GM204) |
| RAM | 3 GB DDR3 |
| Inner memory | 16 GB (eMMC) Expandable via USB stick |
| USB | 2 x USB 3.0 |
| Memory card support | No |
| Network interfaces | Wi-Fi 802.11a/b/g/n/ac, 2.4 GHz and 5 GHz, MIMO 2x2 Gigabit Ethernet (1000 Mbps) |
| Bluetooth | Bluetooth v4.1 |
| Video outputs | HDMI 2.0b (up to 3840x2160@60 Hz, Rec. 2020, HDCP 2.2) |
| Audio outputs | HDMI |
| Remote controller | Bluetooth + IR Microphone |
| Nutrition | 19 V / 2.1 A |
| OS | Android TV 7.0 SHIELD Experience 6.2 |
Equipment and appearance
The NVIDIA Shield TV comes in a large, thick cardboard box.
Technical information is printed on the side.

Inside: set-top box, power supply with European (type C) and British (type G) attachments, remote control, quick guide and reference information, including in Russian. Modestly. There's not even an HDMI cable included.

The power supply is branded and quite large. Voltage 19 V, maximum current 2.1 A. Cable length about 180 cm. Proprietary connector.
 |  |  |  |
 |  |  |

The box body is made of plastic. Chopped shapes look very unusual. Some elements are matte, some are glossy. The glossy part is instantly covered with microscratches.


There is a green insert on top that glows softly when the box is working.

The bottom has a special anti-slip coating and ventilation holes. There are no legs.

Rear: ventilation holes, two USB port 3.0, HDMI port, Ethernet port and power connector.

Disassembly of the device and cooling system
Unscrew the two screws at the back and separate the parts of the case.
Immediately visible active system cooling in the form of a radiator with a snail cooler.

An eMMC SanDisk SDIN9DW4-16G is installed on the reverse side of the board. According to the specifications, its linear speed is 300/45 MB/s (tests will demonstrate the corresponding speed).
We unscrew the radiator, the screws securing the board and turn it over.

All key elements are hidden under shielding covers. The antennas are separated by printed circuit board. Only the power controller and Realtek RTL8111GS Ethernet controller are not hidden. I did not remove the shielding covers.
Although the cooling system is active, it is practically inaudible in operation, even at maximum load. During all testing and use, no throttling was noticed. The maximum case temperature was around 45 °C.
Software
The operating system is Android TV 7.0. The firmware itself with all the improvements from Nvidia is called SHIELD Experience. When first launched, the system offered to upgrade to SHIELD Experience 6.2. This is the latest firmware at the time of writing this review.Let me briefly tell you what Android TV is...
Android TV is essentially the classic Android system with some adaptations. Moreover, starting with Android 7, the difference between Android and Android TV is even more blurred. On Android TV:
- No navigation bar and status line.
- The launcher (home screen) is rigidly fixed - Google Leanback.
- The interface is adapted for TV screens and remote control.
- Google programs and services are also adapted for TV screens and remote control.
- Google Play Store for Android TV contains only those applications that are adapted for Android TV.
Launcher - Google Leanback. The interface is made in the form of tiles with horizontal scrolling in several sections: search, recommendations, applications, games, additional functional elements. Recommendations are customizable - in Settings you can specify which programs can add recommendations. Applications and games can be sorted automatically or manually. The screenshots show a system with third-party programs and games installed.
 |  |  |

Google Play Store made in the same style. It contains only programs that are adapted for Android TV. But many programs and games without an adapted interface work fine on Android TV. If you need to install a program that is not available in the Google Play Store for Android TV, then there are several options. If the program does not have any restrictions, and it simply does not have an Android TV interface, then open Google Play in a web browser on your computer under the same account, as on Shield TV. Select this program or game, click the “Install” button and indicate on which device (in this particular case SHIELD TV). Or you can search for this program or game on the box in your browser and open the found link in Google Play. It will open without any problems in the Google Play Store for Android TV, and you can install it. If the program states any restrictions, there is only the option of installing from an apk file.
 |  |

The system runs Google Cast. At any time, from any device in supported programs, you can stream content directly to your TV (Shield TV). For example, you can open Google Play Movies on your smartphone and start playing it on Shield TV. You can control playback directly on your smartphone (however, the video itself does not play on the smartphone). If necessary, Google Play Movies on your smartphone can be closed, and playback will continue on the box.
 |  |
Launch HD VideoBox. The HD VideoBox program starts.

The weather in Moscow. The weather is displayed.

Where does the Don River flow? Sea of Azov.

inDud. A list of YouTube videos opens.

Paradise Lost. A list of Paradise Lost clips on YouTube opens.

Valerian and the City of a Thousand Planets. Full information on the film, actors, etc. opens. You can immediately go to, for example, HD VideoBox, if this film is there.

What's on at the cinema today? The current list of films in cinemas opens.

There is no root support in the system. But if necessary, you can easily install TWRP and add root support. Those interested can even install a regular clean Android 7 system on the box.
To enjoy the Android TV system, you need to accept its remote control philosophy.
You will learn about all other features and settings of the system as the review progresses.
Remote control, gamepads, HDMI CEC
The standard Shield Remote works via Bluetooth (for communication with the box) and via IR (for working with equipment in certain cases). The remote has a touch panel to adjust the volume. The remote control is quite convenient.
After the first launch, the system immediately offered to update the remote control software.

Brief description of the remote control functions:

Long press the Back button - power menu (Sleep or Reboot).

You can completely turn off the box through the “About device” menu.

Double-clicking the Home button displays a list of previously running programs.

Long press the Home button - screen video recording menu, broadcast on Twitch, screenshot.

HDMI CEC support should work like this in an ideal situation:
- A. Send the box to sleep using the Shield Remote, the TV/receiver turns off (goes into standby mode).
- B. Wake up the box using the Shield Remote (any button), the TV/receiver turns on.
- C. Using the Shield Remote, you can adjust the volume of the TV/receiver (if this option is enabled).
- D. Turn on the TV/receiver using the standard TV/receiver remote control, Shield TV turns on.
- F. Turn off the TV/receiver using the standard TV/receiver remote control, Shield TV turns off.
- G. The TV remote control can control the box.
In Settings you can enable CEC support for power functions. There you can also enable IR support for a specific TV/receiver model and choose how the volume will be adjusted: on the box, on the TV/receiver using CEC, on the TV/receiver via IR.
 |  |
- A. No. Only via IR. In this case, when the box is put to sleep, the remote control must be directed towards the TV.
- B. Yes.
- C. No. Only via IR.
- D. Yes.
- F. Yes.
- G. Yes.
In my review, I have a version of the box without the included gamepad. A cheap Chinese gamepad (for $7) and a Xiaomi Mi Gamepad connected via Bluetooth and worked without problems. Of course, a cheap gamepad is only for testing. You wouldn't wish playing on it to your enemy. But my children and I simply adore the Xiaomi Mi Gamepad. It is one of those gamepads that you don’t want to let go of.

Performance
The console uses SoC NVIDIA Tegra X1 - 4 ARM Cortex-A57 cores and 4 ARM Cortex-A53 cores up to 2 GHz, GPU GeForce 6 ULP (GM204). This is a top box processor, and there are no other boxes on the market with a similar class SoC. The system and any programs work very quickly and smoothly. I will talk about the games separately in the next section of the review. You need to understand that the main thing in Android boxes is media functionality, i.e. VPU and implementation of its capabilities in software. This will also be discussed in separate sections of the review. But the processor and GPU must have enough power to make working with the device comfortable. NVIDIA Tegra X1 has power that covers comfortable work with a huge margin. And the power of the GPU is absolutely prohibitive.
NVIDIA Shield TV displays the interface at a maximum resolution of 1920x1080. Even if you select 3840x2160 resolution on the system, the interface and all programs will continue to run at 1920x1080 resolution and scaled to 3840x2160. As with many boxes, only SurfaceViews can output true 4K resolution. It is this output that is used in video players (and not only in them - programs for viewing photos can also use this output, even games in theory) to provide real 4K resolution for video. Those. in fact, it doesn’t matter at what resolution you run test programs and games - at 1920x1080 and 3840x2160 the result will be identical. But for the purity of the tests, I used a system resolution of 3840x2160.
CPU
GPU
| NVIDIA Shield TV | |
| 3DMark Sling Shot Extreme | 4100 |
| Bonsai | 4200 (60 fps) |
| GFXBenchmark T-Rex | 60 fps |
| GFXBenchmark T-Rex 1080p Offscreen | 121 fps |
| GFXBenchmark Manhattan 3.1 | 46 fps |
| GFXBenchmark Manhattan 3.1 1080p Offscreen | 47 fps |
| GFXBenchmark Car Chase | 29 fps |
| GFXBenchmark Car Chase 1080p Offscreen | 30 fps |
Games
Games for NVIDIA Shield TV can be divided into three groups:- Games for Android (these are games from Google Play)
- Stream games from PC via NVIDIA GameStream
- Cloud game streaming via GeForce NOW
First I wanted to make a table with some games (like I did in my previous reviews). After trying about 10 games, I gave up on this idea. There isn't a single Android game that doesn't run perfectly on the Shield TV box. An excellent and huge selection of games can be viewed on the NVIDIA website (Library section). From there you can go straight to Google Play to download or purchase. All games support gamepad or remote control. As is usually the case, there are exclusives for Shield TV, for example: Metal Gear Solid 2/3, Half-Life 2, Portal, Doom 3, Never Alone, etc.

Stream games from PC via NVIDIA GameStream
In my reviews, I already told you about the amazing Moonlight Game Streaming program for Android, with which you can use the NVIDIA GameStream service on many Android boxes, i.e. play games that are installed on your PC with an Nvidia video card - stream them to the box. For Shield TV you don't need any third party programs. Everything is already in the system. The program is called NVIDIA Games. It combines the GeForce NOW service and NVIDIA GameStream, and local games installed on the box. Just connect to your PC local network, choose any game on it and play. You can set the resolution and frame rate (up to 2160p60).
 |  |  |
Cloud game streaming via GeForce NOW
This is a cloud service from NVIDIA. The game is launched remotely on NVIDIA servers with cards GeForce GTX 1080 (servers are distributed in zones in different countries, you can manually select if necessary the best option). The selection of games is quite large. The subscription cost is 650 rubles per month. There are free and paid games. Play comfortably.
 |  |  |
 |  |  |
Internal and external storage
In a fresh system, about 10 GB of internal memory is available to the user. The linear read speed is at a level prohibitive for boxes, but the linear write speed is at the level of budget boxes - 252/27 MB/s.

A drive connected via USB 3.0 can act as a separate removable drive or can be combined into a single unit with the internal memory of the device. The need for an external drive, the choice of its role, the choice of drive type (USB flash drive, hard drive, SSD) depend on the scenario for using the box.
Checking supported file systems.
| FAT32 | exFAT | NTFS | HFS+ | |
| USB | read/write | read/write | read/write | read/write |
I connected different drives. A 3.5" disk with a capacity of 2 TB worked without problems. Here is an example of the speed of a fast USB flash drive (it corresponds to the speed on a PC):

Network interfaces and network services
The Realtek RTL8111GS controller is responsible for the wired network. The wireless network is controlled by a controller (hidden under a metal screen) with support for 802.11a/b/g/n/ac, 2.4 GHz and 5 GHz, MIMO 2x2. The antennas are made on a printed circuit board.The set-top box is located 5 meters from the Xiaomi Mi Roiter 3G router through one reinforced concrete wall - this is the place in which I test all Android boxes and mini-PCs. The current record holder is Xiaomi Mi Box 3 Enhanced (802.11ac, MIMO 2x2) - 150 Mbit/s.
The tests were carried out using iperf 3. The iperf server was launched on a computer connected to a local network via Gigabit Ethernet. The R key is selected - the server transmits, the device receives.
The actual data transfer speed over the wired interface is at the level of 945 Mbit/s.

Wi-Fi speed when connected using the 802.11ac standard is 166 Mbps. And these are record values for Android boxes.

During the entire testing period (I spent most of the time with Wi-Fi connection) there were no connection breaks or reconnections. IPTV (different providers), Torrent Stream Controller, VOD services, BDRip, BDRemux, UHD BDRip, UHD BDRemux from NAS played without problems. BDRip, BDRemux from torrents directly too. But UHD BDRip and UHD BDRemux from torrents directly and stably only over a wired network.
The system has a built-in Samba/CIFS client and server. You can connect network attached storage (NAS) in Settings. At the same time, they are mounted in the /storage folder (i.e., fully at the file system level). The downside is that they are mounted read-only. It looks like a bug, because when this feature appeared in one of the updates, the description listed write access.

The server is also enabled in Settings. In this case, you get full access (read and write) to the internal and external storage (if connected).
 |  |
General information about audio/video decoding and output
Each box has certain nuances when working with audio and video. The key to comfortable use of boxing lies in knowledge of these nuances and the correct selection of software for certain tasks (video player).NVIDIA Shield TV does not have a license to decode (downmix) audio in AC3, DTS, etc. formats, therefore, the system does not have such decoders, neither in StageFright nor in MediaCodec. Such streams need to be decoded programmatically (using the video player) or sent in their original form to the receiver/TV (the video player must be able to do this).
In NVIDIA Shield TV, decoders in the StageFright and MediaCodec libraries are of equal quality. Both options support high-quality deinterlacing. Each field is converted into a separate frame, i.e., for example, a 25i stream at the input turns into a 50p stream at the output.
NVIDIA Shield TV supports the so-called “modern” autoframe rate, i.e. The system implements an API for switching scanning frequencies. The autoframe rate is controlled by the programs themselves. This means that you need to choose video players that support modern autoframe rates.
The Tegra X1 SoC does not support the VP9 profile 2 decoder. This means, for example, YouTube will not have HDR support.
The system does not have an HDR to SDR conversion function. This means that you will not be able to comfortably watch HDR content on a TV without HDR support.
ViMu Media Player. This lightweight player with convenient and simple interface Great for Shield TV. Especially in conjunction with HD VideoBox, Torrent Stream Controller (and similar P2P IPTV), IPTV managers with an external player. It is ideal for playing videos, up to BDRemux locally, from NAS and torrents directly through Ace Stream. It supports modern autoframe rate (enabled in settings). It has a software AC3 decoder. It has a convenient video scaling function (with individual settings for 4:3, 16:9, 2.35:1). It can pass AC3 and DTS to the receiver/TV for decoding (I have not tested HD formats with this player). At the time of writing the review, ViMu Media Player v6.50 had problems playing HEVC Main 10 content on Shield TV (no problems with HEVC).
Kodi 17+. This is a very powerful media harvester and cataloger. But in this particular case, we are only interested in its player, which is very advanced both in implementation and in detailed audio and video settings. It has all the latest software audio decoders (downmix). On NVIDIA Shield TV, it can directly output all current audio formats (including DTS:X, Dolby Atmos, PCM 2.0 24/192). It supports modern autoframe rates. It is ideal for playing videos up to UHD BDRemux (4K with HDR), locally, from NAS and torrents directly through Ace Stream.
Sound format support and audio output
Sound output is via HDMI, USB DAC or Bluetooth. Let's see how things are in reality with audio output via HDMI. An Onkyo receiver was used for the test.HDMI output
Everything is perfect with multi-channel audio and Hi-Res output.
Video format support and video output
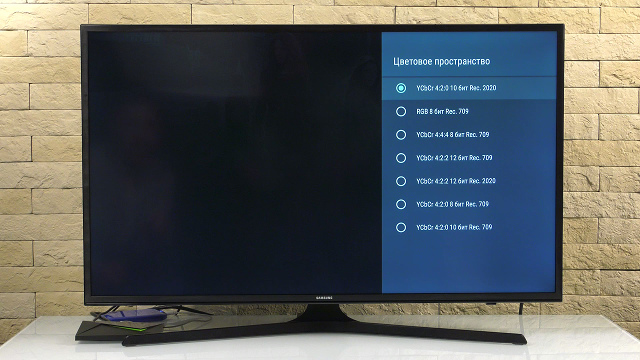
NVIDIA Shield TV has HDMI 2.0b output. Supports resolutions up to 3840x2160 60Hz with HDR (Rec. 2020). You can select the HDMI color space. The interface is displayed with a maximum resolution of 1920x1080. Even if you select 3840x2160 resolution on the system, the interface and all programs will continue to run at 1920x1080 resolution and scaled to 3840x2160. As with many boxes, only SurfaceView objects can output true 4K resolution with HDR support, and they are used in many players.
I tested it on regular consumer stuff (it was online on a NAS) using ViMu and Kodi.
The set-top box can handle decoding H.264 up to 2160p60. 60 frames are fair. Any BDRip, BDRemux and videos from action cameras (2160p60) are played without problems. The set-top box can handle decoding H.265 Main 10 (10 bit) up to 2160p60. 60 frames are fair. Any UHD WEBRip, UHD BDRip, UHD BDRemux with HDR can be played without problems in Kodi. Some strange things arose with ViMu v6.50. The player refused to play both 1080p and 2160p HEVC Main 10 (there were no problems with HEVC). This is some kind of bug in the program. In any case, this is not so critical, because... for “heavy” content UHD BDRip, UHD BDRemux is better suited to Kodi. There were no problems with switching audio tracks or rewinding either. I have no complaints about the video quality and HDR visually.
There was a problem with only one test file, LG 4K Demo: View the Feeling (HEVC 2160p29.97). The uniformity was disrupted.
The system does not have its own specialized player; BD ISOs are played in Kodi without menu support.
Interlaced video is played with correct deinterlacing. Each field turns into a separate frame.
Autoframerate
Autoframe works great. All scan frequencies are supported: 23.976, 24, 25, 29.97, 30, 50, 59.94, 60 Hz. In ViMu, switching occurs with full compliance. In Kodi, the refresh rate is doubled for 25, 29.97, 30 fps. But this is the standard autoframe mode for Kodi, in configuration file this can be changed.
In all modes, the uniformity was perfect. It couldn't get any better. Here are shots of the test material in ViMu (they are identical for Kodi): 24p (running square) at 24 Hz, 24p (arrow) at 24 Hz, 25p at 25 Hz, 30p at 30 Hz, 50p at 50 Hz, 60p at 60 Hz.
 |  |  |  |  |  |
There is no 3D support. MVC MKV is rendered in 2D. BD3D ISO in Kodi 17.6 is only displayed in 2D.
DRM and legal VOD services
The system has support for Google Widevine DRM Level 1 and HDCP 2.2.
Moreover, the NVIDIA Shield TV box is certified for use with key VOD services - Netflix and Amazon Prime Video. Clients are pre-installed in the system and have full support for 4K, HDR and multi-channel audio output (for relevant content).
VOD services and playing videos from torrents directly
One of the most popular programs for Android boxes in Russia is HD VideoBox. This is an aggregator of illegal online cinemas and a convenient torrent search engine with thoughtful navigation, search and management. Works great in conjunction with ViMu. Naturally, auto-framing works. |  |  |  |
The HD VideoBox + Ace Stream + ViMu combination works flawlessly on NVIDIA Shield TV up to BDRemux with any size (at least 40 GB). It is not used inner memory or external media for caching, RAM only. A couple of clicks in HD VideoBox, just select the desired torrent and watch the video with amazing quality, auto-framing and multi-channel audio. Switching audio tracks and rewinding work very quickly.

With UHD BDRip and UHD BDRemux it’s a little more complicated, because... additional conditions apply. You need high bandwidth of your Internet channel. You need a lot of seeders that will ensure high torrent download speed. The Shield TV's 3 GB of RAM is no longer sufficient for caching and needs to be used external storage and fast enough (fast hard drive or SSD). If these conditions are met, then HD VideoBox + Ace Stream + Kodi will do all the work for you on NVIDIA Shield TV. UHD BDRemux (4K with HDR) plays perfectly with HD audio output without pre-loading. Autoframe works correctly audio tracks switch, rewind works (but takes a long time with buffering). The future is already here. Even if it is not entirely legal, the fact is that the NVIDIA Shield TV box is ready for this.
IPTV
IPTV from EDEM, OTTClub, local provider worked perfectly. There were no problems with any channel. Perfect Player (one of best programs for IPTV) with the HW+ decoder switched channels in a split second. A modified version(which switches the scan frequency to 50 Hz during operation) displayed video with perfect uniformity for 99% of the channels (there are 25p, 50p, 25i streams).
Torrent Stream Controller + ViMu is also fine. All channels (most of which are direct streams from satellite without compression) came with correct deinterlacing and auto-frame rate.

YouTube
The YouTube client for Android TV (2.02.08) plays videos up to 2160p60 without any problems. Only HDR support is not available (Tegra X1 does not support the VP9 profile 2 decoder, which is needed for YouTube). I tested the options with all the frame rates that are used on YouTube (uploading test videos there). In all cases, the correct conversion was used (since YouTube does not support the autoframe rate for Android TV, the output was carried out at 60 Hz), there were no frame drops. 24p - 2:3 pulldown, 25p - 2:3:2:3:2 pulldown, 30p - frame duplication, 50p - 1:1:1:1:2 pulldown.
 |  |  |  |  |
Conclusion
NVIDIA Shield TV is a very functional and high-quality Android box straight out of the box from an A-brand. Its capabilities are the limit of what modern Android boxes can do. Of course, a device of this level simply cannot be cheap. And NVIDIA Shield TV is more expensive than most boxes on the market. I will list the main pros and cons of the device.PROS
- Very high performance.
- Stability of operation (during the entire testing period there was not a single system failure).
- High-quality and fast Wi-Fi (MIMO 2x2 support).
- Support for “modern” (via the system API) autoframe rate for the entire spectrum of scanning frequencies, including fractional frequencies.
- HD audio output (including DTS:X and Dolby Atmos) in Kodi 17+ (and more).
- Hi-Res stereo output in 24/192 format.
- Technological remote control and thoughtful volume control modes.
- Ideal support for streaming GameStream games from your local PC and GeForce NOW.
- Maximum support for legal VOD services.
- The ability to play torrents directly, up to UHD BDRemux, with rewinding.
- Built-in Samba/CIFS client (with file system level mounting) and server.
- YouTube works up to 2160p60 (VP9)
- Android TV 7.0 with Google Assistant and further updates from the A-brand.
- There is no HDR support in YouTube (VP9 profile 2).
- There is no support for 3D output (meaning Frame Packing output) and MVC (only 2D is played).
- There is no separate power button on the remote, and the IR transmitter is low power.
- High price.
One of the key advantages of the Arduino platform is its popularity. The popular platform is actively supported by manufacturers electronic devices, producing special versions of various boards that expand the basic functionality of the controller. Such boards, quite logically called expansion boards (another name: arduino shield, shield), are used to perform a wide variety of tasks and can significantly simplify the life of an arduino operator. In this article, we will learn what an Arduino expansion board is and how it can be used to work with a variety of Arduino devices: motors (motor driver shields), LCD screens (LCD shields), SD cards (data logger), sensors (sensor shield ) and many others.
Let's first understand the terms. An Arduino expansion board is a complete device designed to perform certain functions and is connected to the main controller using standard connectors. Another popular name for the expansion board is the English-language Arduino shield or simply shield. All the necessary electronic components are installed on the expansion board, and interaction with the microcontroller and other elements of the main board occurs through standard Arduino pins. Most often, power to the shield is also supplied from the main arduino board, although in many cases it is possible to power it from other sources. In any shield there are several free pins that you can use at your discretion by connecting any other components to them.
The English word Shield is translated as shield, screen, screen. In our context, it should be understood as something that covers the controller board, creating an additional layer of the device, a screen behind which various elements are hidden.
Why do we need arduino shields?
Everything is very simple: 1) so that we save time, and 2) someone can make money from this. Why waste time designing, placing, soldering and debugging something that you can take already assembled and start using right away? Well-designed expansion cards assembled on high-quality equipment are usually more reliable and take up less space in the final device. This does not mean that you need to completely abandon self-assembly and you do not need to understand the principle of operation of certain elements. After all, a real engineer always tries to understand how what he uses works. But we will be able to make more complex devices if we do not reinvent the wheel every time, but focus our attention on what few people have solved before.
Naturally, you have to pay for opportunities. Almost always, the cost of the final shield will be higher than the price of individual components; you can always make a similar option cheaper. But here it’s up to you to decide how critical the time or money spent is for you. Taking into account all possible assistance from Chinese industry, the cost of boards is constantly decreasing, so most often the choice is made in favor of using ready-made devices.
The most popular examples of shields are expansion boards for working with sensors, motors, LCD screens, SD cards, network and GPS shields, shields with built-in relays for connecting to the load.
Connecting Arduino Shields
To connect the shield, you just need to carefully “put” it on the main board. Typically, the contacts of the comb type shield (male) are easily inserted into the connectors of the Arduino board. In some cases, it is necessary to carefully adjust the pins if the board itself is not properly soldered. The main thing here is to act carefully and not use excessive force.
As a rule, a shield is intended for a very specific version of the controller, although, for example, many shields for Arduino Uno They work quite well with Arduino Mega boards. The pinout on the mega is made in such a way that the first 14 digital pins and the pins on the opposite side of the board coincide with the pinout on the UNO, so an Arduino shield can easily be inserted into it.
Arduino Shield Programming
Programming a circuit with an expansion board is no different from regular Arduino programming, because from the point of view of the controller, we simply connected our devices to its regular pins. In the sketch you need to indicate those pins that are connected in the shield to the corresponding contacts on the board. As a rule, the manufacturer indicates the correspondence of the pins on the shield itself or in a separate connection instruction. If you download the sketches recommended by the board manufacturer itself, then you won’t even need to do this.
Reading or writing shield signals is also done in the usual way: using the functions , and other commands familiar to any Arduino user. In some cases, collisions are possible when you are accustomed to a particular connection scheme, and the manufacturer has chosen a different one (for example, you pulled the button to the ground, and on the shield to the power supply). Here you just need to be careful.
As a rule, this expansion board comes in Arduino kits and therefore it is with it that Arduino engineers encounter it most often. The shield is quite simple - its main task is to provide more convenient options for connecting to the Arduino board. This is done through additional power and ground connectors located on the board to each of the analog and digital pins. Also on the board you can find connectors for connecting an external power source (you need to install jumpers to switch), an LED and a restart button. Shield options and examples of use can be found in the illustrations.


There are several versions of the touch expansion board. They all differ in the number and type of connectors. The most popular versions today are Sensor Shield v4 and v5.
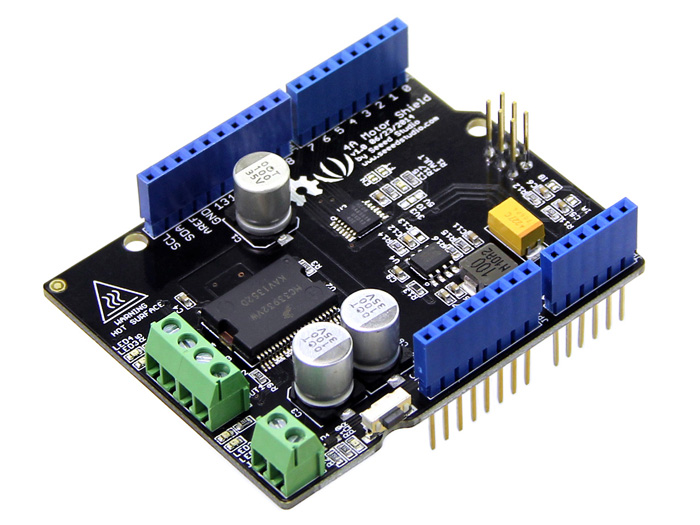
This Arduino shield is very important in robotic projects, because... allows you to connect regular and servo motors to the Arduino board at once. The main task of the shield is to provide control of devices that consume a current that is high enough for a regular Arduino board. Additional features The board has the function of controlling motor power (using PWM) and changing the direction of rotation. There are many types of motor shield boards. What is common to all of them is the presence in the scheme powerful transistor, through which an external load is connected, heat sink elements (usually a radiator), circuits for connecting external power, connectors for connecting motors and pins for connecting to Arduino.


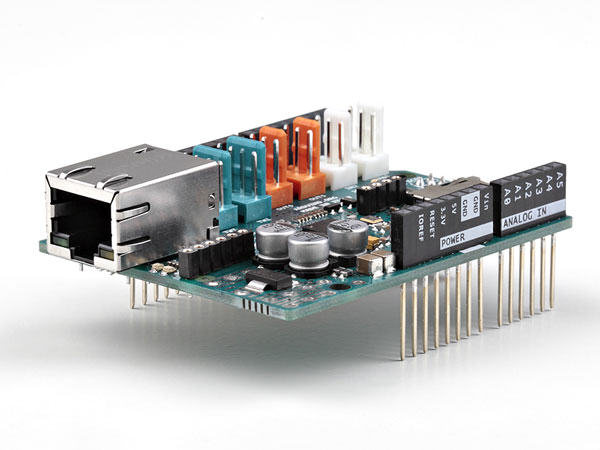
Organizing work with the network is one of the most important tasks in modern projects. A corresponding expansion card is available for connecting to a local network via Ethernet.


Expansion boards for prototyping
These boards are quite simple - they have contact pads for mounting elements, a reset button, and the ability to connect external power. The purpose of these shields is to increase the compactness of the device when everything necessary components located immediately above the main board.


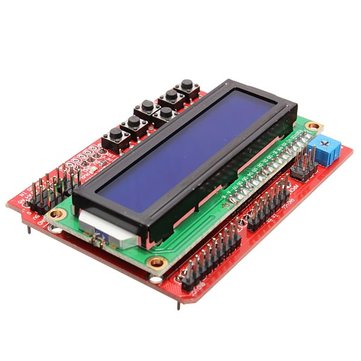
Arduino LCD shield and tft shield
This type of shield is used to work with LCD screens in Arduino. As you know, connecting even the simplest 2-line text screen is far from a trivial task: you need to correctly connect 6 screen contacts at once, not counting the power supply. It is much easier to insert the finished module into the Arduino board and simply upload the corresponding sketch. In the popular LCD Keypad Shield, from 4 to 8 buttons are immediately installed on the board, which allows you to immediately organize an external interface for the user of the device. TFT Shield also helps


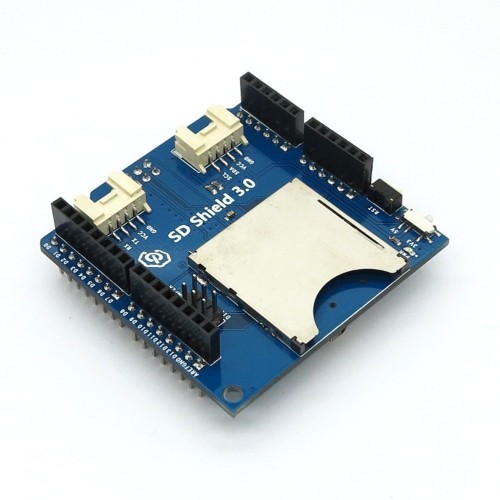
Arduino Data Logger Shield
Another task that is quite difficult to implement independently in your products is saving data received from sensors with a time reference. The finished shield allows you not only to save data and get time from the built-in clock, but also to connect sensors in a convenient form by soldering or on a circuit board.


Brief summary
In this article, we have looked at only a small part of the huge range of various devices that expand the functionality of Arduino. Expansion cards allow you to focus on the most important thing - the logic of your program. The creators of the shields have provided for correct and reliable installation and the necessary power supply. All that remains for you is to find the required board using the treasured English word shield, connect it to the Arduino and upload the sketch. Typically, any shield programming consists of performing simple actions to rename the internal variables of a ready-made program. As a result, we get ease of use and connection, as well as speed of assembly of finished devices or prototypes.
The disadvantage of using expansion cards is their cost and possible loss of efficiency due to the universality of shields, which lies in their nature. For your narrow task or end device, all shield functions may not be needed. In this case, you should use the shield only at the stage of prototyping and testing, and when creating the final version of your device, think about replacing it with a design with your own circuit and type of layout. It's up to you to decide, all the possibilities for the right choice you have.
Media console with gaming services
The first public announcement of the Nvidia Tegra X1 single-chip system took place more than two years ago. Unfortunately, the implementation of real products, despite the impressive hardware characteristics, was very slow. However, the company continued to make efforts in this direction and recently introduced a new model in the series - Nvidia Shield TV, which is already available for purchase, including in our market.
This compact device is positioned as a multifunctional TV set-top box, so it’s not easy to convey all its capabilities in a few words. Among its key features, the company notes support for 4K and HDR, a powerful graphics subsystem, voice control, games via the GeForce Now cloud service and broadcasting games from a computer via GameStream, a remote control and game controller, work under Android control TV and support for streaming video services.
Note that the company uses one word “Shield” to refer to several devices of different generations and their controllers, which may confuse users a little. This article discusses the model with article number P2897.
Specifications
The set-top box runs on SoC Nvidia Tegra X1. This chip is manufactured using a 20 nm process technology and has two blocks of four computing cores (Cortex A57 and Cortex A53), implemented in the ARM big.LITTLE architecture. Their maximum operating frequency is 2 GHz. Apparently, this chip implements a migration mode between clusters, so that only four cores work at a time. Note that in the system settings there is an option to select performance. At the same time, this parameter has a slight effect on the speed in applications.

The SoC also has a powerful GPU- 256 Maxwell cores operating at 1 GHz, support for API DirectX 12, OpenGL 4.5 and OpenGL ES 3.1, video decoding up to 4K inclusive with 60 fps and H.265 and VP9 codecs, video output up to 4Kp60 and 1080p120. There is also a module for video encoding, which can be useful for organizing video broadcasts from a set-top box. In terms of computing performance, this unit surpasses game consoles of previous generations and is comparable to top-end video cards for PCs from ten years ago.

Volume random access memory set-top box is 3 GB. Today this value can hardly be called exclusively flagship, but given the predominantly single-tasking mode of operation there should be no problems. To store firmware and user data, the regular model has a 16 GB flash drive, on which about 11 GB is available to the user. If you plan to use Android games heavily, you may need to install an additional storage device.

Note that the line also includes a “Pro” modification, which has a larger body. It uses a 500 GB hybrid hard drive. Note that we are talking specifically about the main drive of the device, which also includes the system partition. This volume can be useful for storing Android games and applications, as well as recording media files. This version is also equipped with a card slot microSD memory and supports IR control.
You can increase the amount of local storage using USB drives - the set-top box is equipped with two ports supporting version 3.0. They can also be useful for connecting various peripherals. But there is no slot for memory cards in this model.
To connect to a local network and the Internet, the device has a gigabit wired port and a built-in dual-band wireless adapter with support for 802.11n/ac protocols. Moreover, the latter has two antennas implemented on the main printed circuit board. So in a MIMO configuration, it is capable of providing a connection speed of 867 Mbps. But of course, this will require an appropriate router. We also note the presence of Bluetooth 4.1 with BLE support, which, in addition to servicing standard remote controls, can be used to connect headphones, keyboards and other equipment.
Connection to a TV or other display device is via HDMI 2.0b with support for HDCP 2.2 and CEC. Note that the maximum video output mode here is 4Kp60. There is also support for HDR technology.
A centrifugal fan is used to cool the powerful filling. He has automatic adjustment rotation speed and in most cases (from inactivity to work under load, running graphics tests, games and other resource-intensive programs) it was not audible. Although the body of the device does get a little hot in some places, no negative effects were noted. The formal TDP value for the processor used is 15 W.
The standard power supply has a power of 40 W. The real-world power consumption of the test unit without any additional external devices connected, measured from a wall outlet, ranged from 5 W in sleep or idle mode to approximately 20 W during the 3DMark Sling Shot Extreme test.

The console operates under the control of the operating room Android systems 7.0 in a special version of Android TV aimed at connecting to TVs. The firmware has an online update option. Testing was carried out with version 5.1 (24.27.403.124). Note that the company clearly pays serious attention to supporting its products even after their release. The upcoming OTA updates not only fix bugs in previous versions, but also add new features and functionality.
Equipment and appearance
Formally, Nvidia cannot boast of extensive experience in delivering its products for the mass segment to retail stores. However, close interaction with partners on these issues has borne fruit - there are no comments on the packaging of Nvidia Shield TV: strong cardboard, strict design in a minimalist style, glossy inserts in photographs, short description and so on.

The only thing I didn’t like was that opening the box is not so easy - its two parts fit very tightly to each other.

In the box, in special inserts, all the components are located: the device itself, a proprietary power supply for it with replaceable blocks for sockets of different standards, minimal documentation, remote control remote control and a gamepad with a charging cable (standard USB-Micro-USB 1.5 m long).

The parameters of the set-top box power supply are 19 V 2.1 A. Its connector is non-standard, and the cable length is 1.8 m. On the one hand, this allows for a stable power supply and a reliable connection, and on the other hand, it requires the use of only the original version.

We will tell you more about control devices below. In any case, it is worth recognizing that such a package should be considered an advantage of the device. Additionally, you can purchase the same remote control and controller, as well as a special stand for vertical installation of the device. The full version of the documentation is available on the manufacturer's website in the form of hypertext documents. Please note that there is also a version in Russian.

The console received a body made of black plastic with strict geometric shapes. Its overall dimensions are 158x98x26 mm, and the weight of the device is about 250 g. In general, this is comparable to common models of media consoles and is significantly smaller than modern stationary game consoles, not to mention computers. So, if you wish, you can even take it with you on trips.

The plastic is mostly matte, but the sides and insert are top panel glossy. Under its protruding corner there is a status indicator, as you might guess, green. By the way, its brightness can be adjusted through the settings. It lights up while the console is operating and turns off in sleep mode. The flat part of the bottom is covered with a rubber insert, which ensures that the device is securely held on the shelf.

Ventilation grilles are visible at the back and on the underside. Please note that the device uses a fairly powerful filling, so it is strictly not recommended to close the grilles.

All connectors for connection are located on the rear panel. Here you can find: two standard USB 3.0 ports, an HDMI port, a LAN port, and a power supply input. Standard remote controls operate via a radio channel, so there is no need to install the set-top box in an open space and provide direct visibility.

When operating in media set-top box mode, you can use the included remote control. It has compact dimensions (143×36×9 mm) and low weight (52 g). The lower part of its body is made of matte metal, and the top panel uses matte black and glossy plastic. Power is supplied from two CR2032 batteries, which are installed in a specially shaped tray at the end closest to the user. According to information from the manufacturer, they are enough for a year of work.

At the front end of the remote control there is an IR LED designed to control a TV or other equipment. We will discuss these possibilities in more detail later in the text. There is a Bluetooth pairing indicator next to it. The controls on the top include a navigation pad with a confirmation button in the center, back and home buttons, a voice search/command button, and a vertical area between the matte inserts at the bottom of the remote is used for volume control and play/play operations. Pause". All buttons have a matte finish and are easy to touch.
As we can see, the traditional set for Android devices is fully implemented here. Additionally, double tapping on Home allows you to access your recent list running applications, and holding it down for a long time opens the service settings for recording and online broadcasts of video from games, supporting voice and video comments.
Note that a slightly modified remote control can also be sold separately - without an IR transmitter, with an output for connecting wired headphones and battery powered.

Since one of the main scenarios for using the console is games, then, of course, it could not be done without a branded gamepad. You understand the high quality of workmanship and reliability as soon as you pick it up. The structure, made of matte black plastic, looks completely monolithic, as if carved out of a single piece of material.
The dimensions can be considered standard for this class of devices. The width is approximately 11.5 to 15 cm. The maximum thickness of the handles is about 4 cm. The weight of the controller is slightly higher than that of the console itself - 262 g. It is powered by a built-in battery; the manufacturer claims 60 hours of battery life. A standard USB-Micro-USB cable is used for charging. The adapter requires about 450 mA, so any model will do. The vibration motors built into the controller will help add realism to games.

The set of main controls includes a D-pad on the left, A/B/X/Y buttons on the right, two analog joysticks with click support, a bumper and an analog trigger on the left and right. This device also has a built-in microphone and a button to activate voice search/control - it is located on the top center of the gamepad on a silver plastic insert. Located above the button led indicator pairing.
At the bottom center between the joysticks there are two Android control buttons (Back, Home) and Play/Pause. The glossy strip above this block has a sensor for adjusting the volume. Additional actions with “Home”, as on the remote control, allow you to go to the list of programs and control the recording or broadcasting of video from games. In addition, this controller also has a built-in IR transmitter for controlling external audio-video equipment.

At the top end in the center there is a Micro-USB port for charging and connecting to a PC. On the opposite side, from the bottom, there is a standard 3.5 mm mini-jack for connecting headphones or a headset (in the second case, the LRMG/OMTP standard is used). Note that the headset buttons do not work in this case. However, the loss is small, since the control is on the controller itself. Given the many ways to connect devices for audio playback and recording, it is worth familiarizing yourself with the table in the documentation indicating priorities for different modes.

Currently, the device can also be used with computers when connected via wire. Support for working via Bluetooth is promised to be implemented soon. In total, the set-top box supports the simultaneous connection of four controllers.
It is also worth mentioning that the controllers have their own firmware with the ability to update via the set-top box. In the same menu you can find out their battery charge level.
Software
The console uses Google's proprietary launcher, which is aimed at working with Android TV, which is somewhat unusual for users of “regular” Android. Appearance home page resembles other devices designed to connect to a TV. The screen has several zones with large icons. If there are enough of them, then each zone will have its own swipe to the right.

The top block displays dynamic recommendations from programs installed on the device. This can be applications, films, TV series, games and other similar information, as well as information about the availability of updates for the console or controllers. Moreover, the results depend on the actions in your account on all devices linked to it. If necessary, you can “exclude” specific applications from publication in this block.

The second block consists of icons of programs installed on the console. The third block presents gaming applications, including the Nvidia Games portal program. Everything is in a single list without the possibility of grouping, but their order can be changed. You can also enable automatic sorting based on startup frequency. You can find out the names of games optimized for the platform at.

The final block is access to device settings, viewing information and connected controllers, status wireless connection, power management (sleep and reboot).

You can also launch a search service using voice or keyboard input from this screen. Note that search on the Android TV platform is supported not only in Google services and well-known sources on the device, but also in applications if this was implemented by their developers. The user can disable the service's access to certain programs in the settings.

The firmware, as expected, fully implements Google services. However, please note that the Android TV app store is different in content from the "regular" version. mobile devices. This version of the operating system tries to further “hide” its internal structure from the user.

In addition, some applications that are already installed on the console are not displayed in the menu. So to access them you may need to install a third-party manager, such as Sideload Launcher. In particular, the browser will be visible in it Google Chrome. If necessary, you can try to correct the situation by installing programs via APK files, but this may be unsafe. The issue of single-app purchases in the Android and Android TV stores also remains unclear. It is likely that special versions of programs optimized for Android TV may be sold separately.

The following programs are installed in the standard firmware: Google Play services (Store, Movies, Music, Games), YouTube, Netflix, Plex (client and server), Photos & Videos and of course the most important one - Nvidia Games. It is the latter utility that opens access to game catalogs in various versions - local, streaming from the GeForce Now service and from personal computer, and also provides information about the most interesting projects for this platform.

In addition, the firmware contains many background utilities that are used to maintain controllers, broadcast games, organize video recording and solve other problems. root access here, of course, not. You can find instructions online for obtaining it and other similar operations. As for the developer menu, you can open it in the standard way.
In addition to the options described above, the company also indicates the ability to act as an element of a “Smart Home”. At CES in January, it was announced that Google Assistant and SmartThings Hub technologies will be integrated into the device in future software updates. At the same time, it will be possible to control the system by voice from any room using the Nvidia Spot accessory - a special wireless module installed directly into the wall socket.
Connection and setup
The minimum connection option for operation is power supply for the set-top box and an HDMI cable (not included) to the TV. Optionally, you can use a wired network and various USB devices. Note that the device does not have an explicit power button. In the shell menu there is an item “Go to standby mode”, and if you go a little deeper into the settings, you can also find “Turn off power”. It’s just that you won’t be able to turn the device back on using the remote control, so most users will probably have it in standby/sleep mode when not in use. By the way, there are no reset or reboot buttons here either. Probably the manufacturer is confident in the reliability of its product. During testing, we never needed these features.

When interacting with TVs, it may be useful to support the HDMI-CEC protocol, so that you can control the volume of the TV using the remote control. There is also the opposite option - navigating the menu and controlling video viewing from the TV remote control. In addition, the standard set-top box remote control can be taught to transmit IR volume and power control signals for your audio-video equipment. To do this, you will need to select the appropriate code through the menu. The list includes many popular brands of TVs, receivers and soundbars. But you shouldn’t expect that all this will definitely work with your equipment.

In addition to standard control panels, you can also use proprietary utility Google for remote control of devices with Android TV. It has the implementation of navigation, emulation touchpad and on-screen keyboard. Plus, you can control it from Logitech Harmony Bluetooth-enabled remotes.
The USB 3.0 ports of the set-top box can be used to connect storage devices, web cameras, input devices, sound cards and other equipment. If you need to work with more than two devices, you can use hubs.

Supported on storage devices file systems NTFS, FAT32 and exFAT. At the same time, you can implement not only access to files on them, for example, to a large media library, but also apply a special mode of replacing the standard built-in external storage with external drive. In the second case, the drive will be formatted and encrypted to work only with this set-top box.
if you have USB-USB cable with the same Type A ports (note that this is a rather rare option), you can connect the set-top box to your computer to record content into its memory, as happens with regular smartphones. The first of two ports is used for this.

In addition, there is an interesting option to provide network access to the built-in memory from other devices on the local network via the standard SMB protocol (username and password for protection can be specified in the settings). The speed when working on a gigabit network in this case will be at the level of 50 MB/s.
Webcams require UVC compatibility. For example, the Logitech C920 or even the middle-aged C525 are suitable. Models with high resolution. Input device support allows you to connect standard keyboards, mice and even gamepads. For example, the wireless Logitech F710 worked out of the box for us, allowing us to add a second character right during the game from the LEGO series. If you do not have a regular keyboard connected, a standard on-screen one appears if necessary.

Interestingly, the firmware provides a standard way to remotely access files - built-in support network storage. So you can mount your network drive (or several) to the set-top box via the SMB protocol. As a result, new ones will appear virtual folders and all programs on the device will be able to use files from them. This is one of the simple options for implementing a network media player for your existing media library. Although there are a couple of comments - a list of available resources on network storage is formed only at the moment of connection. If you later add some new shared folder on it, you will need to delete and create the connection again. In this case, it will contain all folders on network storage devices accessible to the specified user in one large list. In addition, the set-top box creates service folders called “Android” on each shared resource. We also encountered a loss of resources after rebooting the device, which is of course unacceptable for a constant use case.

The set-top box uses standard capabilities Android settings TV. In general, this menu is similar to the version in regular Android. In particular, there are options for setting time, language (Russian is fully present), keyboard, speech, search, network connections, managing applications and their rights, and so on.

We have already mentioned some of the specific parameters - the processor operating mode and the brightness of the indicator (you can turn it off completely). There is also setting up a couple of options for the main screen, managing controllers, setting up a screensaver, setting video output options, managing external devices and other possibilities. As for access to services and synchronization, support for Google and Nvidia accounts is implemented here.

When you turn it on for the first time or after resetting the settings, there are two options for starting to work with the set-top box: local setup using a remote control or controller and using another device with Android and Google services. The second option allows you not to use the on-screen keyboard of the set-top box to enter account information and other parameters. After setting up Android itself, you will need to provide Nvidia Games account information to access its resources.
Performance
Considering that we have before us a device that is unique in its characteristics, there is little point in assessing its performance for comparison with other models in traditional Android tests No. Nvidia Shield TV will be chosen for its support for 4K and Nvidia gaming services, and not for its “parrots” in benchmarks. But traditionally we still pay attention to these moments, so we won’t miss it this time either.
First of all, we note that for this device the issue of operating speed has a rather specific meaning. If we talk about the media player scenario, then it is more important to have a high-quality video decoding unit that will cope with the required formats. For streaming game services, the speed of processor cores and graphics units is also not significant. The only scenario where it is important to have a fast platform is Android games. But here we often encounter a situation where developers of gaming applications focus on the average level of devices and therefore the real requirements of their projects are low, as is the quality of graphics. Nvidia, in order to provide the “best experience” for users of its platforms, releases a couple of dozen under the Nvidia Lightspeed Studios brand, which use the capabilities of the Tegra X1 SoC and look very impressive.
For comparison, the table below shows the results Xiaomi smartphone Mi Note 2 is based on a quad-core Qualcomm Snapdragon 821 platform with an Adreno 530 graphics accelerator and media player indicators found on the network on the widespread Amlogic S912 platform.

Nvidia Shield TV testing was carried out in two available modes - “Max. performance" and "Optimized", which were selected in the settings. The benchmarks used were 3DMark, PCMark, GFXBench, AnTuTu and GeekBench. The results are shown in the table.
| Nvidia Shield TV Max. | Nvidia Shield TV Wholesale. | Xiaomi Mi Note 2 | Amlogic S912 | |
| 3DMark Sling Shot, points, more is better | 4928 | 4653 | 2634 | 594 |
| 3DMark Sling Shot Extreme, points, more is better | 4100 | 3878 | 1820 | - |
| PCMark Work 2.0 points, more is better | 7388 | 6631 | 5268 | - |
| PCMark Computer Vision, points, more is better | 5607 | 5639 | 3260 | - |
| GFXBench Car Chase, fps, more is better | 29 | 27 | 17 | - |
| GFXBench Manhattan 3.1, fps, more is better | 45 | 42 | 26 | - |
| GFXBench Manhattan fps, more is better | 56 | 54 | 36 | - |
| AnTuTu Benchmark, points, more is better | 138608 | 131126 | 122938 | 42664 |
| GeekBench Single-Core, points, more is better | 1488 | 1429 | 1844 | 456 |
| GeekBench Multi-Core, points, more is better | 4061 | 3967 | 4246 | 2307 |
The superiority over Adreno 530 in graphics tests ranges from 50% to 110%. In PCMark, Nvidia's solution is also noticeably faster than the product with the Qualcomm SoC.

At the same time, in AnTuTu the gain is relatively small, and in GeekBench, which takes into account mainly the capabilities of processor cores, we see the expected lag Nvidia solutions, operating at a lower frequency. The media player on the Amlogic chip lags very far behind in these tests and cannot be considered as a competitor. However, such products cost several times less.
In addition, we tested the speed of the set-top box's wireless controller. The test was carried out in conjunction with the Zyxel Keenetic Ultra II router, which supports connection speeds of 300 Mbit/s and 867 Mbit/s in the 2.4 GHz and 5 GHz bands, respectively. The test was carried out at a distance of about five meters through one non-permanent wall and a wooden door.
| 802.11n, 2.4 GHz, 144 Mbps connection | 802.11ac, 5 GHz, 867 Mbps connection | |
| Broadcast | 37 Mbit/s | 60 Mbit/s |
| Reception | 26 Mbit/s | 110 Mbit/s |
| Transmission and reception | 41 Mbit/s | 99 Mbit/s |
As we can see, due to regional restrictions in the 2.4 GHz band, the device can only use the 20 MHz channel, which affects performance. In this case, it is 25-40 Mbit/s. This will be enough for many streaming services, but it will not be enough for streaming games in maximum quality. Switching to the 5 GHz band changes the picture significantly. Maximum speed In this case, the rate of data received by the set-top box exceeds 100 Mbit/s, which makes it possible to implement all the stated scenarios for its use.
As for the wired connection, the set-top box, for example, when working with a network drive, provides maximum speeds for a gigabit connection of more than 900 Mbit/s.

Additionally, we present the results of the Speedtest.net test obtained on cable, 5 GHz and 2.4 GHz (three runs in each mode). The Internet access channel had a speed of 100 Mbit/s.
Use in media player mode
The SoC installed in the set-top box is one of the few solutions on the market capable of decoding video with the H.265 codec in 4K format at 60 fps and outputting it to TV via HDMI 2.0b in the same mode, using HDR technology. The question of the existence of such records and their advantages is beyond the scope of this material, but maximalists this model I'll definitely like it. The general list of chip capabilities includes decoding of popular codecs H.265, H.264, VP9, VP8, MPEG4, MPEG2 and support for all popular audio codecs, Hi-Res audio up to 24/192 inclusive, as well as output of multi-channel digital audio (including Dolby Atmos and DTS:X) via HDMI to the receiver. In addition, the set-top box supports external sound cards/DAC with a USB interface. But the product does not have a license for decoding multichannel audio. To solve this problem you will have to use the capabilities of third-party software.
Note that we tested the device for this article with several TVs, including Samsung model UE40KU6020K, which has both 4K and HDR, as well as a receiver that is not the most latest generation, but with support for common HD audio options. The 4Kp60 resolution on a compatible TV turned on immediately, but to activate HDR it was necessary to change one item in the settings through the TV menu. From the photo above you can estimate the comparative sizes of the set-top box and the 40″ TV.

Testing in Kodi and Plex showed that the specified hardware capabilities can indeed be implemented in this media box. 4K video with H.264 and H.265 codecs plays smoothly. The Main10 profile for H.265, which implements a 10-bit color depth, is also decoded correctly. There are no problems with high bitrate (100-200 Mbit/s) content.
On special videos with gradients, if you really try, from a couple of meters you can notice differences when outputting in modes with different color depths. But you just have to try really hard and believe that they exist.

Multichannel audio is successfully output to the receiver, including in HD versions, and automatic selection of the video output frame rate depending on the file parameters works in Kodi. The company doesn’t say anything about the 3D format, and interest in it has decreased significantly recently, so we won’t check it. In any case, “half” formats, which in fact are no different from regular media files, can be viewed, including 3D mode on the TV side.

Software also plays an important role in this scenario. Oddly enough, with the exception of Plex, which we will talk about later, there are no interesting media players for regular files in the basic firmware. There is only the standard Android "Video Player", which in combination with the "Photos & Videos" explorer can theoretically be used to solve this problem, but the process will be very inconvenient. However, in addition to Kodi and Plex, the store also contains MX Player, VLC and other well-known products, so there is a certain freedom of choice here.

As for Plex, the device has both a client and a server of this brand installed, which is a good option for those users who require a beautiful design of the media library, a convenient player, compatibility with different platforms and remote access. In this ecosystem, you can create several servers and provide access to them from different players through the mechanism of one account. Everything works according to a well-known scheme, but you may have to spend time selecting server and client parameters to obtain maximum quality. Note that in this case, it is the client that is of interest, which can connect to servers located, for example, on a network storage device. We would not seriously consider the scenario of using a server on a set-top box. Although with connecting external USB drives large capacity it is also possible.

To be fair, it’s worth saying that for “heavy” 4K video, we found it more convenient and stable to work through Kodi with connecting remote folders on a network drive using the standard tools of this shell. By at least, in this case, no one tries to transcode anything and the capabilities of the SoC are revealed as efficiently as possible.
The reason for the unusual situation with local players is easy to understand if we recall the current trends towards the transition to online services. Indeed, the Android TV platform is focused specifically on streaming services. It could be noted that for this option, the decoding capabilities in the SoC are redundant today, but, remembering the speed of technology development, they no longer seem superfluous.
Foreign services broadcast in this format include, in particular, Netflix and Amazon Video. In the first, a monthly subscription with Ultra HD costs 11.99 euros (regular - 7.99, HD - 9.99). It is possible to check the work within a month. The technical requirements, in addition to the player itself, indicate a minimum network access bandwidth of 25 Mbit/s and HDCP 2.2 on the TV. Real users note that a noticeably smaller bandwidth is often used, comparable to HD versions. As for the available content, there is not as much as we would like. At the end of last year, there were about 80 titles on the list (half of them were TV series, a quarter were documentaries, and an eighth were films). It should also be noted that there is content with multi-channel 5.1 sound. Amazon Video only streams 4K in select countries. At the end of last year, it featured 33 films in this format. The service can be purchased separately as Prime Video ($8.99 per month) or as part of Prime ($10.99 per month or $99 per year), but some movies require a separate payment. There are other services that support 4K, including YouTube, UltraFlix, Hulu, Vudu and Sony Ultra. Content of this format is expected to appear on Google Play Movies. By the way, it implements an interesting feature - while watching films (not all at the moment), you can view information about the actors on the screen and the music used.

As for domestic services, the catalog of programs for Android TV already contains quite a few options - Megogo, Showjet, SPB TV, Videomore, Amediateka, Beeline TV, NTV, Channel One and others. Interestingly, many programs have a completely identical interface. This is probably due to Google's guidelines for the application interface for this version of Android. Note that, of course, all these services exist for other platforms, and using them specifically with the Nvidia Shield TV set-top box does not have significant advantages, except for the ease of management in Android TV. There is practically no complete information about broadcasts in 4K format in these programs. Such data was found only about the Showjet service, but due to the lack of a format filter, it is impossible to confirm the presence of 4K content in it and estimate its quantity.
The manufacturer also notes the possibility of viewing broadcasts using an external digital tuner, but no details about this mode, including a list of compatible equipment, is not provided. If there are many IPTV services available, this option may be interesting only if there is no quick access to the Internet.
In addition to the described capabilities, the set-top box can act as a receiver for broadcasting video, music and applications from mobile and portable devices using Google Cast (Chromecast) technology, including for 4K format. Interestingly, the screen transfer function did not work on the Xiaomi Mi5 with the Qualcomm chip, but it worked on the Zopo ZP920 on Mediatek. Of course, you won’t be able to play, since there are noticeable delays, but for presentations, viewing photos, websites and videos, the function can be useful. Note that sending data via this protocol is also implemented in programs for iOS and desktop PCs. True, we did not find an option to disable this mode or protect access with a password. It turns out that any local network user can interrupt your game at any time, which is still wrong.
Conclusion
Based on the testing results, we can say with certainty that the new product made a very good impression and can deservedly be called a unique solution. The device has compact dimensions, an interesting design and excellent controllers in the basic package. Working under Android TV is indeed noticeably more convenient when connected to a TV. In most cases there is no need to connect a keyboard or mouse. Plus, voice control is provided. In addition, here we have a powerful hardware platform, especially in the graphics part - both in video decoding tasks and in 3D games. Other features of the platform include a fast wireless controller, two USB 3.0 ports and a Bluetooth adapter.
The media set-top box has shown itself to be excellent in video viewing tasks and may well take the place of a universal source for home theater, however, the user will still have to spend some time selecting the software that is convenient for him and configuring it. This is one of the very few options that can compete with modern TV models that support 4K and HDR. There remains, of course, the question of availability of relevant content, but in this case it would probably be useful to have a reserve. As for streaming services, at the moment most of them are capable of providing only Full HD on a large scale and there are no preconditions for a sharp change in the situation.
Estimating the cost of devices that have such a wide range of diverse capabilities is always difficult. And in this case, the prefix also has unique features, which are available only on it. At the time of preparation of this article, the price of the reviewed version of Nvidia Shield TV in the official Russian online store was 18 thousand rubles with free delivery throughout Russia. The price is noticeably higher than that of mass media players, but lower than that of 4K solutions from well-known brands. A direct comparison with game consoles is still not very correct in terms of the latter’s performance, as well as the presence of exclusive projects and some additional technologies. If we consider Nvidia Shield TV a “device for games” without taking these features into account, then this set-top box is cheaper than consoles. About gaming computers may not be mentioned here. An additional advantage in this case will be support for the GeForce Now service, which allows you to access many projects, although there may not be any particular benefit in terms of the price of games. In terms of overall performance, and taking into account the possible spread of 4K content and the expansion of the Android TV ecosystem, as well as the increase in the number of games supported by the GeForce Now service, we would say that the current cost of the Nvidia Shield TV is quite justified.
The company managed to create a truly unique device, which cannot be found on the market. So, despite some roughness in the implementation of some functions, Nvidia Shield TV deservedly receives our editorial Original Design award.
In conclusion, we suggest watching our video review of media and gaming Nvidia consoles Shield TV:
