Diagram for connecting a wifi router to a computer. Connecting and setting up a router to distribute Wi-Fi. Connecting a desktop computer to a wireless network using an internal network card
Do you want to install Wi-Fi so you can use the Internet and be able to access the network from any device? But there is only one catch: how to install it correctly Wi-Fi router(router) - a device necessary for creating and connecting computer networks?
After all, you have never done this and have no idea about installing this device. This article will help you solve your problem.
You can connect a WI-FI router in 2 ways:
- Wireless connection.
- Wired connection using twisted pair (a special network cable that comes with the router).
Choosing a router
The first step is to choose the right equipment. It is worth noting the fact that not all models of Wi-Fi routers are suitable for laptops. It is necessary to study the parameters of a computer or laptop and accordingly purchase a router with suitable characteristics. Before purchasing, check with the seller about the signal transmission range of the router.
Before purchasing a router, you need to clearly understand what kind of local network you need to build - for personal use in the apartment from all gadgets, or to build a powerful network with internal storage in which various files will be stored - music, videos, documents. In the first case, not very expensive models are quite suitable - within 1,500 rubles.
In the second case, you will need more powerful and expensive equipment, for which you will definitely have to prepare about 5,000 rubles, or even more. It is very important that the router has high performance, supported wireless standard IEEE 802.11n, supported gigabit speeds. You can read more about this in the corresponding article.
Router connection steps
If you plan to connect the router via a wired connection, then the sequence of your actions should be as follows:

Setting up a wired network
First, go to the menu, from there go to the “Network” tab (internet setup), and then click on the “Connections” tab (manual internet connection setup). Next, look at the screenshot.
In the “IP Settings” tab, assign a network address to the LAN ports, as well as a subnet mask. These settings must be specified in the Internet connection agreement. Or call your office and get this information from a specialist.

The router can be configured so that the network address can be obtained in automatic mode if it is connected to another router. Don't forget to click the "Save" tab.
Establishing a wireless connection
To install the router, in the router menu you need to go to the “Wi-Fi” (Wireless setup) tab. Then select manual wireless connection setup. Do everything as in the screenshot.

In this case, Wi-Fi is configured in 2 stages:
- Basic settings.
- Setting up network security.
Go to the main settings and in the “SSID” field you need to come up with and enter a name for the Wi-Fi network. Given name will appear on your computer in the list of all found networks. The next stage is choosing a country. Select the channel in which the data will be transmitted; it is better to leave it in automatic mode.
The next step is to select Wi-Fi standards; it is recommended to choose a mixed one. The final stage is choosing the maximum number of clients that can connect to the network. If you need to select an unlimited number of users, then select 0.
Be sure to set up Wi-Fi security to protect yourself from those people who like to surf the Internet at someone else’s expense. Here you need to enter a password to connect to the Internet. Go to “Security Settings”. In the top line you need to select the type of protection; it is better to give preference to WPA2-PSK, since this protection most resistant to hacking.
Enter the password in the “key” field. We leave the encryption settings at default. By clicking the “Change” button, the password is activated.
Be sure to save all settings and reboot the router.
If you did everything correctly, all the network connection indicators on the router are on, then you can start using the Internet, everything works.
Have you already connected a wifi router?
Do you want to be smarter than others? Earn more? Read also:
- . Have you tried that?
- . It is advisable to always know how many pages are in the index.
- ? Or is it still not?
Quite often you can encounter the problem of using wireless networks on a desktop computer. To connect a PC to Wi-fi, you can use the following methods:
- Using internal network card.
- Using an external network card.
- Using an additional Wi-Fi router.
Connecting a desktop computer to a wireless network using an internal network card
Step 1. Remove the side panel from your system unit.
Step 2. Install the wireless network card into the appropriate slot (usually a PCI or PCI-express slot).
Important! Network cards may have one or more antennas. The higher the number installed antennas, the wider the Wi-fi coverage area and data transfer speed. To avoid mistakes, it is worth remembering that the required amount can be calculated as follows: for each antenna, the speed increases by approximately 70 Mb/s.

Step 3. Install drivers for the new network card.
Step 4. Set up a connection to your wireless modem. To change the network adapter settings, you need to enter the “Control Panel” and change the viewing mode to “Small icons”.

Step 5. Access to changes to the properties and settings of a network card is available via the “Network Control Center...” link.

Step 6. In the directory that opens, use the link in the left frame “Changing adapter settings.”

Step 7 Changing the network adapter settings occurs through its properties. Call the context menu and use the desired item.

Click on “Properties”
Step 8 The settings you need are stored in the “Internet Protocol Version 4 (TCP/IPv4)” subdirectory. You can open it by double-clicking, or by selecting this item and clicking on the “Properties” button.

Step 9 Specify your settings wireless connection, and save them using the “OK” button.
Important! Make sure that there are no two identical ones in the same networkIP addresses, otherwise a data sharing conflict will arise, and, in fact, only the device that received this address before the others will work. If your wireless router distributesIP addresses automatically, use this option.

Connecting a desktop computer to a wireless network using an external network card
External network adapters are connected via USB ports. They are usually miniature and look like a “flash drive”. When choosing such an adapter, you should also pay attention to the number of antennas. The most commonly used cards are those with built-in antennas, but their data transfer speeds are not the best, and their area coverage is quite small.
Step 1. Connect the external adapter to your personal computer.

Step 2. Install drivers. Usually they come complete with the adapter itself.
Step 3. Perform network setup as described previously.
Using additionalWi-Router Fi
The configuration of each router is very specific, but there are some common points. Let's look at these nuances using the example of a TP-Link router.

Quite often in the computer environment the meanings of the words “switch”, “hub”, “router”, switch are confused. Let us give a brief explanation of the switching levels and the corresponding devices (switching levels are determined by the OSI network model):
- Hub(first level) – repeater. Equipment that makes it possible to physically parallelize threads. It does not have routing tables and does not distinguish between the addresses of computers and other network devices. Due to the impossibility of distributing information to recipients, the load on the network increases and the speed of the network connection decreases.
- Switch(second level) - a device that can work with information packets that pass through it. In these packets, the device allocates a source and destination address, with a “Media Access Control” (MAC) address rather than an IP address. During operation, it creates a table of addresses associated with specific ports, which significantly reduces the load on the network. Uncontrollable.
- Router(third level) - as the name implies, is a router, that is, a device that provides certain routes. The peculiarity is the switching of networks with different IPs. The most successful solution when working on the network, due to high speed traffic processing. With pre-laid routes, it can be a kind of “border screen”. Supports work with both IP and MAC addresses.
- L4-router(fourth level) – advanced router. As a rule, they have the ability to make pseudo-intelligent decisions about changing the direction of traffic. They can work with applications and combine with other L4-routers. When combined, they work as one device, with common electronic “brains”.
Step 1. To connect your computer to the router, you should use a patch cord (patch cord). Usually one such cord is supplied with the router, but you can make it yourself (see how you can do this).

On a note! Separately, it should be noted that the router has two varietiesEthernet ports –LAN (local area network) andWAN ( global network). The global port is used to connect to the Internet, the local port is used for the internal network of a home or business. In our case, you need to connect the computer inLAN, and asWAN we will useWi-fi.

Step 2. To change the router settings, you need to log into the device’s Web interface. You can find the default address, as well as your login and password on the router itself.

Step 3. Configure the address of your network card. It must be different from the IP router, for example, for our case, you can use the range from 192.168.1.2 to 192.168.1.254. To make changes, use the instructions above. Remember that you need to change the settings for the “Wired” connection to local network.
Step 4. Open your browser and enter the IP address of your router. The “http://” prefix is added automatically and does not need to be entered manually.

Step 5. Enter the credentials provided by the manufacturer. As a rule, when you first log into the device you will be asked to change them.

Step 6. In the right frame of the Web interface, expand the “Network” list. Inside the list you can make settings for connecting to the Internet. Since the custom router will be used as Wi-fi adapter, you should select the “Dynamic IP” or “Static IP” option. Don't forget to save your changes.
Important! It is preferable to enterIP address manually, since the dynamic address may change, and it will be difficult for you to connect to the router to change any settings.

On a note! Some router models have several save buttons - “Apply” and “Save settings”. When using the first button, without using the second, the changes are applied only for one session (until closedWeb interface of the router), when you connect again, the settings will be reset to the previous ones.

Step 7 In the same list, enter the “MAC Clone” menu and specify the preferred Media Access Control address. Optionally, you can leave the factory address, or “Clone” your address personal computer.

Step 8 Expand the “Wireless” list and enter the Settings menu. Please enter your name here wireless network(SSID) you want to connect to. Specifying a region is not important; you can set any one. Other settings can be ignored, with the exception of the “Enable SSID Broadcast” option - this option allows you to distribute Wi-fi and connect other routers and other network devices.

Step 9 Go to the “Wireless Security” security settings menu. Specify the encryption type of your access point and the key to connect to the wireless network. Don't forget to save any changes you make.

Step 10 Using the “System Tools” list, enter the “Reboot” menu, and using the corresponding button, restart the router.

Video - How to set up Wi-Fi for Windows 7
Video - How to enable Wi-Fi in Windows 10
Conclusion
We looked at the nuances of connecting a stationary personal computer to a wireless network. Any of the above methods requires the purchase of new equipment, and its choice is determined not only by the monetary factor, but also additional features each of the devices listed in the table.
| Details/Environment | Internal | External | Router |
|---|---|---|---|
| Operation stability | Yes | No | Yes |
| Ability to connect multiple computers simultaneously | No | No | Yes |
| Maximum number of antennas | 3 | 2 | 8 |
| Price of PC components | Average | Average | High |
| Ability to move the antenna a considerable distance from the PC | No | When using a USB extension cable (up to 5 meters) | When using a patch cord (up to 100 meters) |
Most users prefer to trust the connection and wi-fi setup specialist, fearing possible difficulties. In fact, this task cannot be called particularly difficult, and you can cope with it without professional help. Let's look at how to connect a router to a computer.
To ensure a stable Internet connection throughout the apartment, you need to choose a suitable location for the wifi router. It's better to take care of this before you start setting up.
It is not difficult to decide where to place the router if you will only be able to access the Internet from one device. Then it should be located in close proximity to the computer and laptop. But if several gadgets will connect to the network at the same time, you should use these recommendations for finding a suitable location:
- Place the router in the central part of the room so that the signal is evenly distributed.
- Hang the device on the wall or place it on the roof of the cabinet. It is believed that the higher the router is, the better.
- Try to position the console so that the antennas are in a vertical position.
Now it’s worth considering what could interfere with the signal. There is no need to install a wi-fi router in close proximity to the following objects:
- radiotelephones;
- microwaves;
- any equipment operating at frequencies from 2.4 to 5 GHz;
- mirrors and other reflective surfaces;
- heating electrical appliances;
- refrigerators and split systems.
It is also undesirable for there to be a load-bearing wall between the router and the computer. Such an obstacle may negatively affect the quality of the connection.
How to connect a router to a computer using twisted pair cable

Twisted pair is a special cable that comes with a Wi-Fi router. It is believed that when using this type of connecting the set-top box to a computer, the quality of the connection is higher, and malfunctions occur much less frequently.
But there are also disadvantages to connecting via cable. In such a situation, the user is deprived of the opportunity to move a computer, laptop or other gadget too far from the router, however, not everyone has such a need.
To connect a Wi-Fi router to a computer in this way, you need to proceed in the following order:
- Connect the WAN cable to the router, finding a connector that has a similar marking or is marked in color.
- Connect the network cable to the “Ethernet” port, and insert its other end into the PC connector.
- Open a browser and enter the device address. This data is located on a label that is glued to the bottom of the router, and is also written in the technical documentation.
- Enter identification data in the login and password lines to gain access to wired network settings.
- In the field that opens, fill in the appropriate fields with the network parameters specified in the agreement with the provider.
Attention! If the user plans to access the Internet from several gadgets at the same time, to establish a wired connection to the network, you need to choose a router model that will allow you to connect the required number of devices.
Wireless router connection

Wireless connections allow you to access the Internet from devices located in any part of the apartment. To do this, you do not need to be in close proximity to the router. To produce required settings, you will need to proceed in this order:
- Open the router menu and find the wi-fi section.
- Click on tab manual settings. Depending on the modification of the router, the name of this item may be different.
- After moving to the next page, enter the name of the network in the “SSID” field.
- Select a data transmission channel. If it is already installed, it is better to leave it the same; changes need to be made in the case when other requirements are specified in the agreement with the provider.
- Leave other data unchanged and save the settings.
- Go to the security tab and select the “WPA2-PSK” security type.
- In the password entry field, enter the required combination and save the settings.
Attention! For the changes to take effect, you will need to restart your PC after completing the settings.
Possible problems and their solutions

There are times when, after completing all necessary actions connection is not established. This is indicated by a red cross that appears on the communication indicator. The reason may be:
- The cable connecting the router to the computer is damaged. In such a situation, you need to try connecting the console to the PC using a different cord.
- The cord is not inserted tightly into the connector. In this case, you will need to remove it from the port and plug it in again; you should hear a slight click.
- Disabled network adapter on Windows. To check if this is indeed the problem, you will need to go to the menu network connections and right-click on the adapter. Its status will be displayed in the pop-up window.
There are also frequent cases when the connection is established, but there is no access to the Internet. In such a situation, yellow appears on the communication indicator Exclamation point. This may happen for the following reasons:
- The data entered in the network connection settings is incorrect. To fix this problem, you will need to go to the appropriate subsection of the menu and check that the information entered is correct.
- Not installed automatic receipt IP addresses and DNS server. In such a situation, you need to go to the networks and Internet tab, select the network connections field, and then follow the “IP versions” link and open the properties item. In the field that appears, you will need to check the corresponding boxes.
- An error was made when entering parameters in the router settings. To do this, you will need to go to the device menu and check whether the data entered is correct, making corrections if necessary.
If the router and PC are working properly, and there are no problems on the part of the provider regarding the quality of communication, you can resolve the difficulties that have arisen using one of the listed methods. But if nothing helps and you can’t set up the Internet, it’s better to seek professional help.
In our daily activities, we often use devices with Internet access via wireless channels, for example, Cell phones, tablets, laptops, even modern televisions have access to the Internet. Therefore, using a WiFi router in our home is very convenient; it allows you to connect all the necessary devices to the Internet without any problems. Before I start talking about how to connect a WiFi router to a computer or laptop, you must make sure that your router has WiFi (look at the labels and antennas on the router or check out the characteristics of this model on the Internet.)
So, we have an Internet provider cable (telephone or any other), a router and a desktop computer. Usually in modern computers There are network devices built into the motherboard for connecting to local networks. Make sure your computer is also equipped with this module. Find such a connector on the back of the computer. It's called RJ-45.
If it is, then you can connect a cable to connect to the router. If you do not find such a connector, then the network card will need to be purchased separately at any computer store and installed.
By the way, if you buy a cable and connector separately, you will have to crimp it. So it’s better to buy a ready-made cable! Just in case, here is an article for you: “”, from which you will understand how cables are crimped.
Turning on the router and a few nuances
Now let's move directly to the connection. We power the router from the included power supply into the socket WAN Let's connect the cable from the Internet provider, and connect the network cable to the computer and to one of the LAN sockets of the router (usually they are indicated by numbers) (purchased separately, calculate in advance how long you will need).
You should end up with something like this:

Turn on the router by pressing the power button on it. Most often, network cards in computers and laptops are equipped with connection indicators in the form of yellow or green LEDs. If everything is connected correctly, the LED should light up (it may blink - there’s nothing wrong with that).
Attention! If the router has been configured, the “Internet” indicator will light or blink. This is a sign that the router has Internet and then all that remains is to configure the computer.
If someone has already used your router before you, then do not forget to reset the settings installed on it. Usually there is a “Reset” button for this, which is specially difficult to reach so as not to accidentally press it. It is usually located at the bottom of the router; to reset the settings to factory settings, you need to press it with a needle or pin and hold it for 5-10 seconds. You may not need these items since this button may be in an accessible location.
On the computer connected to the router, click “Start” - “Control Panel” - “Network and Sharing Center” shared access" Find the Local Area Network Connection icon and right-click on it. Select Status.

In the window that opens, click the “Details...” button. Find the line “Default gateway IP...”. Opposite it will be written the IP address of the router itself. Write it down. Perhaps there will be no data here, then read the article further.

Pay attention to the line “DHCP enabled”. If “Yes” is written on the right, then an IP address is assigned to your computer automatically and you do not need to configure it.
If DHCP is disabled, you will have to enter the IP address yourself. Decide in advance how you would like your router to distribute addresses: automatically or manually.
Close the “Network connection information” window and open window“Status – Local Area Connection” click the “Properties” button. Next, in the “Network” tab, find “Internet Protocol Version 4 (TCP/IPv4), left-click once, and then click the “Properties” button. If you decide that your router will distribute addresses automatically, then check the “Obtain an IP address automatically” checkbox; if you do not need the DHCP function, then check the “Use the following IP address” checkbox. And on the right, enter the IP address from the desired range, for example, 192.168.1.2.
However, you can choose any last three digits from the range from 0 to 254, the main thing is that it is not the same as the router’s IP address (we wrote down its address a little earlier). Then click in the field opposite the “Subnet Mask” column. The numbers 255.255.255.0 will appear automatically. Opposite the “Default gateway” column, enter the router’s IP address in the field. Below, mark the line “Use the following DNS server addresses” with a marker. Next to the “Preferred DNS server” line, enter the router’s IP address again. For convenience, write down all the addresses, masks, etc. - they may be useful to you later.
For example:

Let's move on to setting up the router. IN address bar browser, enter the router address and go to it. By the way, you can also find it out from the instructions for the router, and it is also sometimes written directly on the router case. There is an example in this article: "".
Setting up the router
Above, using examples, we figured out how to connect a WiFi router to a computer or laptop; now all that remains is to configure it to receive the Internet on your device. An authorization window will appear in which you must enter your login and password. They are also written in the manual or on the router case. The router settings panel opens. Please check your provider's connection type and settings in advance. The type of connection may be specified in the contract for the provision of Internet access services.
Go to the WAN section. In this section we need to specify the connection type and provider settings. All of them are most often specified in the contract. These settings are the IP address or server name of your provider (serverIP/Name), your account (account) and the password to access it (password). Save the changes.
We are looking for the Wireless section. The main thing we need to do in it is: enable the wireless channel (Wireless – Enabled or check the box), come up with any name for your network (SSID), security type (Authentification Method) – choose WPA2, and Password – come up with a more complex password, if not want someone else to use your Internet. Let's save the changes again.
Reboot the router by turning it off and on. Ready! The computer gained access to the Internet and created wireless point access!
Now let's look at how to connect a laptop to the created access point.
Make sure the router is turned on and configured correctly. . The system will automatically search possible connections. A signal strength icon will appear in the taskbar tray. Click on it and in the drop-down list, select the access point you want to connect to by name. Click “Connect” and, if necessary, enter the access point password. Ready! The laptop is connected to the Internet via a router. All other wireless devices are connected in the same way.
If you still have not received Internet access, then you should check how you configured the router, and also make sure that you entered the correct username and password. Of course, I talked about the main points of connecting the router to a computer or laptop, but you may encounter some difficulties that I did not describe in the article. In this case, ask a detailed question (it is advisable to tell what measures were taken) and perhaps I can help you in the comments after this article.
Note: I didn’t take screenshots to configure the router, since there are a lot of models, and this one is not main topic articles.
I found a video for you that tells you about setting up and connecting the router to your computer:
A router (also known as a router) is designed to provide Internet access to devices that are designed for this. "Router" is jargon. This name comes from the English word router. Its memory is stored for devices included in the local network.
Subscribers can connect to the router using a cable line or wirelessly via WI-FI. Routers are presented in models different manufacturers. And if the procedure for connecting them is largely common to everyone, then the setup process may have its own characteristics for each specific device. Step-by-step instructions on how to connect a router will help users regardless of the model used.
Appearance of routers
Regardless of the shape of the case and its color, all models have indication elements on the front panel. They provide users with information about the availability of power, enabled modes, the status of communication lines with the Internet service provider and devices connected via cable communication lines, and the health of the channel wireless communication WI-FI.
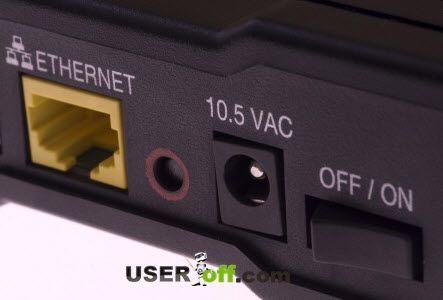
How to connect the router to the Internet? The rear panel has connectors of various configurations. If the provider delivers the Internet via telephone line(ADSL), then the WAN port connector type must be RJ-11 or RJ-12. When receiving information over Ethernet or fiber optic cable (FTTx), an RJ-45 connector is used.

If there is a need to use Mobile Internet, then the router you purchase must have a USB connector to which you can connect a modem. If you are far away from your provider, the modem must have a socket for an external antenna.
The LAN port connectors are RJ-45 configured. Their number determines the number of Internet consumers who do not have a built-in wireless communication module that can be connected to them simultaneously. There is also a socket for connecting the power adapter, which is supplied with the router. Many models have separate on/off buttons (ON/OFF).
Additionally, there may be buttons to enable/disable (ON/OFF) WI-FI, fast network connection mode (WPS), and reset the router settings to the original factory values (RESET). There are router models with a mode switch for its use in the local network. To connect external drives, mobile modems, USB ports are required. The number of high-frequency connectors is determined by the number of antennas that support the wireless network.
Router connection and configuration algorithm
How to connect a Wi-Fi router? The step-by-step instructions determine the algorithm or procedure for the user to independently connect and configure the router. If this order is observed, the reader will not need to return again to those settings that he might have missed, without which further work will not lead to a successful solution to the task.
The main setup steps include the following:
- Unpack the product and check the delivery package according to the attached instructions.
- Choosing a place to install the router indoors (preferably in the center of the apartment), taking into account the length of the cables and a larger wireless network coverage area.
- Connecting the router to the network alternating current through a rectifier device (adapter).
- Connecting cables to the WAN and LAN ports of the router, to the computer’s network card.
- Selecting a method for connecting the router to the PC.
- Configuring network card configuration parameters.
- Reset the router settings to factory defaults.
- Login to the router settings interface using its IP address on the local network.
- Changing the factory password to enter the main menu.
- Configuring connection parameters with the provider using the data of the contract concluded with him.
- Setting up a wireless network.
- Selecting and setting parameters WI-FI security networks.
After saving all entered data and rebooting the router, the work can be considered complete. Now you can determine the most suitable location for the configured router based on the quality of the connection of wireless devices.
Methods for connecting to a computer
How to connect a Wi-Fi router to a computer? There are two connection options. The connection can be made using an Ethernet cable consisting of twisted pairs and via WI-FI. While laptops have a built-in wireless communication module, desktop computers (PCs) initially do not have such a device. Their connection is most often made via a cable line.
How to connect a computer to a router via cable?

The cable from the provider with whom the contract for the supply of Internet services was concluded is connected to the router connector marked “Internet” (WAN). A short cable (patch cord) is included with the router and is used to connect the PC’s network card socket to one of the ports labeled LAN (LAN1-LAN4). The type of connectors at both ends is RJ-45. This connection is more reliable and stable for the computer.
How to connect a router to a computer wirelessly?

To do this, you can use one of the USB connectors on your PC. A network adapter is connected to it, which the user must purchase additionally. Another option wireless connection is to use a separate module with an antenna, which is fixed in the corresponding connector motherboard PC screws.

The WI-FI antenna has an articulated rotating mechanism that allows you to manually orient it to achieve best quality reception.
Preliminary work
TO preliminary work refers to setting up your computer's network card. After connecting its connector to one of the LAN ports of the router, on the PC network connections page, right-click on the icon connecting the computer to the router. In the context menu, after selecting the connection status information section, you need to make sure that DHCP is enabled.
After this, you need to “click” on the “Properties” line. For correct operation, obtaining the IP address and DNS server address of the TCP/IPv4 protocol must occur automatically. If this is not the case, then the corresponding items must be ticked and the action must be confirmed by pressing the OK key. Pay attention to whether your service provider gives you a static or dynamic address. In the first case, you will have to register it in the settings of the router and the PC’s network card.
Resetting the router settings to factory values
This procedure is performed if the router has already been used by another user. He could change the login password to the device interface. For hard reset settings and returning to their factory values is the "RESET" button on the back panel of the device. Usually it is located in a recess and you have to use a pointed rod to access it.
You can go to the device menu and select “Return to factory settings” from the drop-down list. There will be a rollback to the original settings. Please note that you can save the current hardware configuration. This is usually required for the case when you need to configure several routers in the same way at once.

After the router is connected to the mains voltage and the POWER indicator lights up, press and hold the reset button on the front panel. The holding time is about (10-15) seconds. All indicators begin to work in flashing mode. The restoration of the factory settings can be judged by the cessation of the flashing mode of the indicators. Total time should not exceed one minute.
Internet connection

When connecting your router to the Internet, you must carefully read the terms and conditions of your specific provider. Setting items depend on the connection type. All operations are carried out in the product’s web interface. For it to be accessible, you need to know the IP address of the router you are using on the Internet.
Information about it can be found in the attached manual, on the official website of the company. A product purchased in a retail chain has a label on the bottom panel of the router with the necessary data. It contains the IP address itself, the user name (administrator), which must be entered during authorization, and a password.
In the settings panel of most routers, after entering the data indicated on the label, you will be prompted to change the default password. We have to agree with this. This will increase the degree of protection of the created local network. After pressing the "Enter" key, you can begin configuring the router settings. At the first stage, you need to go to the advanced settings section and go to the “Network” tab. The WAN section is of interest.
Connection to the networks of major Russian providers
After its disclosure, a careful reading of the contents of the agreement concluded with the provider is required. You need to select the connection type from the proposed options. Filling out the page causes the least difficulty when connecting the "Dynamic IP" type. It can be provided by Rostelecom, Dom.ru, NetByNet. More common PPPoE connection. When setting it up, you must enter the user name and password assigned by the provider. This data should not be confused with those entered on the login page as an administrator.
The Beeline provider uses a secure L2TP connection with support for a virtual private network (VPN) server. In addition to the user name and password assigned by the provider, you must enter the address of the server that encrypts messages - tp.internet.beeline.ru. All of the listed types of connections require the DHCP service to be enabled in the router settings. It assigns subscribers their addresses on the local network.
Setting up a wireless network
After logging in with the new administrator password, you need to find the " tab in the main interface Wireless mode" (WI-FI) and click on it. On the page of the main settings section, you need to specify the name of the network being created (SSID), by which it will be identified in the list of available connections. In the column for the number of the channel used, “Auto” is initially indicated; it is advisable to use the operating mode mixed (b/g/n mixed). It is recommended to set the channel not automatic, but specific (for example, the third). It allows you to coordinate the router with any subscriber equipment and achieve maximum exchange speed. You need to save the entered data - click on the “Apply” stencil. But this is not all you need to know before connecting a WiFi router and putting it into operation.
WI-FI network protection
The next step is to set parameters to protect the network from outside connections to it. WPA2-PSK network authentication is selected. It is the most protected. In addition to it is the encryption key. It must contain at least eight characters (Latin letters plus numbers). After this, the save command is executed, followed by a reboot of the router.
Conclusion
The interested reader will learn how to connect a wired router to create a local network on its basis or a router that can also organize a wireless network after reading the article. You don’t have to resort to the help of invited specialists, but carry out the work yourself. It will take no more than 10 minutes.
