Program virtual router wifi windows 8. Free virtual router for distributing wi-fi from any computer. Use of third party programs
When we were expecting a new addition to the family of gadgets (a children's tablet joined us), we decided not to provide it with its own card for connecting to the network. But we also saved on buying a WiFi router: we decided to make full use of the capabilities of unlimited home Internet and a laptop with a Wi-Fi module. In this article I will tell you what a Windows 8 WiFi virtual router is and how to install it.
Access point from a virtual wi-fi router: what are the requirements?
To make an access point from a virtual Wi-Fi router using these instructions, your device must meet the following requirements:
- WiFi module;
- Installed OS Windows7, 8 or 8 R2;
- Stable and secure Internet connection via wired network or 3G/4G.
As a rule, the latest laptop models are perfect for this role. Have you chosen the right one from the available range of devices? Let's learn how to choose and download a virtual wifi router for Windows.
Virtual router for Windows 8: select a program
A virtual router for Windows 8 cannot be called a complex program with a variety of functions and custom settings. However, there are several options:
- Virtual WiFi router for Windows 7 is the most common program for creating a virtual router. Minimum settings, simple and intuitive interface. The safest way to download Virtual WiFi router for Windows is from the official website of the program.
- Virtual Router Plus for Windows 7, 8, 8 R2 and 2012. The program is very popular among our compatriots due to the presence of a Russian interface. Otherwise, it is no different from analogues;
- Virtual router for Windows 7, 8 and 8 R2. Convenient and easy to install program. You can download Virtual router for Windows on the official website;
- WiFi Hotspot Creator is suitable for Windows XP and subsequent OS versions. One of the advantages is that already at the setup stage you can specify the maximum number of users of the access point. A good option if you are afraid of unscrupulous neighbors and password brute force.
Download and install Virtual router for Windows
I will not describe the installation process for each program, since it is similar. I’ll give an example of installing a virtual router for Windows 8, and you can easily figure out the rest.
- Download the Russian version of Virtual Router from the website and install it. After the process is completed, click “Close”;
- A window for setting up an access point from a virtual Wi-Fi router will appear on the screen. Fill in the required data:
- The line “Network Name SSID” is the name of your access point;
- “Password” – password for the access point. We come up with a password of at least 8 characters with a combination of Latin letters and numbers, if we do not want our connection to be shared by several other neighboring devices;
- “Shared Connection” - select an Internet connection from the list, which we will distribute to other devices.
- Have you made the initial settings? Click “Start Virtual Router”.
Access point from a virtual Wi-Fi router: working
Then everything is traditional: on your tablet or smartphone, turn on the search for wireless networks. A new network with the entered SSID should appear in the list - select it. Enter the password and take advantage of all the benefits of working with a full Wi-Fi connection.
It is difficult now to find someone who does not use the Internet - thousands and tens of thousands of people connect to the World Wide Web every day, but not everyone knows how and what to do after the line has been drawn. That is why today we will take a closer look at connecting a Wi-Fi router to a Windows 8 computer: how to install and configure the router in order to further make a wired or wireless connection to the computer itself. Also in the article we will look at how to connect a desktop computer without any wires.
General procedure
Regardless of what technology the provider uses, the connection occurs using a router. Basically, modern models of these devices come with both a WAN port and a PON, but older models do not support the second type of connection - there is no socket for it.
If you are going to use a wired connection for a desktop PC or laptop, then you will need a network cable of sufficient length, which will have plugs attached on both sides - their working name is RJ45.
If you are going to use only Wi-Fi in both cases, then there are unlikely to be problems with the laptop, but a desktop PC will need an external or internal adapter for wireless communication.
External Wi-Fi adapters are in the form of flash drives, and some of them are equipped with an additional antenna for better signal reception. Internal adapters are installed on the motherboard and their antennas extend to the rear panel. The internal version is more powerful, but less compact compared to the external one, which can be taken with you anywhere.
And, of course, after installing everything you need, you will have to make settings both on the PC and on the router. Now let's talk about this procedure in more detail.
Connecting a router
Our router body has from 3 to 7, and in some cases more, ports. You need to know what kind of connection you have: if it’s normal, then the socket for it will either be separate from the Lan sockets or will be marked in a different color. Keep in mind that there are usually only 4 Lan sockets and they will most likely be marked with a label.
If you have a Pon connection, that is, a fiber optic connection, then the port for it will also be placed separately and marked with a laser symbol. When you have connected the provider cable, you must not forget about the power supply, after which you can safely press the power button and wait for the download.
You can understand whether your router is working correctly by reading the instructions, where all the indicators are marked; We cannot describe them here, since each device has its own.
Well, now you can safely connect any end of the crimped network cable to any Lan port, and the other end to the socket of a laptop or regular computer.
About wireless adapters
Now you need to understand whether it is worth buying an adapter for a desktop PC. If you want to get rid of any unnecessary wires, then this will be an ideal option - then you need to choose whether you need a mobile version or a regular one.
Mobile adapters, as mentioned above, have the form of a flash drive, connect to any USB port and receive a signal at medium distances (in rare cases, at longer distances) thanks to the antenna.
Stationary ones are installed in a separate port on the motherboard, which is indicated below in the screenshot. One way or another, for both devices you will need to install a driver for proper operation - if it is not available, you can visit the manufacturer’s website and download the program for your model there.
The main thing to know is that the adapter and router must work in the same format, otherwise nothing will work.
How to connect to Wi-Fi
To continue setting up, you need to connect using one of the methods. We have already talked about connecting via a so-called network cable, now let's talk about wireless communication.
You need to find the Wi-Fi icon in the panel at the bottom right - it will show that the module has found a network, but is not yet connected.
Left-click on it and you will see the entire list of networks - find yours and click on it. If there is no password, the connection will occur automatically, and if you need to specify a password, you can find it on the box or on the device sticker. We enter the password, wait until the connection is successful and the icon changes to the signal level, and move on.
If you don’t want to connect manually every time, check the box for automatic connection.
Setting up a network on a computer
You need to configure everything on your computer so that there is a normal connection from the router. We already have either a wired or wireless connection, which we talked about above. Having found the icon for connecting a wired network or Wi-Fi at the bottom right of the panel, click the second mouse button and open “Network and Sharing Center”.
On the left in the menu list we need to find “Changes adapter settings” and click on this option.
A window will open in front of you with a connection that is not yet working correctly - double-click on it with the left button.
You will see another small window where you will need to select the “Internet Protocol Version 4” option.
Inside, you need to set the DSN and IP to connect automatically, and then click “OK” here and everywhere else where this button is present, accepting the changes.
This setup is carried out for both wired and wireless connections.
The final stage is setting up the router
Everything is almost ready, and all we have to do is configure the router itself. In this case, we are considering the setup based on the model of the manufacturer TP-Link.
First of all, open any browser that you have on your computer and enter this into the address bar - 192.168.1.1 (or change the penultimate one to zero if nothing happened).
In rare cases, these parameters, as well as the login password discussed below, can be changed by the manufacturer. In this case, you should look for information about them on the box or on the device itself (there is a factory sticker with all the necessary information).
You can quickly and correctly set up, thereby obtaining a full-fledged Wi-Fi network between any devices, using special software, which will allow you to do this quickly enough, without delving into the intricacies of the process itself.
It is known that under normal conditions, in order for a wireless Wi-Fi network to work between laptops, we also need a wireless router. A virtual router helps you avoid buying a real router and build a network between laptops, one of which will act as a distributor in the network (Wi-Fi Hot Spot).
At the very beginning, we will need these same programs to automatically install and configure a Wi-Fi wireless network. There are several similar ones, but in this article we will consider one of them - the simplest.
Preparing to install a virtual router (router) on a laptop
Download the free program “Virtual Router” (Virtual Router - Wifi Hot Spot for Windows 8, Windows 7 and 2008 R2) from the developer’s website http://virtualrouter.codeplex.com.
To download the Virtual Router program directly, click on the picture just below Download.
I would like to note that by installing a virtual wireless router (router) on one of the laptops and having configured it, we will automatically get a ready-made Wi-Fi network between:
- our laptop and any other laptop;
- laptop and computer (if it has a Wi-Fi card);
- laptop and smartphone with any OS (Android, iPhone (tablet).
Beginning of work
So, since the whole process boils down to using a special program to turn a laptop into a Wi-Fi access point, to which you can easily connect several devices - another laptop, computer, smartphone (Android, iPhone, Windows Phone), tablet, then , all that is needed is a laptop, correctly configured, with drivers installed and a simple but effective working one. I would like to warn you that some antiviruses may interfere with the correct operation of this program - be careful!
The last item on the list of required software will be the same utility for automatically creating a Wi-Fi router on a laptop.
Installing a virtual router
We perform the installation on a laptop, which we plan to use as a wireless network broadcaster. Installing the application itself is simple and without any special features.

Set all settings to default. Once the program installation is complete, if you look into the Windows Device Manager, a new device will appear: Microsoft Virtual Wi-Fi miniport adapter.

It is this that will act as a virtual router on our laptop (computer). If the device does not appear, you will need to find and download, then install the “native” drivers for the Wi-Fi adapter on your laptop. Otherwise the program will not work correctly!
Setting up a virtual router
Immediately after installation, the initial program setup window appears.

Change the network name (SSID) to the required one.


“Share” (make available) access to the Internet - select the type of connection from the program’s drop-down menu. 

Click the start button Start Virtual Router. The laptop should start broadcasting a network with a given name (SSID) and Internet access, which will be provided via a network cable connected to our provider’s ADSL modem. 
Automatic configuration and installation of a wireless network between laptops is completed
In our case, the program will automatically create a wireless router with minimal understanding of the process itself.
Thus, we created a wireless access point - a virtual router based on the network adapter of our laptop. We check the functionality of the created network by opening the network search in the smartphone - a new network with our name should appear in the available networks - SSID. It is to this that you need to connect any existing wireless device (smartphone, other laptop, tablet) in order to gain access to the Internet via a laptop connected to the global web via a regular network cable. At the same time, on another laptop that we will connect - there is no need to configure or change anything in the parameters - the network should distribute network parameters automatically.
I would like to remind you once again: sometimes antivirus programs block the operation of software of this kind - in our case, it was necessary to disable the free Avast Antivisus for Wi-Fi to start working correctly. Therefore, it is better to turn on the anti-virus program after all the settings and checking the network’s functionality.
Virtual Router is a free, open-source application that allows you to turn your computer into a Wi-Fi spot (router for wireless networks). Simply put, with the help of Virtual Router you can organize the distribution of access to Wi-Fi networks using the technologies built into Windows. Despite its apparent complexity, the program is very easy to use. To organize Wi-Fi distribution, you just need to specify a few basic parameters (network name, password, etc.). Using Virtual Router, you can distribute almost any type of Internet connection over wireless networks - LAN, Dial-up, cable connections, etc. You can use Virtual Router anywhere - at home, in the office, at the airport, at the bus stop, etc. In this case, your network will be completely protected, because... in Virtual Router, data exchange with all devices connected to the network is carried out using WPA2 technology - one of the most secure encryption algorithms.
Key Features and Functions
- distribution of Internet access via wireless communication channels (Wi-Fi);
- ease of use;
- security of data exchange on the network.
What's new in this version?
1.0 (14.03.2015)
- interface improvement;
- adding the ability to run a virtual router without sharing an Internet connection;
- Fixed errors that caused the virtual router to fail to start;
- adding support for Windows 8.
In this article you will find all the necessary information on setting up an access point on Windows 8 And Windows 8.1. We will set up Internet distribution from a laptop that runs on Windows 8 and connect our phone, tablet, another computer, TV, etc. to this laptop via Wi-Fi. Our computer will act as a Wi-Fi router.
I have been meaning to prepare this article for a very long time, as this is a very popular topic at the moment. The article received a lot of views and comments. Yes, and even, also popular.
Briefly about what we will do and why we should launch an access point on a laptop.
For example, you have a laptop (possibly a personal computer with a Wi-Fi adapter), there is wired internet (or Internet via 3G/4G modem), and devices that can connect to the Internet via Wi-Fi. Modern smartphones, tablets, laptops, TVs, almost all have this capability. Do you have Internet via cable, or from a USB modem?
We connect the Internet to a computer that has Wi-Fi and launch an access point on it. In this article we will do this using Windows 8 as an example. That's all, our laptop receives the Internet via cable and distributes it via Wi-Fi to the devices we need. That's the whole scheme :) If you don't want to spend money on buying a Wi-Fi router, or you just don't need one (for example, Wi-Fi is very rarely needed), then this method is what you need.
Setting up Internet distribution on Windows 8 is practically no different from setting up on Windows 7 (link to instructions is at the beginning of this article). But, I understand that it is much easier to do everything according to the instructions that are written specifically for the operating system that is installed on your laptop. And since Windows 8 (8.1) is actively gaining momentum, this article will be useful.
What should you do before setting up an access point?
- You need to connect the Internet to your laptop. By cable or via USB modem. There may be some nuances with a USB modem, see the article if you have Internet via a modem. There's an article for Windows 7, but that's okay. If the Internet is connected via a network cable, then there should be no problems. The Internet must work, sites must open in the browser.
- Make sure that your laptop has Wi-Fi and the driver is installed on it. If you have previously connected to wireless networks from this laptop, then everything is fine, it means the driver is installed. If you do not know whether the driver is installed on the wireless adapter, then go to Control Panel – Network and Internet – Network Connections, and see if there is Wireless network. If there is, then everything is fine. If not, then download the driver for your model and operating system from the website of the manufacturer of your laptop (adapter) and install it. Driver for wireless Wireless LAN adapter.
That's all, you can start setting up.
Setting up a Wi-Fi access point on Windows 8 using the command line
This is the first method in which we will not use third-party programs, but will make everything standard features of the operating system. This method is a little more complicated than the second one, which you will find below. But sometimes it’s even easier to configure everything through the command line. Yes, problems can arise through third-party programs.
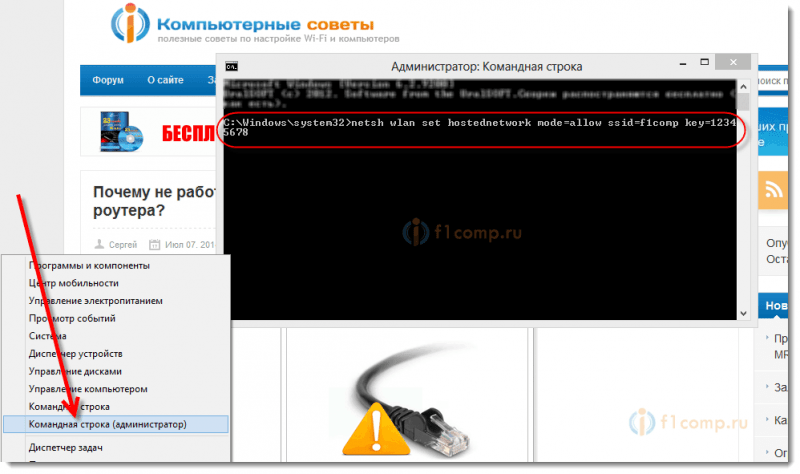
Right click on the lower left corner (or keyboard shortcut Win+X), and select Command Line (Administrator).
In the command prompt window, enter the command (you can just copy and paste):
Where “f1comp” is the name of the network, it can be anything. In English letters.
And “12345678” is the password for the network. You will need to enter it on the device that you will connect to Wi-Fi. Please enter a password of at least 8 characters. You can use numbers and English letters.
 Click Enter.
The launch result should appear with information that the network name and password have been successfully changed.
Enter another command:
This is the command to start the access point. Click Enter, and we see this result:
 It should say that the hosted network is running. If you have the same result as me in the screenshot above, then you can continue. The command prompt window can be closed.
If you see an error Failed to start hosted network, then run two commands in turn:
netsh wlan set hostednetwork mode=disallow
netsh wlan set hostednetwork mode=allowGo to Device Manager, open in the list Network adapters, right click on Hosted Network Virtual Adapter and select Turn on.
We execute two commands to start the network, which I wrote about above:
netsh wlan set hostednetwork mode=allow ssid=f1comp key=12345678
netsh wlan start hostednetwork
Allowing the use of public Internet access
Right-click on the connection icon in the lower right corner. Select an item Network and Sharing Center.
In the new window, on the left, click on the item Change adapter settings. Further attention! Right-click on the connection through which you receive internet ( For me it’s Ethernet, since it’s just a network cable connected to the laptop), and select Properties.
In the new window, go to the tab Access. Check the box next to the item Allow other network users to use this computer's Internet connection.
Below in the list, select the network that appeared after starting the access point. Most likely, it will look something like the screenshot below.
Click OK.
You can take your device and connect it to the Internet via Wi-Fi, which is already provided by our laptop.
You can see instructions for connecting to Wi-Fi: , .
The most popular problem is when the device connects to an access point created on Windows 8, but the Internet does not work. Sites do not open. Or when problems arise with obtaining an IP address.
Solution: completely disable your antivirus, antivirus utilities, firewalls. Most likely, they are blocking the connection. If everything works after disabling the antivirus, then you need to add the connection to the antivirus exceptions.
Also, check your Internet sharing settings, as in the screenshot above.
How to start the network after rebooting the laptop?
You probably have a question, how to restore the wireless network after rebooting the laptop.
You just need to run the command:
netsh wlan start hostednetwork
As we did above in the article. There is no need to enter the network name and password again. Just start the network.
We distribute the Internet in Windows 8 using the MyPublicWifi program
This is an easier way. We will launch the network not through the command line, but using the program MyPublicWifi. This is a free, small program with a clear interface, although without the Russian language. Instead of MyPublicWifi, you can use Virtual Router Plus, Connectify and the like. Their operating principle is the same.
Download and install MyPublicWifi. Version 5.1 can be downloaded from this link (I took the file from the official website http://www.mypublicwifi.com).
The installation is standard. After installation, reboot your laptop and launch MyPublicWifi. If an error appears during startup, right-click on the MyPublicWifi shortcut and select Run as administrator.
Select an item Automatic HotSpot configuration.
In field Network Name (SSID) specify the name of the network to be created.
In field Network Key specify the password that will need to be specified on the device to connect.
Put a tick next to Enable Internet Sharing and select from the list the connection with which your laptop is connected to the Internet.
Click on the button Set up and Start Hotspot.
You can already connect devices to the created network. If again, there is a network connection, but the Internet does not work, then check the Internet sharing settings (I wrote about this above in the article) and disable antivirus, firewall and other programs that may block the connection.
In the MyPublicWifi program, on the tab Clients you can see the devices that are currently connected to your network.
And on the tab Management You can further customize the program. For example, by checking the box next to the item Enable Firewall… we will prohibit devices that connect to your network from using to download and distribute files through clients such as Torrent and the like.
And if you check the box next to MyPublicWifi Will be launched on every system start, then the program will start automatically when you turn on the computer.
All is ready! You can use the Internet.
If you encounter any problems, errors or other difficulties during the setup process, you can ask a question in the comments. Describe the problem in as much detail as possible, and we will try to figure it out together. Best wishes!
Also on the site:
We set up Internet distribution via Wi-Fi from a laptop on Windows 8 and Windows 8.1. Setting up an access point updated: February 6, 2018 by: admin
