How to connect an additional hard drive to a computer. About possible display problems. Installing software on an external drive
Modern hard drives are distinguished by their capacity, sufficient to meet the needs of almost any user. However system requirements programs and games grow along with disk volumes, so sometimes there is a problem of lack of space. If you can’t remove anything, you can connect a second one HDD.
Connecting equipment
First, let's figure out how to connect a hard drive to a computer.
Modern hard drives for computers have a 3.5-inch format. They are connected using the SATA interface, which replaced the outdated IDE connector.
Look at your hard drive - it should have two connectors. One is short, designed to transfer data from the motherboard. The second one is long, it is needed to connect to the power supply and obtain energy for the hard drive to work.
SATA plugs can look different: straight, snap-on, L-shaped, etc. However, this does not matter - no matter how hard you try, you will not be able to connect the hard drive incorrectly. 
Install one end of the SATA cable into the appropriate connector on the hard drive. Then connect the hard drive to the power supply. If the power supply is old, you may have to use a special Molex to SATA adapter to connect the devices, which can be purchased at any computer store. 
The connected hard drive looks like this: 
The second end of the SATA cable is installed in the corresponding port on motherboard. These ports are usually painted blue or red, so you can easily spot them. Naturally, in this case, it is necessary to follow the main rule for connecting any equipment - “red to red, blue to blue, etc.” 
If SATA connectors no, or they are all busy, you can purchase a special PCI controller. If you know how to connect network card, then you won’t have any problems installing this controller; the main thing is that there is a free slot on the motherboard.
Don't forget to secure the hard drive with screws!
After turning on the computer, the new disk should appear in the system. If this does not happen, perform the initialization procedure.
Right-click on “My Computer” and select “Manage.” 
Go to Disk Management.  The initialization wizard should appear on the screen. Click "OK" to run it and finish installing hard disk.
Second disc
Connecting a second hard drive produced in a similar way. The main thing here is to maintain a distance between the hard drives so that they do not overheat.
Install the hard drive only in a special basket. Under no circumstances does it leave it hanging.
When you turn on the computer, a new disk is detected automatically. All you have to do is format it in the NTFS system. If formatting does not start automatically:

After formatting is completed, you can work with the new hard drive.
Since you've set out to improve functionality your computer, try connecting USB, increasing the number of available ports. You can also connect a video card to your computer if your old one doesn't suit your visual needs.
Old hard drives
If you are the proud owner of two vintage hard drives with an IDE interface and want to install them in one computer, then you will have to perform several additional steps to ensure that the equipment works correctly.

Now you need to manually set the configuration of the hard drive operating modes. For this, a special jumper is used.
- On the hard drive that will be the main one, it should be set to the “Master” position.
- The second hard drive is set to “Slave” mode.
The mode diagram should be indicated on the hard drive itself.
Finally, you need to check that the devices are defined correctly in the BIOS. Go to the Basic I/O system and make sure that the home page interface, the leading disk is marked in the “Primary IDE Master” column, and the slave disk is marked in the “Primary IDE Slave” column. Subsequent setup hard drives is done in the same way as when connecting hard drives via the SATA interface.
Often, unstable computer operation is associated with a lack of free space on your hard drive. To solve this problem, you can remove unnecessary files, but if there are none, you need to install an additional HDD on your PC. This article provides instructions for connecting a second drive and describes some pitfalls that a user can expect when performing this operation.
Motherboard support
So, how do you connect a second hard drive to your computer? "SATA or IDE ports are soldered to system board" - the first question that should be answered before installing the HDD. You need to find out what model of motherboard is installed in the system unit. This can be done by installing the AIDA64 program on your computer. This utility shows full information about the computer. On the left side of the main application window, just click on the text “Motherboard” to find out the model. After this, you need to find the documentation for the motherboard and find out which connection ports for drives are installed on it: SATA or IDE.
If you cannot find the documentation, you will need to study the hardware of the computer yourself. To do this you need to remove the left cover system unit, having previously unscrewed the mounting bolts on its rear side. Hard drives are located in the front of the PC case in special pockets. Pay attention to the cable that goes from the motherboard to the HDD. If it is wide, it means the drive connection interface is IDE; if it is narrow, it means SATA.
After a visual inspection, you still have doubts about what type of connection is used on the motherboard? In this case, disconnect the cables from the drive and pay attention to their cut. If there is a slot in the shape of the letter "G" in the connector. If the IDE connector will look like a rectangle with two rows of holes.
Pay attention to the area of the motherboard where the cable from the drive goes. Are all ports busy? If there are no free ports, connect a hard drive in the classic way will not work. Also take a look at the cable itself if the HDD connection interface is IDE. Usually it has two connectors for drives, and one of them may be free.

Before connecting a second hard drive to your computer, see if there are free pockets in the equipment case for installing drives. If they are not there, the hard drive can be placed on the bottom of the system unit, but this is unsafe for the equipment. When moving the computer, the hard drive will wobble, and there is a possibility that it will damage the components of the PC or fail on its own.
Selecting a hard drive
Before you can connect a second hard drive to your computer, you must first purchase it. After determining the connection interface, you can begin selecting a drive. Remember that they are best suited for a computer hard disks size 3.5 inches. Smaller samples are designed for installation in laptops. Although, if there is a suitable one HDD parameters 2.5-inch form factor, you can install it in a special adapter case and use it in a desktop PC.
Also determine which one you will need. If only documents will be stored on it, it is enough to purchase a HDD with a capacity of 320 GB. If you plan to store films high definition And computer games, it is better to choose a hard drive with a capacity of at least 1 TB.

It makes sense to pay attention to the characteristics of the speed of reading and writing data. There is only one rule: more is better. Although, if the computer is used only for work in office applications, it makes no sense to overpay for this feature.
Correct jumper position
Users whose motherboard only has IDE ports must make jumper adjustments. How to connect a second hard drive to a computer, where to put the jumper? So, if only one HDD is connected to the cable, the jumper must be set to the Master position, and the drive itself must be connected to the outermost connector of the cable. If two drives are connected to one wire, then the jumper on the additional hard drive should be in the slave position, and it should be connected to the connector that is located at a distance from the edge of the cable. There is no need to install jumpers on a SATA drive, since a separate cable is used for each drive.

How to connect a second hard drive to a computer?
Order HDD installations for drives with any interface is the same. Regardless of the type of hard drive, follow these steps to install it:
- Disconnect power from the system unit.
- Unscrew the bolts holding the left housing cover and remove it. This usually involves pulling it back.
- Place the drive in the pocket of the system unit. At correct installation the slots for screws at the place where the hard drive is mounted and the holes on the HDD will coincide.
- Tighten the mounting screws.
- Before connecting the second hard drive to the computer, pay attention to connecting the cables to the first one. Connect the wires to the additional drive in the same way as to the main one.
- Replace the case cover and turn on the computer.
BIOS setup
After a second hard drive is connected to the computer, several changes should be made to the BIOS, since sometimes the newly installed HDD is assigned as the first boot device. This results in the OS being unable to boot. To configure "BIOS":
- Turn on the computer by pressing the power button.
- As soon as the screen lights up, immediately start pressing the DEL or F8 key. Different motherboards use different buttons to enter the utility BIOS settings. To figure out which key to press, watch the messages on the screen or read the instructions that came with your motherboard.
- After entering the BIOS, go to the Boot tab.
- Use the arrows to select and press "ENTER".
- In the menu that opens, move the cursor to the First Drive item, press ENTER and select the hard drive on which the system is installed. If you are not sure which HDD should be selected, set the switch to a random position.
- Return to the previous menu by pressing ESC.
- Here, move to the First Boot Device line and press "ENTER". Sometimes, to see it, you need to move to the Boot Devices Priority submenu.
- Select Hard Drive from the drop-down menu. Sometimes the full name of the hard drive will be displayed instead of this message.
- Press F10 to save your changes, then press ESC to exit the setup utility and restart your computer.
If after these manipulations the PC does not boot, return to step 5 and select another drive.
External hard drive
How can I connect a second hard drive to my computer if the SATA and IDE ports on the motherboard are busy? In this case the best option will use an external drive. Typically, such devices are connected to a USB port. Less often - to FireWire. In the first case, the drive can be installed on any PC, in the second - only on one equipped with a special port. Main advantage external HDD- portability. It can be easily connected and disconnected without turning off or disassembling the computer. However, such devices usually work slower than those installed in a PC case.
Operating system settings
What system settings should be made after the second hard drive is connected to the computer on WIndows 7? SATA or IDE - drives that are often not detected by the system in file manager after installation.

To display the new HDD in Explorer, follow these steps:
- In the Start menu search bar, type "Manage."
- Click on the item with the text “Computer Management”.
- On the left side of the snap-in window, select Disk Management.
- Right-click on the drive that is not displayed in Explorer. You can find out which HDD you should work with by comparing the indicated volume with the real one and examining the partition labels.
- In the expanded list of actions, click on “Create a simple volume”, then specify the file system and cluster size, and then click “OK”.
- After completing the operation, right-click on the HDD again, and select “Change drive letter” from the menu.
- In the window that opens, click on the “Add” button and specify the desired letter.
Hello, friends. Sooner or later, disk space runs out. We constantly fill our devices with data and one day we find out that there is no more space on our disk. And I want it to always be there. Today I’ll tell you how you can quickly solve this problem yourself. In today's article we will connect the hard drive to the computer ourselves.
So, friends, you have discovered that you have a problem, but don’t worry, connecting the HDD is actually simple. IN regular computer install from one to six hard drives. You can make them into a place to store files, you can install another operating system. For example, on one disk you have Windows 10, and on the other Windows 7. When necessary, you boot from “seven”, and when not, from “ten” - you can do that. And you can do RAID arrays if necessary.
We connect a 3.5 hard drive from a laptop to a computer via a USB adapter
The easiest and most hassle-free option is to buy an external portable hard drive. This drive is connected via a USB connector and used as a large flash drive. The advantage of this solution is that you can store a lot of things on it? It connects easily to your computer, is compact and easy to carry. There are also disadvantages:
- the presence of a cord that must be connected all the time;
- speed read-write lower than that of a disk connected in the usual way;
- special sensitivity to shocks and falls.
What does this have to do with a laptop disk? Inside this case is the most ordinary laptop hard drive. And if you have such a used laptop disk, you can make it portable yourself. The most important part is the adapter. You can buy an adapter in a store, taking the disk with you, and the seller will select an adapter for you, and perhaps even a beautiful case. Putting everything together we get a portable disk:

It can now be connected to USB port. Or this option, without an adapter, just a connector screwed to the case, into which the hard drive is then inserted. The case itself can be secured in the system unit basket with screws:

This option is suitable for connecting an HDD without an adapter, inside the system unit. Read on.
Connecting a HDD without an adapter at home
You can easily connect the same 3.5 hard drive yourself. You will need an additional SATA cable for the hard drive and possibly an additional power plug (if there are not enough connectors on the power supply). On sale there are the following cable options where everything is in one:

We open the system unit after disconnecting all the wires from it, and unscrew the screws:

...remove the cover,

Connect the data cable to the motherboard...

...and the hard drive along with the power connector:

It is highly desirable that the 3.5 disk does not hang on the wires. If possible, it is better to secure it in a stationary state to avoid vibrations and shocks.
Then, we find a suitable place for it and secure it, if possible, with standard mounting screws in the basket, or at worst with plumbing tape, so that our disk is firmly and motionlessly fixed. We put the cover of the system unit in place.
How to connect a second, additional hard drive to a computer via a SATA connector
If you have a standard hard drive from your computer, you can just as easily connect it as a second drive. We do everything according to the same scheme. First, we secure the new disk with standard screws on both sides in the disk basket so that there is no vibration:

Then we connect the cable and the power connector. The disk is connected.
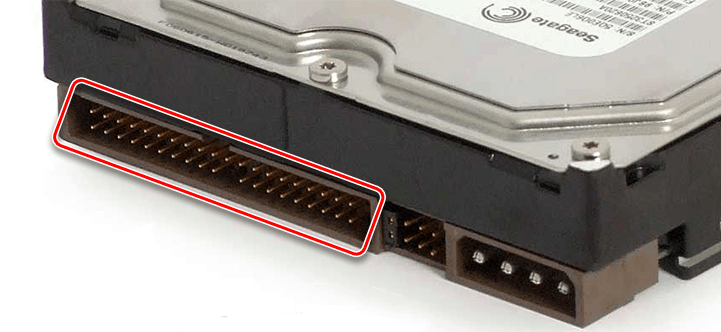
Connecting an IDE hard drive to the motherboard and SATA connector
If your computer's motherboard has connectors for connecting hard IDE drive, you can try connecting such a drive. For a long time, all computers worked on the IDE interface, something like this until 2005. A disk with such an interface looks like this:

The connection socket looks like this:

Sometimes the connectors are multi-colored. And the cable for connecting to the motherboard looks like this:

The blue block connects to the motherboard, the black (topmost) to the hard drive, and the white to the DVD drive.
Eat important point when using IDE drives. If you are going to use such a disk, you need to correctly switch the jumper to the position Master or Slave. This option tells the system what role this disk will play. Master— this disk is considered the main one, and loading will take place from it. Slave— secondary disk.

U different manufacturers own pinout of jumpers. The decoding of the switching modes is always indicated on the disk case:

By setting the jumpers to a certain position, we indicate the priorities - which disk is the main one. Previously, when there were several such disks, it took a lot of time to switch them. The SATA interface does not have these disadvantages. The IDE interface has long been outdated and is no longer used modern devices. However, you can connect your existing IDE drive to the SATA socket on the motherboard using a special adapter. You need to connect the adapter to the IDE drive:

...and a SATA cable and power cable to the motherboard and power supply. In this way, you can increase disk space by some, albeit small (by modern standards) amount. Everything is more than a flash drive!

If you bought a new hard drive, you must initialize it before using it, otherwise Windows will not see it, even if it is connected correctly. This is done using special programs Acronis type Disk Director 12. First, install the disk in the system unit, connect, and load Acronis Disk Director:

At first you will not see the new connected disk under Windows. However, if in your Windows versions If the “Disk Management” snap-in is available, you can try to initialize the connected disk through this snap-in. In the photo, we first went to “Computer Management”, then to “Disk Management”.

However, I always use Acronis; it is guaranteed to see all disks connected to the computer.

Need to choose required disk, right-click to open the menu, select “Initialize disk”, and then at the very top click “Apply pending operations”:

After initialization, we create a partition or partitions on the disk, formatting them in file system NTFS. At this point, the operation of connecting the disk to the computer can be considered completely completed. We connected it physically and programmatically. After these steps, the disks can be used for their intended purpose - installing an operating system or making volumes out of them to store your data.
If you decide to install another operating system on a new drive, then after installation, when you boot your computer, you will need to select the drive on which you installed it. This is done through the BIOS. To enter the BIOS, first press the key DEL, and then select the desired disk:

I repeat, you need to select from the list that appears the disk that you need. You can then change the download at any time. In general, you can connect a hard drive yourself very easily, try everything and you will definitely succeed.
Modern technologies are developing more and more every year. The time has long come when one hard drive in a computer is not enough. A huge number of people connect a second HDD to a personal computer. The connection procedure is nothing fancy and even a beginner can figure it out. Let's look at everything more carefully and in detail.
Connecting a second HDD to a laptop or Personal Computer
There are two options for adding an additional hard drive:
- To the PC system unit. This method Great for standard desktop computers;
- Adding in the form of an external drive. This is very easy way, which is suitable for all devices.
Method 1: Adding to the system unit
The process of adding additional media to the system unit can be divided into several small stages. Let's look at each of them in more detail.
Type Definition
At the very first stage, you need to decide on the type of interface with which the hard drive interacts. It is worth noting the important fact that the majority of computers have a SATA interface, therefore, it is advisable that the second hard drive be of a similar type. The motherboard may not have an IDE bus because it is considered very old, which may cause some problems when installing older hard drives.
The best way to determine the standard is to carefully consider the pins.
Example of a SATA connector

Example of an IDE connector
Adding a second SATA drive to the system unit
Addition additional disk- the simplest process that occurs as follows:

Boot priority for SATA drives
By default, there are four holes on the motherboard for adding SATA drives. It is worth understanding that their numbering starts from zero. Namely, the priority of the hard drive directly depends on the connector number. To set the priority yourself, you must use the BIOS. Each specific type of BIOS has its own special controls, as well as a special interface.
In the earliest version, you need to go to the “Advanced BIOS Features” menu and start working with items such as “First/Second Boot Device”. IN modern versions the path looks like this: “Boot/Boot Sequence – 1st/2nd Boot Priority”.
Adding an additional IDE drive
There are also cases when you need to connect an old IDE drive. Step-by-step instruction The process looks like this:

Connecting the second IDE to the first SATA
If you need to carry out this procedure, you will need an appropriate IDE-SATA adapter. An example of an adapter can be seen below:

Step-by-step instruction:
- First you need to put the jumper in the Master position.
- The IDE plug is connected to the hard drive.
- Take a red SATA cable and connect one side to the motherboard and the other to the adapter.
- The power cable is connected to the power supply and adapter.
About possible display problems
Sometimes it happens that after an additional hard drive has been connected, the system cannot recognize it. Don't panic, because most likely you did everything right. Just for proper operation the second hard drive needs to be initialized.
Method 2: Connecting an external hard drive
Connecting an external HDD is convenient if the stored files are needed not only at home, but also outside of it. In addition, this method is the only correct one for laptop owners, since they simply do not have a special additional connector for a new hard drive.
In fact, everything is easy here, because the external hard drive is connected via USB, just like any other devices (mouse, keyboard, flash drive, webcam and much, much more).

Hard drives that are installed in the system unit can also be connected via a USB connector. Here you will need an external hard drive enclosure or a special adapter. The bottom line is this: the required voltage is supplied to the HDD through the adapter, and communication with Personal Computer happens via USB. Different hard drives have their own wires, so you should always pay special attention to the standard that specifies the dimensions.
The amount of information stored on a hard drive is growing at a rapid rate, take a movie for example. good quality(HDRip) its volume can be 2400 MB, which means that only 50 movies can fit on an average hard drive of 160 GB, unless of course the drive is empty.
The advantage of an additional hard drive is another important factor, such as data recovery after reinstalling the system. You've probably already encountered a problem where a reinstallation is required. software and in order to save all the information you have, it takes a day to first copy it to an external drive, and then return it to its place after reinstalling the software. It will be much more convenient to have a second hard drive to store all information except the installed software itself.
In this article we will look at how to install an additional hard drive.
Let's get down to business.
We will leave our first hard drive for the operating system, and we will connect the second to store movies, games, music and other information. This configuration is not only convenient, but also improves the performance of the computer itself.
Let's consider point by point how to “get” to the installation location of our hard drive.
1. It is necessary to disconnect the computer from the power supply.
2. Remove the cover of the system unit (if the cover is separate, then it must be removed from both sides).
3. Find your first hard drive (most often it is located closer to the end part).

4. It is necessary to determine the type of hard drive (types: IDE and SATA. They differ in connecting wires).

IDE power cable

IDE data cable

This is what the IDE connector on the motherboard looks like for connecting a data cable.

SATA data cable

SATA power cable

This is what the SATA connector on the motherboard looks like for connecting a data cable.
For information:
If you have a SATA output on your motherboard, then it would be wiser to install this type of hard drive. SATA has greater bandwidth compared to IDE. IDE is more difficult to find in stores due to the fact that this interface is no longer in active use, and has been replaced by SATA, SATA-II, SATA-III (the larger the number, the higher the data exchange speed).
5. If your choice falls on an IDE hard drive, then on the rear panel you need to move the jumper to the Slave position. You also need to check how the jumper is set on the first hard drive (it should be set to the Master position).

6. Now install your additional hard drive in place and connect it to the motherboard and supply power to it.
7. Secure the hard drives on both sides with the screws included in the kit.
8. Replace the system unit cover.
9. Connect the wires that were previously disconnected and apply power to it.
10. Turn on the computer, wait until it boots completely, then check if a new hard drive has appeared (to check, go to “My Computer”)
11. If everything went well and the disk appears in the computer, then before starting work you should format it.
Well, this completes the installation of the second hard drive.
