Search for Wi-Fi on a laptop. Enable WiFi on laptops of different models. Enabling on the keyboard
Turn onWi-Fi on a laptop
Nowadays, more and more people use the Internet. Technologies do not stand still, but develop at the “speed of light.” Any Internet user with even a little knowledge of hi-tech technologies will eventually appreciate the delights of the absence of “kilometers” of wires that constantly had to be untangled.
Wi-Fi is especially loved by laptop owners, because this device itself is portable, and the wires trailing behind them limit freedom of movement. Despite the widespread use of the network, many people wonder: how to turn on Wi-Fi on a laptop, how to set up Wi-Fi, why doesn’t the laptop see the network? In fact, connecting a wireless Internet is not a very complex task, and this article outlines the main ways to connect a laptop to Wi-Fi.
Dear users, the Wi-Fi module is not built into all laptop models.
This must be taken into account before looking at the most common problems and reasons for lack of connection. To find out if your laptop has this feature, you can simply use search engines. To do this, you will need to find a laptop model on the Internet (go to the website of an online store that sells computer equipment: Eldorado, MVideo, Yandex Market, etc.), and in the technical specifications pay attention to the inscription “Wi-Fi”. If the description found says “no” or “absent,” then this can be solved by purchasing an external signal receiver (adapter) that looks like a flash drive.
If you see that the network icon is not active or is not displayed at all, we hope that this article will help you troubleshoot this problem. So, how to enable Wi-Fi on a laptop? Let's look at the most used options.
HardwareWi-Fi connection method
Some laptops from well-known manufacturers, for example, devices from Sony Vaio, have a built-in slider that turning on The network must be moved towards “on” or “1”. This mechanical button is most often located on the left or right side of the laptop, but there are also models with the desired key located on the front.
Sometimes instead there are two buttons with the values of turning on and off the connection to a wireless network. Manufacturers often highlight the Internet connection button in blue, red or orange, thereby making it easier to find.
It’s just that it lights up when Wi-Fi is working. But don’t get discouraged ahead of time, because here the indicator built into the laptop and located on the front of your device will come to the rescue. If it is highlighted in green, then Wi-Fi is connected and you can start using the Internet, and when it is red or orange, then there is a problem with the network connection.
Activekeys
You can also enable Wi-Fi on a laptop using a combination of active keys that activate one or another command, in our case this is a Wi-Fi connection. It should be noted that each manufacturer has its own characteristics:
- In Asus, for example, Wi-Fi is turned on when the “Fn” and “F2” keys are used simultaneously;
- In Acer, activation is triggered by a combination of “Fn” and “F3”.
- HP connects Wi-Fi by holding “Fn” and “F12”;
- Lenovo usually responds to "Fn" and "F5";
- For Samsung, one of two connection options is possible - “Fn” and “F9” or “Fn” and “F12”;
- In laptops from MSI, in order to connect to Wi-Fi, the combination of “Fn” and “F10” is widely used;
- Toshiba devices respond to “Fn” and “F8”.
But this is on devices from fairly well-known companies, and as for less common brands, in this case you will have to look for the direct Wi-Fi button on your laptop yourself. Most often it is in the “Fn” - “F12” key range. In appearance, it resembles the network icon on your smartphone or has an image of an antenna providing a signal.
Software enable Wi-Fi
The keyboard or laptop does not always have a key to turn on the adapter; some Samsung and Intel models may initially have a factory program that is responsible for connecting Wi-Fi to an external device that receives the signal. For Samsung laptops, this software is called “Easy Setting”, for laptops from Intel – “Intel PROset”. In such cases, a wireless Internet connection is made when using this utility. To connect, launch one of the programs and select “Enable”.
Switching on via Windows OS
If the above methods are not effective, and you are still tormented by the question “how to turn on Wi-Fi on a laptop,” then you should try to launch it through the settings. This is done in two ways:
- To search for a network through “Settings”, you need to follow the order of the commands “Start” / “Control Panel” / “Internet Network” / “Network and Sharing Center”. On the left side of the window, select “Change adapter settings.” Here we hover the cursor over “Wireless network connection” and right-click on “Enable”. If it is replaced by “Disable”, then the connection has already been established.
- You can get to the Network Control Center in another way: to do this, right-click on the network icon at the bottom of the screen (right) and go to the desired section. Then follow the sequence of actions listed in the previous method.
Launch via Device Manager
Wi-Fi in a laptop turns on less often this way than other methods, but it still needs to be considered. Network adapters are extremely rarely disabled on the system, but if this happens, you will not see the “Wireless Network Connection” icon, since it will not be active. To correct this error, you need to use the key combination “Windows” (on laptops it is indicated on one of the keyboard buttons with the abbreviation “Win” or the image of the “Windows” logo) + “R” in the active line of the “Run” window, enter “devmgmt.msc”, Device Manager will open.


Select it, right-click and go to the “Properties” section, where you can see the device status and adapter name.


If for some reason the selected device does not start, then the reason is most likely an incorrect driver for the adapter or its absence. To fix this, download the network adapter software (driver) for your laptop model from the manufacturer’s official page. Use a search engine: go to the manufacturer’s website, find the “Support” section, in this section enter the name of the device, find “Wireless Lan driver”. Most often, in the absence of a driver, there is a yellow triangle with an exclamation mark in front of Wi-Fi or Wireless services, but as in any case, there are exceptions.
You can also get to the task manager through “Start”; to do this, in the context menu that opens, select “Computer”, click “Manage”, then go to Device Manager on the left side of the window.
Eventually
Now you are familiar with almost all the ways to troubleshoot problems turning on the Internet on a laptop. We believe that this article has come to the rescue in resolving most issues related to connecting a network on a portable device. If none of the above options suits you, then we recommend contacting your provider’s technical support and troubleshooting the problem over the phone.
Lenovo laptops are not particularly fussy when it comes to wireless connections, but sometimes you have to work hard to turn on Wi-Fi on a Lenovo laptop. Especially if it is not a very new laptop model, and Windows 7 or Windows 8 (or even XP) is installed on it. In Windows 10, everything is somehow simpler. Although, after installing Windows 10, I couldn’t turn on Wi-Fi on my laptop. I wrote about this in one of the articles on the site. But the problem was solved quite quickly. I will also write about this in the article.
Of course, depending on the laptop model, the installed operating system and different settings, the reasons may be different. But as personal experience and information that is often shared with me in the comments show, most often a Lenovo laptop cannot connect to Wi-Fi due to the fact that it is turned off by a switch on the laptop body or a key combination on the keyboard. Therefore, we will consider these two methods first. And of course, very often the wireless module driver is simply not installed on the laptop.
Let's go in order:
1 If you have a wireless network icon with an asterisk in your tray, this means that everything is fine. Click on it, select the desired network and connect. 2 If there is no Wi-Fi icon there at all, but instead a “network connection” (Ethernet) icon, then I’m almost sure that your Lenovo laptop does not have a Wi-Fi driver installed. This is what the icon looks like:And in the Device Manager, on the "Network Adapters" tab, you will not see a wireless adapter (Wireless, WLAN).

In this case, you need to download and install the required driver. I already wrote about this in a separate article: .
3 Well, the third option, which this article is devoted to, is when there is a Wi-Fi adapter, everything seems to be working, but the Wi-Fi icon with a red cross and the status, or “Wireless network - Disabled”.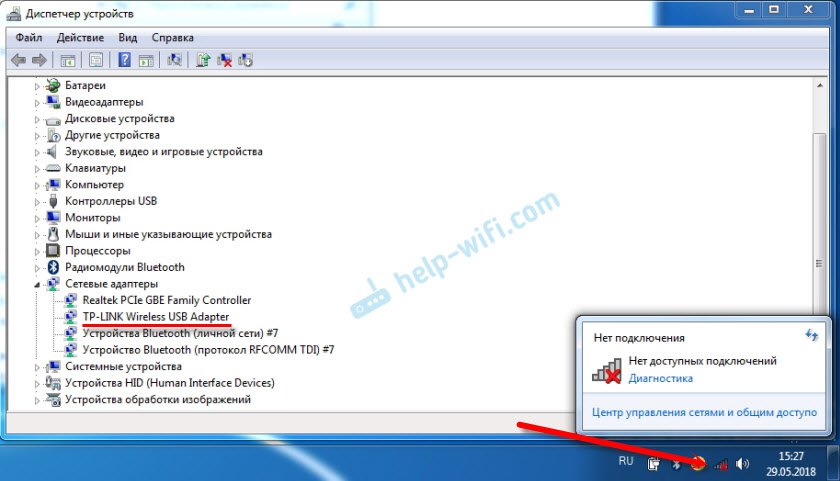
In my case, in Windows 10 the Wi-Fi button was simply grayed out. And the wireless network switch in the settings did not work. I wrote about this in an article. There I just encountered this problem on a Lenovo laptop.
If you have the same case, you cannot turn on the wireless network on your laptop, then look and apply the solutions from this article.
Mechanical Wi-Fi Switch
Many Lenovo laptop models have a separate switch that is designed to disable and enable the wireless connection. You need to check if there is such a switch on your laptop. Maybe you or someone else accidentally turned it to the "Off" position. Therefore, wireless communication is disabled.
Most often it is located on the front of the laptop. Maybe the assembly, or somewhere near the keyboard. There should be a wireless network icon next to the switch.

If your laptop has such a switch, make sure it is in the "On" position. If everything is turned on there, then turn it off and turn it on again.
You can also reboot your laptop. If the laptop does not see wireless networks immediately after using a special switch.
Fn key combination on Lenovo laptop to turn on Wi-Fi
On new models on which the manufacturer recommends installing Windows 10, the keyboard shortcut Fn+F7 (with airplane icon) serves to turn it on and off. But it is possible that using this key combination in some cases you can also turn on Wi-Fi.

The keyboard shortcut is also common Fn+F5 (with wireless network icon).

Basically, Lenovo laptops use the key combination Fn + F7, or Fn + F5. I haven't met any others.
Press these keys together once and look at the result. If nothing happens, then click on them and restart the laptop.
Why don't the function keys work?
It happens that the wireless connection on a Lenovo laptop is actually disabled using the function keys. Windows (after running diagnostics) tells us to use the keys or switch to turn it on.
But there is no separate switch, and the function keys do not function due to the lack of a driver or utility that is responsible for the operation of these function keys. Including Fn + F7 and Fn + F5.
This means that we need to download and install the utility from the Lenovo website, specifically for our laptop and the system installed on it. Most likely this is the Hotkey Features Integration utility, which can be downloaded from this link: https://support.lenovo.com/ua/ru/downloads/ds014985. This is for Windows 8, Windows 7 and Windows XP.
And if you have Windows 10, then most likely you need the Lenovo Utility for Windows 10 utility. It can be downloaded on the page of your specific laptop model.
After installing the utility, restart your laptop and try using the function keys.
Software method (in Windows settings)
Try using Windows Mobility Center. To call it, press the Win + X key combination.
There may be a "Turn on wireless" button.

If it is there and active, then after pressing Wi-Fi should work.
In Windows 10, you can open this window through search.

But on my Windows 10 laptop there is no wireless control in this window. Therefore, go to the settings, to the “Network and Internet” section and on the Wi-Fi tab, try to turn it on.
I think these tips are enough. If you know other ways in which you can enable Wi-Fi on a Lenovo laptop, then write in the comments.
If nothing from the article helped, then check the function keys again. Especially if you have Windows 8 and below. Download and install the Hotkey Features Integration utility, which I wrote about above.
http://tvoirouter.ru/nastrojjka-routera/kak-vklyuc...astrojjt-wifi-na-noutbuke.htmlOften, users who have purchased a laptop or netbook encounter difficulties when turning on and setting up wifi. The procedure itself is quite simple, but in some cases there are various snags and unforeseen difficulties, and sometimes it is also necessary configure the router Before you start, connect Wi-Fi to your laptop. In this article we will look at both the standard connection and options for solving such problems.
How to turn on wifi on a laptop
Usually, to turn on wifi, it is enough to perform 2-3 simple operations. Which ones exactly depend on the model and manufacturer of the laptop. Here are the options for enabling a wifi network on beeches from the most popular manufacturers:
- On an ASUS laptop, you need to press the combination of the FN and F2 buttons.
- On Acer and Packard bell, hold down the FN button and press F3 at the same time.
">- On HP laptops, wi-fi is activated by touch button with a symbolic image of an antenna, and on some models by the FN and F12 key combination. There are also models that have a regular button with an antenna design for this purpose.
- To turn on wi-fi on Lenovo, hold FN and press F5. There are models that have a special connection switch for wireless networks.
- On Samsung laptops, to turn on wi-fi, you need to hold down the FN button and press either F9 or F12, depending on the model.
To connect Wi-Fi, laptops of different models and different manufacturers can use their own original key combination. A detailed description for a specific model should be found in the user manual that came with the laptop. The FN button is found on almost all models of modern laptops. With its help, you can connect various functions and connect the beech with other devices. If the laptop does not have an FN button, then a special button or switch is used to turn on the wireless network. As a rule, it is indicated by one of these drawings.
If you don't find it on the keyboard, examine the ends of the laptop; perhaps the switch is on the side. Also, take a close look at the bottom of your laptop. There are models in which the switch is located on the bottom cover. Moreover, manufacturers make this button barely noticeable. It practically merges with the body and may not be visible at first glance. It may be signed Wireles or Wlan. Have you turned on wifi using the required button or combination, but it doesn’t work? You should set up Wi-Fi on your laptop.
Example of a hidden WiFi switch
Attention: It is worth saying that such switches can be located in the most unexpected places, even on the back cover of the laptop. So if your WiFi is not working, carefully inspect your laptop for a switch.
How to set up wifi on a Windows 7 laptop
Before setting up, you need to check the availability and connection of drivers. Checking drivers Checking the driver is to find out whether they are on your device at all and whether it is currently in use. So, in Control panels select an item device Manager, which can be hidden inside the item Equipment and sound.
A window opens in which we find Network adapters. There must be two items: Ethernet and Wi-Fi. One of them should have the word “Wireless” in its name. This is your adapter.
If there is no entry for the wi-fi adapter, or there is an icon with an exclamation mark on a yellow background next to it, this means that you have a problem with the drivers. If there is no entry, it means that the drivers are not installed and you will have to install them from the disk that came with the laptop. Or find it on the manufacturer's website. Without them, wi-fi will not work. If there is an entry, but there is a yellow exclamation mark next to it, right-click on this item. In the window that appears, select “Engage”. The reason for connection difficulties may lie in the fact that the adapter is set to a power saving mode. To disable it, right-click on it, then Properties - Power Management, now you need to uncheck the box “Allow the computer to turn off this device to save energy.”
Now everything is fine with the driver. Enabling the adapterwi- fi . To do this through Control Panel→ Network and Internet go to Network connections. Here we find Wireless network connection. This is the wi-fi adapter. Right-click to open the dialog box and select “Enable”. Connect to an access point. All that remains is to connect the laptop to the access point. Make sure the access point is active. Find the wi-fi icon in the lower right corner of the screen on the taskbar. When clicked, a network management window will open, select the desired network, click “Connection”.
If the network is protected by a password, the system will ask you to enter it (if you have forgotten the password for your network, you can find it in several ways). Only after entering the required password will you be able to use the Internet. If the network is open, the connection will occur automatically. That's all. Enabling and setting up Wifi on a laptop completed. If you have set up Wi-Fi once, you won’t need to do this anymore, since they will automatically be saved in the laptop’s memory. You will only need to turn it on with the appropriate button or key combination. Remember that connecting wirelessly takes a lot of power from your device, so the battery will be used quite intensively. Pleasant and simple connections without incident!
Original post and comments at
In this article we will tell you how to enable wifi on a laptop. The fact is that on laptops of different brands and manufacturers, Wi-Fi is also turned on differently. On some laptop models you need to turn on a mechanical switch, on others you just need to press the desired combination of keyboard keys.
Therefore, our article will be divided into two parts. In the first part we will talk about enabling WiFi on different laptop models, and in the second part we will look at some of the features of enabling WiFi in the Windows operating system. So, let's go!
Next, we will give standard laptop key combinations that allow you to enable Wi-Fi on a laptop. Don’t forget, as mentioned above, that some models have a mechanical switch/switch that is responsible for turning on the laptop’s WiFi.
You can always clarify this point by asking a question in the comments. Now, we will move on to the laptop key combinations that are designed to enable wifi. Typically, the button on a laptop that is responsible for turning on the wireless network is marked with a stylized icon:

- Let's start with the company's laptops Asus (Asus). To turn on Wi-Fi they use a key combination Fn+F2.
- The company's laptops HP (Hewlett Packard) need to be clamped Fn+F12. Or find a button with a picture of a wireless network.
- Laptops Acer And Packard Bell turn on WiFi using a key combination Fn+F3.
- On laptops MSI WiFi is turned on using the keys Fn+F10.
- On laptop models from Samsung need to be clamped Fn+F9 or Fn+F12 .
- Laptops from Lenovo (Lenovo), depending on the model, may have a special switch. You can also turn on the wireless network through a key combination Fn+F5.
- On laptops from Toshiba keyboard shortcut should be used Fn+F8.
- Laptops from Sony Vaio (Sony Vaio) may have a mechanical switch.
If there is no button Fn It makes sense to look for the switch at the end of your laptop. If, after turning it on using the keys or switch, WiFi still does not work, then perhaps the reason lies in the configuration of the Windows operating system, the configuration of which will be discussed below.
Software enable Wi-Fi on laptops
Some laptop models may have software that enables the WiFi adapter. For example, on laptops Samsung this program is called “Easy Settings”, and on laptops with Wi-Fi adapters from the company Intel“Intel PROSet” program is installed. This fact undoubtedly needs to be taken into account, especially if you have not found a hot key on the keyboard and there is no mechanical switch on the laptop.

If you have similar software installed on your laptop, then turning on the Wi-Fi network is done through this software.
How to turn on wifi on a computer
For those of you, dear visitors, who do not have a laptop but want to enable Wi-Fi on a desktop computer, we want to make a small explanation. The fact is that not everyone has a built-in Wi-Fi module that allows you to communicate wirelessly. You can find out whether your computer has a WIFI module from the specifications for your motherboard or try to find the adapter in Windows Device Manager.

As you can see from the screenshot above, the Wi-Fi adapter contains the word “Wireless”. The module may also contain the word “WiFi”. As you probably already understood, without such an adapter you will not be able to communicate with a wireless access point or router. There is a variety of equipment on sale, Wi-Fi adapters and modules to suit every taste and budget. They can be divided into two main types - USB and PCI adapters. The picture below shows a PCI module for connecting to Wi-Fi:

Accordingly, the USB adapter is inserted into the USB connector on the motherboard, and the PCI adapter is connected into the PCI slot of the motherboard. After installing the drivers, you can fully use this adapter. Let's move on to the settings that are responsible for Wi-Fi in your operating system.
Turn on WiFi in Windows
There are a number of options that should be checked for WiFi to work. First, go to Device Manager (“Control Panel” > “System” > “Device Manager”) and check if everything is ok with the network adapter driver. The device should not have a yellow exclamation mark, and it should be enabled, as shown in the following picture (we will talk about setting up the adapter in Device Manager below).
Next, we need to check whether the wireless connection we need is enabled. To do this, visit “Control Panel” > “Network and Internet” > “Network Connections”. The following picture shows that the wireless connection is not enabled. If you also do not have it enabled, then you need to enable it by right-clicking on it.

In addition, you should make sure that your laptop sees the access point or router and connects to this device. By the way, we advise you to read the article:. So, if the WiFi router is visible, then in the Windows tray (in the lower right corner there is a ladder icon) you need to select it and click the “Connect” button to the desired Wi-Fi network.

After this, it’s enough and the WiFi network will work.
If WiFi on the laptop does not turn on
Here we decided to give brief instructions if Wi-Fi does not want to turn on, although the required key combination seems to have already been pressed. First of all, make sure that the adapter we talked about above is enabled in the device manager.

It may also happen that the driver for the adapter is not installed. In this case, you need to go to the laptop manufacturer’s website, find the section for downloading drivers and download the required driver for the WiFi module. If you already have a driver (for example, on the driver disk that came with your laptop), you can install it manually by specifying its location:

Next, you need to make sure that your wireless router is turned on and working. If the router is turned on, you can turn off the power for a while (about half a minute) and turn it on again. You can check the WiFi network using a mobile phone or tablet computer, if you have one at hand.
If the gadget finds the network and connects to it, then the problem is in the laptop. If you have problems turning on WIFI, we also recommend reading our other article if. That's all, we hope that our instructions on how to enable wifi on a laptop were useful. If you still have questions and the problem is not resolved, you can always ask a question in the comments. Finally, watch a short video on how to set up Wi-Fi on a laptop:
Wi-Fi not working on your laptop? Then you've come to the right place.
There are quite a few reasons when a laptop cannot connect to a Wi-Fi network. This article will provide an algorithm for solving this problem, taking into account the frequency of possible causes.
Step 1: Diagnose the source of the problem
If the connection to the wireless network is unsuccessful, the problem may not be in the client device (netbook, ultrabook, etc.), but in the router settings.
To do this, you need to try to connect to the wireless network using any other device equipped with a Wi-Fi module - another laptop, netbook, tablet, smartphone, etc.
If you were able to connect to the wireless network, the problem is with your computer. If the connection fails, the problem is in .
Step 2. Hardware enable the Wi-Fi module of the laptop
So, based on the diagnostics that we carried out in the previous step, it was determined that the connection problem occurred on one of the client devices of the wireless network.
As a rule, all laptops are equipped with light indicators for the operation of the wireless module and have a specific key combination to turn it on.
Note! A glowing indicator indicates that the adapter is turned on. The absence of backlight indicates that the Wi-Fi adapter is turned off.
Most manufacturers place indicator lights on the front or one of the sides of the computer.
Less common is the location of indicators near the touchpad or on the monitor body.
On some HP models, a module status light may be built into the power button on the keyboard.
To turn on the Wi-Fi module, a key combination is used, which consists of a special Fn key and one of the system keys from F1 to F12.
Look carefully at the system (function) keys and find the Wi-Fi connection icon on one of them.
On some older models, in particular from the company, you can find a solution for turning on the Wi-Fi module in the form of a two-position switch.
Such a switch is usually located on one of the sides of the laptop or on its front side.
Below is a list of keys that can be used to enable/disable the Wi-Fi module on the most popular brands of laptops.
Acer: Fn+F3 
Asus: Fn + F2

Dell: Fn+F2

Fujitsu: Fn+F5

Gigabyte: Fn + F2

HP: Fn+F12

After the adapter is turned on in hardware, connect to the wireless network. If the connection fails, move on to the next step.
Step 3. Software enable the laptop's Wi-Fi module
In addition to the hardware enablement of the wireless adapter, which we dealt with in the previous paragraph, there is also a software enablement, which is performed directly in the operating system installed on the laptop.
To enable the wireless connection adapter in Windows 7, you must complete the following steps: on the notification panel (near the clock), select the Internet connection status icon “Network and Sharing Center”.
In the left column, select “Change adapter settings.”

In the list of connections, you need to pay attention to the indication of the “Wireless network connection” item. If the adapter is disabled, it will not be highlighted.
To enable it, right-click on the icon and select enable.
The icon color should change.

Now you need to pay attention to the notification panel area. In the first case, the laptop's Wi-Fi adapter is turned on, but there is no network to connect to (usually this is a problem with the router).
In the second option, the adapter is turned on and you need to find your network in the list of connections and connect.

After software enabling the adapter, we try to connect to . If the connection fails, move on to the next step.
Step 4. Installing/reinstalling drivers for the Wi-Fi module
To check whether the driver is installed, you need to right-click on the “My Computer” shortcut, which can be found either in the “Start” menu or on the Desktop, select “Properties” in the context menu, and select the “Manager” menu in the left column of the window that opens devices".

In the window that opens, you need to find the “Network Adapters” menu and find the name of the wireless adapter, which contains part of the name “... Wireless Network Adapter” or “Wireless Network Adapter …”, where instead of “…” there should be the name of your wireless adapter, for example, Atheros , Realtek, Qualcomm.
In our case, this is Atheros Wireless Network Adapter. Right-click on it and select “Properties”. In the menu that opens, you need to make sure that “The device is working normally.”
Important! If you do not find the name in the “Network Adapters” menu, you need to install drivers. Drivers can be found on the disk that came with the laptop, or by searching the Internet.
Step 5. Fix connection problems in the router

In the first step of our article, we looked at how to determine with a high degree of probability the possible reason why it is impossible to establish a Wi-Fi connection.
Since there are quite a lot of routers, and even more firmware for them, in this paragraph we will give general recommendations for troubleshooting the problem.
1. Try to reduce the distance between and the router. Try to ensure that there is direct visibility between the devices and as little interference as possible (walls, partitions, ceilings, microwave ovens, radiotelephone bases, etc.).
What to do if Wi-Fi does not work on your laptop
Why doesn't Wi-Fi work on my laptop? You can find out by running system diagnostics. You will learn how to do this in the video presented.
