How to restore something deleted from the recycle bin. Step-by-step recovery of deleted files from the Recycle Bin. If regular remedies don't help
While working with a computer, we have to regularly delete files. Therefore, it is not surprising that sometimes situations occur when files we need are accidentally deleted. In most cases, we can restore them from the Recycle Bin, but if the Recycle Bin was emptied after deletion, then the situation becomes more serious. A problem arises: how to recover files deleted from the Recycle Bin.
To solve this problem you have to resort to . IN this material We will demonstrate how this is done using the Recuva program as an example. This program is completely free and has a very simple and intuitive interface. Therefore, it is ideal for less experienced users.
Step No. 1. Launch the Recuva program and click on the “Next” button.
Immediately after launching Recuva, you will see a file recovery wizard. If you click on the “Next” button, the program will continue to work in “Wizard” mode. Whereas when you click on the “Cancel” button, the standard interface of the Recuva program will open. If you have little experience in, then it is better to click on the “Next” button and use the wizard. It is this option that we will consider in this article.
Step No. 2. Select the file type.
The next step is to select the file type. You will see a list of the most common file types. Select the type of files you want to recover. For example, if you deleted photographs, then select the “Pictures” type; if you deleted Word/Excel documents, then select the “Documents” type. If you need to restore files different types, or the file type you need is not in this list, then select the “All files” option.

Step No. 3. Select a storage location for files.
Next we need to indicate where the files we want to recover were stored. If you remember exactly the folder where the files were located, then select the “In a specified location” option and use the “Browse” button to select the folder where the files deleted from the recycle bin were previously located. Indicating the exact location of the files should make their recovery easier.
If you don’t remember which folder the files were in before you deleted them from the Trash, then select the “In Trash” option. In this case, Recuva will search for all files that have been deleted from the Recycle Bin.

Step No. 5. Start searching for files.
At this point, the setup is complete, and the program will ask you to click on the “Start” button.

After clicking the “Start” button, disk analysis will start. The time it takes to search for files deleted from the recycle bin depends on the speed of your hard drive and the settings you specified earlier.

Once the analysis is complete, a list of found files will appear.

Step No. 5. Recovering files deleted from the Recycle Bin.
Once the files are found, we can restore them. To do this, check the boxes next to the required files and click on the “Recover” button.
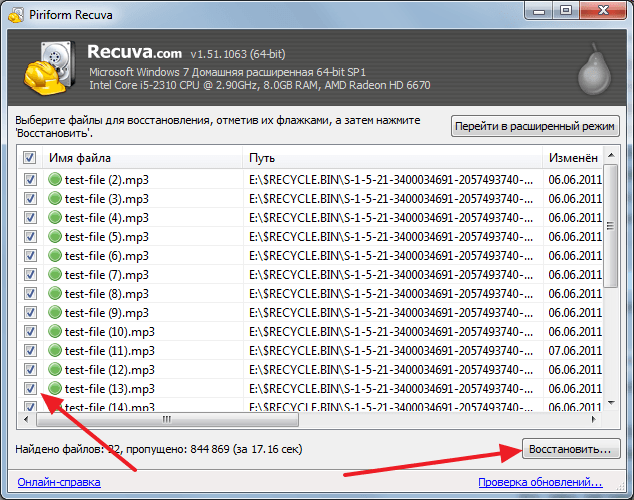

After this, file recovery will begin. The time it takes to recover files depends on the number of files, the size and speed of your hard drive.

After all deleted files have been recovered, a window will appear with information about the number of recovered files and the time spent.

As you can see, the files deleted from the recycle bin were restored without problems. At the same time, only a couple of minutes of time were spent on recovery.
In Windows, by default, everything that is deleted ends up in the trash. If you suddenly change your mind, you can always return everything from it. You can empty the Recycle Bin manually, and since its volume is limited, old files are overwritten by new deleted ones. How to recover files deleted from the Recycle Bin is a relevant question for those who have not found previously deleted documents, photos, etc. in it.
How to recover deleted files from the Recycle Bin after cleaning
It's not that easy, but you can always try. The uninstallation process in Windows looks different than it appears to ordinary users. In fact, when deleting it to the recycle bin, the system assigns an attribute to the file - deleted; when it is deleted from the recycle bin, the system marks it as writable and after a while writes new data to it. After this, the file can no longer be restored. Therefore, the sooner you discover the loss, the more likely it is that you can get the document back. Let's look further at how this can be done using standard Windows tools and third party programs.
How to recover files using Windows
- Use the search in the shopping cart window, if there is a lot of stuff in it, perhaps you just didn’t notice what you need

- Look under "Previous Versions". Go to the properties of the folder where the deleted file was stored using the right mouse button and go to the “Previous Versions” tab. It contains information about documents that were stored in the folder and restoring them will not be difficult.

Such copies of Windows automatically creates when creating recovery points, however, if this service is disabled, then you will not be able to return deleted items in this way.
- You can use free (or paid) applications. They need to be downloaded and installed. But, keep in mind, by installing them on disk, you can overwrite your documents deleted from the folder, which the system has marked with the attribute - writable. Therefore, it is better to use a bootable DVD or USB disk resuscitator. Or connect HDD to another computer. For a flash drive, this is not so critical - it’s enough not to write anything to it. For example, the Recuva program from Pinform is free and does a good job of recovery.

How to recover files deleted from the Recycle Bin
Recovering files from a hard drive is an issue that worries many personal computer owners.
This includes the loss of valuable information and the time required for its successful recovery.
Specialized services charge a lot of money for this, but if the media is in good condition, it makes sense to try to recover the data yourself.
Reasons for losing information
If the storage medium is undamaged, the main reason may be:
- errors that occurred in the partition table or file system devices. Most often this happens due to incorrect shutdown personal computer, failures, malfunctions in hardware and software;
- the harmful effects of viruses, as well as user errors, often lead to the loss or corruption of data. With such failures, the information usually remains on the disk, but data about its location is lost. This is expressed in the loss of several disk partitions, displaying the partition as unformatted;
- Inaccurate file system records can also lead to partial or complete loss separate files and catalogues.
The main causes of malfunctions that lead to loss of information
Or maybe files, important data were accidentally deleted or the partition in which they were located was formatted. Information recovery is carried out using certain software in manual or automatic mode.
When using the appropriate programs, all information that exists on the media is scanned. Based on the detected information, a “map” of fragments of recovered data is created. It contains information: which file belongs to which sector, names, sizes and other parameters of the elements of the system being scanned. The selected data is then transferred to another drive.
What to do if data is lost?
If nothing was written to the sectors from which information was deleted, then the data was not physically destroyed, but information about its location was distorted or lost. First of all, it is necessary to determine exactly where the sectors that store the necessary information are located, and also to reproduce it in the correct sequence.
If information was written to the disk from which the files were deleted, such as formatting and installing a new operating system, there is a high probability of physical destruction of data. In these cases, the feasibility of successful information recovery depends on the ratio of lost and recorded data. For example, if you delete 2 gigabytes of databases and write 100 gigabytes of music and movies in their place, the probability of successful recovery approaches zero.
Data recovery mechanism using programs
- media scanning;
- Based on the scanning results, a map of the location of pieces of information is compiled, based on the detected service records, and a directory tree is built;
- the map contains data about which file belongs to which cluster, the name, size and other parameters of the file system elements;
- if the information received is not enough, then certain extrapolation methods are used;
- folders and files that need to be recovered are selected in accordance with the compiled map and transferred to another medium.
This article will review a variety of programs, both paid and free, and analyze their strengths and weak sides so that the reader can quickly choose the most suitable software for his request.
5 Best Data Recovery Software
Recuva
Recuva is one of the most common programs for recovering lost data or formatted disks. The high demand for this program can be explained by its simple and intuitive interface. Recuva does not require experience or special knowledge in the field of data recovery, it is very convenient and easy to use. You can download it from here
The program scans the selected hard drive in detail (various hard drives and flash drives are supported). Information can be recovered even if the drive has suffered any physical damage or was formatted using a standard system command.
It is recommended to perform recovery using the program without changing standard settings, unless, of course, you are an expert in the field of data recovery. This utility has simple interface and will ensure effective recovery of information, even if the user does not have the necessary knowledge.
The program will prompt you to select the type of file to be restored. When searching for a specific file (music, picture, document), it is worth specifying the category to save time necessary for the recovery operation. But, if you do not know the file type or want to find data from different categories, specify “Other” and the program will search for all deleted information.
Choosing WHAT to look for
Next you need to choose a place where this file was there before removal. You can select not only a separate folder, but also more extensive areas, for example: “My Documents” or “On a memory card”, and the program will check the selected area for the presence of the necessary data. If the exact location is unknown (the file was deleted using special programs or simply disappeared), you should leave “Exactly unknown” by default so that the utility scans the entire surface of the media.
We choose WHERE we will look
A window appears when you are ready to perform the restore operation. It is recommended to conduct an in-depth analysis: it takes longer, but its efficiency will be many times higher.
It is worth waiting a while while the program searches for files. If you did not choose in-depth analysis, the operation will take very little time.
Selecting information to restore
A window will open indicating the deleted data found. From this list You should select the information that needs to be restored, after which the program will prompt you to select a folder for recovery.
It is important right choice folders where our files will be restored, because this will affect the efficiency of their recovery. Restoration should be carried out to a drive other than the one from which the recovery is being carried out. This is especially true when returning a large number of files. You can connect an additional hard drive or flash drive to return data to them. The space should be slightly larger than the size of the files being restored.
The recovery procedure will not take much time and depends on the number and size of files.
R-Studio
R-Studio is a convenient and functional program for recovering information from various drives that was deleted by mistake. With its help, you can scan various media and recover lost data not only from hard drives, but also from flash drives. You can download the utility from the website http://www.r-studio.com/ru/Data_Recovery_Download
Initially, you should decide on the choice of version: demo or full. If you do not perform data recovery on a regular basis, it is better to choose the demo version. A 20-day period is more than enough to restore all information.
If you are not a pro, it is better to use the demo version
In addition to recovery, the utility can also perform a preliminary scan. This operation will speed up and increase the efficiency of the recovery procedure. Please note that you can scan your device third party programs, and upload a file with a report on the work done into R-Studio. The utility always conducts a detailed scan by sector. This may take certain time, depending on the size of the partition being scanned.
We scan the selected partition
After the scan is completed, it will be possible to view all the files that it was able to detect and then select those that can be restored. In order to restore a file, you need to right-click on it and select the “Recover” command.
R-Studio is convenient and multifunctional
If you don’t know exactly what was deleted from the device, and you are going to recover all lost files, in this case, right-click on the desired media and select “Recover all files.”
At the end, simply select the partition where to restore
At the end, you will need to select a folder where the seized information will be restored. Important! It is imperative to take into account that the folder should not be located on the hard drive from which the information will be returned, because during the recovery of some files, others may be completely overwritten by them.
After selecting a folder, you need to wait while the program diagnoses the drive and restores lost information.
Easy Recovery
Easy Recovery can safely be called a high-quality program for professionals, which can be mastered by an ordinary user. It has gained popularity due to its excellent efficiency and, at the same time, ease of use in comparison with similar utilities. The advantage of this program is that it can also perform preliminary diagnostics of the media. Download the program
Click on “Disc Diagnostic” and select the required command. If the utility was downloaded in order to recover data, then we conduct a deep scan “SmartTests”. In addition to scanning, the program will perform diagnostics and determine whether the hard drive has problems, for example, unreadable sectors or any others, in order to prevent troubles.
Diagnostic menu
After selecting the command, the type and number of media that are currently running on the device are determined. We choose which one we will work with and where to restore the information.
For the most accurate and complete diagnostics, select “Run extended” SMART test" First of all, you should be patient: the verification will take a lot of time.
Be patient and choose scanning
To restore files, go to the “Data Recovery” section and select the mode that is interesting to us. In this program, modes are selected depending on the specific situation.
For example, if you accidentally formatted your hard drive, select the “Format Recovery” category. Next, select the file system of the drive and the partition that was formatted.
If there is a need to recover deleted files, then select the “Deleted Recovery” function - the disk selection menu opens and the formats of the recovered files are determined.
Recovering lost files
If the data is lost as a result of a software failure or the reason for the loss is unknown, select the option “ Advanced Recovery" After scanning, the program will find information that was deleted within a certain period of time.
We choose what we need to restore. Typically, the diagnostic and recovery procedure does not take much time. This will depend on the amount of data that needs to be returned.
PhotoRescue Pro
PhotoRescue Pro is a utility that will help you recover deleted photos or videos. Today's digital devices provide ample opportunities for recording, dubbing and optimizing media files. If you accidentally deleted the necessary files from a digital gadget, this utility will solve this problem.
Using this program you can recover data from any type of flash drive, hard drive or mobile phones. It is possible to recover data even from damaged and formatted media.
Working with PhotoRescue Pro is very convenient and accessible. You can download it from here. The program supports many languages, including Russian. After selecting the language, a window appears in which we click the “Next” button and the registration window appears. If you just want to recover a few photos, there is no point in registering the program, but if you constantly work with the camera, and this problem occurs quite often, it is worth purchasing the full version.
First, we select the drive from which we will return information. The utility works with several file systems at once, which is very beneficial. Click “Next”.
Analyzing the content
After selecting the drive we need, click “Next”, wait a couple of seconds - the utility will check the partition we have selected. A list of folders is displayed; we need to select the one that interests us. If the location of the file is unknown, click on the checkmark at the very top to highlight all the data found. "Next"
Select the desired folder
We select the formats of the files that interest us. To avoid mistakes, it is better not to uncheck individual formats so that the utility can find as much information as possible. Next, select the required files. Click “Next”.
Select the desired folder
Once you have completed selecting formats, the scanning operation will begin. The verification time will depend on the volume of data and will take from a few minutes to a couple of hours.
Scan duration depends on data size
The advantage of the program over analogues is that it simultaneously checks the drive for the presence of unreadable sectors. Thanks to this, you can not only restore lost information, but also carry out diagnostics and troubleshooting.
All that remains is to restore the data
After scanning is completed, a list of files opens. It is possible to search for files by categories (video, photo, audio) and formats, and not by sections and various folders.
The program shows how much data was found and what was deleted. Thanks to this, you will quickly find out which files were found and which were irretrievably lost.
GetDataBack
GetDataBack is one of the most effective and most powerful. With its help, you can recover data in almost any situation. The developer divided the program into two subtypes: the first for the NTFS file system, and the second for FAT. Download it from here: https://www.runtime.org/data-recovery-software.htm
We recover all deleted files for effective results
This utility must be installed on a foreign hard drive. You cannot restore to the media from which files will be restored, since the necessary information will be overwritten.
After opening the program, a menu of four items appears. For maximum efficiency, it is recommended to select the fourth option – “I want to recover deleted files” (I want to recover deleted data).
Select the required section
In the list of local drives that opens, which the utility will find while scanning the hard drive, you need to find the partition where the deleted files were located. The program provides many possibilities in the field of data recovery, but if you just want to return information from the drive and do not know where it was, you should select the “Physical drives” category.
A file system window opens and you need to select the one that supports this version programs (in our case NTFS). IN modern computers different file systems are used simultaneously, so check the box next to “Show recommended”.
Select the file system we are interested in
After a detailed scan, the utility will open a folder explorer, simple and easy to understand. The contents of the selected folder will be displayed on the right; if the information was deleted, after recovery GetDataBack will show the files in strikethrough font for ease of classification. Each file is equipped with a special marking, which can be used to determine the type of information found.
Data recovery is easy and convenient
As a result, we select the data we need and start the recovery. Once finished, the recovered file will be available in the editor
Recovering files using this program in file system FAT is carried out in a similar way.
Conclusion
This article discussed, in my opinion, the most popular and effective programs for recovering deleted data from a hard drive and various media. For beginners, the popular Recuva with a simple interface is suitable; if you lose media files, you should choose PhotoRescue Pro, it can recover data from almost any modern gadgets; for constant work with returning information, GetDataBack is ideal - it has powerful functionality, is efficient and at the same time has an ergonomic main menu.
If for some reason you were unable to recover your data, but the information is valuable, it makes sense to contact specialists. They have more powerful software and can help where these utilities are powerless.
“I deleted an important file!” Stories with this beginning happen to users quite often. It is possible that some of our readers have already encountered a similar problem. Such stories always begin the same, but end differently. In this article I will tell you how to make the ending of this story happy. Or by at least do everything to make the likelihood of a happy outcome higher.
1. What to do if an important file or folder is deleted?
Well first of all, don't panic. When you throw out garbage, you don’t immediately send it to a landfill. First a trash can, then a container, and only then a landfill. This happens in Windows too. Using the Del key, you first send the file to the Trash. Then, after emptying the recycle bin, the file can be found on disk in unused clusters for some time (this is analogous to our container from the example). And only after the area on the disk in which there were still traces of the file is occupied by other data, then the file is hopelessly lost (this is already a landfill).
1.1 Search in the Cart
It may sound trivial, but the Recycle Bin is the first means of protecting data from accidental deletion. At the same time, many Windows users automatically clean it immediately after placing files in it. Although, by and large, the Recycle Bin does not need to be emptied at all, because it does it automatically.
Searching for files in it is not at all difficult. Find its icon on your desktop and open it. If the file name is known, then simply write it in the search box. You can also sort files in the Recycle Bin by deletion date and immediately find required file, which was just deleted.
The next time you think about using some utility that background cleans the Recycle Bin to free up disk space, think carefully about whether you should trust this important process to an automatic machine. It may be easier to do it yourself and at a time when you are sure that there is nothing valuable in it.
1.2 Searching among shadow copies
It is not necessary to use any paid programs. Standard product Reserve copy in Windows 7 it is quite suitable and this system is turned on automatically when installing the operating system.
If “System Protection” is not disabled manually (which is often recommended by would-be optimizers), then restoring a deleted file from a shadow copy in Windows 7 is quite simple.
- In Explorer, find the folder where the deleted file was (not the Recycle Bin).
- Click on the name of this folder right mouse button and select " Properties»
- Go to the " Previous versions"(see picture below).
It contains information about all versions of files that were in this folder at different times.

We select the closest one by date and try to search for our file in it. If it is not there, we turn to an earlier version. And so on until you find the desired file.
This way you can not only recover an accidentally deleted file, but also return to one of the previous versions a document that was modified and saved to disk, and then its previous version was needed.
Shadow copies of user files are created automatically by the operating system during reboots and installations various programs at system restore points. Therefore, you don’t need to do anything separately to create them. The main thing is not to disable “System Protection,” since some “experts” recommend disabling it to save resources, keeping silent about the fact that the security of the system as a whole will decrease.
2. If standard remedies did not help
2.1 Use a third-party file recovery utility
You can use a specialized data recovery utility, which, after analyzing the disk, will display a list of files and folders that you can try to recover. One of these programs can be kept on disk in case of fire.
The chances that the file will be recovered without loss are not so great, but there can be luck. It's very important point, influencing the “success of the concession” is the minimum number of disk operations since the file is deleted. Some sources even tell us to urgently turn off the computer and boot from a flash drive or disk. To me, this is pure paranoia. Much easier to comply simple rules, which I will give below, and do not risk your nerves in vain.

I will immediately upset the happy owners of SSD drives - they do not have this chance of salvation! The fact is that the system regularly performs the TRIM function for such disks, which resets sectors with deleted files.
2.2 Don't forget about the professionals
There are people who can help with recovery deleted files on disk. There is a chance of running into a charlatan or an inexperienced specialist, as in any other type of service. But if the file is really valuable, then it may make sense to pay professionals.
3. What can I do to prevent files from disappearing without a trace?
3.1 Do not disable standard protection measures - they are very effective
The operating system developers have come up with a multi-level protection system against problems associated with accidental data deletion. Do not neglect them and disable them, as well as empty the Recycle Bin every time immediately after deleting a document. Make sure that “System Protection” is activated and that the Recycle Bin is working properly. With these system components, it is possible to lose a file irretrievably unless on purpose. To prevent data loss due to disk failure, use the recommendations in the following paragraphs.
3.2 Use cloud storage
Despite the chance of information disclosure, synchronize your folder of important documents with cloud storage. I haven’t seen a user whose documents would take up 10 GB, which is exactly how much they are willing to offer cloud drives for free. They also offer their own applications that will synchronize your document folder with the cloud. For example, I use . But there are also products such as Google Drive, Yandex.Disk and of course the famous one.

Yes, it is very important that you cloud storage It also has its own basket! Don't forget to look there too if your local copy of the file is irretrievably lost.

3.3 Make regular backups
If you have an operating system other than Windows 7, 8 or 10, we recommend that you do backups(backup) with a special utility.
Windows 7
Windows 7 has its own utility for backing up versions of important files, “Backup or Restore,” which is located in the “Control Panel.”

To create backup copies, you will need a separate hard drive (external or internal) that has sufficient capacity. free space to place an image of everything system disk, as well as to create backup copies of user files.
Windows 8/10
This version of the operating system has a more advanced feature called File History, which is turned off by default. If you have really important documents, take the trouble to enable version control for them. Just type “res” in the control panel search box, as shown in the picture.

Then, in the “File History” window, make the necessary settings. By default, the system suggests storing versions of all documents and drawings. If you have large folders with home photos in your documents, then it is better to make backup copies of them yourself, as I described in. And in “File History” it is better to place these folders in “excluded” folders.

Now you will have copies of the document for each change option. Your dissertation or thesis will be safe. Even if you deleted an entire chapter by mistake and wrote down the document.
File History requires the use of a removable storage device. This is in case the main hard drive fails. So don’t spare money and buy a flash drive for a hundred or two rubles (for example, 8 GB), so that you don’t have to shell out a thousand or two later to restore files bit by bit from the body of a dead hard drive.

How many times has something irreparable happened when it was caused by rubbish lying around, and as a result they were removed? important files. Everyone has probably encountered a similar situation. And, if some have come to terms with the loss, then we propose not to remain inactive, but to apply special programs for data recovery.
The principle of storing information on a hard drive is such that deleted data continues to reside in the memory cell until it becomes necessary to place new information in it. Therefore, there are chances that it has not yet been overwritten, and the data remains intact, that is, ready for recovery.
Programs that are designed to recover deleted files from the Recycle Bin:
R-Studio– a whole software package for data recovery. Works with all popular storage media: from hard drives to flash drives and floppy disks. Able to return files after formatting.
Features of R-Studio:
Works .
- Able to reconstruct RAID disk arrays.
- Provides the user with the ability to recover data remotely.
- Equipped with a hexadecimal editor.
R-Studio is intended for experienced users.
R.saver– a program that recovers data from all known storage devices. Returns files that were deleted from the Recycle Bin, as well as when formatting or when a system error occurs.
The program interface is Russian-language and quite simple. It is intended for general use by non-professional users.
Distributed free of charge for non-commercial use.
Free File Recovery– simple program By . This can be not only a flash drive or hard drive, but also a camera or mp3 player.
Some users may find the program's interface to be sparse and very simple. But is this critical during restoration? important information. Moreover, it is very easy to work with the program, and it is distributed free of charge.
In addition to the regular version of Free File Recovery, there is a portable one.
Let's see how it works.
We launch the program from the shortcut.
In the main window at the very top we find the “Drive” field. Here we select the device from which information was deleted and needs to be restored.

Select the disk, and then click the “Scan” button.

Once the scan is complete, the found data will appear in the center of the window, along with its name and size. We mark the data that is of interest to us with a tick. Next, go to the “Edit” tab and select “Recover Selected Files”.
After this, a window will appear where you need to specify the directory where you want to move the selected files. Click “Ok” and the files will be saved to the specified location. After which it will be possible to work with them.

This utility will also help you recover deleted files from the Recycle Bin. Its operating algorithm is similar to Free File Recovery.
It is distributed absolutely free, easy to install and even easier to use.
We have already looked at . So there is somewhere to read about it in more detail.
The ability to recover lost files is good news. Moreover, there are programs that will do this quickly and for free.
