How to make a wifi router from a laptop. How to distribute WiFi from a laptop: instructions from A to Z. Setup without using third-party programs
Hello everyone, Yuri is here and on this sunny day, I would like to write a post about whether a laptop can distribute wi-fi. To be honest, I didn’t know about this topic until I did a little research on the Internet.
It turned out that it is possible, and there is different ways, which we will talk about in this article, so read carefully and write your comments.
In fact, for this purpose it is better to use some kind of routers, although you will have to spend a little money on them, but you will be able to get good Wi-Fi connection. And now, without such a network, it’s very difficult, sometimes you’re sitting in a cafe, and then they write to you on Skype that you need to discuss this or that project.
In general, Wi-Fi is difficult to overestimate, since without it it is now very difficult for a modern person.
Method 1 is to purchase this router. Well, you will spend 1500-2000 rubles, but you will be able to distribute the Internet and receive great respect from others. Well, I’m kidding, I don’t know for what purpose you need to distribute, perhaps for yourself.
Method 2 is programs for distributing wi fi. Among which you can download for free are: mHotspot, MyPublicWiFi, Connectify, virtual router plus, CommView for WiFi, Insider. The programs, as I already said, are free, download, install and start working on the Internet.
Method 3 is a little more complicated; it means that you will have to write commands on the COMMAND LINE. Yes, it turned out to be a tautology, but it is so, if you do not know how this is done, then read this post carefully.
Can a laptop distribute wi fi?
If you have Windows 7 or 8 installed, then you can try to make a distribution using the computer functions. To do this, click on the “Wireless Network” shortcut and select “Properties”.

Now, we need to click on the “Access” button and check the “Allow other users to use the Internet connection” checkbox.

Don't forget that now we will need the command line. To do this, go to “Start” – “Accessories” – “Command Line”.

In the line we will need to write the following code “netshwlanshowdrivers”. Just write it without quotes.

It doesn’t support distribution for me, since I’m writing from a computer that doesn’t even have a router. But this should be written if you support distribution:

Now that you have checked, through command line that everything works fine, then you will need to write the following code “netshwlan set hostednetwork mode=allow ssid=softhardware.ru key=softhardware”, where ssid is the name of your network, and key is the password for your Wi-Fi.
Well, if you have a network running on your laptop, then it will be able to distribute. The operation is very simple, as you can see, so it can be done in a couple of minutes, well, if, of course, you know what to prescribe and where. I hope that I didn't miss anything and that the information was useful to you.
Sincerely, Yuri Vatsenko!
Innovative technologies are developing at lightning speed. Every day we have more and more mobile devices - tablets and smartphones have literally taken over everything. “How can I connect to a computer or laptop using WiFi” is a question that worries many. Subject to availability home router, the problem is easily solvable. But what to do in a situation where it is missing, but you really need to connect to a computer or laptop?
It's not too difficult to do this. You just need to make sure that the laptop (computer) distributes the network like a router. It’s good that the developers of Windows 7, 8 also took care of this by including such important functionality in the operating system.
There are currently two real ways connect a mobile device, that is, a smartphone, tablet and others to a computer, laptop:
- using built-in functionality in Windows;
- by using special programs, allowing you to create a virtual router on your laptop.
How to distribute WiFi using Windows functionality
For these purposes, you need to make sure you have a wireless adapter or card that supports MS Virtual Wi-Fi technology. As a rule, everything modern devices have this function. Next you should find “ Network and Sharing Center" You can enter using the button near the clock by right-clicking the mouse.
A window will open where you need to select the appropriate menu section. Then you should click on “ Setting up a new connection».

After clicking, the next menu will launch, in which you need to select the fifth item from the top.

An information window will open, here you need to click on “ Further».

In the window that opens, you need to enter the parameters of the created WiFi networks:
- name - "SSID";
- security type - it is advisable to leave the default setting, that is, “WPA2-Personal”;
- password - here you need to enter the Wi-Fi security key, you can use letters and numbers in a mixed sequence, you need to use at least eight characters.

That's it, you can connect your mobile device. But first you need to enable and configure general access. We find " Enable Internet Connection Sharing", click with the mouse.
After enabling this access, you can close the window. Now you need to configure it. Let's go again to " Control center networks and sharing».

In the window that opens, look for “Change add. param. public access." Now another window should appear on the screen.

Optionally, so that connected mobile devices could see folders, network printers that are open on a laptop (computer), you need to check the box “ On network discovery», « On sharing files, printers" Now you should click on “ Save changes».
That's it, our work is finished, the wireless network has been configured. You can use the WiFi network from your laptop to its full potential, connecting all kinds of devices - phones, smartphones, tablets and even media set-top boxes and TVs.
Distributing WiFi via netsh and command line
In order to distribute Wi-Fi from a laptop to other devices, you can use a virtual access point. To do this you need to open text editor (great option– notepad) to create text file, where you should write the line:netsh wlan set hostednetwork mode=allow ssid=pc-helpp key=12345678
Then in the “SSID” field you need to enter your personal wireless network identifier. Where the “KEY” field is, the network password is entered. If the operations are carried out correctly, the following should come out.

Then the file needs to be saved in the bat extension. To do this, click “file” “Save as” and write in the “file name” field, for example WIFI.bat

Now you need to run the file using administrator rights. To do this, right-click on the file, and then find the field “ Run as administrator».

The Virtual WI-FI Adapter driver must be installed, after which you will be able to detect the created network called “Connection via local network 2" In my case, this is Local Area Network Connection 13. Now you need to connect this network to the Internet. We go to the “Control Center”. networks and social access", right-click on the connection through which you connect to the network. Then go to the “Properties” tab. Here you need to go to the “Access” tab.

Check the box next to "Allow other network users to use the Internet connection" of this computer" In "Connection" home network» you need to specify a new one network connection, that is, “Wireless Connection2”. After all the steps you need to click on “OK”.
Now everything is ready. All that remains is the created virtual network run. To control it, use special commands:
- for start - netsh wlan start hostednetwork
- to stop - netsh wlan stop hostednetwork
- to view the status - netsh wlan show hostednetwork

It is worth noting that the above steps can only be performed if you have administrator rights. Command Prompt can also be launched using administrator rights. To do this, you need to start typing the word “ cmd" and the system will display the following shortcut.

However, it is much more convenient for each team to make its own bat file. This solution has one more advantage - the file can be included in startup, which will allow you to launch the newly created Wi-Fi access point on your laptop or computer when you turn on the device.
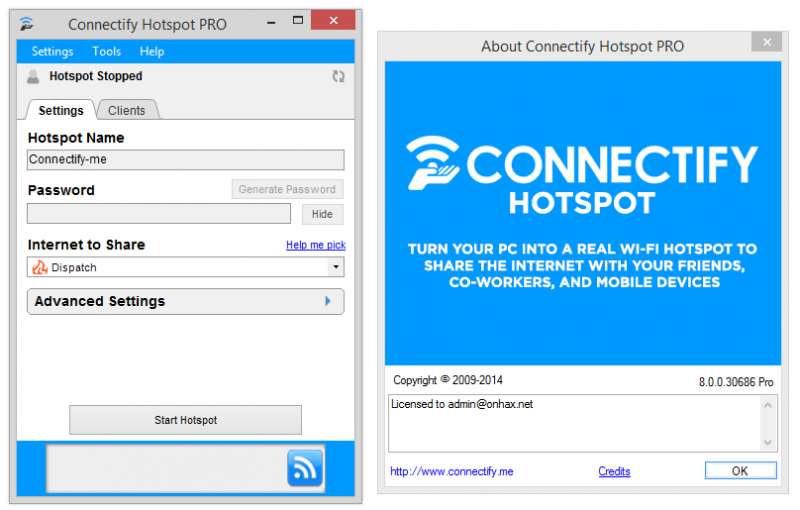
How to distribute Wi-Fi using the Connectify program
This option is an excellent alternative to the Virtual Wi-Fi method, especially when for certain reasons it is not possible to use it. .It is worth noting that this program exists in several versions - Free, PRO. The first is a free version, but with reduced capabilities, but for our purposes it is quite sufficient. So, let's launch the program.

In the window that opens, you need to enter the following settings:
- “SSID” - we skip this item, since the free version does not allow for changes;
- “Password” - here you need to specify the password for the wireless network;
- “Internet to share” - in this field you should select a connection to access the global network.

In “Sharing Mode” it is worth specifying the most secure WPA2. Then click on " Start Hotspot».
This is all, wireless network configured for distribution on a laptop or computer.
Many users are not happy with the fact that full version This program is paid. However, you should not look for pirated options. Exist similar programs, allowing you to use a computer or laptop as virtual router- This MyPublicWiFi, mHotSpot. They are free, but have functions no worse than their counterparts.
How to connect WI-FI using the MyPublicWiFi program
This program is an excellent option for creating a virtual router on a computer or laptop. It is free, not inferior to Connectify, easy to manage and quite fast. After installation, you need to run it with administrator rights. Download .
A window will open with three main parameters of the hotspot: network name, security key, Internet connection.


The “Management” tab, in addition to autorun, has one interesting function - “Enable Firewall”. By checking this box, using uTorrnet and DC will become impossible.
mHotSpot – using a laptop or computer as a virtual router
mHotSpot is another program that allows you to use Wi-Fi distribution laptop. The program is completely free, downloadable from. Its configuration, like that of its brothers, is carried out by adjusting three parameters.
These are “Hotspot Name” - the network identifier, “Password” - the password for the hotspot, and also the choice of “Internet connection”. Then you need to click on “ Start Hotspot" and the device is ready to connect.
Before you start setting up Internet distribution from your laptop/computer, you need to make sure that Wi-Fi adapter included. On most laptops, the WLAN adapter activity indicator is present on the case; otherwise, you should enable the adapter in the Network and Sharing Center.
Set up Internet distribution using a wireless Wi-Fi network on your computer/laptop.
One way to organize Internet distribution via Wi-Fi is to create a Wi-Fi network computer-computer using Windows (Don’t rush to do it!!!). Let me immediately explain that this method has a slight drawback, the fact is that you will not connect an Android tablet or tablet to such a network. smartphone IPhone, only another computer/laptop with installed operating system Windows. This is due to the fact that you are creating a point in Ad-hoc mode (also called: point-to-point, computer-to-computer, peer-to-peer network) and devices with a different operating system (Android, iOS) will not see your network or will not be able to access connect to her. You need Soft AP mode (also called: access point mode, soft Access Point, virtual WiFi, virtual router) and how to do this is written in the second part of the article.
The first step is to get to the Network and Sharing Center. To do this, you can right-click on network icon in the lower right corner of the screen and select "Network and Sharing Center."
Another way is to go to “Start” - “Control Panel” - “Network and Sharing Center”.

No matter which method you use, you will eventually see the Network and Sharing Center window. Click "Set up a new connection or network."

In the Setting up a connection or network window, select “Set up a wireless computer-to-computer network” and click “Next”.

Read the information window and click “Next”.

In the next window you need to enter the details of the network you are creating:
Network name- Name Wi-Fi networks(SSID) that other computers/laptops will see. Enter any name.
Security key- password for connecting to the Wi-Fi network, I recommend using complex password at least 8 characters, consisting of letters, numbers and special characters (!@#$).

In the next window, click the "Turn on Internet Connection Sharing" button and click the "Close" button.

At this point, setting up a Wi-Fi network between computers can be considered complete. Now if you go to the Network and Sharing Center you will see your Wi-Fi network.

On other computers you can see and connect to the created network.

In order to delete a computer-to-computer connection, go to the Network and Sharing Center, select “Manage wireless networks” and delete the created network.

Set up Internet distribution on a laptop for a computer/laptop/tablet/smartphone.
If you want to distribute the Internet not only to computers and laptops, but also to tablets and smartphones, the method described below will suit you.
We launch the command prompt with administrator rights, to do this, click “Start” - “All Programs” - “Accessories”, right-click on “Command Prompt” and select “Run as administrator”.

Another way is to click keyboard shortcut
On the command line you need to run the command:
netsh WLAN set hostednetwork mode=allow ssid=“point name” key=”password”
For example:
netsh WLAN set hostednetwork mode=allow ssid=site key=Pa$$w0rd

After this, you need to enable the network, to do this, run the command:
netsh WLAN start hostednetwork

The next step is to provide Internet access to all connected devices; to do this, go to the Network and Sharing Center and select “Change adapter settings.” In the connection window that opens, select the connection that has access to the Internet (it doesn’t matter what the Internet source is - a 3G/4G modem, a provider cable or a Wi-Fi network with access to global network), to do this, you can change the view to “Table” and see “Internet Access” next to the connection. In my case it is "Local Area Connection 2". The orange line marks the network that we created, the line will tell you about it Microsoft Virtual WiFiMiniport Adapter (remember the network name, it will come in handy later).

Right-click on the connection and select "Properties".

In the properties window, select the "Access" tab, check the box next to "Allow other network users to use this computer's Internet connection", below select the connection you created, in my case it is Wireless Network Connection 2 (the connection marked with an orange line in the picture above).

On this Wi-Fi setup the network can be considered complete. It should be noted that after restarting the computer distributing the Internet, you will have to run the command again since it will not work automatically . If you want it to start automatically every time you boot your computer, you need to create a batch file and add it to startup. To do this, create Text Document enter the command into it netsh WLAN start hostednetwork, save the document. Further change the extension from txt to bat and add the file to startup (Start - all programs - startup).
In order to delete Wi-Fi connection, launch a command prompt with administrator rights and use the command:
netsh WLAN set hostednetwork mode=disallow ssid=“point name” key=”password”
For example:
netsh WLAN set hostednetwork mode=disallow ssid=site key=Pa$$w0rd

That's all. If you have any questions or suggestions, write in the comments.
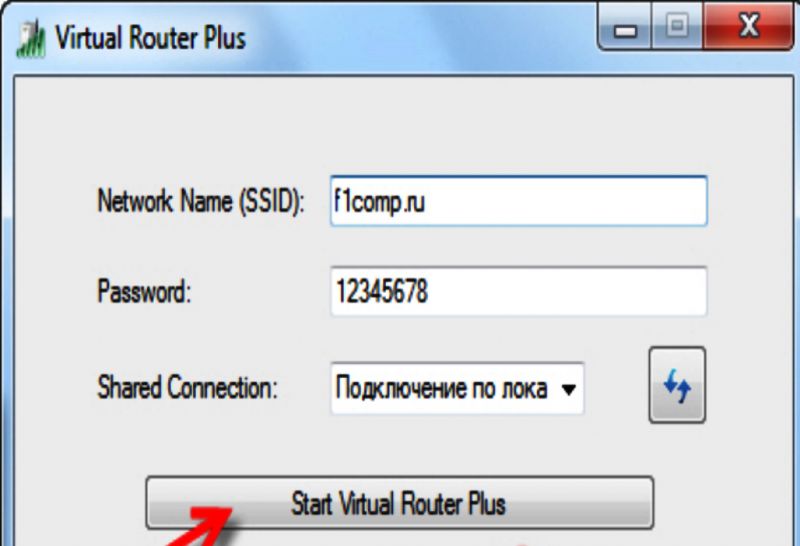
A cable connection to the Internet creates a lot of inconveniences, but a wireless network can solve them. But what if in the house you can distribute WiFi from a laptop. This article will discuss how to distribute Wi-Fi in Windows 7.
The program looks like this.

Come up with a name - SSID, password and indicate the location from where you should distribute the Internet via Wi-Fi, in our case it is “Local Area Connection”. Then click Start Virtual Router.
WiFi has been created, now you need to go to the “Network and Sharing Center” and click on the “Local Area Connection” link. Go to “Properties” - open the “Access” tab, check the box next to “Allow other users to connect to the Internet on this computer” and below indicate the network from which you want to distribute WiFi on the laptop.

Virtual Router is not the only program for distributing WiFi from a laptop, there are others, but their setup principle is similar:
- Need to come up with a network name
- Create a password
- Indicate the source from which the Internet should be distributed.
Be sure to check programs downloaded from the Internet for viruses.
That's all. As you can see, distributing WiFi from a laptop in Windows 7 without a router is not difficult and there are different ways to do this.
There are times when you need to access the Internet from your phone or tablet, but, as luck would have it, there is not a single WiFi network at hand. In this case, it is not necessary to buy traffic or look for a free access point. Advanced users and IT specialists know how to distribute wifi from a laptop and computer if an adapter is installed on it. We hope these methods will help everyone else quickly start distributing wifi without a router and provide themselves with a stable connection.
Using a laptop as a WiFi access point is quite simple, and the speed provided when using this device is sufficient for comfortable browsing on the Internet. It is possible to distribute via WiFi from a laptop using:
- Built-in Windows tools.
- Third party software.
There are a lot of programs that allow you to distribute via wifi from a laptop, but not all provide a high-quality connection. However for certain tasks It's enough. In turn, it is possible to distribute a signal to Windows 7,8,10 from a laptop using built-in tools in only two ways.
It is also possible to distribute wifi from a computer, but in this case an adapter must be installed on it wireless communication. It is installed extremely rarely in the factory assembly; it is most often used external device. This adapter resembles a radio receiver from wireless mouse and provides good signal Bluetooth and WiFi.
Preparing the laptop
If the laptop is connected to the network via a Lan cable and you need to distribute Wi-Fi from the laptop as a router, there is nothing complicated about it. The main thing is to create a regular connection so that the device itself has access to the Internet. You also need to check the functionality of the built-in network adapter.
It is easy to check the operation of the network cable. When it is connected to a laptop, the “Internet Access” icon appears in the lower right corner of the taskbar:
The main reason why the laptop does not distribute wifi and there is no Internet connection is a faulty cable or its insufficiently tight contact with the socket. In this case, the icon looks like this:
After connecting the cable, it's time to check the operation of the adapter. To do this, you need to go to “My Computer”. This is done as follows: open the Start menu or click on Windows button. Next, find the “Computer” button and click on it. In the menu that opens, right-click on any free area and select the last item - “Properties”.
In the upper left corner, find the “Device Manager” section, click on it and find “Network adapters” in the list. All installed ones will be displayed in the drop-down menu. You need to find a line where NetWork is mentioned, for example:

Right-click on it (RMB), if there is an “Enable” item, activate it; if there is no such option, it means that it is already working and you can start setting up Wi-Fi.
Required virtual point wifi access In order for the laptop to simultaneously receive and distribute a signal, in this case, Windows 7 (and any other Windows will not cope), requires additional software. You can take a more trivial route and install an additional removable adapter, but further we will tell you how to do without extra costs using special software.
Wi-Fi distribution using built-in tools
The first way to make a wifi access point on a laptop , very simple and appeared in Windows systems 10, versions older than 1607. This all happens in the graphical menu and without using commands.
First you need to open the “Start” menu, find it in the “Settings” column on the left. Open it and launch “Network and Internet”. Among the list of suggested parameters, find and open “Mobile hotspot”. Then immediately turn it on by dragging the slider, or click on the “Change” button and enter your own password and name for the future connection. That's it, after this the point will work. The answer to the question of how to properly distribute wifi on a laptop has been found.

Distributing Wi-Fi using the command line and netsh
The second way to distribute the Internet from a laptop is to use the built-in Windows tools. They are also called Wireless Hosted Network, they are available on all versions, starting with “seven”. Following these instructions using the command line, it is also possible to distribute WiFi on a laptop.
To get started, go to Windows menu and in the lower window “Find programs and files” enter “cmd”, in the proposed programs you can see one single entry: “cmd.exe”. Right-click on it and run as administrator. In the black window that opens, you need to copy and paste the following command: netsh wlan set hostednetwork mode=allow ssid="1111" key="11111111"keyUsage=persistent.
Where 1111 is the name of the network, and eight units are wifi password. This data can be changed to something more familiar to the user, as long as the password consists of eight or more characters.
This is the basic command for distributing WiFi via the command line. If everything is done correctly, an entry will appear informing you that the Virtual WiFi network has been created:

All that remains is to launch a virtual network so that the laptop distributes WiFi. To do this, copy and enter another command: netsh wlan start hostednetwork. If the launch is successful, you can see that the hosted network is running.
If, after all that has been done, the Internet does not work when distributing from a laptop, you need to additionally enable the virtual adapter created by the system. Usually it starts automatically, but there are also bugs. It is used so that you can connect to the created WiFi from other laptops and from Android. To do this, go to “Device Manager”, in the “Network Adapters” section and enable the virtual adapter that appears in the list. How to turn adapters on and off was described above. Only now our adapter has specific name– Microsoft Hosted Network Virtual Adapter.

If you decide to enable a WiFi access point on a laptop running Windows 10, you need to check whether sharing is enabled. To do this, click on the "Start" window, find " Network connections", click on them PMC, go to the "Properties" tab, "Access" and check both boxes in the menu so that everyone uses the connection.
Distributing Wi-Fi using programs
If during the creation of an access point wifi windows 7 difficulties have arisen and the system does not work; it can take a very long time to find the cause. It's easier to use programs. They automatically connect all services, launch the virtual router manager, so the user practically does not have to do anything. Also, some programs from a laptop “create” a repeater. It turns out this way: for it to distribute WiFi, you do not need to have a computer connected via a Lan cable. You can distribute the Internet and at the same time receive it yourself via wifi from another laptop or even a phone. But, of course, not every free version of the application provides this opportunity.
Connectify
 If it is difficult to understand how to distribute Wi-Fi from a computer to a phone using an adapter as a router, then for Windows 7 there is a very simple and intuitive program - “Connectify”. Need to download free version program from the official website or other source and install it, then restart the computer and begin setting up a new network.
Understanding how to set up wifi distribution via a laptop running Windows 7 is quite simple. After launching the application, a program window will appear with several empty fields:
- “HotsSpotName”: here you must enter the name of the future network. It will appear when searching for WiFi from a tablet or phone.
- “Password”: create a password for the network.
- “Internet to Share”: select which Internet connection will be broadcast.
- “Share Over”: determine the method of Internet distribution. Either via a local network, if there are devices connected via a Lan cable, or WiFi. You need to choose the second method.
- “Sharing Mode”: selecting an adapter to broadcast the signal if the computer has one adapter capable of distributing WiFi. This means that at this point there will be only one of the options.
The “Connectify” program is a paid version, it sets almost all the settings itself, but using these hints, the user will configure everything independently, quickly and correctly.
This application is another way to quickly distribute wifi from a laptop. First you need to download and install the program. Next, right-click on the shortcut located on the desktop and run it as administrator.
There are very few settings here; in the first field – Network Name – you should enter the name of the future network. Network key is the future password. Enable Internet Sharing is the most interesting part of the program, since here it is possible to select both a local cable and another Wi-Fi as the initial connection. That is, this program on the computer uses it as a router and repeater.

Mypublicwifi – free product, which has powerful and convenient functionality despite its simplicity.
MHotSpot
After downloading and installing this program, run it as an administrator in Windows and proceed to the setup stage. The standard menu is used here, as in previous programs. One difference: in the last column you can select the maximum number of users who can connect to the network. The program creates WiFi using only a Lan cable as an Internet connection, but allows you to distribute the Internet from a computer to a phone or to another laptop without problems and very quickly.
This is the easiest way to distribute WiFi from a laptop. Download the program and run it. The menu is simple: only three fields. In the first section, enter the name of the network, in the second – the password (at least eight characters) and in the last section, select the method of Internet distribution: WiFi. That’s it, click on the “Start” button and enjoy the availability of Internet connection.
Security when distributing Wi-Fi from a laptop
In addition, when creating a password in the listed programs, it is possible to select an encryption code. The most secure is WPA 2.
Problems and solutions when creating a Wi-Fi access point
When creating your own WiFi network on a laptop, problems sometimes arise. For example, a network has been created, but the phone “does not see” it. In this case, you need to reboot network adapter. To do this, find it in Device Manager, turn it off and on again. More details on how to enter the “Dispatcher” are provided in the “Preparing the laptop” section.
Also when creating wireless point You need to check whether the Airplane mode is turned off; this applies to both laptops and phones. For these purposes, there is a special key on the keyboard, in the top line above the numbers, with the identification sign “airplane”.
To distribute the Internet on a laptop, you need to disable the antivirus and Windows firewall. The easiest way to do this is through “msconfig”. To do this, press Windows + R and enter “msconfig” in the line that appears. In the new “System Configuration” window, find the “Services” tab. The list includes antivirus (Kaspersky, Eset 32, Avast, etc.) and “ Windows Firewall" You need to uncheck the boxes next to them, save the settings and restart the laptop.
The method for distributing WiFi from a PC is no different, of course, if it is equipped with an adapter. It is recommended to first update the drivers using the Driver Booster 5 program. Now it is clear whether the laptop can distribute wifi and how to prepare it for this process.
