Formatting a damaged flash drive. Program for formatting SD cards. HDD Low Level Format Tool - low-level formatting
After memory card failures, usually only a program for formatting ntfs, fat32, microsd, transcend, usb, kingston, sd, apacer, hp flash drives helps. There are several of them.
It is impossible to say which is the best. They are installed by default on your computer and phone, but may often be required. additional programs for formatting.
Each flash drive (memory card) contains a microprocessor responsible for its operation.
The program for formatting flash drives, in case of failure, simply closes the “broken” sectors (cells) and leaves only working ones.
This reduces the amount of memory, but the memory card remains operational.
Very good program for full formatting of flash drives ntfs, fat32, microsd, transcend, usb, kingston, sd, apacer, hp “Flash Doctor”.
It can be used for force and low-level formatting, and it's free.
Download this program for free to format flash drives
How to use? First of all, after starting, to format, find your flash drive in the panel:

A new window will open, wait until the scan of your selected drive is completed.
You will see the state of your memory card or disk (depending on what you are checking).
Formatting a flash drive and more
To format the flash drive, click “recover media”. Just be careful. All content (unless saved separately) will be destroyed.

By the way, if your flash drive does not want to be formatted, . If after this there is no positive result, then nothing will help her.
In conclusion, I will give an example from personal experience. One day my memory card completely stopped working. Whatever I did. I tried to format it with all existing programs. There were no results.
Then I started being on the phones. It was micro SD (with the rest: ntfs, fat32, microsd, transcend, usb, kingston, sd, apacer, hp, if the phone doesn’t support this option, it won’t work) and a miracle happened, everything worked.
Only not on the first one, but only on the fourth by Sonya Erickson. Before this I tried on Samsung, Nokia and LG - it didn’t help. Where am I going with this?
Sometimes, computer programs for formatting flash drives that are considered the best may not help, especially if your memory card is Chinese.
Good day.
Questions regarding work hard drive (or as they say HDD) - always a lot (probably one of the most numerous directions). Often enough to resolve this or that issue - HDD needs to be formatted. And here, some questions are superimposed on others: “And how? With what? This program does not see the disk, which one should I replace it with?” etc.
In this article I will present the best (in my opinion) programs that help cope with this task.
Important! Before formatting the HDD with one of the presented programs, save all important information from the hard drive to other media. During the formatting process, all data from the media will be deleted and it is sometimes extremely difficult to restore something (and sometimes even impossible!).
"Tools" for working with hard drives
Acronis Disk Director
In my opinion, this is one of the best programs for working with a hard drive. Firstly, there is support for the Russian language (for many users this is fundamental), secondly, it supports all Windows operating systems: XP, 7, 8, 10, thirdly, the program has excellent compatibility and “sees” all disks (unlike from other utilities of this kind).
Judge for yourself, you can do “anything” with hard disk partitions:
- format (in fact, for this reason the program was included in the article);
- change the file system without data loss (for example, from Fat 32 to Ntfs);
- resize partition: very convenient if Windows installation, you, say, have allocated too little space for system disk, and now it needs to be increased from 50 GB to 100 GB. You can format the disk again - but you will lose all the information, and with the help of this function you can change the size and save all the data;
- combining hard disk partitions: for example, we divided the hard drive into 3 partitions, and then thought, why? It’s better to have two: one system one for Windows, and the other for files - they took it and combined it and didn’t lose anything;
- Disk Defragmenter: useful if you have file system Fat 32 (with Ntfs - there’s not much point, but at least, you will not gain in performance);
- change drive letter;
- deleting partitions;
- viewing files on disk: useful when you have a file on your disk that is not deleted;
- ability to create bootable media: flash drives (the tool will simply save you if Windows refuses to boot).
In general, it is probably unrealistic to describe all the functions in one article. The only drawback of the program is that it is paid, although there is time for a test...
Paragon partition manager
This program is quite well known, I think that experienced users have been familiar with it for a long time. Includes all the most necessary tools for working with media. By the way, the program supports not only real physical disks, but also virtual ones.
Main features:
- Using disks larger than 2 TB in Windows XP (with this software you can use larger capacity disks in the old OS);
- Ability to control boot of multiple operating systems Windows (very important when you want to install another Windows OS in addition to your first one. For example, to test a new OS before finally switching to it);
- Easy and intuitive work with sections: You can easily split or merge the required partition without losing data. In this sense, the program works without any complaints at all ( By the way, it is possible to convert a basic MBR to a GPT disk. Regarding this task, there have been a lot of questions lately. );
- Support for a large number of file systems- this means that you can view and work with sections of almost any hard drives;
- Work with virtual disks : easily connects a disk to itself and allows you to work with it as with a real disk;
- Huge number of functions backup and restoration (also very important), etc.
EASEUS Partition Master Home Edition
An excellent free (by the way, there is also a paid version - it has several additional functions) tool for working with hard drives. Supported OS Windows: 7, 8, 10 (32/64 bits), there is support for the Russian language.
The number of functions is simply amazing, I will list some of them:
- support different types storage media: HDD, SSD, USB flash drives, memory cards, etc.;
- changing hard disk partitions: formatting, resizing, merging, deleting, etc.;
- support for MBR and GPT disks, support for RAID arrays;
- support for disks up to 8 TB;
- the ability to migrate from HDD to SSD (however, not all versions of the program support);
- possibility of creating bootable media etc.
Generally, good alternative paid products presented above. Even functions free version enough for most users.
Aomei Partition Assistant
Another worthy alternative to paid products. The standard version (and it is free) has a bunch of functions for working with hard drives, supports Windows 7, 8, 10, and has the Russian language (although it is not installed by default). By the way, according to the developers, they use special algorithms to work with “problem” disks - so there is a chance that your “invisible” disk in any software will suddenly be seen by Aomei Partition Assistant...
Key Features:
- Some of the lowest system requirements(among software of this type): processor with clock frequency 500 MHz, 400 MB hard disk space;
- Supports traditional HDDs, as well as newfangled ones solid state SSD and SSHD;
- Full support for RAID arrays;
- Full support for working with HDD partitions: merging, splitting, formatting, changing the file system, etc.;
- Support for MBR and GPT disks up to 16 TB in size;
- Supports up to 128 disks in the system;
- Support for flash drives, memory cards, etc.;
- Support virtual disks(for example, from programs such as VMware, Virtual Box, etc.);
- Full support for all the most popular file systems: NTFS, FAT32/FAT16/FAT12, exFAT/ReFS, Ext2/Ext3/Ext4.
MiniTool Partition Wizard
MiniTool Partition Wizard is free software for working with hard drives. By the way, it’s not bad at all, which only shows that over 16 million users use this utility in the world!
Peculiarities:
- Full support for the following OS: Windows 10, Windows 8.1/7/Vista/XP 32-bit and 64-bit;
- Ability to resize partitions, create new partitions, format them, clone, etc.;
- Convert between MBR and GPT disks(without data loss);
- Supports conversion from one file system to another: we are talking about FAT/FAT32 and NTFS (without data loss);
- Backup and recovery of information on disk;
- Optimizing Windows for optimal performance and migration to SSD drive(relevant for those who are changing their old HDD drive to a newfangled and fast SSD), etc.;
HDD Low Level Format Tool
This utility does not do much of what the programs listed above can do. In general, it can only do one thing - format the media (disk or flash drive). But it was impossible not to include it in this review...
The fact is that the utility performs low-level formatting of the disk. In some cases, restoring the functionality of a hard drive without this operation is almost impossible! Therefore, if no program sees your disk, try HDD Low Level Format Tool. It also helps to delete ALL information from the disk without the possibility of recovery (for example, you do not want someone to be able to restore your files on a sold computer).
In general, I have a separate article about this utility on my blog (which describes all these “subtleties”):
PS
About 10 years ago, by the way, one program was very popular - Partition Magic (it allowed you to format the HDD, split the disk into partitions, etc.). In principle, you can still use it today - only the developers have stopped supporting it and it is not suitable for Windows XP, Vista and higher. On the one hand, it’s a pity when they stop supporting such convenient software...
That's all, good choice!
Question from a user
Hello.
Tell me how you can format a memory card if the phone refuses to do it, and Windows, when you try to format it, just freezes and nothing happens. The card in the phone works, everything seems to be in order...
Michael.
Good day.
In this article I will look at several options for formatting memory cards. I think both the author of the question and other users will find one of the methods that will work for them...
I also note that formatting may be necessary in cases where: you want to completely delete all information from the memory card (for example, you decided to sell your smartphone), you are going to change the file system, you bought a large flash drive and the phone does not see it (on a PC you can format the flash drive into a smaller one) volume).
So, let's get down to business...
Option 1: in the device itself (phone, camera, etc.)
In my opinion, all devices (at least those that I have met) that use memory cards can format them to suit themselves. Android smartphones and cameras are no exception.
I'll look at how this happens on an Android phone below:
- go to "Settings";
- select the "Memory" section;
- Next, you need to open the “Formatting a memory card” subsection;
- Please note that this operation will delete all information on your SD card.

Despite the simplicity of the method, it has certain disadvantages:
- cannot be selected when formatting file system(by default, the memory card will be formatted in FAT32);
- you cannot give a name to the drive, specify cluster sizes;
- When formatting, the phone often produces various errors and the process does not complete successfully. When you try to perform the operation again, the device may report that it no longer “sees” the drive. In general, it’s still torture...
Note! You can learn about the difference between the FAT, FAT32, NTFS file systems from this article (see the first part) -
Option 2: Windows tools
If your phone/camera (or other device) is “buggy” and cannot correctly recognize and format the card, then simply remove it from the device and connect it to your laptop/PC directly.
Any modern laptop has a card reader, usually located on the side panel of the device.

If you do not have a card reader on your laptop/computer that reads SD memory cards, you can purchase one at any computer store.

I will say more, now such adapters can be ordered from Chinese online stores for mere pennies (and even if you use cashback...).
Note: the best Chinese online stores (where the cheapest equipment is) -
After connecting the memory card to your laptop (PC), go to "My Computer" (press the combination Win+E and select the required one from the menu on the left) and right-click on the memory card. Select an option from the pop-up menu "Format...", see screenshot below.


If you don't see your memory card in My Computer(or the operation cannot be completed, for example, formatting freezes) - go to disk management .
To open in Windows control disks, you need:
- press the buttons simultaneously Win+R ;
- enter the command diskmgmt.msc and click OK.
To format a drive: select it from the list, right-click on it, and specify this operation in the context menu (see example below). Next, you will see a standard window where you can enter the disk name, specify the file system, etc.

Option 3: formatting using special. programs
When you are dealing with glitchy memory cards, the formatting of which causes errors and freezes, it is best to use a special card for this operation. utilities. They will instantly help you format your SD card and clear all information from it!
In addition, according to the assurances of many developers of such utilities, they work much better with drives and perform a better formatting operation than Windows tools or Android (thanks to which many errors can be avoided).
To help!
Repair programs USB flash drives, SD cards (diagnostics and testing, formatting, recovery) -
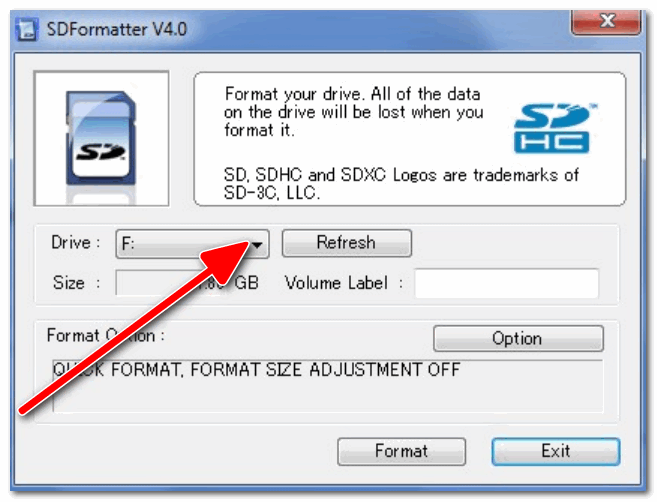
A specialized tool for formatting a wide variety of SD/SDHC/SDXC memory cards. The utility is very compact, simple, and works in all versions of Windows 7/8/10.
After installation and launch, your first action is to correctly indicate the letter of the connected memory card. See the "Drive" item in the screenshot below.

HDD Low Level Format Tool
Enough popular program for low-level formatting of failed drives. Often it brings back to “life” even those memory cards on which the last one was lost...
Peculiarities:
- supports interfaces: S-ATA (SATA), IDE (E-IDE), SCSI, USB, Firewire;
- allows you to format drives of all popular brands: Western Digital, Samsung, Toshiba, Seagate, Quantum, etc.;
- full compatibility and support for card readers (SD cards, respectively).
After installing and launching the utility, select the drive you want to format in the main window and click the button Continue .


Formatting a flash drive // Format This Device
After formatting is completed in this utility, Windows will prompt you to format the flash drive again (since the utility performed a low-level operation). I note that after such an operation, all data on the memory card will be deleted, and you can restore something even with the help of special tools. software will no longer work.
AutoFormat Tool
Another specialized utility for quickly formatting problematic flash drives and memory cards. A utility from the well-known manufacturer Transcend (but it works not only with drives from this manufacturer!).
It is very simple to use: after starting the program, first select the disk (Disk Drive item), then indicate the type of drive (in our case SD), set the drive name (Format Label), and press the start button. After some time, the operation will be performed.

PS
1) Please note that there is a small lock on memory cards: if it is set to LOCK(closed) - then you will not be able to delete anything from it, or format it.

2) If your computer does not recognize or does not see flash card (microSD, miniSD, SD), I recommend reading this article:
That's all.Good luck to all!
Many people have USB flash drives. This is an indispensable attribute modern man who exchanges information, has his own computer or useful gadgets. Flash drives help us in everyday life; they come in handy when we need to transfer data or make a multiboot flash drive for resuscitation. operating system and restoring the computer's functionality.
Why format a flash drive?
USB flash drives, like any complex electronic devices, tend to break down or have performance problems. It happens that when you connect a flash drive, the computer does not detect it or does not see its contents, cannot format it, or an attempt to write data to the flash drive causes an error.
In addition, formatting a USB flash drive is necessary when you need to upload a file larger than 4GB onto it. All removable media are in the FAT32 file system format by default.
This allows you to connect a flash drive to various devices and equipment, since this file system is recognized by most electronic devices working with removable storage media. FAT32 does not allow files larger than 4GB to be written to the drive. In this case, you need to change the file system of the flash drive to NTFS.
How to format a flash drive in Winows using standard tools?
Nothing could be simpler. To format a flash drive and change its file system, you need to open “My Computer”, right-click to bring up the context menu, select “Format”, select the necessary parameters - file system and formatting method (I choose “Quick Format”) and click "Start" button.


If everything is in order with the flash drive, then Windows will successfully complete formatting of the USB drive and you will receive a message about the successful completion of formatting. 
What to do if the flash drive is not formatted?
If there is a problem with the flash drive and Windows cannot format it, you will either receive an error message, or for a long time the format window will not respond to user requests, and when you try to click on it with the mouse, it will turn gray and Windows will issue a warning that that the process is not responding.
Nobody wants to lose a working drive, so the issue of resuscitating a flash drive and formatting it using third-party tools will be relevant. We'll have to look alternative options to format the USB storage device.
Formatting a flash drive via the command line
First alternative way formatting a USB drive - using the system command line. Everything is simple here. Open the command line by pressing the combination Windows + R.

In the window that appears, you must enter cmd command to open the command line and click OK.

In the command line window, type the convert command (the letter of which is marked on the flash drive): /fs:ntfs, for example, convert h:/fs:ntfs and press “Enter”.
If the process is successful, you will receive a message that the formatting was completed successfully.

If Windows cannot format, you will receive an error message; third-party specialized programs for working with memory cards and USB drives will come to the rescue.
Programs for formatting USB flash drives
There are enough third-party utilities on the network to work with memory cards and USB drives. Programs vary in functionality, but allow you to perform basic operations with removable media. For the most part, all third party software is free, but there are also paid programs.
SwissKnife- a utility designed to create and format hard disk partitions and removable media. Specially designed for people who want to make their external hard drive visible across different operating systems.

JetFlash Recovery Tool is another popular program for working with removable disks and USB drives. A program for restoring USB flash drives. If your flash drive is unreadable or unformatted, then jetflash recovery tool, in most cases, will help solve this problem.
![]()
The program does not require activation and runs on any version of Windows. Using the transcend jetflash recovery tool, you can restore the functionality of failed media; it corrects an error in the OS working with a flash drive if the USB flash drive is not detected or is not visible by the system.
Hard Disk Low Level Format Tool- another utility for low-level formatting of flash drives and other disks. In some cases, it helps to fix errors in the operation of a USB drive.


HP USB Disk Storage Format Tool — special utility from Hewlett-Packard for formatting memory cards and USB flash drives. The program has a simple interface and is similar to the built-in Windows opportunity disk formatting.

SDFormatter- a program for formatting memory cards, especially SD cards.

Formatting is the process by which a data storage area is marked up. This area is called file system, and is a table.
Each square of such a table is called a cluster. And when a file is copied to a flash drive, the clusters are filled with data one by one until the file is completely moved.
If information is frequently rewritten to the device, the clusters begin to fill unevenly, since some of them contain remnants previous files. And new recorded files can occupy clusters at different ends of the “table”, which slows down the operation of the flash drive.
Formatting resets all parameters and re-marks. This has a positive effect on the speed of the device, because the file system is reset. That is, the “table” is cleared.
Why do you need to format
- To quickly destroy all recorded information
- To “kill” all viruses and traces of their activity
- To resolve errors that occur when opening and writing files
- To speed up the device
- When creating a bootable USB flash drive
Formatting erases all data that was written to the flash drive! Therefore, before you run it, be sure to transfer everything important files to another location (for example, to a hard drive).
How to quickly format a flash drive
This can be done standard means systems. They are available in any version of Windows (XP, 7, 8, 10).
1 . Insert the flash drive into your computer.
Most likely, an autorun window will open in a second or two. Let's close it.

2. Open Start - Computer.

3. Right-click on the flash drive icon and select “Format...”.

4 . Select parameters or leave everything as is.

File system. You are asked to choose one of three. The default is usually Fat32. It is good if small files will be written to the device, as it interacts with them faster. But if you need to write a file larger than 4 GB, then problems arise - Fat32 does not support working with such large files.
NTFS is another matter. This system is capable of working with very large files, even more than 1TB. But with small ones it works a little slower than Fat32.
There is also exFAT. This is an upgraded Fat 32 that can handle files larger than 4GB. However, on this moment it is only supported in Windows system 7 and higher, and other devices (for example, TVs) and computers on the previous Windows versions can't work with her.
There are more advanced file systems, for example, ext4, but Windows does not yet support anything better than NTFS and exFAT.
So, if you plan to write small files to a flash drive, then you can leave the default file system (Fat32), and if you need to copy to it separate files more than 4 GB (for example, a movie), then select NTFS.
Cluster size. Minimum size data. It is better not to change anything in this field.
Volume label. The name of the device that will be shown during boot. For example, I want the flash drive to appear as "Neumeka". This means that I erase from this field what is suggested and print the name I need. As a result, it will appear like this:

Formatting Methods. Initially, this item is checked for “Quick (cleaning table of contents)”. This method will overwrite the file system, which is usually quite enough.
If you uncheck the box, a full format will be done, which means that the computer will first check the physical surface of the flash drive and if it finds damage, it will fix it. In fact, they will simply disguise themselves and then it will not be possible to write information there. And only after all this will the file system be written.
5 . Click “Start”.

The system will warn us that it will destroy all information from the device. We agree and wait for the end of the process.

When it finishes, we will see the following window. Click “OK” and close the formatting window.

All! The device is ready for use.
If it didn't work out
Despite the fact that a flash drive is more reliable than a CD and DVD disc However, she also faces problems. For example, it may simply not be displayed in “Computer”.
This happens for several reasons:
- File system is damaged
- The device was not formatted by the manufacturer
- The letter of the flash drive matches the letter of the drive already in use by Windows
To eliminate these reasons, go to Start - Control Panel.

Go to “System and Security” and/or “Administration”.


Open "Computer Management".

Click on “Disk Management” on the left side.

The window takes on the following appearance.

Right-click on the flash drive and select “Format...”.

Formatting using the command line
Another formatting method. But in order to use it, you need to know exactly the letter of the flash drive. Otherwise, you may accidentally delete data from another, desired drive.
1 . Press the keyboard shortcut Win + R.

2. In the Run window, enter cmd and click OK.

3. In the window that appears, enter format G: /FS:NTFS /Q /V:flashka

- format is a command to start formatting
- G is the drive letter under which your computer recognizes the flash drive (do not confuse it!)
- /FS:NTFS - file system in which you want to format the device. If you want fat32, then enter FS:FAT32
- /Q- quick formatting. If you need the complete one, just don't use this command
- /V:flashka - volume label (this name will be displayed when loading in “Computer”).

When everything is ready, a similar inscription will appear.

Low-level formatting or “flash drive treatment”
Use this method should only be done if all of the above did not help.
Download and install the HDD LLF Low Level Format Tool program from the official website. During the installation process, select “Continue for free”.

Open the program, select your flash drive and click Continue.

A window with information about the device will appear. Go to the LOW-LEVEL FORMAT tab.

Click on the FORMAT THIS DEVICE button.

A warning appears that all data written to the media will be erased. Click “Yes”.

And we wait for the end of the process: when the window becomes something like this and 100% complete is written.

We close it and do the usual formatting, otherwise the flash drive will not open. To do this, follow the first instructions from this article (Start - Computer - right-click on the flash drive icon - Format...).
