How to completely remove a driver from the system. How to completely remove a driver from a Windows system
A printer is indispensable these days. peripheral device for office and home. Therefore, users often have personal computers Windows 7 OS causes problems with drivers on these devices. Problems can be very different. For example, the printer does not want to print, the device driver is outdated and needs to be replaced, or the wrong driver is installed on the printing device.
To solve this or that problem you need remove or reinstall printer driver. To solve this problem, we have prepared material that describes in detail the process of removing and reinstalling the printer driver. In addition, in the material you will find useful information, which will help you solve some problems associated with printing devices.
Removing the printer driver from Windows 7
First of all, let's go to the Control Panel section "". You can get there using the program " Execute" and the following command: control printers The program is launched using the keyboard combination Win + R.
After executing the command, the required section will open. It is also worth noting that this section can be found in the Control Panel itself.

For example, we took a new MFP.

Our next action will be to remove it from the section that we opened. To delete it, right-click on it and select “”.

Now we need to go to the add-on " Services" To do this, in the program " Execute" we use the following command: Services.msc You can also find this add-on in the Control Panel in the Administrator section. In this add-on we need to find the service " Print Manager" After that, right-click on this service and select “ Restart».

Operations performed will reboot the one under consideration service. This is necessary so that the drivers on the print server can be uninstalled normally. Now let's move directly to the print server. This can be done with the command in the program “ Execute": printui /s /t2

In the window that opens, we find the driver related to Samsung MFP M2880FW and delete it using the Delete button. Our actions do not end there yet. We need to go to the latest add-in " Print management" To do this, execute the following command: printmanagement.msc in the program “ Execute" In the add-on that opens, go to the sections “ Custom filters / All drivers“After that, we’ll find our printer from the list and delete it.

After completing all the steps described in the example, you will completely get rid of all traces of the Samsung M2880FW MFP driver in Windows 7. All traces will be deleted regardless of how the device is connected: even if parallel port or WiFi.
Now all that's left to do is last action, namely remove all software related to the MFP Samsung M2880FW. This can be done using standard Windows 7 tools via uninstall panel.

The example shows how standard system tools can easily remove all traces of drivers. In addition, the above method is suitable for everyone Windows versions, for example, for XP. The only difference in Windows XP will be the name of the section for printers.
Correct installation of printer software
The main reasons are not proper operation printers are drivers, which Windows user 7 downloaded from unreliable source. Such sources can be various pirated resources and torrent trackers. Therefore, if this is exactly the situation you have, then - delete Software of your device, using the method described in the first example. After this, you need to download software for the printer or MFP from reliable source.
The most reliable and only safe source of printer drivers is the website of the printing device manufacturer.
For example, to download drivers for an MFP Canon PIXMA MG7740 You must go to the company’s device support website www.canon.ru/support. Then enter the name of this MFP in the search menu.

After completing the search, the site will return results containing necessary software for proper operation of the MFP in question Canon PIXMA MG7740.

Uninstalling Drivers Using Driver Fusion
Driver Fusion is a great tool for removing software for printing devices. You can download the utility from its official website https://treexy.com. The utility has a Russian interface, although some sections are poorly translated.
Consider the work Driver Fusion more details. Let's launch the utility and go to the section " Driver's family" From the Russian title of the section it is clear that it is incorrectly translated. The correct translation is " Driver family».


In the window that opens you can see almost all printer manufacturers. To remove all drivers from operating system Windows 7 select the required manufacturer and click the " Delete" After these steps Driver Fusion will start complete removal all traces of drivers from the selected manufacturer. All types of printers are removed from various types connections - at least through a parallel port or USB interface.
The example shows that using the utility is quite easy. It performs the task of removing drivers much easier than standard means Windows 7 described in the first example. Therefore, Driver Fusion can be recommended to beginners.
Using this utility, you can remove the driver for any device. I would also like to note that the utility supports both new and old Windows operating systems, so you can run it on XP or ten.
Conclusion
One of the main reasons for the inoperability or malfunction of a printing device is drivers obtained from unreliable sources. Therefore, follow the examples and recommendations in the article to solve and avoid problems with your printer. We hope that our material will be useful to you.
Video on the topic
When reinstalling drivers, sometimes a very unpleasant situation occurs when old drivers are not completely removed, as a result of which new ones are just installed drivers begin to conflict with them. This problem is observed quite rarely, but, nevertheless, when this happens, the “tails” remaining in the system can seriously ruin the life of the user, for example, causing BSODs or preventing the launch of certain programs. How to remove drivers so that nothing unnecessary remains from them in the operating system? For this purpose you will need a special utility.
Benefits of Driver Sweeper
A small program called Driver Sweeper from the developer Phyxion can easily, quickly and completely remove the driver of any device. In addition, using this utility, you can clean the operating system of junk files that were left behind by previous drivers, as well as get rid of unnecessary driver keys in the system Windows registry. To make working with the Driver Sweeper program convenient and safe, it has automatic Reserve copy and driver recovery (if driver removal is unsuccessful, you can always roll back to the previous version).
How to use Driver Sweeper
The Driver Sweeper program is free software, so it can be downloaded absolutely free from any suitable site, for example, from here: techspot.com/downloads/4266-driver-sweeper.html.

After installing the Driver Sweeper program, launch it using a shortcut on the desktop and in the main window go to the section Language, since the utility runs in English by default. Select the Russian language from the drop-down list and click Apply.

After that, go to the section Analysis and purification- here is a list of all installed drivers. To remove any specific driver, you need to check the box and click the button Cleaning.

If you want to be absolutely sure that the program will not delete it along with the driver necessary files, you can first select the item Analysis(noting in advance required driver). The next window will display a list of files that will be deleted when uninstalling the device driver. Here you will need to uncheck those files and registry items that you do not want to delete.

In case of unsuccessful driver removal, the Driver Sweeper program contains a section Recovery. By going to the tab Recovery, you can undo the changes you have made.
Driver Sweeper is a convenient and extremely easy to use tool. It allows you to easily get rid of the remnants of previous drivers in the system or remove the driver, so that later this does not cause any conflicts in the operation of the devices. It is worth noting that the need for such functions does not arise often, but in case it does appear, it is better to keep a reliable and proven program such as Driver Sweeper on hand.
Still have questions? - We will answer them for FREE
Hello everyone, my dear readers!
Glad to see you again on my blog! Yesterday I changed the software to newer versions and was faced with the fact that sometimes I have to remove old software. The question immediately arose - how to remove installed drivers? After all, sometimes a simple rollback is not enough. In this article, I will tell you all the ways you can do this safely and without damaging your PC.
What is it for?
Sometimes removing drivers is not just desirable, but necessary. If, when updating programs, only a few files are added to them, then with system software the situation is completely different. Manufacturers sometimes completely change the driver structure, for example, for audio devices.
Especially with the advent of the new DierctX. And in this case, you need to remove all old versions of drivers. This can be done in several ways and programs, which I will discuss below. By the way, this applies not only to primary hardware and a certain OS. This may be needed even on modern Windows 10.
I want to immediately give an important clarification: do not uninstall if you do not have a new driver. Remember, as soon as you uninstall the software, the operating system will simply stop working with it, or even turn it off altogether. Therefore, it is important to have in advance new version, or software with which you can find and install it.
Removing the driver using special software
The good thing about this option is that everything is done quickly. However, quality program, and even a free one, is quite difficult to find. Driver Sweeper is a software that I tried myself. You can download from here. Download and install. After launching on Windows 7, or on any other system, it is advisable that you immediately activate the Russian language. This is done in the Language tab.
On the left side you need to click " analysis and purification" You will have all the devices for which the OS has drivers, even for the printer. Choose the hardware that needs to be rid of old software. Then click on the button Analysis. The system will display all files that are associated with this device. Also, parts of the registry that are related to it will be shown.

Then you should click the button Cleaning" Once the process is complete, close the program and restart your PC. This is how it is done on desktop computer, and on a laptop. Only after this you can install new software.
There is another program that will help you with this. It's called Driver Genius. Download it you can from here. Download, install and run it. A window like this will open.

As shown in the picture, click Driver Cleanup and select the device. Then click the button " Next" The program itself will remove everything you need, and all you have to do is restart your PC.
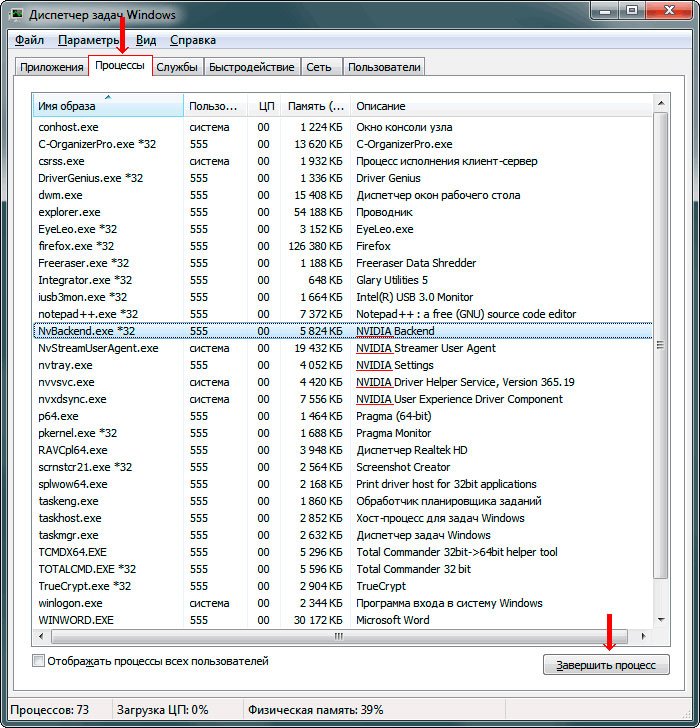
Removal through the operating system device manager
First you need to open the task manager. Right click on the panel quick launch, on some free space, not occupied by shortcuts and in the menu that appears, select the line with this name. You need to end all processes associated with the driver you want to remove. For example, you want to remove the software on your laptop that is responsible for the video card, close all processes related to the image.
Now you need to go to the control panel and open device Manager. You will see a window like the image below.

In it, select the desired device, right-click and select the “ driver" Next, click “ Delete».

The following will appear.

Check the box where indicated and click " Delete».
In principle, all this is enough, however, this method does not completely delete all files associated with the device. For example, there will still be entries in the registry. This is not dangerous, but in the future, without cleaning the registry, it can slow down the system.
Precautionary measures
Installing new drivers while uninstalling old ones can cause problems. For example, you will remove the driver, but the new one will simply not be installed, causing an error digital signature. This especially happens with software for a printer or scanner. In this case, reboot to safe mode. To do this, restart your machine and click F8, and select the first line.

Only after loading the operating system in this mode can you begin to take action. In this case, the OS simply disables some functions that block some actions related to confirming the quality of the software. And for new operating systems, installing software without driver signature is simply a potentially dangerous action. Therefore, we have to use this method.
Conclusion
At the end of the article, I want to warn you that any operation described here must be carried out to the end. Do not interrupt the process associated with software removal. Otherwise, your system will slow down. The worst thing that can happen is errors in the registry. It will be very difficult to correct them manually, so it is important to complete all procedures. By the way, there is an excellent video on this topic.
On my own behalf I can recommend you to use special programs. They will not harm the system, and will definitely delete all files associated with drivers. All software is free, I tested it myself. The programs work on all versions and are visible. By the way, some actions may require permissions from the system itself, so it is better to always run the software only as an administrator, otherwise nothing will work.
With this I say goodbye to you! Hope. my article helped you, share it with your friends on in social networks, because they may need help too! Also, subscribe to my blog updates, because I only collect useful information here! All the best to you, I wish you not to encounter computer problems and see you in new articles!
It happens that you stop using the device. But you should remember that a certain number of files that control it remain in the system. This is part of the driver program. The question arises: is the driver correct?
The easiest way is to use standard remedy all Windows operating systems - "Device Manager". Simply left-click the device you want to remove from the system, right-click, selecting the menu, and go to “Properties”. Go to the "Driver" tab and select the "Delete" button. After this, remove the device. This is the answer to the question of how to properly remove a driver, but there are also more advanced and convenient methods.
Now turn off the PC if required to remove the device. But, as already mentioned, these are not all existing options for solving the problem, since after this procedure some files still remain in the system, which can lead to problems in the future. Therefore, to clean the system of unnecessary drivers, it is advisable to use specialized programs, especially for people whose line of work this is related to - service engineers and system administrators, as well as specialists technical support.
This will slightly speed up the performance of the system where such software is used. We are talking about an automated mode, so how to completely remove a driver is a matter of the operation of the program algorithm, and it will no longer concern you. It should be noted that one should not expect miracles. Such programs are the same as the benefit that can be obtained by using them is calculated at best + 1-5% to productivity. But still, many people who are interested in tuning the system like such “whistles”, which give the illusion of great benefits.
To be fair, we must add that many of these programs have much more useful features than from the system. But we will return to this issue later in the article. For now, let's list the most common ones paid programs- Driver Cleaner, Driver Sweeper, Drivertool. It should also be noted free solutions(although the above are also available with sufficient functionality in the shareware version). Acceptable freeware program options include: DriverPack Solution, Drivers Installer Assistant, Drivers Pack Unpacker & Installer, Guru3D Driver Sweeper.
Let's look at the functionality of the DriverPack Solution program, the code of which is distributed under an Opensource license, which provides for publication of the source code and its modification, as well as use. The developers of this most useful program did not stop at solving the problem of how to remove the driver. This software allows you not only to remove unnecessary drivers from the system on Windows XP/Vista/Seven, but also to find and install them, as well as perform an update by downloading it from the Internet, thus greatly facilitating the installer’s already difficult work.
Note that there are two versions of this software: Full and Lite. The first is distinguished by the size of the distribution kit, occupying 3 gigabytes. A very useful thing, as it solves problems with identifying and installing drivers in one fell swoop. Just insert the disc and the rest will be done in automatic mode. Drivers will be taken from an extensive database of packages and installed immediately. Let's note a huge number of laptop vendors for which drivers are especially compatible - Lenovo, Toshiba, Dell, Acer, Sony, HP, eMachines and so on. If you wish, you can make amendments to the database and remove a driver that is unnecessary in your opinion, thus changing the considerable size of the distribution kit.
But why do this if there is a need for constant availability universal collection of drivers? Just write DriverPack Solution to an external hard drive USB disk and take it with us. And now we don’t have the problem of how to remove or install the driver Last update. It should also be noted availability Lite versions. If you are absolutely sure of the future presence of a high-quality Internet channel on all machines where you will install drivers, then take this version. All necessary drivers will be downloaded after the hardware is identified, and will subsequently be updated automatically.
The free Driver Sweeper utility will help you completely remove unnecessary drivers or their remnants from the operating system. Windows systems. Moreover, in case of system failures due to the removal of any driver, it will help restore it in a matter of seconds.
It often happens that after installing new drivers on the system, it stops working normally. This happens especially often among beginners who are just beginning to learn the basics of computer literacy. The reason for system failure is most often the remaining traces after removing the drivers, or a conflict between the new version and the old one.
It is not at all easy to correct this situation by removing the remnants of drivers, especially if unofficial or very “ancient” versions of specialized software were installed. In addition, when changing a video card, for example, from NVIDIA to ATI, incompatibility problems may also arise; not only can they, but they will arise in 90% of cases. When replacing a graphics video adapter, you must install the appropriate drivers for it. If you do not remove drivers, they will clog Windows, possibly conflict with it and slow down its operation. Decide this problem will help free program for removing drivers Sweeper. Today we will talk about no, and how to remove Windows drivers using it.
Completely remove drivers using Driver Sweeper
The Driver Sweeper program is distributed by the developer completely free of charge. You can download the driver removal program from our website using the link above, or from the official website of the utility, the address of which is indicated in the table. When installing the utility, please note that along with it you are asked to download and install another program; it is paid, so if you do not need it, then do not download it. This is done like this: In the program installation wizard, carefully review each step and, where necessary, uncheck the “I accept” checkbox License agreement with the end user and Privacy Policy and I want to install Mobogenie for free.”

After you download and install the program, you can begin removing drivers from the system. By default Driver Sweeper has English language interface, to make it more convenient to work with it, it needs to be changed to Russian. To do this, click in the “Options” section of the “Navigation” menu on the “Language” item and then select Russian from the drop-down list (see the figure below). Click the “Apply” button to localize the program interface.

To detect all remnants of previously installed Windows drivers, click on the “Analysis and Cleaning” link, tick the driver checkboxes according to their developers. We recommend checking all checkboxes. Click the “Analyze” button.

The utility will find all specials. programs and their traces, and displays them as a list in the next window. Mark the ones you don't need. If the program has found a lot of garbage and you decide to delete everything, then for easier selection, click on the button with an asterisk located at the very bottom of the list and select “All”. To begin the driver removal procedure in Window, click on the “Cleanup” button.

The program will ask you a security question - “Are you sure you want to continue?” Click “Ok” in the dialog box that opens to confirm your intentions. After the utility completes the process of removing drivers from the system, you will need to restart your computer.
If after uninstalling the drivers and rebooting Windows computer will malfunction, then you will be able to recover all deleted files. This is done simply. Launch the Driver Sweeper program again and in the “Navigation” menu, click on the “Recovery” item in the “Tasks” section. On the list deleted files, which the utility will display, select the ones you need and click “Restore”.
That's all. Good luck!
Similar materials


