Windows Defender Update Error. Windows Defender Security Center errors and how to fix them
Hello admin! After I updated on my Windows laptop 8.1 to Windows 10, ten began to be actively updated and after each shutdown of the laptop the message “Working with updates. 100% complete. Don’t turn off the computer” and the laptop does not turn off for quite a long time, I’m tired of it and I . Everything would be fine, but I use Windows Defender as an antivirus program, and its antivirus databases are updated through the Center Windows updates, which I disabled, which means that the antivirus databases built into Win 10 antivirus do not receive updates. Tell me, how can I manually update Windows Defender? You can download update files somewhere separately for Windows Defender for operating systems Windows 7, Windows 8.1 and Windows 10?
Hello friends! We all know what's built into Windows 10 free antivirus protects our operating system from various malware and receives virus signature updates every day through Windows Update.
If you have disabled updates in Windows 10, this means that the Windows Defender antivirus built into the operating system will also not be updated. Therefore it has great importance, Keep Windows Update turned on to ensure Windows Defender receives updates promptly.
If for some reason you have disabled Windows updates, you can update Windows Defender manually (offline), in today's article I will show you how to do this.
IN Windows settings select “Update and Security”,
Then “Windows Defender” and look at the subsystem version, as well as the antivirus program definitions and the antispyware program definitions. After manual update versions must change.

Left-click on the button “ Windows Search»

And type “Windows Defender”, then click on the “Windows Defender” application that appears,

A window appears Windows antivirus Defender. We see that the definitions of viruses and spyware are very old.
Click on the “Update” button.

Click on the button “ Updating Definitions».

Update in progress antivirus databases Windows Defender.

Antivirus has been updated.

The subsystem version, as well as the antivirus program definitions and antispyware program definitions have changed.

During the update process, you may receive an error: “Failed to update virus and spyware definitions.”

https://www.microsoft.com/en-us/wdsi/definitions
Update anti-malware and anti-spyware software from Microsoft.
Scroll down to the words...

Anti-malware and anti-spyware updates.

We select the version of the operating system installed on our computer and its bit depth. In my case, this is Windows 10-64 bit.

The file mpam-fe.exe with virus signature updates for Windows Defender, 120 MB in size, is downloaded to my computer. I'm launching this file from the administrator.

The program does not open any window. Windows Defender updates in minutes. Now in Windows settings, select Update & Security, then Windows Defender and see subsystem version, as well as antivirus program definitions and antispyware program definitions. After a manual update, the versions should change.
Stable operation of a number of services is required, which may freeze from time to time, which negatively affects performance antivirus protection. During a restart, all Windows Defender components and services are restarted. If rebooting does not solve your problem, then pay attention to the following solutions.
If a third-party antivirus is installed on your computer, then it may cause a conflict that causes performance errors. Incompatibility issues lead to slow system performance, application crashes, frequent freezes, and other problems.
When installing third-party antiviruses, Windows Defender is usually disabled. If you want to use built-in system protection exclusively, then uninstall the third-party antivirus and restart your computer. After the system starts, Windows Defender should turn on again.
Instructions (How to remove an antivirus) and utilities (AV Uninstall Tools Pack) are available on our website for complete removal antiviruses from the Windows system.
3. Cleaning up threats
Another common reason for Windows Defender Security Center to fail is that your computer is actively infected with malware. To find a threat, you need to perform a thorough analysis of the system. To check, you can use anti-virus scanners Malwarebytes Free and Microsoft Safety Scanner.

Run a scan and, if malware is detected, clean and reboot the system. If Windows Defender continues to generate errors, please refer to the following instructions.
4. Integrity check
Accidentally or suddenly, some files may become corrupted on your computer, which in turn causes Windows Defender to malfunction. To make sure there are no corrupt files on your system, run the built-in System File Checker (SFC) utility:
- Command line

If the SFC utility detects file integrity violations, the problems will be corrected automatically.
5. Checking the status in the registry
Any mishandling of registry keys can disable Windows Defender Security Center. It is important to check the primary keys.
- regedit and press Enter.
- The Registry Editor will launch. Follow the path HKEY_LOCAL_MACHINE > SOFTWARE > Policies > Microsoft > Windows Defender.
- New > DWORD Value (32 bits)

Many applications rely on the Windows system time and date. An incorrect time value may affect the performance of the built-in system antivirus. Make sure the date and time are set correctly.
Right-click the clock on the taskbar and select "Adjust date and time." On the Settings page, enable "Set time automatically" and select your time zone.

7. Download the latest updates
Windows Defender errors can often be caused by an incorrect system update. However, Microsoft could fix the problem in a patch or a new cumulative update. Make sure you have it activated automatic update Windows and regularly check for new available updates.
To check, go to Settings >

8. Check the zone setting and update the proxy in Internet Explorer
An inaccurate Internet Explorer zone entry causes Windows Defender to malfunction. The only and simple way to overcome this problem is to reset your browser settings.
To do this, you need to manually perform the following steps
- Press the Windows key and enter Command line. Right-click on the item that appears and select the “Run as administrator” option.
- Copy NETSH command WINHTTP SET PROXY 1.1.1.1:8080 or NETSH WINHTTP SET PROXY MYPROXY.NET:8080 and paste it into the command line.
- Press Enter.

How to fix Windows Defender Security Center error 0x800704ec
In fact, this is not really a bug, because the operating system is specifically designed for this behavior. The reason for the error is that antivirus software is installed and active on the computer. To avoid software conflicts, antivirus software automatically disables Windows Defender. There are several ways to fix the error 0x800704ec.
Method 1: Uninstall third-party antivirus
You can solve the problem by simply removing the antivirus program from your computer - as a result, Windows Defender will become active again in the system.
- Enter appwiz.cpl and press Enter.
- Select the antivirus program you want to remove and select “Uninstall.”
- Confirm additional requests to remove the product if they appear.
- Restart your computer. Once the system starts, Windows Defender Security Center should become active again.
Note: If you encounter problems uninstalling a third-party antivirus, check out the How to remove an antivirus section for the solution you need.
Method 2: Change the registry settings:
In some cases, method 1 may not work and to solve the problem you will need to change the system registry keys:
- Press the Windows key combination + R. Enter regedit and press Enter.
- The Registry Editor will launch. Navigate to HKEY_LOCAL_MACHINE > SOFTWARE > Policies > Microsoft > Windows Defender.
- In the right area, select the key and enter the value “0”. Then click OK.
- If you do not see the DisableAntiSpyware key, then right-click on the free space and select New > DWORD Value (32 bits). Name it DisableAntiSpyware and set the value to “0”.
Method 3: Use the Group Policy Editor
Sometimes Windows Defender Security Center can be disabled through Group Policy Editor settings. You can easily check and restore settings:
- Press combination Windows key+R.
- Enter gpedit.msc and press Enter.
- Go to Computer Configuration > Administrative Templates > Windows Components > Windows Defender Antivirus.
- and double click on it.
- Select the “Not Specified” option. Click “Apply” and then “OK”.
Method 4: Start the service
- Press Windows key + R.
- Enter services.msc and press Enter.
- Select and double click on it.
- Make sure the “Automatic” option is selected and the service is running. Otherwise, manually start the service.
How to fix Windows Defender Security Center error 0x8050800d
Many users encounter this error when trying to scan the system. A pop-up window with an error code appears and the user is asked to close the program. Most probable cause This error may result from a conflict between Windows Defender and a third-party antivirus. There are 2 main ways to fix the problem:
Method 1:
- Securely remove the remnants of your previous antivirus solution (How to remove an antivirus). You can uninstall the program manually or use GeekUninstaller to automatic search and removal.
- Disable and Security Center using the editor group policy. Press Windows key + R and enter gpedit.msc and press Enter.
- Go to Computer Configuration > Administrative Templates > Windows Components > Windows Defender Antivirus
- In the right pane, select a policy Turn off Windows Defender Antivirus and double click on it.
- Select “Enabled”, click “Apply” and then “OK”.
- By using Windows Explorer go to the path C:\ProgramData\Microsoft\Windows Defender\Scans (view hidden items must be enabled) and delete the “Scans” folder.
- After uninstalling Scans, re-enable Windows Defender using the same procedure, but in step 5, select the “Not configured” option.
- Press the Windows key and enter Command line. Right-click on the item that appears and select the “Run as administrator” option.
- When prompted by User Account Control, answer “Yes.”
- In the window that opens, enter sfc /scannow
- Press Enter to run the command.
- Wait for the scan results.
How to fix Windows Defender Security Center error 0x800705b4
This error may be caused by the antivirus service. third party solution. A conflict is possible between two programs with similar functionality. In this case, you need to uninstall the third-party antivirus to get Windows Defender Security Center to work again.
Method 1: Enable the system firewall
- Press the Windows key and enter Control Panel. Select the option that appears. Go to section B Windows firewall and select the option “Turn Windows Firewall on or off” from the left navigation menu. Select the “Enable” option windows firewall” and click “OK”.
- Press Windows key + R and enter services.msc. Right-click on “Services” and select the “Run as administrator” option.
- Select Windows Defender Security Center service and check the service status. If the field is empty, double-click on the service name and select the “Run” option. If the service does not start, set the Startup Type to “Automatic” and restart the computer.
Method 2: Windows reset
- Launch the application Options
- Go to Update & Security > Recovery and select the “Restart now” option
- Then select the option “Troubleshoot” and “Reset your computer”
- Select “Keep personal files”, specify the administrator account and click “OK”.
- If you are asked to use the installation disk, you need to connect installation disk Windows 10 or OS recovery disk.
Note: Resetting Windows may take quite some time. Windows computer you can reboot several times.
Method 2: Run an integrity check
If for any reason the above method does not fix the error, then you will need to run a validation check system files to detect and fix damaged or missing system files.
- Press the Windows key and enter Command line. Right-click on the item that appears and select the “Run as administrator” option.
- When prompted by User Account Control, answer “Yes.”
- In the window that opens, enter sfc /scannow
- Press Enter to run the command.
- Wait for the scan results.
How to fix Windows Defender Security Center error 0x8050800c
At the end of 2016 with an error 0x8050800c faced many users of system antivirus in Windows 10 when they wanted to scan the system in search of malware.
The problem could be caused by an incorrect patch or update deployed to the computer. Many users were able to get rid of this error by simply installing all available Windows 10 updates/
Method 1: Install updates
- Go to the Settings app > Update & security and tap Check for updates.
- Wait while Windows Update searches for and installs all necessary updates automatically.
- Restart your computer and make sure there is no error.
Method 2: Use Norton Removal Tool
Often this problem occurs among users who have ever installed Norton products on their system and uninstalled them incorrectly. For thorough removal of marks Norton antivirus use the Norton Removal Tool application.
- Download and run Norton Removal Tool.
- Follow the onscreen prompts to get rid of installed applications Norton and their traces on PC.
- Restart your computer to apply the changes. After rebooting, make sure there is no error.
How to fix Windows Defender Security Center error 577
Sometimes users, when trying to uninstall a third-party antivirus, may encounter error 577 when starting the Windows Defender service:
"Error 577: Windows system can't check digital signature this file. At last change equipment or software an incorrectly signed or corrupted file or malware of unknown origin may have been installed."
There are two main ways to solve this problem:
Method 1: Using Security Center
- Press Windows key + R
- Enter wscui.cpl and press Enter
- Click “Enable” next to the “Virus protection” option. After this, the system antivirus and all necessary services will be launched.
Method 2: Using the System Registry
- Press Windows key + R. Enter regedit and press Enter.
- The Registry Editor will launch. Navigate to HKEY_LOCAL_MACHINE > SOFTWARE > Policies > Microsoft > Windows Defender.
- Check the DWORD value of the key. If the value is different from 0, then double-click on the entry and in the window that opens, enter 0 in the value field. Save the changes.
- Run the file MSASCui.exe in the following location C:\Program Files\Windows Defender
Found a typo? Highlight and press Ctrl + Enter
Introduction
Windows Defender is the basic antivirus protection in Windows 8, 8.1 and 10. Unlike its counterpart in Windows XP, Vista and 7, the version for Windows 8/8.1/10 protects against viruses and other types of malware, not just spyware . The product is reminiscent of Microsoft Security Essentials for Windows XP, Vista and 7, but unlike it does not have several features such as the ability to select the time or limit the CPU resources used for scheduled scans using the GUI, quick start scanning using the context menu, displaying an icon in the notification area of the taskbar, etc.
Windows Defender uses Windows Update to download new virus signatures once a day. If the update process fails, you will need to reinstall Windows updates.
Please note that you cannot install Microsoft Security Essentials on Windows 8, 8.1 or 10. If you install a third-party antivirus program (such as Avast Free Antivirus), Windows Defender will turn off automatically - there is no point in consuming extra system resources by using multiple antivirus solutions .
Setting up Windows Defender in Windows 10, 8.1 and 8
To launch Windows Defender in Windows 8 and 8.1, open the application search bar by pressing the key combination - Windows key and Q, enter the phrase “Defender” in the search bar and click on the result.
In Windows 10, open the Start menu or Cortana Search by pressing the Windows key + S, enter “Defender” in the search bar, and select “Windows Defender Settings.” Since all Windows Defender settings are now located in the new universal interface, there is no point in opening the main program window.

If you previously uninstalled a third-party antivirus, you will see a dialog box stating that Windows Defender is disabled. In this case, open the Action Center using the icon in the notification area of the taskbar and in the “Security” section, enable the “Virus protection” and “Spyware and unwanted software protection” options. Alternatively, you can open Control Panel (Windows key + X), type “Center” in the search bar, and then toggle the options under “Security” to “On.” Please remember that in Windows 8 and 8.1, Action Center may not display a red icon in the notification area for several days after uninstalling a third-party antivirus product.
Windows Defender Settings in Windows 8 and 8.1
When the main Windows Defender window opens, go to the Settings tab and make sure that the “Turn on real-time protection (recommended)” checkbox is checked. These measures are sufficient to activate Windows Defender Antivirus protection in Windows 8 and 8.1 after uninstalling third-party free and paid antivirus solutions.

If something is blocking activation, run Rkill to kill malicious processes and services that may be preventing Windows Defender from starting. Then repeat the operation without restarting the computer.
The following 3 tabs in the “Options” section work with exceptions: the user can prevent scanning of certain files and locations (folders), file types and processes. These settings should be used by experienced PC users who clearly understand why scanning of certain objects should be excluded.
Click on “Details” in the menu on the left. Enable the options “Scan archived files” and “Scan removable media" The first option allows you to scan compressed folders (files with the .zip extension) for malware. The second setting allows you to scan connected USB devices during a full check. This is very important because malware can spread in these ways.
Then check the “Create a system restore point” checkbox. In this case, a system restore checkpoint will be created each time a detected virus or malware is removed or quarantined. If your computer becomes unstable after deletion, you can return it to its original state using the system recovery tool.
If you want all PC users (and not just administrators) to be able to view detected objects on the “Log” tab, activate the “Allow all users to view the results of all scans” option. Set the value of the “Delete quarantined files after” parameter to “3 months”. This measure will free up some space on your hard drive.
In Windows 8.1, there is another settings item here - “Automatically send sample files if further analysis is required.” When turned on this parameter The system antivirus will display fewer annoying alerts, so it is recommended to enable this feature.


If you are seriously concerned about the privacy of your personal information, go to the “MAPS” tab and select the “I do not want to join the MAPS service” option. In this case, information about detected objects will not be sent to Microsoft. Other users can leave the “Basic participation level” item active.

Finally, open the Administrator tab and make sure that the “Turn on Windows Defender” (in Windows 8) or “Turn on an app” (in Windows 8.1) option is enabled. Click the “Save Changes” button.

The settings will be saved. You can now safely close Windows Defender by pressing ALT + F4. Defender will start in background and will monitor files and settings. The program will automatically update virus and spyware signatures once a day when Windows Update is running.
Windows Defender Settings in Windows 10
Windows 10 makes it even easier to interact with Windows Defender settings and uses the universal Settings app for customization.
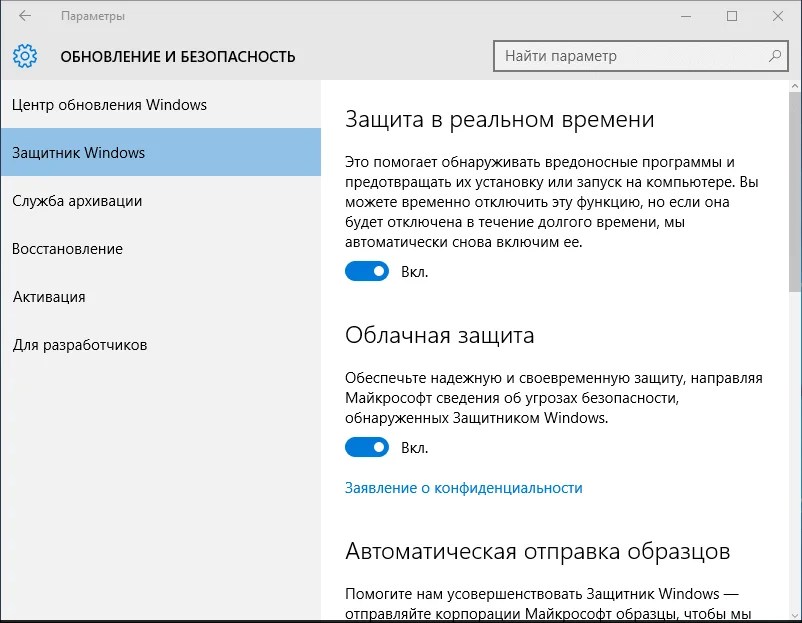
First, enable the Real-time Protection option to enable Windows Defender. If you disable the option, the remaining parameters will be unavailable (grayed out).
Cloud Security enhances security for most users. Only if you are seriously concerned about privacy, disable this option.
"Automatically send samples" is very similar to the previous setting, so it's worth leaving this option enabled.
If you are not a professional IT specialist, it is better not to touch Exceptions.
You can now close the Settings app.
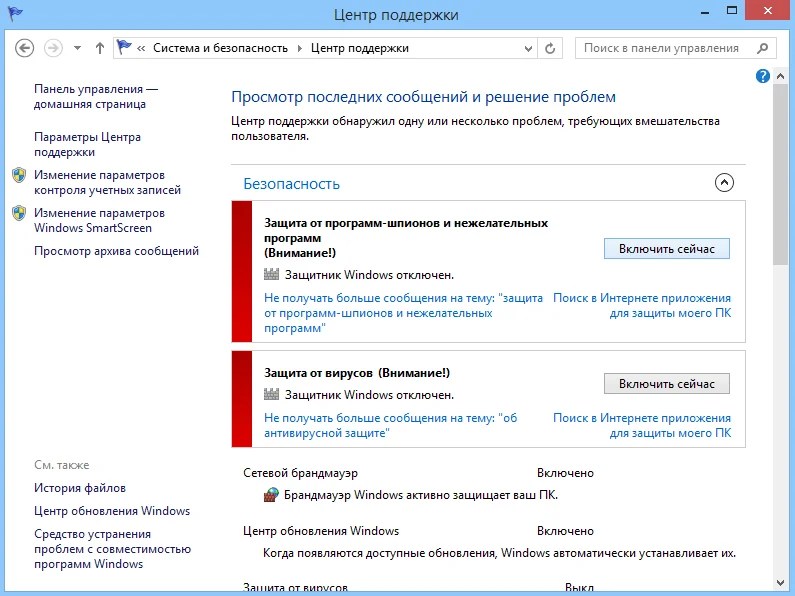
Windows Defender messages in Windows 8, 8.1 and 10
In Windows 8 and 8.1, Windows Defender does not have an icon in the taskbar notification area (system tray), so the best solution will be a periodic check of the status of the Help Center icon (white flag). If a checkbox appears with a red circle with an “X” on it, something has gone wrong. Click the icon to view a list of detected issues - these may not be related to Windows Defender.
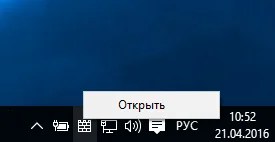
In Windows 10, the Windows Defender icon has been brought back. The icon works stably, nothing blocks it. To open the program itself, right-click on the icon and select "Open".
If the icon has a red circle with a white cross, something has gone wrong, for example, a malicious infection has occurred and the user’s attention is required to clean it up.

If a green circle is displayed next to the icon, a scan is in progress - no action needs to be taken.
If Windows Defender needs to scan your computer, a corresponding alert will appear in the Action Center, just click on it to start the scan. The program conducts an automatic scan every day at 3:00 by default, and the user will see notifications if the system antivirus has missed several scans.
If Action Center displays the "Update your antivirus protection (Important)" and "Update your antivirus protection" alerts. spyware(Important)" Click on them to open Windows Defender to download the latest signature definitions.
If you see the messages “Turn on virus protection (Important)” or “Turn on spyware protection (Important),” click on either of them and wait for Windows Defender to load. The computer status in the main Windows Defender window should soon turn green, after which you can safely close the window. These messages typically appear when Windows Defender real-time protection or services are disabled.

If you see the message “The Windows Defender service cannot start,” the antivirus protection service has been stopped or disabled. Click the “Close” button.
In Windows 8 and 8.1, open search (Windows key + W), enter the phrase “services” and select the “View local services” utility. On Windows 10, open the Start menu or Cortana search (Windows keyboard shortcut + S).
Scroll down the list of services to “Windows Defender Service” and check if the “Startup type” field is set to “Disabled”.
Windows 8 only: Call the context menu of the disabled service and select the “Properties” menu item.
In Windows 8.1 and 10, you cannot change Windows Defender service settings in normal mode.

Then only in Windows 8, in the Windows Defender service settings window, change the startup type to “Automatic”. Then click the “Run” button and then “OK”.

On Windows 8.1 and 10 you need to boot into Safe Mode. After authorization, the start screen and start menu will open, enter the command regedit, Right-click on the result and select the "Run as administrator" option.

Go to section HKEY_LOCAL_MACHINE\System\CurrentControlSet\Services and click on the entry WinDefend. Select entry Start in the right panel . If the parameter value is 0x00000004 (4), the service has been disabled. Double click on the entry Start.
Enter the value 2 and make sure the number is in hexadecimal, then click OK. The Windows Defender service will now start automatically.
Then repeat the same step for the WdNisSvc (Windows Defender Inspection Service) service.
Save the changes and restart your computer normally, Windows Defender should now work correctly.
If Windows Defender cannot start, first run Rkill and then perform a full scan with Malwarebytes Anti-Malware without restarting your computer.
If Action Center displays the message “Update antivirus protection” or “Update antispyware protection,” click on either of them to launch the Windows Defender window and download latest versions antivirus databases.
If the signature update fails, try reinstalling Windows updates.
When a malicious program is detected, a message (pop-up notification) appears in the upper right part of the screen. You do not need to do anything, because Windows Defender automatically removes or quarantines threats it finds.
The pop-up alert closes automatically. If no other messages appear, your computer was cleaned successfully.

If you need to restart your computer to complete the cleanup, you will see the following notification. Click it to launch Windows Defender.

Click the large “Restart now” button in the Windows Defender window.

Just like with Microsoft Security Essentials, a confirmation window appears. Click “Yes” to restart your computer.

Your computer will restart and Windows Defender will remove any remaining traces of the malware.
If you receive repeated messages about malware detection and/or removal, run RKill to kill the malicious processes, then run a full system scan with Malwarebytes Anti-Malware.
Manage quarantined items in Windows Defender in Windows 8, 8.1, and 10
By default, most infected objects go to quarantine - a safe place where malware cannot harm the real system. Windows Defender removes items after three months (if the option is selected). To scan and manage quarantined objects, in Windows 8 and 8.1, open the search bar (Windows key + Q), enter the phrase “defender” in search bar and click the result.
Users of devices with touch screens can bring up the sidebar on the right side of the screen, and then select the “Search” option.
In Windows 10, open the Start menu, type "defender" and select the top result, "Windows Defender."
Click the “Log” tab and make sure that “Quarantined objects” is selected. If you haven't enabled the “Allow all users to view the results of all scans” option (available in Windows 8 and 8.1) in Windows Defender settings, you need to first click the “View details” button (even if you are a device administrator).

It is usually recommended to select the “Delete all” option - all objects have been added to quarantine for some reason. If you are curious and want to find out more information about the files added to quarantine, you can click on an item in the list to view the description and original location. You can also select any detected object by checking the box on the left side of the list. Then you can delete the selected files using the “Delete” button.
You can also restore an object to its original location using the “Restore” button. Be extremely careful - false positives are rare. Never restore objects with a strict, high or medium alert level!

Set up scheduled scans and updates in Windows Defender in Windows 8, 8.1 and 10
Unlike Microsoft Security Essentials, Windows Defender does not have scheduled scan settings in graphical interface program, but the user still has the opportunity to automate a quick or complete system scan.
In Windows 8.1 and 10, Quick Scan runs daily (at 3 a.m. by default) along with Windows feature updates and other tasks. If an operation was skipped or canceled due to shutting down or restarting the computer, the scan will run the next time the computer is turned on or restarted. You will see a clock icon next to the Action Center icon in the taskbar notification area (system tray) during maintenance.
If a scan has not run for an extended period of time, Action Center will notify you with the message “Windows Defender needs to scan your computer.”
To schedule a Windows Defender scan, in Windows 8 and 8.1, open the search bar (Windows key + W), type “schedule” and select the “Schedule tasks” object.
In Windows 10, open the Start menu, type “scheduler” and select the top result “Task Scheduler”.
Users of touch screen devices can bring up the Charms panel by swiping from the right side of the screen and then selecting the “Search” option.

Right-click on “Task Scheduler (Local)” and select the “Create simple task” option.

The Create a Simple Task Wizard will open. Provide a name and descriptions for the scan task and click Next.

If you want to run quick system scans weekly, select the “Weekly” option (in Windows 8.1, quick scans are scheduled by default).
Since full checks can take a long time, you should use the “Monthly” value for these purposes.

On the next screen you can set the day of the week and time for performing quick checks, as well as the months, days and times for full checks. Since there is no limit on the use of CPU resources, it is recommended to select the time when the computer is most likely to be idle - the scanning process reduces the performance of the computer.

When selecting the desired action, select the “Run a program” option.

Click the “Browse...” button.

Go to folder C:\Program Files\Windows Defender and double click on the MpCmdRun.exe file. This executable file Allows you to run basic tasks in Windows Defender.

To perform a quick scan, in the “Add arguments (optional)” field: write “-Scan -ScanType 1”, and to perform a full scan enter “ -Scan -ScanType 2”.

The setup process is almost complete. Enable the “Open Properties window” option for this task after clicking the “Finish” button.

The properties window will open with the “General” tab active. Click the “Change...” button in the “When performing tasks, use the following” option account user” in the “Security Settings” section.

In the “Enter names of selected objects” field, enter “SYSTEM” in capital letters and click the “Check names” button. The title should be underlined. Click the “OK” button. This way, the account with the highest priority and user rights will be selected.

Return to the “General” tab of the scheduler settings and check the “Run with highest rights” checkbox. This will run Windows Defender with elevated rights, ensuring that complex malware removal will be successful.

Open the “Settings” tab and enable the “Run task immediately if scheduled launch is missed” option. If the computer was turned off when it was time for a scheduled scan, the scan will be performed the next time you turn on the computer and log in to your account. Click “OK” in the “Options” window.

During scheduled operations a window will be launched command line. It will close automatically when scanning is complete.
Update Windows Defender more than once a day
If you are unhappy with the fact that Windows Defender updates its databases only when it checks for Windows Update updates (that is, once a day), you can follow these steps. Create a new simple task, specify the execution frequency as “Daily” and set the time to 12:00 AM (0:00). On the “Action” screen, specify the same file MpCmdRun.exe but with the new argument “- SignatureUpdate”.

After creating a task and opening its properties, select the “Triggers” tab, select an existing schedule and click the “Edit” button.
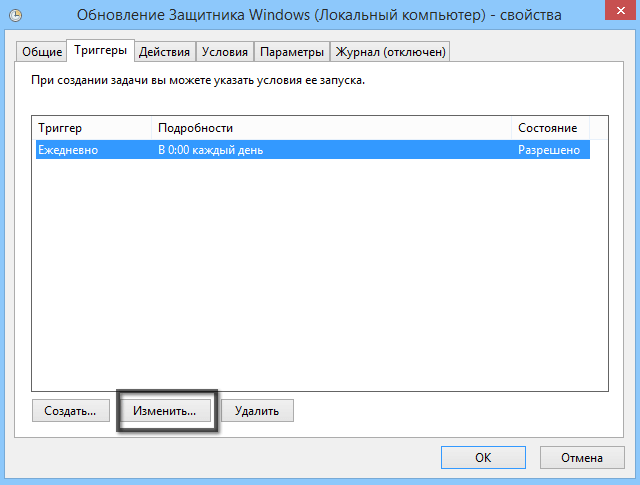
Enable the “Repeat task every” option and specify the value “4 hours”. This value is not initially listed, but you can select “1 hour” and then manually change it to “4”. Click “OK” and close the task properties window.
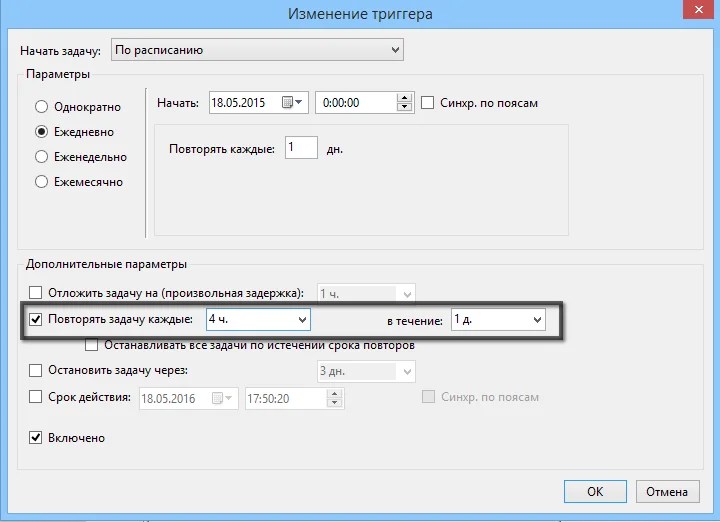
Windows Defender will now update its databases every 4 hours. Each time the command prompt window will open and close automatically.
Keep in mind that this does not mean that Windows Update will run every 4 hours - the operations done only apply to Windows Defender updates.
Found a typo? Highlight and press Ctrl + Enter
Error code 0x80070652 can appear when updating almost any Windows component. This happens especially often when Windows Defender tries to download its updates. Since the seventh version of the popular OS, most users have encountered this problem at least once.
How to fix Windows Defender update problem.
You can combat this by using cleaners, such as CCleaner, or more universal solutions - Windows 7 Manager will do an excellent job of many system maintenance tasks. However, the second program is paid, although not very expensive.

There is a standard way to update the system configuration so that important files were not affected.

You need to understand that error code 0x80070652 is a warning to the user that the file system The PC is not doing well. It does not mean damage to important Windows files, but indicates that one or more programs are causing a conflict.
Often to appear in The Defender Windows code error 0x80070652 due to conflict system applications with third party programs. Clean boot allows you to eliminate this factor by launching only those applications that are required for Windows to work. Windows Defender should stop issuing alerts if the problem is in the wrong software.
Hello, friends! While I was writing about Microsoft Security Essentials, I came across Windows Defender 7. I realized that I didn’t know anything about it and decided to write an article to make it a little clearer for myself why Windows Defender 7 is needed and when it is advisable to use it.

The main window of Windows Defender 7 is shown in the figure below.

If Windows Defender does not start, you may need to manually start the service of the same name. Also, by searching in the Start menu, launch the “Services” utility.

Finding a service Windows Defender and double click on it. In chapter Startup type select from the drop-down menu Automatic (delayed start) and press the button " Launch»

After this, we should launch Windows Defender without any problems. If the service, for some reason, failed to start, then I would check the computer for viruses with two different utilities (for example, Dr.Web Cureit and Kaspersky). Then I would check for Trojans using MBAM. I rebooted and tried to start the service. If the result is negative, then perform system file recovery. If the result is still negative, then I would think about reinstalling the operating system.
Hopefully, getting Windows Defender up and running will be easier.
How to disable Windows Defender
Everything seems to be clear with excluded files, folders and file types. If the defender, by mistake, reacts to a deliberate secure file, then you can add it to the exceptions.
On the tab in detail, Just like in Microsoft Security Essentials, I check the box to scan USB devices so that the defender scans connected flash drives, external hard drives and other storage devices.

In chapter Administrator You can turn off the defender completely and allow the log to be shown to all users. If you have multiple users using your computer, you can allow them to see what Windows Defender 7 has detected.

Everything is done with the settings.
Windows 7 Defender Update
If you want, for example, to conduct a full scan of your computer, then it is advisable to check for updates before doing so. You can do this by clicking on Down arrow next to the help icon and selecting Check for updates

Magazine
In chapter Magazine you can view what the defender did with the detected objects.

Microsoft SpyNet
In the Journal section you can join the Microsoft SpyNet community. That is, if unknown spyware is running on your computer and you are connected to Microsoft SpyNet, then the information from your computer will be sent to Microsoft. There they will be processed and the “Antidote” will be found. This “antidote” with new definitions will then be downloaded into Windows 7 Defender on all computers in the world and this spyware will be neutralized.
You can join as ordinary participant or in the role experienced participant. In the second case, more data will be transferred from your computer and, as I understand it, the efficiency of finding an antidote will become higher.

You can also join the Microsoft SpyNet community in the “Programs” section

I have chosen to join as an experienced member or as an advanced member.
It is advisable to update before performing the scan. To perform a Quick check, just press the button Check. If the computer begins to work unstably, then it is advisable to conduct a Full scan. You can launch it by opening the menu to the right of the Check button.

Custom scan Used to scan individual folders or external devices. Click Choose to select individual drives or directories (folders) and then Check now

Everything about settings and use.
How to enable Defender in Windows 7 through the registry
Valentina shared this method in the comments to this article. Thank you, Valentina.
- Go to the registry branch: HKEY_LOCAL_MACHINE\Software\Policies\Microsoft\Windows Defender to the DisableAntiSpyware key, and change the value (1) to (0).
- We restart the computer and rejoice, Windows Defender is working.
Conclusion
In this article, we figured out what Windows 7 Defender is. This is not a full-fledged antivirus solution, but only protection against spyware and other potentially dangerous software. That is, protection from Trojans. I will use it on very old computers (for example, on my grandfather’s laptop), since the defender requires less resources than a full-fledged antivirus. My grandfather only communicates on Skype and looks at photos. That is, the likelihood of infection is minimal. I would be glad if you share your opinion on using Windows Defender. By the way, in Windows 8, the developers abandoned Microsoft Security Essentials and transferred all its functionality to Windows Defender 8, which also comes with operating system. I wonder what will happen in Windows 10?
