Installation and review of the ADB RUN program. Unlock your Android tablet yourself. Via data reset
![]()
Judging by the statistics, many people have problems unlocking their tablet. Unfortunately, even if the device is under warranty, they will not unlock it for you for free. You'll have to pay some money, but you won't have to make any effort. Don’t want to spend money on paying at the service center? No problem, read on. In this article I will discuss restoring access to your device if you have forgotten your password or pattern to log in.
What to do to unlock a tablet on Android OS
1) If you had the Internet turned on
If you cannot unlock yours, you can try the following: when you enter the key incorrectly many times in a row (usually after the fifth time within 30 seconds), carefully watch the screen - a window will pop up asking you to restore access and enter your login and password from mailbox Google (gmail). In some cases, the offer to restore access will be at the bottom of the key entry field, like on the Nexus 7.

Try entering your login (without @gmail.com) and password for your account. If you have forgotten your password or login, you can try to recover it using Google here. If it doesn't work, we move on. This is the easiest way, but it doesn't work for everyone.

2) If you have software from the manufacturer
Another option is to unlock the tablet using proprietary programs. Like Kies from Samsung or HiSuite from Huawei. It happens that people forget (or don’t know, in the case of buying used devices) even the Google mailbox to which the account is linked Google Play. This software can help.
3) If USB debugging was enabled in the settings
A very rare method of resetting unlocking through the ADB RUN program, it can only help you if your tablet has USB debugging enabled in the settings. If the tablet is locked, you naturally will not be able to enable debugging. Still, if you can’t, try it, in case this option was enabled and you didn’t even know it.
1. Download ADB drivers for your Android tablet. Take advantage Google search, enter the query “Adb driver for Nexus 7” without quotes. Instead of Nexus 7, enter the name and model of your device.
3. Install the ADB driver on a computer running Windows 7 or 8. Detailed Process Installing drivers on a PC is described.
4. Download and install the ADB RUN program on your computer
5. Launch the program, you will see a simple main menu.

6. Connect your Android device to your computer using a USB cable
7. Press the “1” button on the keyboard, and confirm your choice with the Enter key. This way you will activate the “Device attached?” function, which will check if your tablet is connected to the computer.
If the program reports that the tablet is not connected, this means that the ADB drivers are either not installed or the wrong driver is installed. Re-read steps 2 and 3, and download the appropriate driver, and then install it correctly. Happened? Go ahead. If it doesn't work out, there's no point in continuing.
8. Do you see the line “Unlock Gesture Key” and the number next to it? This is the point we need. Press the number “6” on the computer keyboard and confirm your choice with the Enter key.

9. Next, a window will open in which two automatic methods are offered. If you press “1”, the gesture.key file responsible for storing graphic key will be deleted. After this, all you have to do is reboot the device and enter absolutely any pattern. The second method will simply reset the system.db file, and you will be able to use your device as before.
That's all, if you did everything correctly, congratulations. If it doesn’t work, try again, carefully reading each point before, or try to do the same, only on the command line. To do this, follow the following path on a computer with a connected tablet: START button in Windows -> Run... -> enter “cmd” without quotes -> enter the following commands, after each line pressing Enter on the keyboard:
cd/
cd adb/progbin
adb shell
rm /data/system/gesture.key

3) If there is a Recovery menu
If there are no more options left, but you have them, do it. Look on the Internet or for instructions on how to do it for your tablet model. Please be aware that all your data stored in internal memory devices, deleted. The memory card will not be affected.
Dima gave excellent advice in the comments, and Alexander made a useful clarification:
- turn off the tablet
- simultaneously press the keys " increase volume» + key « house"(if any) + power key
- hold down the power button until vibration feedback occurs and then release the power button
- at the same time, still hold the volume button until the menu appears
- then use the volume buttons " more less" (+/-) select " wipe data/factory reset" and press the power button on it
- if another list appears with one item yes and the rest no- choose volume yes and press the power button
- wait until the reset occurs, and then click the first line at the top (“ reboot system now") - the tablet will reboot
- That's all, this reset should solve the problem
ATTENTION, if the method above did not help you, press the keys “ turn down the volume" And power key in the second paragraph.
If your tablet does not have volume buttons, but you need to reset it, then you need to read the instructions. Everyone does it differently. But for Explay Informer 701 hard reset is done like this:
1. press and hold down the “back” button
2. press, but do not hold, the power button 1 time
3. release “back”
4. Android itself will appear in person, press the “home” button
5. The menu appears, select reset in it
Owners of Chinese tablets may find useful advice from Natalia, which she gave in the comments:
1. Turn off the tablet
2. Press the volume + button and at the same time the power button briefly for 4 seconds, then release the power button and alternately press the volume button then + then -, then + then - and so on several times, not quickly one at a time
3. Then again hold the power button and the volume + button together and then the recovery menu should pop up.
I didn’t succeed right away, I tried it different variants, pressed in different order with at different speeds, in general, by luck, I found at random an option for the order of pressing these buttons, at first I got an Android with a red belly, which means that the unlocking option is not suitable and I need to try another option. So, after the required recovery menu pops up, look for “wipe data/factory reset”, move using the volume button and make a selection with the power button. Then a column appears with a lot of No No No No, click yes delete all user data, then another column will pop up, there we look for “reboot system now” click and you’re done.
4) If there is no more hope
Well what can I tell you. The surest way to solve a problem with a graphic key is .
In case of complete despair, I recommend that you simply take the tablet for service or repair. Yes, you will pay some amount, but believe me, sometimes it’s better to just pay than to suffer with the problem, spending a lot of time and nerves on it, and never solving it. Moreover, if it is not you, but your friend, who is to blame for the problem, why not take this amount from him? This seems logical to me. This way you can make money by taking a little more than the cost of unlocking from the specialists as moral compensation. But it's up to you, of course.
ADB stands for Android Debug Bridge, that is, a debug bridge for Android. The program is designed for operating system Android and works in conjunction with a computer. It allows you to change files, use root rights, restore the system.
ADB run, in turn, is an application that allows the user flash a device running on Android. It includes ADB and Fastboot. These applications are familiar to everyone who has encountered flashing their gadget.
ADB, ADB run and Fastboot
Android Debug Bridge allows you to manage Android using a PC. This application is installed directly on a laptop or computer, which is connected to a mobile device via a USB cable in debugging mode. Then after launch It is possible to execute special commands that allow you to initiate any actions with the gadget.
The utility allows perform such actions, How:
Most often, the application is installed together with the Fastboot utility. This mode allows you to reset all settings to factory settings, which is why it is sometimes called Recovery - a recovery function. In addition, you can install firmware using Fastboot, but in this case only work via a PC is possible.
These two programs are better install together, allowing you to access more options.
In turn, ADB run simplifies work and automates common commands and actions most often used by users. Although it has a console, it has a visualized appearance and consists of 14 points.
This program is much simpler, it is suitable for those who find it difficult to understand the command line, who do not know how to work with it. It already provides a menu and items that you can select. She's different simple interface , greater functionality, without requiring additional installations programs.
All utilities can be downloaded, installed for operation and updates mobile device.
How to use ADB run
To understand how to use the utility, you need to become familiar with the installation and basic commands. Connection to the gadget is carried out using a computer and a USB cable or via a wireless network.
You can understand that the connection has taken place by entering adb devices. The message should then appear: " List of devices attached“, indicating that the connection has occurred. Connection via Wi-Fi occurs using adb wireless. The mobile device must be rooted.
To work, you need to enable USB debugging on your gadget. Usually this item is located in the settings. If it is not there, you can look for it in the developer options. This menu is hidden; to enable it, you should find the line with the build number in the Android settings and click on it several times (5 to 10 times). After about half of the clicks, a notification will appear that you are doing everything correctly, and then you will be provided developer rights. Then you can return to the settings, where the “developer options” item will appear. This is where debugging is enabled.
The utility has a number of positive qualities:
- Easy to install.
- Simple controls.
- Easy check for updates.
Installation
Before installing ADB, you need to download it, this can be done for free. You can download ADB on the website 4pda. The official resource does not allow you to download the utility separately, but only with the entire Android SDK package. The program is installed using the standard installation wizard. 
The whole process is simple and intuitive. The installer himself offers hints, directing all actions.
After this, you need to install drivers for your mobile device, otherwise the application will not see the device. The easiest way is to use the utility for automatic installation adbdrivers. But you can also download drivers for Windows 7, 8 or 10 from the manufacturer’s official website.
If there is no installer or driver, you can install manually, for this:

Overview of the ADB run interface and command
Let's look at all the menu items offered by the program and how they work:
- Device attached? - responsible for connection between PC and smartphone, but you must enable USB debugging.

- Move – is responsible for moving files from a laptop to a smartphone. There is both automatic and manual movement available here.

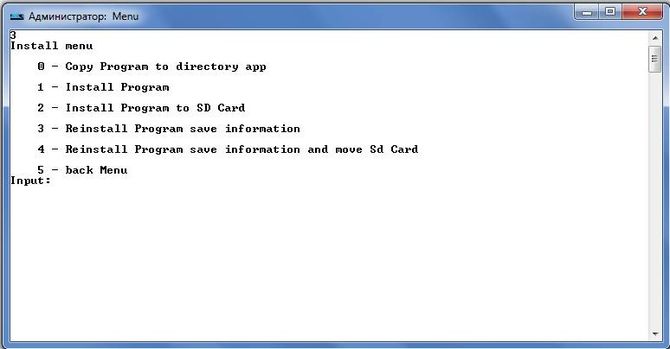
- Install Android App to Device – allows you to install applications, with options for saving and moving to a memory card.
- Reboot Device – various reboot modes Android:

- Fastboot – firmware, system flashing. All settings are set automatically.

- Unlock Gesture Key – unlocker graphic key, also copes with PIN codes and face codes.

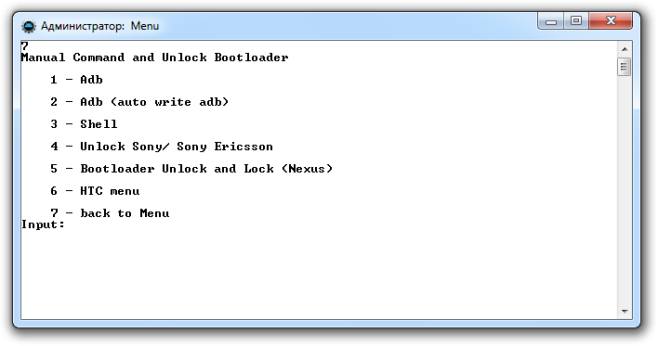
- Manual – allows you to enter commands manually.
- Check Update - check new version programs.
- Intsall Bootanimation – installs and changes animation when turning on the device.

- Memory and Partitio – introduces blocks and sections Android.

- Run Script - working with scripts.
- Backup – create a backup copy.
- Odex – odex-ing of the firmware, taking into account various parameters.

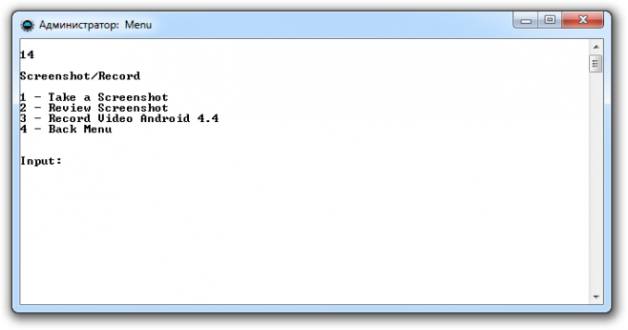
- Screenshot/Record screenshots, video recording capability.
- Exit – accordingly exit from the program.
Flashing your phone using ADB run
The program allows you to change the gadget's firmware. To do this, just install it, connect to your PC and use the Fastboot utility. The files that need to be flashed must be in the same folder as the utility.
First you need translate device into bootloader mode using the menu. 
Then you need to unzip the pre-downloaded firmware files. After this, select the item Run SCRIPT and place the firmware files in the window that opens and close it. Click on Enter. The firmware has started. While the process is in progress, you cannot remove the cable from your phone or computer.
The program makes it possible to reflash all partitions step by step or only some:
- system;
- cache;
- data;
- recovery.
Using ADB
Using the utility allows you to:
- reboot gadget using various modes;
- carry files, folders from phone to PC or vice versa;
- work with applications by installing or removing them;
- work with firmware;
- perform various scripts;
- remove the lock graphic key.
The utility is usually installed and used together with the Fastboot application. 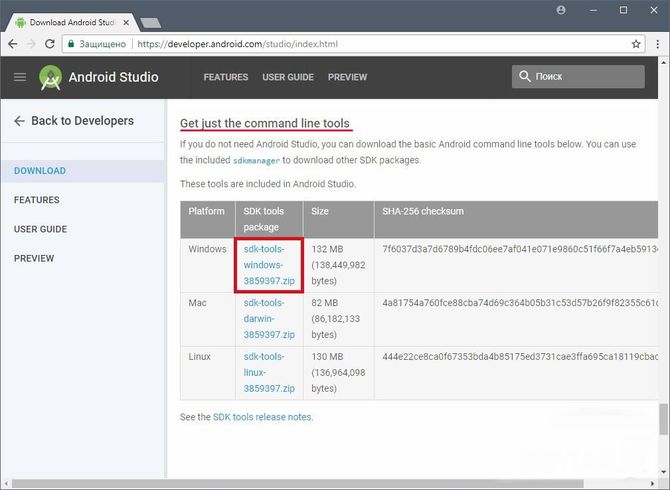
Installation
You can install the application by visiting the official website. Necessary download archive SDK tools for Windows, having previously agreed to the terms of use.
After this it is required unpack the archive, go to the tools directory, select the bin folder there and access the sdkmanager. It just allows you to install the program. 
Next comes team work Windows line. Let's run it as administrator. After that, open the sdkmanager folder, prescribing the path to it C:\sdk-tools-windows-3859397\tools\bin. 
During installation, read license agreement
, press the Y key. 
If the whole process went correctly, then the platform-tools directory with the files adb.exe and fastboot.exe will appear in the root folder. 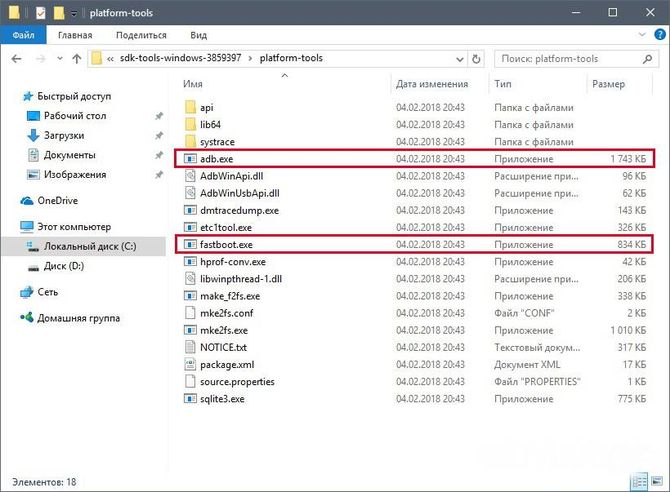
How does ADB work?
Once you install the program, you can work with it. To make sure that everything is functioning correctly and normally, you should use the command line to open the folder with the adb and fastboot files and run the adb.help program. What you get should look like the screenshot below: 
Now you need to connect the device to the PC and check whether the application can see it. Connection occurs when usb help cable. Should select mode MTP – file manager, and then the “for developers” option. If such an item does not appear, then you should go to the “ about the phone", click 7-10 times on the build number. After that, in the “for developers” item that appears, you need to select “usb debugging”.
Then enter adb devices in the system command line. This will allow you to see information about the device. It looks like the screenshot. 
Afterwards, the fastboot program is checked, the fastboot reboot task is written in the console, and press enter.
After checking the functioning of the task, you can safely work with the program.
ADB Commands
The utility involves working with a smartphone and performing various actions. There are only 10 basic ADB commands:

It is enough to specify the path to the folder from which the information is copied and into which it is copied. 

It is also possible to access the “recovery” menu.

But it is worth remembering that after running this program, all data on the phone is deleted. 
- Shell – it can be used in two ways. The first is to enter it into command line, followed by input. This will allow you to enter terminal mode, where it is possible to perform any Android commands shell. But you should use it carefully, as the device can be seriously damaged.
Second option - single input actions. Thus, you can, for example, change the access rights to some folders.

Bonus utility – Sideload. It is suitable for Nexus device owners, allowing you to update official firmware on all company devices.
FAQ
What to do if ADB does not see the device
If suddenly ADB does not see the smartphone, then you need to check first USB debugging or check for ADB drivers on your PC.
It is also worth paying attention to other reasons:
- check usb cable, his performance;
- check installation Android SDK, availability of its latest version;
- costs try switching mode from MTP to camera and back;
- Can try reconnecting device or restart the computer.
After all these steps, the program should work and the device should be detected. This problem often happens with unknown Chinese brands that are not familiar to the program.
ADB or fastboot is not an internal or external command
Sometimes when you enter a number of commands in the console, you may encounter a system refusal to perform the entered action. A message appears that the command is not internal or external. This is often due to the fact that the path to the file is not specified, who serves the team.
The reason for this message may be that the system does not have information about the location of the files. It is possible that the required component is not in the system, then it needs to be installed.
In order to get rid of this error, you need to give the program the path To the necessary files. You should copy it to the clipboard.
- On the desktop you need to select " My computer", click on the right mouse button, select the column " properties»;
- now select " additional system parameters" and then "environment variables";
- there you need to find " system variables"and the Path parameter, to which you need to add the copied path and confirm the changes;
- then we open the console and enter the required action, after which the error disappears.
Alternatively, after all the manipulations it’s worth to restart a computer.
The graphic key for the tablet is protection, which blocks other users from entering your device, particularly if it is stolen or lost. In simple words graphic key is password, which does not consist of numbers, but represents combination of nine circles, connecting which in the sequence specified by the owner of the gadget opens access to the device.
It is important to know: In some cases, trying to enter the security key may take an infinite amount of time. But, often, after several attempts the program automatically blocks gadget, believing that it is protecting it from an attacker who has attempted to steal the data stored in the device’s memory. In this case, trouble begins, especially if you need to use the tablet urgently. How take off Graphic keys will be discussed a little lower.
How to unlock your tablet
As a rule, there are two ways to protect your data on a tablet: graphic key And password(fingerprint scanners familiar on smartphones have not yet been deeply integrated into the world of tablets). So, how can you unlock a protected tablet using a password?
Password represents a four-digit digital or alphanumeric combination that was previously specified by the user (for example, pin code 1111 or password ab11).
It is important to know: as you can see, the methods for activating the key and password are the same and carry identical functionality, A differ They interact with each other exclusively by input method and each user chooses for himself which method is more convenient for him to unlock.
Well, now we should move on to a detailed description of how to unlock the device if the password information was lost or simply forgotten.
We use Google accounts
Confirmation via Google account– this is the most optimal a method for unlocking a tablet, allowing you to access the device by sending a letter by email. To carry out this procedure necessary:

Reset the device to factory settings
If the password information was lost, and recovery through account does not help, then in this case resetting the settings via Recovery.
Recovery allows you to log into developer menu and it will be useful for those users whose device is not only blocked, but also malfunctions from time to time (reboots, freezes, etc.). So for this necessary:
- Disconnect the device and go to Recovery menu .
U different manufacturers You can get to this menu in different ways.
Navigation through the developer menu using keys volume, and selection must be made using the button nutrition.

Reflash the device
If the user was unable to enter the Recovery menu, then all that remains is reflash device, since it is the only way start its operation from scratch. For flashing required:
- Find required version firmware for the device (firmware is selected depending on the manufacturer).
- Now, on the official website you need to download software required to control the tablet system.
- Next, you need to plug device to personal computer and launch the previously downloaded software. It will automatically detect the user's device and offer to start OS updates.
- After which, the firmware starts load and installed on the tablet.
Removing gesture.key and password.key
gesture.key is a file on the tablet system that stores data about the graphic key, and password.key- this is a similar file, but it contains data about the password. In order to restore access to the tablet, you must delete one of these files.
Deleting files:
- The first thing you need to do is get rights superuser ( root rights). To do this you need to go settings— About the device— Firmware version(you need to tap several times until the corresponding inscription appears. On new models, special software is required).
- Next, you need to go to Recovery menu.
- Then you need to select file manager and select the files you need to delete.
- All that remains is confirm your actions and restart the tablet.
The essence of the ADB RUN application is that most people who use ADB use standard commands and actions, and it automates them and makes it easier for the user to access the console.
As you can see, the utility looks like a console, which contains sixteen items; the control process in the program occurs by moving from the main menu to the submenu using numbers, confirming the selection with the Enter button.
Overview of menu items in the ADB RUN program
Now let's go through the main points of the console:

Attached WI-FI item / Android Wear - this item checks the smartphone’s connection to a PC or Wi-Fi (don’t forget to activate it in android settings USB debugging).
Reboot Android item– reboots the device into different modes.
Fastboot (Flash/Erase) item- created for android firmware using fastboot (the data has already been entered for you).
ADB Sideload– The adb sideload command is quite interesting, with its help you can easily update the firmware or restore Android in case it does not boot.
Item Move (Push/Pull)– transfer files from Android to PC and vice versa. These points have automatic methods, and manual control functions.
Item Unlock Gesture Key– everyone’s favorite item that helps in unlocking the graphic Android password, also allows you to unlock pin and faise codes.
Unlock Bootloader– to unlock the bootloader.
Memory and Partitions– helps to see information about existing Android blocks and sections.
Backup (adb and dd if)– creates backup copy for Android.
Screenshot/Record– to create screenshots and videos.
Item Install/Unistall Android App (APK)– designed to install or uninstall applications on Android, or transfer to an SD drive.
Other command– other commands that will be useful.
Run Script– this item is useful for those who often use the Bat script or need to run the Root script.
Root Android– in order to get root access to your Android.
Update ADB and Drivers– checks for new versions of the ADB RUN program or drivers.Update ADB Run– checks new versions of ADB RUN.
For Linux users There is a distribution tailored for Ubuntu.
If you have forgotten the pattern on Android, one of the options to reset it is to remove the lock using a computer and ADB. This utility also has many other functions, so it is worth installing it.
Attention! USB debugging must be enabled on your device. Fortunately, many Android phones and tablets, when you connect the device to a computer, you can activate this item.

If before you forgot the pattern key, this option was not activated in the “For Developers” section and when connecting the mobile device to the PC via USB, you did not see the option to enable debugging (see screenshot above), reset the pattern pattern You can't with ADB.
The method has been tested on old Android versions– below Android 5.0. It was not possible to achieve results on smartphones with new firmware - most likely, the vulnerability was fixed in Android 5.0 or even Android 4.4.
So, after connecting the device to the computer, unzip the downloaded archive from the Android SDK to any folder. ADB is located on the path sdk/platform-tools inside the archive.
We will work with the program through the command line. To do this, select “Run” from the Start menu, type “cmd” and press Enter.

Write down the path to the folder with ADB and enter the commands sequentially. After each one, press Enter.
First way:
adb shell
cd /data/data/com.android.providers.settings/databases
sqlite3 settings.db
update system set value=0 where name=’lock_pattern_autolock’;
update system set value=0 where name=’lockscreen.lockedoutpermanently’;
.quit
At the end just reboot Android tablet or telephone.
Another option (need root rights):
adb shell
su
rm /data/system/locksettings.db
rm /data/system/locksettings.db-wal
rm /data/system/locksettings.db-shm
reboot
Also try:
adb shell
rm /data/system/gesture.key
After the reboot, simply enter a custom pattern (if displayed).
This article was written based on materials from XDA-Developers. This is not a solution to the issue for 100% of device models and I cannot guarantee that at least one of the methods for resetting the pattern given in the instructions will work for you. But the article helped many, so try it - there is a high probability that you will also be able to remove the graphic lock using one of the methods!
