Make 1 page landscape orientation. How to make a landscape sheet in Word? We get a landscape sheet of one or several pages. How to make a landscape page in Word for the entire document
People are accustomed to completing all office and work documents using the program. Microsoft Word. Beginner users often wonder how to flip a sheet horizontally in Word. By default, the program produces vertical, or book, pages - long but narrow. Find out how to turn a page in different versions of Word.
How to make a landscape page in Word for the entire document
To print a wide table, chart, or insert an image, it is best to use a horizontal page view. For regular text, standard book format is suitable. To change the paper orientation, you do not need to install additional editors or programs, you just need to follow the steps and steps from the instructions below. It is important to remember that when using different versions program, it is worth turning to different sequences and algorithms. Learn step by step how to create landscape orientation in Word.
In Word 2003
The oldest, but still no less popular version of the text editor does not differ in functionality from the newest ones. Additional options, new fonts and beautiful designs are added every year, but the base remains unchanged. The position of the document is one of the main criteria of the editor. How to make a landscape sheet in Word 2003? Making these changes is easy and simple; you just need to remember the algorithm once:
- Open the File tab. To find it, look at the upper left corner.
- In the menu that opens, find and click “Page Options”.
- On the “Page Orientation” line, select the icon depicting the desired orientation.
- Using the same menu, you can return the classic page position.
For Word 2007
The algorithm is simple:
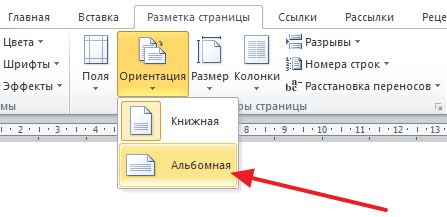
- Since you can make a landscape sheet in Word only using the menu, you need to expand the “Page Layout” column in the top menu bar.
- The word “Orientation” will be located on the bottom line; it should be the leftmost one. You have to click on it.
- Two items will open: “Portrait” and “Landscape”. Once selected, you can change the layout of the pages of the entire document.
In Word 2010
New and latest versions Word programs are not very different from 7: the design has changed a little, the color scheme has changed, but the functionality is consistent highest requirements. Changing the position of the sheet using the tenth year version is as simple as in older ones. To do this you need:
- On the Navigation Panel, select “Page Layout”.
- Among all the functions: theme, color, effects, margins, size, background, border color, line numbers, breaks and others - you need to find “Orientation”. It will be closer to the left edge, but you shouldn't look for it by looking at the corner of the menu.
- After clicking on this button, you should choose from two options that appear: “Portrait” or “Landscape”. The first is vertical, and the second is horizontal. After these simple steps, the document will acquire the desired appearance, and placing the necessary information will become much easier.
How to make one page in Word landscape

If you have figured out how to turn a vertical sheet into a landscape one, all that remains is to learn the last secret, how to delimit each page and give it its own arrangement. You can set a new sheet to have a different orientation than its neighbors. Here are the steps to take:
- We need to make it active. To do this, you just need to place the cursor on this sheet, highlighting any line or word.
- Open the familiar “Page Layout” tab.
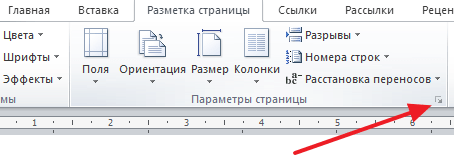
- On the expanded window, among all the options, you need to click on the small “expanding” arrow - “Page Options”. It will be in the lower right corner.
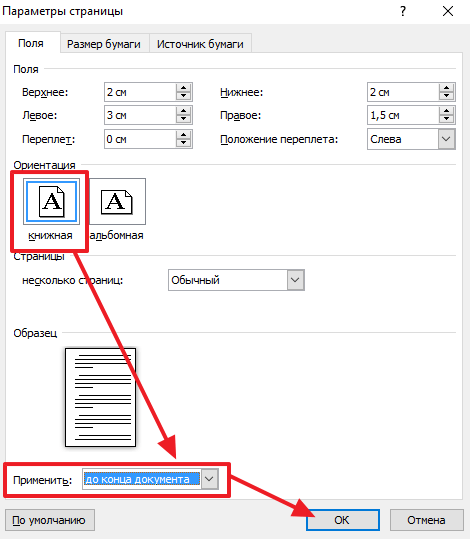
- The characteristics window appears. Mark the desired location.
- For the bottom column “Apply” you need to select “until the end of the document”.
- Click "OK".
- After this, all pages, starting with the selected one, will change orientation.
- To make only one sheet horizontal, you must continue to follow these instructions.
- Make the next sheet from the document active. And do all steps two through six, only changing from landscape to portrait, and not vice versa, as you did from the very beginning.
- As a result, only one page stands out from the crowd.
When working with Word program Often it is necessary to make the entire document or some individual page in it landscape orientation (while the rest should remain portrait). IN this material presented detailed information on how to make a landscape page in Word. Below we give detailed instructions about how to do all this in Microsoft program Word 2007. In other versions of Word, the sequence and principle of performing successive steps remain approximately the same.
First, let's look at the option of how to make all pages in Word landscape, that is, all pages of the document will have this orientation. Click on the Word icon on the desktop or in the Start menu to launch the program. The following panel will open in front of us (underlined with a red line in the picture):


After clicking, the following dialog box will appear:

In it, select the “Landscape” orientation and click the “OK” button:

Thus, all pages of the document become landscape format:

Now let's look at how to make one landscape page in Word. This can be done in two ways. Let's consider the first method. Let the first page in the document, which is filled with text, be in book format. Let's make the second one landscape. Move the print carriage to the second page:


As a result of clicking, the following dialog box opens:
Click on the “Landscape” item, select “Apply to the end of the document” and click “OK”:

As a result, the second page takes on a landscape orientation:

After filling the second page with text, the carriage will jump to the third page, which will also be landscape, but we need it to be portrait. Let's do the same as we did with the second page, but select the "Portrait" orientation until the end of the document:


Thus, the third page becomes book format:

Now let's look at the second method using page breaks. Let the document have a first page in portrait orientation. To make formatting symbols visible, click the “Home” tab and select the paragraph icon:

Let's create a second page in the document, separating it from the first with a page break. To do this, select the “Page Layout” tab and in the list of functions that appears, select and click “Breaks”:

When clicked, the following menu will appear, in which we need to select the “Next page” item:

After these manipulations it should look like this:

We will also separate the third page from the second with the same page break:

Now let's set the second page to landscape orientation. To do this, move the cursor over the second page of the document and left-click so that the print carriage is active on it:


As a result, the following submenu will appear, in which we select the bottom item:

As a result, the second page becomes landscape:

You can open an example of the resulting file using the link: .
If you don’t understand something or have any difficulties in how to make a landscape page in Word, then you can safely ask about everything in the comments.
When working in text editor Word, portrait page orientation is not always suitable. Sometimes it is necessary for the pages to be like in an album, i.e. located horizontally. It's not at all difficult to do this. It is much more difficult to create a landscape page in Word in the middle of a document. This is where you have to work hard.
Default O The page orientation in Word is portrait, but it can be changed to landscape if necessary. How to do it?
This may be necessary when creating reports from or for an album.
- Select a team – File – Page settings…
2. In the window that opens “ Page settings » select the tab « Fields" In chapter " Orientation» click on « Landscape" and save by clicking the " OK ».

If you want your document to have only one or more sheets in the middle of the document in landscape orientation,

then place the cursor on the page that should be landscape and select from the menu – File – Page settings . In the window that opens " Page settings " on the " tab Fields" In chapter " Orientation» install « Landscape" Below in the section " Sample" in the window " Apply" in the drop-down list, select " until the end of the document " and click the " OK ».

Next, place the cursor on the page from which the book format will again appear, and do the same. Just select " Orientation » — « TOlower " And in the section " Sample" in the window " Apply" set also "to the end of the document".
As you can see, nothing complicated.
The same can be done in a text editor Word 2007/2010. To do this, open the menu Page layout and to the right of the block name Page settings Click on the little black arrow. A window will open Page settings .

Do everything else in the same way as described above.
This is how you can make a landscape page in Word in the middle of a document .
If you have Word 2007 or 2010 installed, you can watch a video tutorial on changing the page orientation:
Typically, Word prints text on a page from top to bottom, the way we are used to reading. However, you can also print across the page. In this case, they say that the page orientation has been changed: the text is printed not along, but across the sheet.
If you want to make it clear to others that you are a major specialist in word processors, you can show off some technical terms: printing from top to bottom is called portrait, or portrait, orientation, and printing across is called landscape, or landscape, orientation. Portrait format means that the height of the page is greater than its width. It is convenient to place portraits on pages of this orientation - it is not for nothing that this format is called portrait. Landscape orientation is more suitable for landscape sketches. Such paintings are most often elongated horizontally.
To force Word to print across the page (that is, in landscape format), do the following.
- Select a team File>Page Setup.
A dialog box will appear Page settings. Click on the tab icon Fields(Fig. 14.2).
- Select in group Orientation parameter Landscape.
Document form in the area Sample and a small icon in the area Orientation will change to reflect your new view of the document.
- Click the button OK.
Rice. 14.2. Page Setup dialog box with Margins tab
- When creating a document in landscape format, you may need to change the margins of the document. You will learn how to achieve this in the next section.
- You should format the document only after setting the page orientation. If you do the opposite, you will almost certainly have to re-edit the document, i.e. redo your work. Not a very pleasant prospect!
- Not worth printing standard documents in horizontal format. Scientists and other wizards in white coats who know their stuff have found that when reading an overly long line, reading speed noticeably decreases. Landscape mode is better for printing lists, tables, and other documents for which the regular vertical format is not wide enough.
- As with changing paper size, you can set the orientation type for the entire document, for a section, or for a group of pages - from the one specified to the last one in the document. This was discussed in more detail in the previous section.
- In a document that is printed in one format, you can change the orientation of any page to another (for example, print in landscape format any page from a document that has pages in portrait orientation). This is possible due to Word's ability to apply formatting commands to a specific section of a document. Start introducing a new section, changing the page orientation only for that section, and then, when you need to restore the previous page orientation, start a new section again. For more information on how to split a document into sections, see
And vice versa. But, the button that is responsible for changing the orientation changes the orientation for the entire document at once. Therefore, if there is a need to change the orientation for only one page, then you have to resort to various tricks. In this material we will look at two ways to make one page landscape and the other portrait in Word.
The instructions are written in Word example 2010, but it will also be relevant for Word 2007, 2013 and 2016. And with the right skill, the information from the article can be applied in Word 2003.
How to Make One Page Landscape Using Section Breaks
Perhaps the easiest way to make one page landscape and the other portrait is to use section breaks. To do this, you need to separate the page you want to make landscape with two section breaks. One section break should be before this page (at the end of the previous one) and one section break after this page (at the end of the page, which should be landscape).
So let's say you have Text Document. And you need to make one of its pages landscape, while the remaining pages of the document should remain portrait. To do this, place the cursor at the end of the previous page, go to the “Page Layout” tab, click on the “Breaks” button and select the “Next Pages” option. After this, place the cursor at the end of the page that you want to make landscape and click “Breaks - Next Page” again. If you have Word 2003, then to insert a break, use the “Insert - Break” menu.
This way you will separate desired page from the rest of the document using two breaks. To make sure that section breaks are in the right places, go to the “Home” tab and turn on the “Show all characters” function.

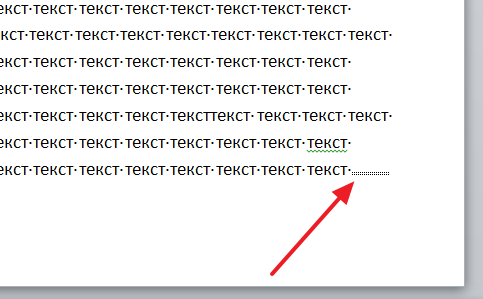
You will then be able to see where the section breaks are set. They should be located immediately above the landscape page and at its end. If the breaks are placed incorrectly, you can edit the pages so that the breaks fit correctly. In the screenshot below you can see what the break at the end of the page should look like.
After the section breaks are set to the required positions, you need to place the cursor on the page that should be landscape, go to the “Page Layout” tab, click on the “Orientation” button and select the “Landscape” option.
If everything was done correctly, then you will have one page landscape, and the rest portrait. If something doesn't work, then most likely the problem is in the placement of breaks.
How to make one page landscape using page options
There is also another way to make one page landscape and the other portrait. It's a little more confusing than the one above, but it can still be used.
In order to use this method, you need to place the cursor on the page that comes before the one that should be landscape. After that, you need to go to the “Page Layout” tab and use the small button to open the “Page Setup” window. If you have Word 2003, then to open the “Page Setup” window, use the “File - Page Setup” menu.
After that, you need to select the "Landscape" orientation and apply this "To the end of the document" setting.

After saving the settings using the “Ok” button, all pages below the selected one will switch to landscape orientation. Now you need to place the cursor on the page that you want to make landscape and open the Page Setup window again. This time you need to select portrait orientation and apply it to the end of the document.
After saving the settings using the “Ok” button, you will receive one page in landscape orientation, and the rest in portrait orientation.
