Yandex.Metrica - what kind of beast and how to tame it. Step-by-step instructions for setting up. Where is it better to insert the Yandex metrics code and why? Where to place the Yandex metrics code
We have released a new book “Content Marketing in in social networks: How to get into your subscribers’ heads and make them fall in love with your brand.”

You can install the Yandex code on your website completely free of charge. Probably, in most cases, the default settings will be enough, but it is better to immediately approach the issue politely and figure out what and why we are doing in the settings.
We will look at examples for the following control systems:
First of all, register on Yandex and go to Metrica. Fill in all the required fields:
- Counter name - everything is clear here, an arbitrary name for your counter.
- Website address - link to your website.
- Mirrors. Be sure to register if they exist. A mirror is when your website opens at several addresses, for example, at www.site.ru and at site.ru. Ideally, this should not happen, of course. Such mirror pages must be designed with a 301 redirect. here.
- Timezone. It is important that it matches the region of the site.
- Visit time-out. As a rule, always standard, but if you have long videos on the site, then you should increase the session time to the average of your videos.

On the "Counter Code" tab, mark the required items. For each item there is a nearby reference Information, you should click on the "?" icon. I would also like to draw your attention to the following points:

You can configure the type of informer counter yourself:

This is what the Metrica counter will look like in your personal account after you install the Yandex counter on your website:
Where to install the metric counter?
It must be placed inside the ... tag in the HTML code of each page (closer to the end of the page).
Let's look at options for installing a counter in various CMSs.
There are two ways to install Metrica on WordPress. The first is to install the Yandex.Metrika plugin and enter the counter number there.
Go to your admin area, select the "Plugins" tab and click "Add New". In the search window, type yandexmetrika:
Select the plugin installation from the list that appears.

When the plugin is installed, enter your meter number in the appropriate line.

Save your changes.
The second way to install the Yandex Metrica counter on WordPress is to do it manually. In the admin panel, open the section “ Appearance” and select the “Editor” option. In the window that opens, on the right side of the screen, go to the “Footer” section (footer.php) and place the code that you received during registration in the “Counter Code” section.

We place this piece of code inside the tag.....
How to install metrics on JoomlaIn this system we will use Joomla module Yandex. Metrics. Open the admin panel of your site, in top panel select “Extensions” - “Module Manager” and in the upper right corner click “Create”.

Then in the window that opens, select the “Custom HTML code” option. Fill in the fields: title - write any word; Below in the “Show title” field, select “No”; "Enabled" - select "Yes"; "Access" - "All".

Scrolling down the page, out the window custom text insert the counter code:

Save the changes. Voila! Joomla metrics have been added.
How to install metrics on BitrixWe go to the admin panel of the site, in the left column select the “Settings” menu item. In the list that opens, select “Product Settings” - “Sites” - “Site Templates”. On the right side we see the templates that were created for our site.

To install Yandex Metrica on Bitrix, select a template and open it. We are interested in the text field, this is where the code is placed.
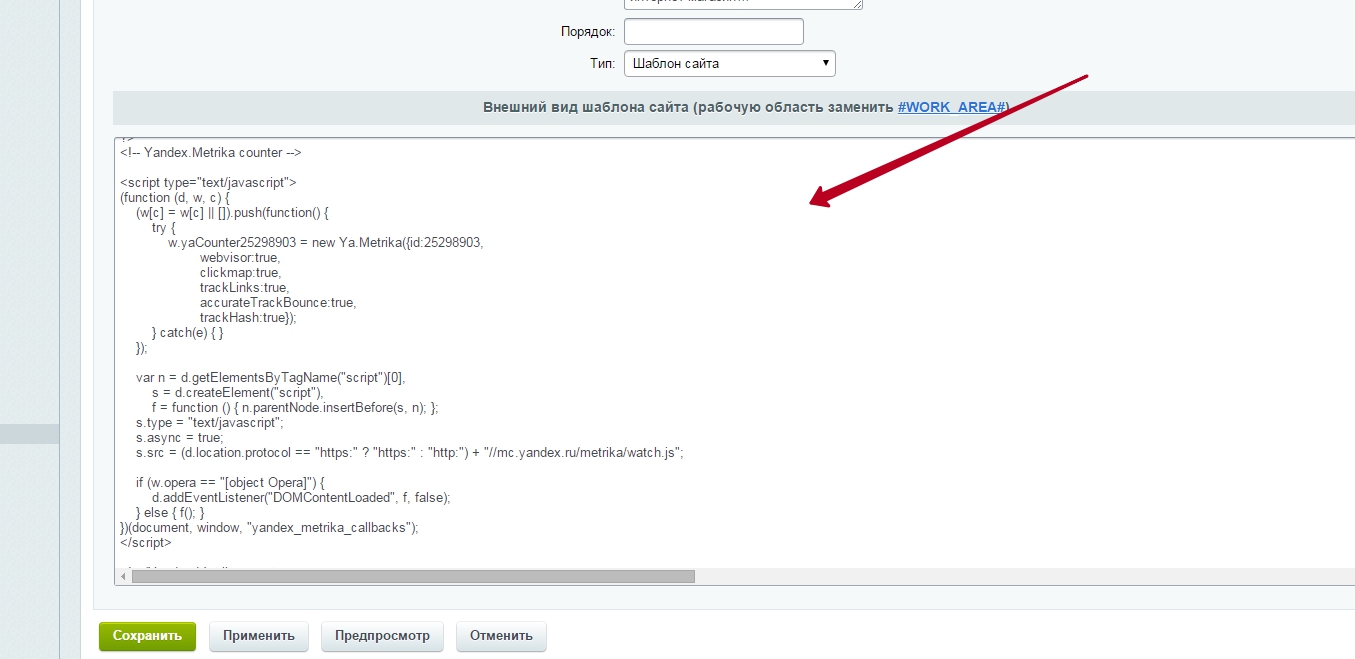
That's it, Yandex Metrica Bitrix is installed. After saving the changes, the counter will be displayed on every page of the site.
How to Set a Metric on WixTo add Yandex Metrica to Wix, follow the link, click “Add”, select our site, click “Open site”.

Then, click "Connect". Enter your username and password and click "Login". In this window, select "Allow".

We create a counter in the application. Wix developers advise creating a new counter, since if you connect an existing one on an account that could be registered in old version, they will not be able to be responsible for the correctness of its operation.

When creating a new counter in your Yandex account, fill in the following information: “counter name” and “site domain”.
After installing Metrics on Vicks, you can view statistics of visitors, visits and site views by selecting the period and schedule of interest.


Let's look at the most popular questions that Metrica users have:
What to do if the meter does not work?
You can get a detailed answer to this question in. It examines several problems and ways to solve them.
Do I still need to perform any actions after making changes to the counter settings?
If you have made changes to the Metrica interface, be sure to reinstall the counter code on all pages of the site. If you use several different CMS, then do not forget to update the Metrica code in each management system.
Why is it more practical to place the counter code at the top of the page?
In fact, you can place the code anywhere on the page, as long as it is in the ... tags, but if you place the counter at the beginning of the code after the , it will load faster and report viewership data.
This article covers the main questions about installing Metrica. We hope that after reading you will not have any difficulties on the topic of how to install the Yandex Metrica counter on your website.
Hello, dear readers of the blog site. Today we will talk about a new visible visit counter (with an informer), which over time may be able to somewhat shake the ultra-reliable position of the most popular one on this moment in RuNet. I mean the informer that Metrica recently published.
When I created my first website, I really wanted to put a counter on it from . I typed such a query into a search engine, looked through many resources, but it turned out to be just a myth, although many did not fail to advance using this fairly popular query. I remember that it was through him that I first came to Devaki’s blog. A very useful resource, by the way, I recommend visiting it.
Yandex counter - myth or reality?But still promotion this request at that time, because such a thing did not exist in nature. Many passed him off as him. Well, starting in the fall of 2009, it was possible, almost without a twinge of conscience, to display a web analytics tool called Yandex Metrica, which, in general, was just that.
But still, it was somewhat different from the popular LiveInternet, which, in addition to quite powerful web analytics tools (probably not even analytics, but still statistics), had an informer visible to site visitors, where one could, if desired, configure the display of traffic data in any form convenient for the webmaster .
This is exactly the kind of informer that Metrica lacked so that it could absolutely be called a counter. But this was relevant only until recently, and now we can talk about it publicly, because this system acquired a visible part that allows you to display information about the traffic of this resource on the site pages.
When setting up the informer, you will be able to choose one of these three options for displaying it on the site, as well as customize the color scheme and what exactly should be displayed in it. For a start, I think it's good. I am especially impressed by the second option, which displays site traffic by day of the week in the form of a step chart - very original.

By the way, you can configure it so that when you click on the informer, a drop-down window appears with statistics for the previous week:

In general, Metrica attracts with its clarity, beauty and other web two-zero (WEb 2.0), especially against the backdrop of LiveInternet, which in terms of the presentation of information and the clarity of its presentation is still a bit of the past, although, of course, the information it provides is very important in some cases is unique.
Let's hope that, finally, LI will have a worthy competitor in the person of Metrica and its visible hit counter, because competition is always good for the end user, i.e. for you and me, dear webmasters.
By the way, this system can be called a web analytics tool, because it has the ability to set goals and track certain events (for example, going to a certain page, registering, following certain links, etc.).

In RuNet, the most popular tool for web analytics is still Google Analytics, which is quite sophisticated and seriously surpasses Yandex Metrica in capabilities.
But the question is that in RuNet at the moment web analytics is in its infancy, unlike the bourgeois web (which, according to some data, is about 5 years ahead of the development of our SEO), where similar systems have become one of the most popular tools for website promotion.
In RuNet, Google Analytics is considered the coolest, but in the burzhunet it is used only by novice optimizers. They quite often use professional paid software to analyze the progress of projects. Well, we are lagging behind the bourgeoisie and there is nothing we can do about it. Therefore, Metrica’s web analytics capabilities will be sufficient for us in most cases.
In addition, the brainchild of the RuNet mirror has such unique tools as Webvisor, a map of links or clicks:

Well, now let's move on from singing the praises of Yandex and its new counter (something in Lately I’m promoting their services too much) directly to how to get all this beauty on your website.
How to register and set up Yandex informerLet me remind you that if you make money on your website by displaying ads from advertising network Yandex (YAN), then along with the context block code, the Metrica code will also be loaded. Those. Consider that you are already registered in this system, and in order to make sure of this, you can click on the corresponding link on the statistics page of your advertising platform in YAN:

Let me also remind you that if ads from YAN are not displayed on all pages of your resource, then the Yandex counter statistics will be underestimated. In this case, you will need to register and add your site to Metrica (registration actually involves receiving), and then receive and install the code on your site.

But we are more interested in the “Counter Code” tab, where, in fact, you can customize the appearance and get the code. By the way, if you have a YAN context running, then you will only need to get the code for the informer, because Your counter will be loaded automatically along with contextual ads.
In general, until 2009, Metrica was available only to those who used Direct on their website, which is why there is now such a strong relationship between these two services. , is the reverse side of the YAN advertising network - advertisers advertise in Direct, and in affiliate network they are posted by webmasters. Well, this is to roughly approximate.
So, to activate the display of the informer, you will need to check the box of the same name. All settings for the appearance and functionality of the visible counter are hidden behind the “Configure informer” item.

As a result, an additional area will open where you can select one of three types of Yandex counter and fine-tune its appearance and the information displayed in it:

The first option will display all three possible traffic indicators at once (from top to bottom): the number of impressions of pages of the site under study for the current day, the number of visits and the number of unique visitors. In general, just everything you need.
The second option displays a color graph of attendance by day of the week and one of the three parameters described above. Which one will be displayed on the counter will depend on which field you check in: Views, Visits or Visitors.
The third option will simply display one of your chosen indicators of traffic to your resource.
I think that there is no need to talk about how you can adjust the color scheme, because everything is already clear. You need to select one of two display options and text color, and also get more information when you left-click on the counter (option “Advanced” - see the screenshot at the beginning of the article).
After you create your masterpiece, scroll down the window and click on the “Save” button. Now you need to copy the informer code and, if necessary, the counter code, which will be located in the lower area.

Please note that the counter code will be enclosed in opening and closing tags like:
and the informer - in tags:
Looking ahead a little, I will say that once you install the informer code on your website, you are unlikely to see anything on it, because you will still need to activate its display. This is done on the “Accesses” tab:

You need to check the box “Show informer data":

At first I thought that it would take time, after which the numbers themselves would appear in the informer. Ah, no. This checkbox is necessary and you can’t do without it.
What is the best way to install a Yandex counter on a website?You can of course copy and paste them together. Everything will work, but it would still be better to insert the Metrica counter code into the template of your site before the closing /body tag, because in this case the frozen script will not slow down the loading of the pages of your resource.
Although lately we have been offered an asynchronous version by default, which does not affect the page loading speed in any way:

But you can install the informer in any place convenient for you, just as I described it in articles about:
I think that by using the materials above, you will be able to cope with this overwhelming task without any problems.
Yes, if you want visitors to your resource to be able to view the detailed data of your counter, you will need to go to the “Access” tab in its settings and check the “ Public access to statistics”, after which you will be provided with a link leading to a page with a statistic open to everyone:

Good luck to you! See you soon on the pages of the blog site
You might be interested
 OpenStat - visit counter and rating (formerly SpyLog), installation and work with statistics
  HotLog - registration in the ranking of sites and receiving a visit counter code
  Rambler Top 100 - how to add your site to the rating (catalog) and get the visit counter code
  OpenStat - free system collection and analysis of website traffic statistics (formerly SpyLog)
  Mail.ru rating - registration in top.mail.ru, setup, receiving a counter code and visit statistics capabilities
  How to install hit counters in WordPress and SMF - insertion method to improve counting accuracy
  How to insert visit counter code into a site running Joomla using the Custom HTML code module or directly into a template
  Yandex Metrica - login Personal Area, setting up and installing a counter on a website, working with statistics (goals, web viewer, etc.)
  LiveInternet - installing an LI counter on a website - what to look for in visit statistics according to LiveInternet
  Site traffic - how to check the statistics of visits to your resource or find out the meter readings of someone else’s site
Good afternoon, iklife blog readers!
You are probably very interested in how many specific people come to your resource, from where and for what queries. You can find out all this information using special tools – metrics. The script is installed into the code of your site, and you can see almost all the actions that your guests perform. Today I will tell you how to install Yandex Metrica on a website with WordPress or any other CMS.
With this tool you can track the behavior of your visitors on the resource. But these are not all the benefits that can await you after installation.
There is one story among SEOs. Its meaning is that sites with Yandex analytics installed are ranked better in the search engine. The code that is present directly on the project can provide certain information to the search engine. The release of new materials, some changes in the operation of the resource itself, or something else like that.
Yandex Metrica can track user behavioral factors. If they are good, then the search engine will rank your site higher in the results. If the situation is reversed, problems may naturally arise. For this reason, some webmasters are in no hurry to install analytics on young projects. They think that it will only be harmful and try to take advantage alternative ways attendance tracking.
Nevertheless, using Yandex Metrics can significantly influence the development of your project. If you are using analytics for a commercial site, then you can set up so-called “goals”.
Goals are a way to track specific user actions. For example, how many people out of the total number of visitors paid attention to the “Submit Application” button, and how many actually sent it.
If we are talking about landing pages, then goals can show the time that users spend reading each block. That is, is he interested in them or not? This information will allow you to adjust the content and design of your project to achieve greater conversion.
For correct settings goals may require a certain skill. Therefore, many project owners rush to turn to freelancers on various popular exchanges.
If you master proper goal setting, you can even earn a little money by offering your services to resource owners.
Yandex Metrica also has a web viewer. This is a really extensive option that will allow you to see literally everything. Right down to your visitor's cursor movements. Now almost all webmasters install webvisor code.
Webvisor can help you:
- See which pages are user-friendly and which are not.
- Find out about errors in the site structure or design.
- See what information guests focus on.
- Increase the clickability of elements.
- Adjust the correct optimization vector for the project.
With the help of a web viewer, almost everything is possible. You see absolutely all the actions of guests: scrolling pages, highlighting text, reading some individual elements. By collecting all the data together, you can understand what you want the target audience. This will greatly increase the efficiency of the project.
Registration in Yandex and creation of metricsTo use any Yandex services, we need an account. It is generic and starts once. Therefore, I will not explain exactly how registration takes place. Let's move on to the actual creation of the counter.
Don’t neglect installing analytics tools on your resource. Sometimes they can become a lifeline for your project, showing information that cannot be obtained in any other way. If you want to learn how to create your own information resources on WordPress and make money on them, it will give you all the necessary knowledge. There you will also gain skills in search engine promotion and optimization of your project. Access to the first level is open to everyone.
If you have already created your website and it is open for indexing search engines, then soon you will want to receive information about traffic statistics, traffic sources, etc. To do this, you will need to install a traffic counter on all pages of the resource. Let's try to figure out how and where to install such counters.
Yandex.Metrica CreationTo create a Yandex.Metrica counter, follow the link while logged in to your account and click the “Add counter” button:
Then you need to fill in the “Counter Name” and “Site Address” fields, select the time zone, accept the terms of the user agreement and click “Create counter”:

After this, you will immediately be taken to the counter settings panel, where you can select certain parameters for its operation, for example, enable a web viewer, track a hash (for ajax sites) or install a widget:

As shown in the screenshot, the counter code with all its settings is presented in the field at the very bottom. Now all that remains is to copy the code and place it on the site.
InstallationIt is best to install counters on all pages of a resource, so you need to place the code in a common template.
IN general view it will look something like this:

In this case, the informer does not have to be placed together with the main counter code; for example, it can be placed in the footer of the page, before the closing tag:

Creating a counter begins with registering a new one Google account Analytics. To do this, follow the link and click “Registration”.

Then click “Get Tracking ID” and accept the user agreement:

Immediately after this, you will be taken to a page with a new counter, the code of which must also be placed on all pages of the site.
ABOUT detailed settings Google Analytics counter can be read.
InstallationThe installed counter looks something like this:

To install counters in Bitrix, you just need to open the general template and paste the code.
To do this, being on any page (provided that one template is used for all pages), you need to expand the administrative panel (or, in other words, the Development Panel), select the “Site Template” tab, the “In Control Panel” subtab and click “Edit” sample":

Then insert the necessary counters according to the examples given above:

There shouldn’t be any problems when installing counters on WordPress either.
Just select the “Appearance → Editor” tab in the administration panel, open the header.php file for editing (signed as “Header”) and insert counters:

There is a special field for adding a Google Analytics counter to OpenCart.
You need to go to the “System → Settings” section, select the “Change” action opposite your store, then select the “Server” tab:

At the bottom of the page, paste the counter code into the “Google Analytics Code” field and save:

The installation of the Yandex.Metrica counter and any others can be done in a general template, according to the examples given above. To do this, you will have to connect to the site via FTP and find the template files. Typically, the path is something like this: /catalog/view/theme/your_theme/template/common files footer.tpl or header.tpl
JoomlaAs with all the systems described above, counters are placed directly in the template files. But if using FTP access is not very convenient, or you are afraid of doing something wrong, you can place counters directly in the admin panel.
To do this, you will need to create an HTML module (tab “Extensions → Module Manager”, click “Create” and select “HTML code”) and configure it.
So, let's create a new module:

If you are using a framework, then most likely it already provides the ability to place counters on all pages (you will have to look carefully in the settings).
Other countersAll other counters, for example Mail.Ru Rating, LiveInternet, etc., are recommended to be inserted before the closing tag. First of all, this is necessary so that the code does not interfere with the page loading. If you still want to place the code somewhere else, then you can use asynchronous loading (the “async” attribute for the tag). This will allow the counter to load simultaneously with the html page.
If you have problems creating, configuring or installing meters, you can order these services.
The secret to successful promotion of any online platform is continuous development and improvement based on analysis of the data obtained. It is for this reason that we recommend installing Yandex.Metrica on your website right now!
To completely take control of the resource, you need no more than 15 minutes, including the time to read this useful article. Today you will find all the necessary information about setting up a Yandex informer, the features and capabilities of this service. From the material you will also learn how to correctly add counter code to different CMSs.
So let's get started.
Why do you need to install Yandex.Metrica?This free web analytics for the site allows you to get correct information about the amount of traffic and its sources. It makes it easy to determine the effectiveness advertising campaign, analyze visitor behavior.
Start using the service and you will discover new opportunities in usability and content auditing for timely changes. Tracking statistics is just the tip of the iceberg. Having decided to add the Yandex counter code. Metrica to the site, you will not only monitor the progress, but also manage it.
For example, having made any changes to the site, the owner will see how much the performance has improved or worsened. In addition, based on the data obtained, he will be able to remove unnecessary functions and outdated materials, due to which the failure rate increases.
The second reason to add a counter is to use the metric data to index new pages and assign behavioral factors for the site.
Important! Before installing this lifesaver for webmasters, make sure you have access to source code resource. That is, you must be able to change the site through the CMS administrative panel or via FTP - otherwise nothing will work.
Step-by-step algorithm for connecting Metrica1. Authorization
If you don't have account in Yandex, register in the system. Those who have an account just need to go to https://metrika.yandex.ru/ and click on the yellow button located in the middle of the screen.

2. Creating an informer
Select the “Add counter” section and enter the appropriate data:
- Counter name - the name of your analyzer, which will be indicated on the “My Counters” page.
- Website address - here should be the full path of the blog or its domain without a protocol.
- Additional site addresses are information for monitoring the availability of the project and checking the number of internal transitions. If you see statistics from other people’s sites in your reports, check the box next to “Accept data only from specified addresses.”
- Timezone.
- Currency - monetary equivalent, will be used by default for purposes related to e-commerce.
- Visit timeout in minutes - after the specified value (from 30 to 360 minutes) the visitor’s visit is considered completed.
After this, you need to accept the user agreement and click on the “Create counter” button.


3. Initial setup
The next window provides for the generation of web analytics code taking into account the specified parameters:
- Webvisor
SEO pros recommend installing this useful tool, which reproduces all the actions of visitors. Thanks to it, you can watch a video recording at any time and analyze the behavior of visitors.
- Hash tracking
The presented function is intended for AJAX sites, in particular, for collecting statistics on pages that are updated without reloading.
- Asynchronous code
Activate the option, and then installing Yandex.Metrica will not slow down the loading of the resource. This is especially true when the web site is not hosted on a very powerful server - in this case, the tracking system is loaded at the very end, and not along with the blog.
- For XML sites
Check this box if the portal contains data sets that are regularly processed by the corresponding applications.
- One line
An amateurish function: it reduces the size, but makes the code unreadable (in one line, without breaking it into tags).
- Prohibition of indexing
For some reason, you don’t want the pages to be included in the Yandex index. Search? Feel free to check the box next to this item.
- Informer
It is needed to demonstrate the number of views to all site visitors; it is usually inserted into the footer. After selecting this option, a preview of the informer will be available on the side, and you will be able to configure its size, color and type. It is important that everyone will be able to see the exact traffic to your resource.
- Alternative CDN
The presented function can negatively affect the download speed, but it allows you to correctly calculate statistics from regions with limited access to Yandex (such as Ukraine).
- Submitting e-commerce data
Advice! Immediately go to the “Filters” tab and check the “Do not take into account my visits” option - this way, work visits will not affect the correctness of the data. In the “Notifications” section, set your priority method for receiving information about problems. You can also add users with different access rights and set up to 200 goals for each of your sites.
Now it's time to save your settings and move directly to placing the code!

In May 2017, the service came under prohibited sanctions from Ukraine. However, especially for webmasters from this country, Yandex has transferred Metrica to the Amazon cloud.
In order to receive reports as before, use one of the following methods:
- install the most on your PC latest version Yandex. Browser;
- use a VPN service;
- select an extension for your browser (for example, FriGate CDN is suitable for Mozilla Firefox, Google Chrome and Opera).
The second step is to bypass the Yandex.Metrica code blocking. To do this, you need to update it by replacing the line
s.src = "https://mc.yandex.ru/metrika/watch.js";
s.src = "https://d31j93rd8oukbv.cloudfront.net/metrika/watch_ua.js";
This way you can fully work with web analytics - it will take into account all visitors, including Ukrainian ones.
How to install a Yandex.Metrica counter on a website?You can start collecting data only after placing the HTML code on the site. Open the “Counter Code” tab and click “Copy”.
To obtain statistics without distortion, insert the code between the tags of all pages of the online platform. It is advisable to place it closer to the top of the page - this is a guarantee of a correct and complete analysis.
Please note! On popular engines, there is no need to add code to all pages of the site. It is enough to install the script in the template file or in the one responsible for the footer (footer) or header (header).
How to add code to a site?There are several ways to cope with this task - choose the one that is most convenient for you.
1. Manually via FTP
Open the server via FTP access, find a file called header.php in the root folder of the required site. Place the counter code inside the tag...., then save the changes. Important! The file name is based on the WordPress CMS, if you are using another CMS, the file names may differ.
2. Using plugins
How to check that the counter is working?
Attention! Visitor actions are displayed in Yandex.Metrica with a delay of up to five minutes. The minimum value is 30 seconds.
Let's sum it upYandex.Metrica is a treasure trove important information about traffic, conversion, as well as the share of referral, direct and search traffic. This multifunctional business tool simply must be in the arsenal of every webmaster. Moreover, there is nothing complicated in installing the service, and setting it up takes just a few minutes.
