Install third party windows 7 themes
Universal Theme Patcher - free utility, designed to change some operating system files Windows systems 7/Vista/XP!
Thanks to this patch, you can easily install any theme.
Such themes most often have the format .msstyles (sometimes .theme, but less often) and they must be copied to the folder with OS Windows themes (C:WindowsResourcesThemes). After this, you just need to double-click on such a file with the mouse - and the design theme will change, without any additional programs.
Patched files can be restored by running the patch again and clicking on the corresponding buttons. Universal Theme Patcher is suitable for both 32-bit and 64-bit architectures for the following Windows versions: 7, Server 2008, Vista SP1/SP2, Server 2003, XP SP2/SP3.
There is nothing complicated in working with the program; installation is simple and intuitive.
The downloaded program must be extracted from the archive and run UniversalThemePatcher, always with administrator rights.
Select a language, preferably the great and mighty one, and click on “OK”
A window opens with information about installed system and the necessary files
Click “Yes” to continue and see a window where it will be shown which files we need to patch.

They are different on each system, but Universal Theme Patcher will independently select exactly those that need to be patched. Click the “Patch” button next to each file in turn.
When all the necessary files are patched, Universal Theme Patcher will ask you to restart your computer.

After reboot you can install third party themes, if you have Windows 7, Windows Vista or Windows XP
Windows family operating systems offer their users amazing design options. appearance OS. Various color schemes, styles, sets of buttons, options for windows and panels, as well as everyone’s favorite themes have long been invented at the service of users. This has been implemented on a particularly large scale in the two latest releases from Microsoft - “Seven” and “Eight”.
Despite the fact that many things in Windows operating systems are learned almost intuitively and are done quite simply, many users still face serious difficulties in how to do this or that thing. And installing themes is no exception! Let's take a closer look at it.
Installing official themes in Windows 7
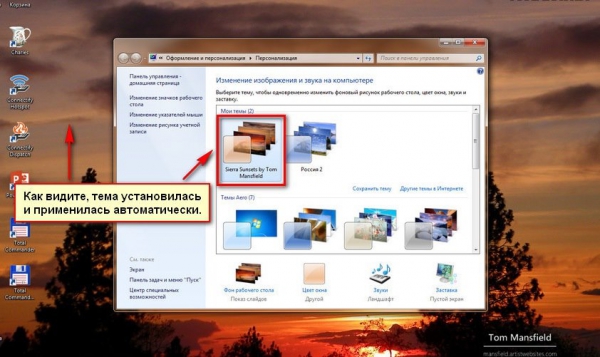
First, click on an empty/free space. table right keyboard mouse and call the option "Personalization".
This way you will instantly be in registration service Windows. As you can see, there, in two sections, the system already offers a wide variety of topics to choose from, both in “aero” and “basic” (simplified) versions. Select any of them by clicking on it with the mouse, and it will be automatically installed immediately.


If you want something “new” or different, then to download additional official themes, use the option "Other Internet Topics".

By clicking on it you will instantly be taken to official microsoft portal, where you can choose and download many beautiful themes for design. Take advantage search bar and categories to find something faster. The site also has a function for viewing each topic so that you can clearly see what you are going to download.

After downloading the theme you like, find its file on your computer (by default it will be in the folder "Downloads") and launch it by double-clicking the mouse.

The theme will also be installed automatically and appear in "Design and personalization" In chapter "My themes".

Installing third-party (unofficial) themes in Windows 7
It’s hard to disagree with the fact that today the Internet is full of beautiful custom themes that, unfortunately, cannot be installed in Windows using the usual method. Decide this problem possible using special utilities, For example, VistaGlazz, which will patch system files and, thus, will make it possible to install third-party themes.
To get started, download the latest version of VistaGlazz and install it on your PC. There is nothing super complicated here. Simply, run the installer file from them administrator and follow the installer's further instructions.

After VG will be installed, launch it from the “working” shortcut or from the menu "Start" and press the button "I agree" to start using it.

Click on the icon "Computer with white shield", then, on the button "Patch files" to begin the process of patching system files.


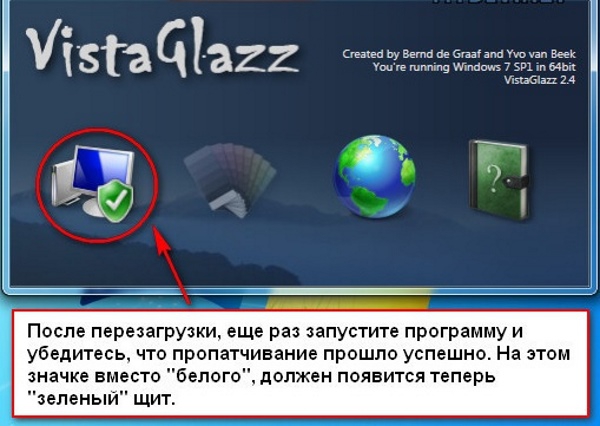
After finishing, click on "Reboot" to reboot the machine. Then all the changes made VistaGlazz will take effect.

After restarting the OS, run the program again and make sure everything went well. A green shield should now appear on the “Computer” icon!

That's it, now you can start installing themes!

After that, open "Design and personalization" and look - the topic should be displayed there, in the section "My themes".

That's all. Now you will no longer have problems installing official and proprietary themes in Win7!
Despite the many text and pictures included below, the installation third party themes for Windows 7 is actually very simple operation, which will take you no more than 10 minutes the first time. And after that, if you follow the instructions correctly, installation new topic you will need about 2 minutes.
Keep in mind that all your further actions you do at one's own risk, no one except you is responsible for the possible crash of the OS. Before installing patches and replacing system files, we recommend making a restore point or backup copy OS.
Preparing the system to support third-party themes
1.
Download and install the patch (run the program as administrator and follow further prompts).
2.
Download and run the second patch as administrator, press 3 buttons in the window that opens Patch(see screenshot).
After completing the above operations, reboot your computer, your system is ready to install third-party themes.
Setting a visual style (theme)
Replacing system files
In our case, we will change the file ExplorerFrame.dll, which comes in the archive with the theme (if there is none, read the notes at the end of the article).
Installing a theme for Windows 7 is very simple and does not require any special computer skills from the user. Initial setup It will take about 5-10 minutes, since you need to patch the system and learn how to install new designs. If for the first time you carry out the installation strictly according to the instructions, then subsequent installations will proceed quickly, smoothly and smoothly.
Preparing the system to support third-party themes
If this is your first time installing a theme on your computer, you will need to patch the system.
After installing patches, you must restart your computer to make changes. After this, the system will be ready to install third-party themes.
If you want to change the Start menu icon and navigation buttons in File Explorer, you'll need to gain System Files permissionsexplorer.exe(for the Start menu) andExplorerFrame.dll(for navigation buttons in Explorer).
The above steps only need to be done once. The following theme changes do not require re-installing patches or obtaining rights to system files.
Installing a theme
Step 1
In the downloaded archive we find the theme file in the format .theme(example: theme name.theme) and a folder with the same name. The file and folder must be copied to the system directory C:/Windows/Resources/Themes.

Step 2
Go to the personalization panel and in the section " Installed themes"We find our topic.

Step 3
Double-click on the theme name and observe changes in the interface design.

 Demonstration of an unstable Start button and navigation buttons in File Explorer
As you can see in the screenshot, we still have the same Start menu button and navigation buttons in Explorer. To replace these system elements, move on to the next point.
Replacing the start menu button
Find in the archive with the topic an image with a button in the format *.BMP(in our case the image is located in the folder " Orb") and set the button, .
Replacing navigation buttons in Explorer
If the theme archive contains the file ExplorerFrame.dll, copy it to the folder C:/Windows/System32.
- Go to the directory C:/Windows/System32 and find the file ExplorerFrame.dll.
- Rename the file ExplorerFrame.dll V ExplorerFrame.dll.old.
- Transfer a new file from the theme archive ExplorerFrame.dll to a folder C:/Windows/System32.
- Restart your computer or simply restart File Explorer for the changes to take effect.
If the archive does not contain the file ExplorerFrame.dll, then there are pictures in the format .BMP, which must be installed using the Windows 7 Navigation Buttons Customizer program.
You must have access rights to the ExplorerFrame.dll file. The first paragraph of the article describes how to obtain rights to this file.
- Install the program
Automatically changing background images alone may not be enough to improve performance and efficiency. We will need to change the entire style of displaying information on the screen. How to update the desktop theme in Windows 7 using special programs or manually, we will figure it out further.
Is it possible to change the subject?
In most cases, when talking about Windows 7, we mean “Windows 7 Ultimate”. You can change the theme on this version. However, not everyone has the opportunity to use this particular version, and the options for home - “Windows 7 Home Basic” or “Windows 7 Home Starter” - are generally devoid of customization options: the “Personalization” item is simply missing from the Desktop context menu. So in the future, when talking about installing themes, we will focus specifically on “Windows 7 Ultimate”.Also, before starting the topic change activity, you should make sure that your Account has sufficient rights to carry out such actions in operating system. It's best if you are an Administrator on your PC. If this is not the case, most likely you will not be able to replace the topic that has set your teeth on edge. Try contacting system administrator or a computer expert with a request to expand your powers.
Program for installing themes for Windows 7
The global brand in the field of application programs, the StarDock company, has been producing the WindowBlinds program for many years, which is the most popular program for manipulating themes in Windows.The program is offered for download on the official resource, which is located at https://www.stardock.com/products/windowblinds/

The following window will open:

After downloading and launching the installer, the program will offer to use a paid version or a free version for trial, which is active for 30 days.
To start the program you will need to enter the address Email, after which an email will be sent to your inbox with an activation link:

After clicking on the button indicated in the letter, activation will automatically occur in the “WindowBlinds” application and the trial period will begin counting from that moment:

During installation you will be prompted to install another useful program from the same development company, changing the theme of the Desktop design - “Fences”. It will allow you to organize your desktop icons by organizing them into unique folders. However, the folders themselves on the table will have the shape of rectangles of arbitrary sizes, which you can determine yourself. In addition, you can “swipe” additional screens to the right and left of the main one, just like in a smartphone.
The installed WindowBlinds program looks like this:

The application allows you to choose from 15 styles. Each of them is both similar and different from the others. Among such a variety, you will surely find something suitable for yourself. In addition to the style, you can immediately change the desktop wallpaper, as well as create your own unique and inimitable style in the “Modify style” tab.
How to install the official theme?
The operating system offers its users several themes to choose from, which are installed according to the following instructions:

If you don’t like the above options, you can download other official themes. To do this, we continue our actions:

How to install a third party theme?
Microsoft does not allow its users to arbitrarily install and change themes in the operating system. This is done to generally improve the stability of the OS and the security of the users themselves. However, if workplace not too responsible, you can quite afford to experiment, choosing a topic that suits you individually. But for this you will have to do a little magic.The principle of installing a theme that is not signed by Microsoft is to download any program that allows you to patch system files, and then download and install the new theme itself.
The most recognized programs for our purposes are as follows:
- Universal Theme Patcher. It replaces some system files, and after that you can install any themes from any creators without restrictions. However, replacing system files may be perceived negatively by your antivirus. After replacing the files, you need to restart the PC.
- UxStyle Core. Its difference from the previous one is that no system files are affected, but an additional background service, Unsigned Themes, is launched. However, the application has a significant drawback: when you try to change the theme, sometimes the theme “flips” to the usual classic one. In this case, uninstalling and reinstalling UxStyle Core helps, after which the desired theme can still be installed. Perhaps until the next replacement.
- VistaGlazz (VG). This application also affects system files, but also has important additional features: automatic creation of initial copies of workable files with the ability to automatically restore if necessary; adding a “transparency” effect to windows (maximized folders, etc.).

Next, we proceed directly to downloading and installing a third-party theme.
One of the most popular and trusted sites with a huge number of themes for every taste is located at https://winzoro.net/themes/windows7_themes/
The themes themselves are downloaded to any folder on the PC, even to the Desktop itself. Most often, a downloaded theme is an archive in *.zip format, which can contain not only files for the theme (Theme), but also thematic ones:
- wallpapers – background options for the theme;
- preview – screenshots to get an idea of the theme’s appearance;
- me – a file that describes the theme’s capabilities, installation nuances and a little self-promotion of the creator;
- System Files is a subfolder whose contents need to be replaced with system files, but this is at your own peril and risk.


To fully comply with the creator’s intentions, you may need to install fonts, wallpapers and replace the “explorer.exe” file. It must be remembered that when changing the theme, the results of these manipulations will have to be canceled or restored. Therefore, it is better to copy the replaced files to backup folder on a PC or flash drive.
Advice: I would like to warn fans of everything free from downloading themes and styles for Windows 7 in the “*.exe” file format. Any of these files may contain a virus, and instead of updating the appearance of your desktop, you may have to reinstall the entire Windows 7 (see). In this case, you can lose all your documents, Word settings, Excel, other office or accounting programs. If you still download executable files from the Internet, then be sure to use an antivirus.
Video instruction
This short video describes step-by-step and clearly the simple process of replacing a theme in Windows 7:Well, now, after reading our article, you can independently change the themes and styles in your Windows 7. You can make your workplace less official, more friendly and individual, in some ways even surprising you. They will help you with this special programs and a huge number of Windows 7 themes available on the Internet. Good luck in your design search!
