Setting up a local network in Linux. Accessing a Windows shared folder from Linux Local network in ubuntu
Despite the apparent ease of access to the general Windows folder from Linux, some users, especially those who have just started using Linux, may encounter a problem that, at first glance, may turn out to be insoluble. At the same time, Windows users will say “I don’t know anything - bullets fly out of me.” To avoid the impression that Linux is “buggy”, let’s try to understand this issue.
The private issue of working in home network Linux with a Windows XP shared folder for the purpose of changing data in it, that is, writing and deleting. The content of the publication does not disclose work with later Windows versions(although the situation with them may be similar), as well as working in domain networks, that is, in networks with centralized management of the password policy and user database, for example, Windows Active Directory.
So, on Windows the folder opens public access. But when a Linux user accesses this folder through the network environment, it turns out that it is impossible to “reach” even the node.
At the very beginning, you may encounter the problem of lack of access even to the workgroup.

This may be explained by a slight inertia during the first access via the SMB protocol, which is used to access folders and Windows files from the network. Wait a little, at least a few seconds, and try again. Eventually you will “see” the computer.

Upon further access, a form for requesting access permissions will be displayed, for example:

The Linux user enters his password and... again receives the same request form on the screen. And this can continue indefinitely.
The reason is that in both Linux and Windows, in order to ensure security at the level file system The so-called rights to files and folders apply. And in this case Linux user tries to access a Windows folder using its name and password, which Windows has no idea about. You must access the resource using the data that Windows “knows” about. That is, using some username and Windows password, which Windows is familiar with.
Since in Russian speakers Windows names users can be Cyrillic, that is, for example, Administrator, Vasya, Petya, beauty, etc., then for the purpose of providing access to the folder, ask the administrator Windows computer create a user with a Latin login or rename an existing login to Latin letters. For example, you can create a special user
which will have a permanent password and will be in the "Users" group. This can eliminate possible further cases of “system misunderstanding” between Linux and Windows.
The permissions for the shared folder need some adjustment, since by default users are assigned read-only permissions.
Explanation. To see the full contents of the "Security" tab on a Windows system, open Explorer and in the "Tools - Folder Options - View" section, uncheck the "Use simple file sharing" box.


There is no need to set “Full Control” either on the “Access – Permissions” tab or on the “Security” tab, although many people do just that. Full control implies permission to change both the permissions on an object and its owner. And if to some extent this may be acceptable within a home network of 2-3 computers, then in other cases it is better not to do this.
It’s better to check the “Change” box (All are active, that is, not disabled, user accounts on a Windows computer).

Next, you need to go to the "Security" tab and for Windows computer users, check the "Record" box.


But that's not all. You need to click on the "Advanced" button and for the line with the change made (column "Permission - Write") add checkmarks in the fields "Browse folders", "Folder contents", "Delete subfolders and files", "Delete".


At the same time, check the box “Apply these permissions to objects and containers only inside this container” (see the figure above).
Wow, so many things. Some kind of Mexican passion. And all this must be done on Windows.

Now let's return to the issue of accessing the folder from Linux. Enter the correct values. Instead of
specify the username in the format computer\user. Since the computer being accessed is called H-38, and the DHCP server operating on my small network assigns the domain name vot, I enter the necessary data and finally receive a list of shared resources on the H-38 computer.


As you can see from the figure, the Samba client displayed not only the Data folder, but also the hidden ADMIN and C resources used by Windows system for administrative purposes (hidden Windows resources are displayed with a $ icon after the resource name).
However, when you try to access the Data folder, the system again prompts you to enter your credentials. By default, you are offered to connect anonymously.

Remember that the sharing was made for Windows users. Therefore, you must enter a specific username and password.
If the password Windows user will never change (and at the very beginning it was recommended to create a user on Windows with an unchangeable password), then you can select “Remember forever” and then the password will not be requested in the future when accessing the shared folder. The same is true for accessing a computer. In the examples given, the password is not saved.
I carried out all the manipulations to open public access to the folder on the local network in Ubuntu 14.04 LTS.
- To begin, right-click on the folder that you want to share on the network and select the “Local Network Public Folder” option. If this option is not available from the context menu by clicking the mouse, then you need to open the Ubuntu Software Center - find and install nautilus-share. After restarting Nautilus, use the command:
nautilus -qor just log out and log back in.
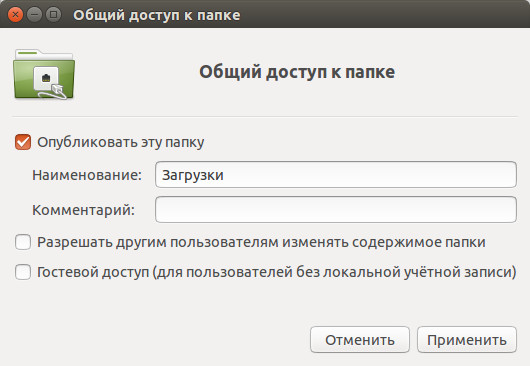
- When the Share Folder dialog box opens, select Share this folder. Click the "Install Service" button if the system asks you to do so.
 After the installation process is completed, you will have to log out and log in again.
 - After all installations, after setting up the folder for shared access, the additional options. Depending on your needs, you can enable: “Allow other users to change the contents of the folder”, “Guest access (for users without local account)". At this point, you can apply all the settings. This folder will be available on the local network for all users.
- But if you want client machines to be able to access this folder only with a username and password, then the following conditions must be met:

- Open Ubuntu Software Center, find and install system-config-samba.
- Launch the installed graphical Samba service configuration tool from the menu.
- Settings -> Samba Users.
- Click the "Add User" button.
Then select the username, enter the name in "Windows Username" and "Samba Password" -> OK.


Now, you can access this folder from the local network of another “machine” using the username and password.
Before you start setting up network connection in Linux, you need to start by looking at what network settings are being used now. To do this you need to use the command ifconfig. IN information mode it is available without ROOT rights, although for it full use It's better to get superuser privileges by typing the command sudo ifconfig. The result of its work will be a list of network connections available in the system and their parameters.
IN different versions The Linux name of the network interface can be short for Ethernet - eth0, eth1, eth2, etc.
On the interface lo - short for loopback - that is, a local loop with the address 127.0.0.1.
For example, consider the Eth0 interface.
In line inet addr The current IP address of the computer on the local network connected to this network card is displayed. In the example this is: 192.168.1.144
Bcast- this is a broadcast address on the network, the so-called Broadcast.
Mask is the network mask.
HWaddr- this is the hardware address of the network card, also known as the MAC address used at the data link layer.
We have learned about the current connections, now let’s look at setting up a local network in Linux. You can do this in three ways:
1 - Through the graphical shell
2 - via command ifconfig or tool Network Manager
3 - through configuration files network service Netork or Networking.
In my opinion, last method- the most convenient and reliable, and therefore correct. To configure a network in Linux, you need to open the file containing the interface config. It all depends on what Linux distribution used.
Option 1. On Debian-based distributions (Ubuntu, Kubuntu, etc.)
File with network connection parameters:
/etc/network/interfaces
In order to change in linux settings network, you need the file from root rights any text editor. For example, via nano:
Sudo nano /etc/network/interfaces
For automatic receipt addresses from the DHCP server you need to write the following:
Allow-hotplug eth0 iface eth0 inet dhcp
If the address needs to be specified statically, then indicate the following:
Allow-hotplug eth0 iface eth0 inet static address 192.168.1.2 netmask 255.255.255.0 network 192.168.1.0 broadcast 192.168.1.255 gateway 192.168.1.1 dns-nameservers 192.168.1.1
This config describes an example of a regular home network, where the computer address will be 192.168.1.2, the address of the gateway and DNS server (their functions are usually performed by a wifi router).
Option 2. RedHat-based distributions (Fedora, OpenSuse, CentOS)
Linux network settings file:
/etc/sysconfig/network-scripts/ifcfg-eth0
We also open it via nano or vim:
Vim /etc/sysconfig/network-scripts/ifcfg-eth0
In case of automatic receipt of settings from the DHCP server:
DEVICE=eth0 BOOTPROTO=dhcp HWADDR=00-1C-1B-11-F6-07 ONBOOT=yes
Static IP address:
DEVICE=eth0 HWADDR=00-1C-1B-11-F6-07 IPADDR=192.168.1.2 NETMASK=255.255.255.0 BROADCAST=192.168.1.255 GATEWAY=192.168.1.1 ONBOOT=yes
In this case, the IP addresses of DNS servers are written in the file
/etc/resolv.conf
Here is an example for public DNS servers from Google:
Nameserver 8.8.8.8 nameserver 8.8.4.4
Network setup in Linux is complete. All that remains is to restart the network with the command:
Service network restart
That's all.
As a postscript, I’ll tell you how to turn the network on and off in Linux. This is done through the same ifconfig command. Switch off network card eth0:
Sudo ifconfig eth0 down
Turn on network card in Linux back:
Sudo ifconfig eth0 up
Completely stop all network interfaces.
Service network stop
/etc/init.d/network stop
Turn everything back:
Service network start
/etc/init.d/network restart
The process of setting up a connection via a network cable between two Linux computers can be divided into two parts: first, we will establish a connection between the PCs so that they can ping each other, and then we will directly configure the software for data exchange. In this case, we will create an NFS server. To make friends on Ubuntu computers, you need to assign ip 192.168.0.1 to one PC, and ip 192.168.0.2 to the second PC. Accordingly, the netmask for both machines is 255.0.0.0 In the terminal you can write: sudo eth0 192.168.0.1 netmask 255.0.0.0 up or, if you have Network Manager, then this is easy to do in its settings. It is worth noting that when I registered the IP and mask through the console, and then established the connection through the network manager, nothing worked. You need to either disable it, or manually assign an IP address and mask. So, having registered everything on both machines, connecting them via a network cable in the terminal, we try to ping another PC. for this we write ping 192.168.0.2 If packets are being exchanged, then everything is fine and we move on to the next stage. Here you need to decide which machine will act as a server and which will act as a client. I decided to make a PC with 192.168.0.1 a server. Install the necessary packages on the server PC: sudo apt-get install -y nfs-kernel-server nfs-common portmap Run portmap reconfiguration and restart the process sudo dpkg-reconfigure portmap sudo /etc/init.d/portmap restart Now it's time to create a share folder on NFS server Open with any text editor, I use a nano file /etc/exports sudo nano /etc/exports and add a line there, something like this /home/user/music 192.168.0.2 (rw,sync,no_subtree_check) where first we set the address to the ball folder, and then immediately indicate the client’s IP. Well, we save the config after the manipulations. We write lastly: sudo exportfs -a Setting up the ubuntu client All the actions we performed were carried out on the Server machine, now we are moving to the client Ubuntu. And we start by installing the new packages: sudo apt-get install portmap nfs-common Now all that remains is to mount the server folder on your own. Let's create it in the home directory simple user empty directory: mkdir share mount sudo mount 192.168.0.1:/home/user/music /home/user/share There is nothing to explain here, we indicate what and where to mount. You can mount the folder when the system starts, for this we will use fstab sudo nano /etc/fstab and insert there: 192.168.0.1:/home/user/music /home/user/share nfs rsize=8192,wsize=8192,timeo= 14,intr Now, to mount a folder, you just need to write mount /home/user/share That’s how easily and simply using a network cable I connected two machines to the local network under ubuntu management for simple transfer of important files
