Where to find the computer name on Windows 10. Graphical way to change the computer name
More and more people are using personal computers, are eager to learn how to change the username in Windows 10, since many of the default logins set by the system do not meet the requirements for work. This operation simplifies the use of the system and allows you to more conveniently and accurately define work groups and devices. Exist various ways how to change your name in Microsoft Windows latest versions.
How to change login on Windows 10
The simplest way to change the user name in Windows 10 is to change the system settings account. This function is accessed through the Start menu, where you need to click on the icon with the avatar and user name. You can also go to the system control panel and select “User Accounts”.
In the window that opens, you can rename the profile of both your own and other users (if you are logged in as an administrator).
Enter the desired name and confirm it by pressing Enter. Now you can see it in the Start menu, on the boot screen and other places. Computer owners interested in how to change the username on Windows 10 should keep in mind that it is better to indicate any system name in Latin letters. The use of Cyrillic is allowed, however, this may cause conflicts with some programs that do not support the Russian language, where the name in this font will be displayed incorrectly. Think about this if you want to thoroughly understand how to change your username on Windows 10.
Changing the computer name and workgroup
To replace the computer name and working group In Windows, the same sequence of actions is used. Go to the Start menu and click on the name of the PC Settings item. Go to the “System” tab, where you will see the current name of the computer and workgroup. Click “Change settings” to make changes and in the window that opens, rename your computer and, if desired, your account, confirming the action by clicking OK.
Please note that the change you make will only become active after you restart your computer.
You can perform this operation immediately by clicking on the button that appears, or later, by first ending active applications. If your computer is connected to other devices in the house via a network, you must also remember to rename network connection(for example, by restarting the router) so that it appears in network groups accordingly.
Creating a new user and deleting accounts
If you are interested in how to change the Windows 10 username, be sure to keep in mind that some applications begin to work incorrectly after a standard change of username or workgroup. In addition, some of the system folders can no longer be renamed or moved to other directories. If this phenomenon occurs on your computer, optimal solution will create a new account and make it the default primary account (give administrator rights). To get started, use the standard system features by going to the Start menu, clicking on your avatar and selecting “Change account name.”
In the window that appears, select the function to change parameters. Go to the "Family and other users" tab and then select the option to add a new profile for current computer. Many people ask questions about how to rename Windows users 10 or create new ones without online connection.

The fact is that by default, when creating a new profile, the computer is under Windows control 10 automatically binds it to the Microsoft server, connecting to the system manufacturer’s website. This is not convenient for all users, since access to various data will require a constantly active Internet connection, so the corresponding option can be disabled.
To avoid synchronizing with Microsoft servers, create a new profile without specifying an existing email address, and also check the “Add without an account” checkbox. Microsoft records».
Now you can specify the desired name and, if necessary, set a password, supplementing it with a hint for recovery in case of loss. Give the created profile administrator rights by selecting the “Change account type” function and selecting “Administrator” here. Restart your computer to sign in with your new settings.
After creating a new profile, you most likely won't need the old one anymore, so you can delete an unused account in Windows 10. Use the account settings window you already know, which opens through the Start menu or Control Panel. Here you can go to the options of any profile that is not a computer administrator and select “Delete”.
Be sure to first save all unnecessary profile data from the Users directory on your hard drive in a separate folder or removable media, as they will be deleted from the default folder immediately after the current user record is deleted.
When Windows boots, it displays a personalized greeting. It is set during OS installation and is the account name. This is our ID helping operating system save the configuration and then load the profile data. Today we will discuss how to change the account name in Windows 10 and why it is necessary.
Purpose of changing the account name
Before figuring out how to change the username on your computer, let's figure out why it is needed at all. If the PC is used by more than one person, the account name Windows entries deals with the separation of user profiles. This is important when it comes to rights. The administrator can change the configuration, but the average user has absolutely no need for this.
Additionally, the Windows operating system is designed to retain the user's configuration and settings. Each one has a “My Documents” folder and its own shortcuts on the desktop.
The name is changed in cases where it is not liked or is created in Cyrillic (or another non-standard language). There are still programs that have encodings other than UTF. Since the folder with the user’s profile is called by his name, we get a Russian name. And such programs refuse to work with it. Errors occur.
Change Windows 10 account name
First let's try to make it built-in using Windows. Through the search, go to the control panel.
In the "Categories" mode, select the account management section. 
Go to "Accounts". 
And click on the name change link. 
You will be taken to a change form. 
Specify a new value and click Rename. 
Let's check whether the folder in the user profile has been renamed. Open Explorer and go to the drive C:\Users (or C:\Users). 
As you can see, with this method the folder remains untouched.
That is, by and large, this is not an entirely correct method of change. Manually renaming a folder in Windows can cause problems, since different settings are assigned to it.
So The best way changing the identifier means creating a new user and deleting the old one. To do this, click the Start button and then the hamburger menu icon.
You will see your current account. Right-click on it and select change settings.
Here you will need the "Family and Other People" section. 
Add a new account. 
You can skip the next step by clicking the link below. All this concerns a Microsoft account, we don’t need it. Moreover, Windows has built in the ability to send parameters to the developer. Many people don't like it. So you may need information on how to delete your Microsoft account. 
In the next step, notify Microsoft directly of your refusal to create a configuration by clicking the link below. 
Then specify the new user. You don’t have to specify a password, or you can specify it if you don’t want your profile to be available to other people. Click next. 
New account was created. 
The next step is to give him the license. Call the main menu (Start) and go to the active user again. You need to change the settings. In the window that opens, go again to the “Family and other people” section. Click on the user. 
Click on the “Change account type” button. 
Select Administrator and click OK. 
To delete an old profile, log in under the new one and click “Delete” in the same window.
Let's check the status of the users folder. It has been renamed. 
How to change the computer name in Windows 10
To change the name of your computer, you need to go to settings. To do this, bring up the main menu again and click the gear icon. 
Next, go to the system. 
And at the very end, click on the “About the system” link. 
Here you will see the “Rename this PC” button. Press. 
Enter a new value and click “Next”. 
For it to take effect, restart your computer.
Many people are interested in the question of how to change the computer name in Windows 7. This is easy to do. Follow the path Control Panel – System – Change settings. 
On the Computer Name tab, click Change and enter the new information. 

You can go the same way in 10.
We hope the information will help you manage your user accounts and computer configuration.
Have a great day!
Hello everyone, after the black screen in Windows 10 was defeated and the windows 10 threshold 2 update was completed, my friend asked me to teach him how to change the computer name, since during installation he wrote the name incorrectly, let’s look at three methods, graphical and through the command line.
Graphical way to change the computer name
So changing the computer name is very simple, let’s use in the classic way. Right-click on the start menu and select System.

The System window will open, in which the current computer name is visible and you can click Change settings

The system properties window will open with the computer name tab

Set the computer name and click OK.

You will be notified that the new computer name will be executed only after rebooting windows 10 threshold 2.

Click reboot now

Even in Windows 10 threshold 2, an additional graphical method appeared to set the computer name, this is due to the fact that it can be driven into tablets or tablets. This is done in the following way. Start-Settings-Accessibility

Tab about the system. Click the rename computer button. Please note that there is a button to join a windows domain and even now to Azure AD.

We also enter the name you need and click OK.

Let's reboot.

This is where the graphical methods end))
Command Line and PowerShell
Change the computer name you run the command in PowerShell. PowerShell is a very powerful tool for performing various tasks, including this one.
Syntax Rename-Computer –NewName new computer name
Rename-Computer –NewName pyatilistnik2
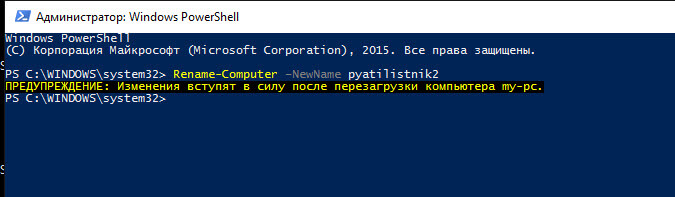
As you can see, powershell is even simpler than graphical methods; enter one command and it will change the computer name in one go.
In this article, we will look at a short instruction on how to change the computer name in the operating system. Windows system 10. To perform these actions, you must have administrator rights.
So why change the computer name? According to Microsoft help, any computer on the network must have its own unique name. Thus two different computers identify each other and interact. This is especially true when we are talking about several organizations and PCs located there, constantly in contact with each other.
By default, each computer has its own name, but any user, if desired, can change it at any time.
This procedure can be performed in several ways. It is worth saying that it is advisable to assign short and understandable names. Combinations of symbols and letters are possible, without spaces.
First way.
Let's move on to the next path Start - Settings - System. In the window that opens, select the “About the system” tab in the left column and click “Rename your computer.”

We enter a pre-invented name into the window, click “Next” and after restarting the computer, it will be assigned a new name.

Second way.
This method may be most familiar to users, as it has been used in some previous versions Windows.
Right-click on the “Start” menu and go to “System”. Next, select “Advanced settings” (you can also click “Change settings”).

In the “System Properties” window, open the “Computer name” tab, then “Change”.

And the final step is to indicate the new computer name and click “OK”.

Third way.
This is a shortened version of the second method. Right-click on the “Start” menu and select “Run”.

Enter the command sysdm.cpl and click “OK”. Next, we perform the steps described above. After you restart your computer, the changes will take effect.
