Instructions for obtaining root rights on Samsung devices. Knox - obtaining RUT rights on new Samsung smartphones Installing root on Samsung
Since the first day Samsung entered the smartphone market, it entrenches on the top list of the smartphone market. It is not the first to the high-end Android handset game, but its initial effort has brought a huge hit. Samsung, now as the leader of its fellow competitors, is not just a market leader in innovation and adapting proactively to consumer needs; it is also a brand with high ambitions and significant forward momentum to the industrial standard.
Samsung line products have occupied most of the top-sale list of Android device s. With such extensive popularity, rooting Samsung becomes the hottest concern among its users, fans, and developers.
Root Samsung via Kingo Root APK without connecting to PC.
IMPORTANT Please try first. Your device may rooted without computer by using this app.
- Enable the unknown sources in setting menu. Settings > Security > Unknown Sources
- Download file into your device.
- By the time download finish, install and launch Kingo Root.
- Press "One Click Root" when you see the button.
- Wait until you see the result.
- It is better try more than once if root failed for different rooting methods.
- If still failed after tried many times, refer to Kingo Root Android(PC Venison), which has a higher success rate than app.
For more detailed tutorial, please click
How to root Samsung in one click with KingoRoot Android?
IMPORTANT: Before you proceed, please do backup your important data first.
KingoRoot on Windows
KingoRoot Android on Windows has the highest success rate. It supports almost any Android device and version.
This week will be remembered for the fact that Samsung opened a new season - sales of the Galaxy S5 began in most markets around the world. Compared to Galaxy S4 new Galaxy S5 may seem like a modest improvement with updated camera, performance, improved timing battery life and IP67 certification.
If you managed to buy a Galaxy S5 and want to quickly get root rights, then you have come to the right place. Let us remind you that we have already presented the first version of the instructions for obtaining root rights on the Galaxy S5 here: “How to get root rights on the Galaxy S5 even before the start of sales? Easily! [Instructions]." Now we present more detailed instructions. Follow all steps carefully.
Keep in mind that, just like on the Galaxy S4 and Galaxy Note 3, Rooting the Galaxy S5 requires disabling Knox protection, which automatically voids your smartphone's warranty. If you are not afraid of the cancellation of the warranty for the new Galaxy S5, then below you can read the instructions in detail. However, we warn you that all responsibility lies with you! We do not bear any responsibility for the consequences.

Step 1. Download the following files. You will definitely need them:
- ODIN: Odin3_v3.09.zip (downloads: 7232)
- CF-Root (required for your Galaxy S5 model)
- USB drivers: SAMSUNG_USB_Driver_for_Mobile_Phones.exe (downloads: 5869)
Step 2. Extract the contents of the CF-Root archive to a separate folder on your desktop. You should have a file with a tar extension, not a file that ends with "img".
Step 3. Launch ODIN, click on the PDA and select the file “CF-Auto-Root…..tar.md5”
Step 4. Turn off your Galaxy S5 and, just in case, remove and reinsert the battery. Then press the Volume Down, Home and Power buttons simultaneously (Volume Down + Home + Power) to load the special mode Download Mode. If the phone shows you a warning about custom firmware on the screen, then skip it by pressing the volume up button.
Step 5. Connect your phone to your computer and wait while Windows checks and installs the drivers. After installing the drivers, ODIN should automatically detect the device. Do not touch any settings in ODIN under any circumstances!
Step 6. Once the Galaxy S5 is detected by ODIN, press the START button and wait while ODIN installs the CF-Auto-Root package on the device. Your smartphone should automatically reboot after the procedure, which should indicate the successful completion of the procedure. Don't panic if the first boot takes longer than usual.
If for some reason the Galaxy S5 goes into a reboot loop, then you should check whether you have downloaded the correct version of CF-Auto-Root for your Galaxy S5. We recommend going through the entire procedure again.
Availability of root rights: In stock
Attention! Installing root on smartphone Samsung Galaxy A6, you do this at your own risk.
You realize that you can:
- turn your phone into a “brick”;
- disrupt the operation of the OC;
- lose warranty and over-the-air updates;
- increase the vulnerability of the gadget;
- lose the opportunity to use banking services and wireless payments.
If you are aware of this, then there are programs at your disposal that will help you get root rights to your Samsung Galaxy A6 smartphone.
How to root Samsung Galaxy A6 using apps
First let's look at simple ways get Ruth through specialized applications. If they did not help, read on and follow the instructions for working with programs for PC and custom Recovery.
KingRoot
- Download the application from the official website and install it on your mobile phone.
- Open KingRoot, wait until the collection of information about the device is completed.
- Click "TRY TO ROOT".
- If you see a proposal to free your gadget from garbage, the process was successful. Reboot your device to verify this.
Framaroot
- Download the distribution kit from the developer’s page and install it on your phone.
- Launch, select the application to manage Root: Superuser or SuperSU (the second is more convenient).
- Select your favorite exploit to hack the system.
- After successful installation, you will be greeted by a smiley face.
Baidu Root
- Download Baidu Root and install it on your system.
- Click "Get Root".
- The program will notify you if the procedure was successful.
Video on how to get root rights for a Samsung Galaxy A6 smartphone
Other Ways to Get Superuser Rights in Samsung Galaxy A6
Use them if you have a custom Recovery or other methods have not worked.
VRoot (for computer)
- Save the program on your PC and setup it.
- Disable the antivirus, connect the phone to the desktop.
- After the gadget is detected, click on “ROOT”.
- The smartphone will reboot, now turn it off.
Magisk (For custom Recovery)
The optimal path for owners of devices with an unlocked bootloader and custom Recovery.
- Download the Magisk archive and the Magisk Manager application.
- Enter Recovery, do wipe “cache” and “dakvik-cache”.
- Flash the archive.zip from Magisk.
- Wipe “dalvik-cache” and “cache” again.
- Log into the system.
- Install Magisk Manager and launch it.
To make sure that the services have done their job, install from Play Market application Root Checker, open it and run a check for superuser rights on your phone.
Share the page with your friends:If all the above tips did not help, then read also.
Smartphones and tablets from the Korean company Samsung are considered one of the best and perhaps the most popular devices with Android OS. The functionality of any Samsung is always at its best, but sometimes users need to have enhanced capabilities, which requires rooting Android on Samsung. The advantage of gadgets of this brand is good protection, which becomes a problem when getting root.
Root rights for Samsung
Root is a user's rights comparable to administrator's rights on computers running Windows control. On Android opportunity managing the contents of the root partition (root means “root” in English) is not initially provided. To use hidden functions, you must perform rooting, that is, manipulation in order to gain access to system folders.
A superuser can do almost everything with Android, including modifying it itself. operating system.
What is the difficulty? It would seem that the Android OS is the same everywhere, but Samsung implements Knox security systems in its firmware, which can be difficult to bypass.
What you need to get root rights for Samsung
According to the developers, root is not provided for device security reasons. There is always a risk of damaging a gadget if the user does not have special knowledge.
After unsuccessful rooting, the device will not even be repaired.
So the first and main condition for such an operation is complete confidence in its necessity and success.
In addition, the list of necessary tools depends on the chosen method of obtaining root rights. In general, one is available - software, but there are two options:
- Using a computer. You will need a computer with Windows OS, a USB cable, the Odin program, custom Recovery, drivers for specific model and a well-charged device with installed application SuperSU. In this way, for example, you can easily obtain root rights for Android 4.3 Samsung Galaxy S3.
- Without PC help. You will need a suitable application to install on your gadget (for example, Framaroot).
Route via Recovery and SuperSU
For the latest versions of Samsung models, it is the custom (CWM) or extended (TWRP) Recovery firmware option using the Odin program that shows very high efficiency. Moreover, for gadgets from this manufacturer this is practically no alternative. It has been used for a long time and very successfully, but it is not the only one for all Android models.
Preparatory stage
So, it was decided to root Samsung. Before the operation, you will have to prepare the gadget itself and the computer with which it will be flashed. The device needs to be charged, preferably completely - a lot of energy will be consumed in the process, and recharging will not be possible because the connector will be occupied. The USB cable must be tested.
On the computer, which must also be connected to a power source, you need to install the Odin application, download, unpack the firmware and install the driver for Samsung. You need to install or update the existing SuperSU program on your gadget. The latter is not difficult, since it is free application available in Google Play. It is better to download the update archive UPDATE-SuperSU.zip and place it in the root of memory.
As for Odin, which is required to root Android on a Samsung Galaxy, things are a little more complicated. The program is freely available on the Internet, but it is not recommended to use Russified versions. The most stable versions are considered to be 1.85 (for models before 2011), 3.07 (from 2011 to 2014) and 3.10.6. (for newest models).
It is best to download custom firmware from samsung-updates.com. If you don’t want to download through file sharing services, you can use the Samfirm program. TWRP firmware is available on the website.
Enable USB debugging
First of all, you need to enable USB debugging mode on Android. This function available on Samsung and used for testing applications by developers. By default it is disabled. To activate the connection of the device to the PC, the option must be enabled manually. This is usually done in Developer Options in the Settings menu.
There is no such section on devices with Android 6.0. To enable the feature:
- Enter settings.
- Select the “About phone” section.
- In the list that opens, click on “Build number” seven times.
- Enable USB Debugging.
Here you immediately need to enable “OEM Unlocking”. 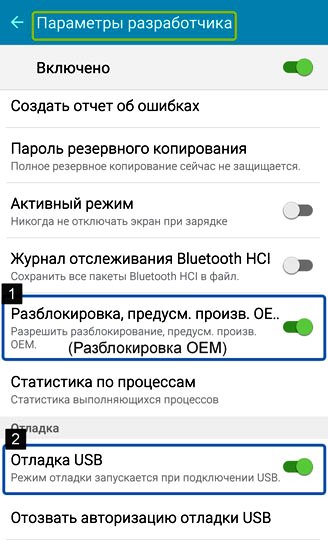
Disable remote control
The remote control feature will prevent you from getting root, so you need to disable it too. To do this you need:
- Enter the “Security” section.
- Open the “Find phone” tab and move the lever “ Remote control» to the “Off” position.

Instructions for installing root rights
Now let's talk about how to install root rights on Android 6.0.1 Samsung. The procedure should be as follows:

After reboot Samsung will get root rights.
Checking for root
The most convenient tool for checking whether you have received root rights is the SuperSU application. If you update the application immediately after rooting, it will instantly become clear whether your Samsung root. Root Checker also works well. There are also options for manual checking.
If there are problems
If you have successfully obtained root rights for Android 6.0.1 on a Samsung Galaxy S5, but it turns out that they are incomplete, you need to deal with the protection. It will have to be removed. The superuser has two options for uninstalling Knox:
- Manually using a file manager, for example, Root Explorer or Root Browser.
- Using the software delete function.
Uninstalling Knox in Root Browser
The manual method allows you to thoroughly clear the registry of folders and files, causing problems with root. File manager will help solve problems with Samsung proprietary protection. After obtaining root rights, you need to do the following:
- Install the Root Browser application.
- Open the /system/app section and delete all APK files starting with KLMS and KNOX.

This helps you completely get rid of protection and get full root rights to Android 6.0.1 on the Samsung Galaxy S6.
Uninstalling Knox manually
A simpler, but not so thorough option is now available in software functions. If you are rooted, you can uninstall any application or feature, including Knox. To do this you should:

Waiver of superuser rights on Samsung Galaxy
If suddenly root rights are no longer needed, the same browser will help solve the opposite problem. To refuse root, just go to the /system/bin/ section, find and delete the .su file from it. In the /system/app/ folder you must also delete Superuser.apk. After the procedure, a reboot is required. If third-party firmware was not used, you can remove root rights using the SuperSU application. If used, flashing is required.
The procedure for renouncing superuser rights is no more difficult than obtaining them.
How to get Root rights to Samsung Galaxy S3: Video
Not only Samsung owners Galaxy J1, but every experienced Android user sooner or later needs to get root rights to their phone. And the point is not that the model becomes outdated or that various bugs begin to be traced in the system. The point is the capabilities that root rights can provide.
Why do you need root rights?
They call it Ruth account superuser, which is the administrator, and root rights are administrator rights. They significantly expand the usual functionality of the phone and give its owner access to those system parameters that would seem impossible to configure.
Root rights are useful because:
- They provide access to absolutely all files that are on the phone, even if they were previously invisible. At the same time, the ability to edit files remains the same as any other.
- They give their owner the right to delete even standard applications and utilities that are “built into” the system and, against the will of the user, “eat up” resources. These include, for example, programs from Google - Google Music, Play Games, Movies, etc. Without root rights, the maximum that can be done with often unnecessary “add-ons” is to roll them back to the earliest version, disable updates and ignore the icon in the menu. With root rights, you will finally get rid of programs that take up unnecessary space on your device.
- They give you the opportunity to work not only with standard applications, but also with the same files. For example, you can change the standard icons, sounds, even images and animations that appear when you turn on the phone.
Root rights allow you to change even the start animation that appears every time the system boots
- Allows you to move applications to a flash card. As you know, only media files and documents can be stored on a flash drive, and all applications are installed exclusively on the device. Root rights solve this problem. In addition, they allow you to move not only applications, but also files that cannot be moved in normal user mode.
Root rights allow you to transfer not only files, but also applications to a flash drive
- Gives access to system settings, which normal mode are not configured. For example, you can increase the speaker sound even if the other settings are already at maximum. One of the most interesting and useful settings is the battery consumption parameters. With the help of root rights and the right actions, you can significantly extend the battery life of your gadget.
- Rescue the owner in case he forgot graphic password phone.
Root rights will be a salvation for those who have forgotten their own graphic password
- Necessary when rolling back the operating system to an older version.
These are the main functions of root rights, but not all. In general, the principle of operation of the superuser mode can be characterized as follows: root rights provide its owner with extremely wide access to all system files.
Is rooting necessary?
It is quite logical to assume that if root rights were absolutely necessary for every user, they would be provided with the phone. According to the developers, root rights are not provided solely for security purposes. A user without special knowledge about the operation of the system may accidentally knock down important settings and render the gadget inoperative. By the way, not every technician undertakes to repair a phone that has been rooted, which further complicates the situation.
In fact, many users have no idea what root rights are and get along just fine without them.
How to root Samsung Galaxy J1
Obtaining root rights is usually not difficult. Especially when you consider that many utilities and programs have now been developed that help automate the process and make the task as easy as possible for the phone owner. One of these assistants is the Framaroot program. It is almost universal in terms of model range and provides all the rights necessary to work with the system.
- To get started, find and download the most latest version Framaroot.
- An apk file will be downloaded to your phone, which you then need to install.
Framaroot is one of the most famous and popular programs for obtaining root rights.
- Launch the program. A list of actions that are proposed to be performed will appear on the main screen. Among them, you need to find a command that starts the process of obtaining root rights. Click on it. In addition to the root rights themselves, the program must also offer an appropriate exploit, which in the future will be responsible for managing the root. The most common options that can be offered are SuperSU and Superuser. There are practically no differences between them, and the choice depends entirely on the taste of the gadget owner.
The program will provide you with a choice of several exploits - utilities that find loopholes in the Android system, through which they allow you to control it
- Select one of the proposed exploits. After this, a message should pop up on the screen notifying you that root rights have been successfully obtained. If some problems suddenly occurred with the installation of one exploit and superuser rights were not obtained, do not despair. Try using a different exploit. If the program itself suddenly crashes, just restart it and try to get root again.
The program itself will tell you how successful it was in obtaining superuser rights.
- After Framaroot reports that you have successfully obtained superuser rights, reboot your gadget.
Rooting via PC
This method of obtaining root rights is much more labor-intensive: you will need to download more than one archive of programs, install them in certain folders, and perform many operations. Unfortunately, not everyone can obtain superuser rights through a PC; the risk is quite high that the user simply will not be able to complete the process correctly. We recommend performing the installation only if you are absolutely confident in your knowledge of the gadget and PC.
Video: obtaining root rights using Odin
In general, getting root rights is not such a difficult process. The biggest difficulties can arise if, after rooting, the phone falls into the hands of a specialist and he simply refuses to work with such a device. Therefore, remember, before rooting your phone, you need to carefully think about whether these root rights are really necessary.
