How to connect feedback. Feedback form without reboot. Feedback form on WordPress
First, let's figure out what random access memory (RAM) is - this is temporary memory personal computer(PC), which works when the device is turned on. She is responsible for the function of stable and full work all installed programs.
As we found out, RAM is a kind of temporary data storage buffer located between the disk drive and the processor.

Therefore, the data on it is stored only until the PC is turned off, which means that before that you need to worry about saving all the materials. The operating speed of the entire PC system, in particular installed applications, depends on the OP.
To summarize, RAM affects:
- to stable, fast work PC;
- the ability to use several programs (applications) simultaneously;
- on the speed of completing assigned tasks.
In order to find out how much on a PC, you need to follow several steps.


Now we know how much OP is provided on the PC, and how much is available. Now you need to understand whether everything is okay with the RAM or whether you need to take some action.
Identifying RAM problems
Problems with RAM occur nowadays innovative technologies often. There are several most common signs of complications in the work of an OP.
- Slow operation of the computer, requested files take a long time to open, specified functions are not performed, and freeze.
- Messages about low memory appear on the monitor when downloading files, opening applications, etc.
- Some programs stopped working.

Slow computer performance is a sign of problems with RAM
There are quite a few reasons for the malfunction of the OP.
- The detail itself is defective. This is rare, but still. In this case, the solution is simple: contact the store or market where you purchased the PC and use the warranty card to make an exchange or repair.
- Mechanical damage. It mainly occurs when the OP itself is installed manually by a PC or connector user.
- Wear. Any equipment has its own wear rate, which depends on the degree of use, location, and PC load.
- Overheat. Occurs mainly due to untimely cleaning of dust from systems. Of course, overheating is possible due to high temperature indoors, but usually in rooms with equipment there is a cooling system.
Video - How to check RAM for errors?
Testing: step-by-step instructions
To understand the reason for the unstable operation of the computer's RAM, you need to test it.
On a note! Microsoft once approached the problem of testing quite seriously. The Windows operating system has built-in utilities for checking the status of many components. Windows versions 7 and later provide memory testing by default, but the results are displayed only if a critical situation occurs. But in order to understand the state of RAM at any time, you can check it manually.
Step by step instructions.
Option 1
Press the Win + R keys, a window appears, in the “open” line we enter: mdsched, click “ok”. Figure 4 below shows all the steps.

A window with a verification request appears on the screen; all you have to do is make a choice and wait for the result.
Option 2
- Go to the Start menu. On the screen, this sign is located in the far left corner.
- In the search bar we write the word “operative”.
- Now in the top line we find “diagnostics of computer RAM problems”, click.
A window will appear on the screen prompting you to check, taking into account a reboot to this moment or the next time you turn it on.

Testing can also be carried out using specialized programs, for example, Mem Test 6.0 - this is a kind of utility for testing the reliability of the operating system.
Having tested RAM PC and having identified errors, it is necessary to urgently begin to correct them.
This memory works very quickly, allowing the processor to read the necessary information almost without pause. What the RAM contains, of course, is available only when the computer is already turned on, and before you press, for example, the reset button. When the PC is turned off, all data not saved in advance is automatically erased. Don't forget about this and always save what you work on!
For this purpose there are so-called memory hard disks, as well as other storage devices that store data permanently. And when you turn on the power of the PC again, you can again launch the saved information into the RAM.
The amount of RAM (this is the second name for “RAM”, that is, random access memory) also regulates the number of tasks that a computer can carry out simultaneously.
The definition of RAM refers not only to the microcircuits themselves, which represent the basis for the device of this memory in computer system, but also to logical display and placement. This refers, respectively, to the way in which memory addresses are represented on the chips, and the arrangement of data and commands at known memory addresses of the entire system.
Sometimes the definition “volatile memory” is also used. It's not hard to understand where it comes from: unsaved data is lost when the computer is disconnected from the network. Therefore, sometimes some applications are created “in reserve” backups used data.
Saving the data you are working with is very simple: any program has a “Save” function, which can be easily found in the options panel. This function is also duplicated by pressing the “Ctrl” and “S” keyboard buttons. After this command, your file goes to HDD and is saved.
The chips that represent RAM are usually connected directly to system board. They may differ in characteristics, therefore, for normal operation, these microcircuits must be normally compatible with the system on which they are installed.
The presence of annoying RAM errors can be suspected if the computer is seriously malfunctioning: frequent “freezes” interfere with work and are annoying, the scary blue “screen of death” regularly appears, and programs crash. There is already a reason to say that there is something wrong with the RAM and check it for errors.
The reasons for such errors are simple:
- New memory modules have been added;
- The memory simply failed;
- The fact of memory overclocking;
- A number of other reasons.
To reliably check memory for errors, we have developed special utilities. "Memtest86+" is one of them. However, if you have new Windows_7 systems or a version of Vista installed on your PC, the memory can also be checked using the built-in diagnostic tool built into the Windows environment.
Using the built-in diagnostic tool
Step one - turn on your PC, find “Start” in the lower left corner of the screen, click the cursor in the search bar and enter “mdsched.exe” in it.
You will be presented with the program "mdsched", to run it, simply press "Enter".
If you are interested in the first, immediate option, close (saving the necessary information!) all programs you have open, and then click “Reboot and scan /recommended/”. Your PC will immediately reboot and the memory diagnostic will begin running.
You will learn about detected memory errors from the inscriptions on the screen.
To launch additional parameters for checking the “RAM”, you can press the “F1” button on the keyboard, but, as a rule, if there are errors, they will be successfully identified during operation standard settings.
Diagnostics can also be launched when the operating system starts. When you see the Windows boot manager, press the Tab key on your keyboard (it's in the third row from the top on the left) and select Memory Diagnostics. It will start immediately.
As for the Memtest86+ utility, it will help you out if you are working on any other operating system. When downloading it from the website http://www.memtest.org/, select one of the utility options.
To use it, first extract the ISO image from the downloaded archive, then burn it to disk. When you start your computer, you will need to boot from this disk. For this to happen as it should, you need to check in the BIOS that the first boot device has been set to “CD-ROM”.
When your computer starts, the utility should boot successfully and start working.
In operation, it will show you all the information about computer memory, the processor, and the chipset. The active memory test process will be visible in the display in the upper right area of the screen.
To somehow change the settings, select additional parameters for testing memory, you need to press “C”, and to exit – “ESC”.
If we can find out on a computer that the hard drive needs defragmentation, then we will not identify significant problems in the RAM of the computer or laptop. RAM-related errors are difficult to fix. A more detailed analysis can be obtained using third party programs, but do not underestimate windows 10, which develops instantly. In this guide, we'll look at ways to diagnose and check RAM for errors, like in a standard way, and check for errors using the popular MemTest86 utility.
Possible computer RAM errors:
Before throwing sins at RAM, we need to know approximate errors and symptoms that will help us move in the right direction. We will analyze the most popular symptoms of computer or laptop RAM errors.
- Your computer beeps several times during startup.
- Crash or under heavy load in 3D games.
- The computer keeps rebooting.
- Problem accessing and working with files.
How to check RAM in Windows 10 and Windows 7
- Enter in search mdsched.exe, in later windows systems press or combination windows buttons+R.
- In the next window, select the mode that is currently suitable. (The tool also offers the option to schedule a test on the next reboot if you are unable to close your applications and restart immediately).

- As soon as the computer restarts, it will start in the Windows Memory Diagnostics environment, and tests will immediately begin running in standard mode. In this mode, the tool will run all the checks available in the main mode, in addition to LRAND, Stride6 (with cache), CHCKR3, WMATS+ and WINVC. You can also select scanning parameters by pressing the key F1.

- After clicking F1, the test selection will appear: basic, regular, wide. Below you can enable the cache and number of passes. In the expanded "Wide" test mode, more tools will be available, which will allow you to thoroughly diagnose RAM performance. Disabling the “cache” will allow direct access to RAM, which will improve the quality of diagnostics. When you have configured the settings for scanning, click F10 and it will start checking the RAM.

Checking test results
While you can see the status during the scanning process, once the test is completed, your computer will restart automatically and you will need to use Event Viewer to see test results to see if you have a bad RAM module.
- Press a combination of buttons Win+R and enter eventvwr.exe to open Event Viewer.

- Expand the folder " Windows logs" and right click " System", select from the menu " Find"
- Enter "Find" in the search field MemoryDiagnostics-Results.


- In Event Viewer, double-click the source MemoryDiagnostics-Results and look at the result, if there are no errors, then you can not blame the RAM of your laptop or computer.

What to do if there are errors when diagnosing RAM?
- Your best bet is to replace the RAM stick.
- You can try cleaning the contacts from dust on the bar and in the connector.
- Try inserting one strip into different slots to identify the problem in the module or slot itself.
How to test RAM with MemTest86
If you checked the RAM using Windows and did not find any errors, but you are sure that there are errors in the RAM, then use the MemTest86 program. Select on the website, download boot image CD or USB flash drive to run the program under BIOS.

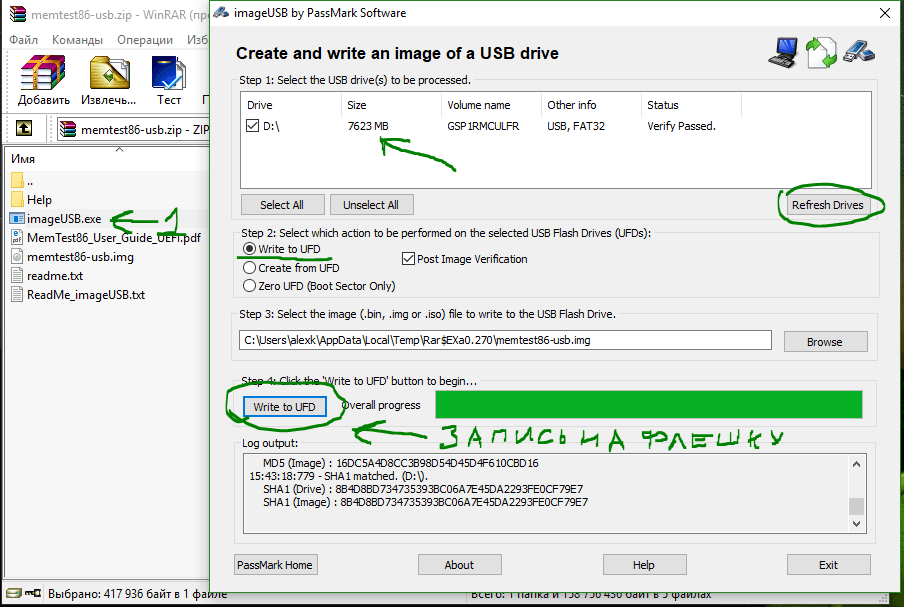
After downloading, open the archive" zip" and run the file " imageUSB.exe" to start the program.
- Insert the formatted flash drive into your computer and click " Refresh drives", so that the program sees the drive.
- Select mode " Write to UFD".
- This is the image in the archive folder" MemTest86", which will be written to the flash drive.
- Click " Write to UFD" to write to a USB flash drive. After everything has been done, you can restart the computer and it will start under bios with the MemTest86 program and begin diagnostics.
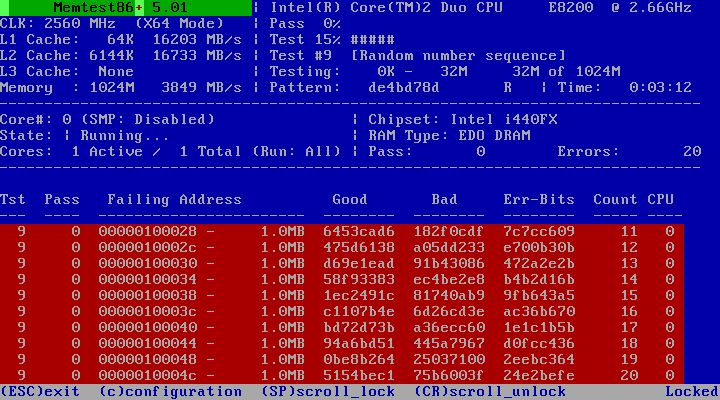
- When you restart your computer, your computer's RAM will be checked.

- If errors appear, they will appear in red at the bottom, like in the picture.
The guide was covered on Windows 10, but the RAM Checker has been available for years, which means you can also use it on previous versions, including Windows 8.1 and Windows 7.
Random access memory (RAM) is an extremely important element of a computer; its quantity, for example, will determine whether you can run “heavy” programs, such as graphic or video editors. Also, it is the RAM that determines how many applications can be launched at the same time, how many tabs can be opened in the browser, etc. But, like other elements of the computer, RAM can fail, and therefore it must be checked regularly. But before you do this, you need to find out its volume.
Finding out the amount of RAM is easy; Windows has built-in tools for this. To do this, go to “My Computer” and select “System Properties”. In the window that opens, you can see a line in which the amount of RAM available on the computer will be indicated in gigabytes.
This can also be done in other ways - for example, through the task manager. Open it through the menu, go to the “Performance” tab and there you can see not only the total amount of RAM (in megabytes), but also how much memory the computer is currently using.
How much will be enough? As is commonly believed, for ordinary home computer, which is used mainly for Internet surfing and other simple tasks, two gigabytes will be enough. But if you plan to run games or other “heavy” applications, such as graphic editor, then it might be worth upgrading your car.
RAM status
How to check your computer's RAM and its status? This is somewhat more complicated and takes more time. But it is still necessary to do such checks, since the failure of the RAM can be an unpleasant surprise. If you use operating system Windows released later than XP, then you are in luck: the system already comes bundled with special program to check the performance of the RAM.
It's called mdsched, and you can use the search bar in the Start menu to launch it. After you launch it, a special window will appear in which you will be asked to either restart the computer now and immediately start scanning, or do this the next time you turn it on. Choose the option that you think is most suitable.
After this, when you turn on the computer, you will see blue screen, in which you can see the progress of the RAM check. There you can see what problems were detected. Be prepared that the entire process may take up to several minutes. After it is completed, you will be able to see the results of the scan again.
However, if you are using Windows XP, the verification process may become somewhat more complicated. The fact is that this Windows versions The mdsched program is not included, and in order to find out what state the RAM is in, you will have to use third party applications. The most popular of them is the Memtest86 program, which is actually the standard in its field.
There are several ways to use it. The simplest would be to use bootable flash drive. Go to the program website memtest.org, in the “Download” section, select the “Auto-installer for USB Key” option. After this, you will need to wait for the file to download. Unzip the archive, insert the USB Flash drive and run the downloaded program. You will see a small window, select your flash drive in the drop-down list and check the box next to it, then click the “Create” button. After this, within a few minutes your flash drive will be bootable. All data on it will be destroyed.
Next, you need to restart the computer, and when you turn it on, depending on the model motherboard, press a special button, usually Delete or F10 (its name is written on the screen when the computer starts up). Next, in the list that appears, you will need to select your flash drive, wait for it to boot, and wait for the check to complete, which can last quite a long time. If there are any problems with the RAM, you will see information about them on the screen.
Conclusion
Thus, it is quite simple to find out the amount or state of the computer’s RAM. To do this, you just need to either use the built-in using Windows, or resort to third-party easy-to-use tools.
It will probably not be a discovery of the century for any user that most error messages that appear when working with Windows 7 arise due to all sorts of problems with the computer’s RAM. At the same time, detecting them is not as difficult as it seems at first glance, even without resorting to the help of third-party programs. The point, in fact, is that Windows 7 itself already has a built-in utility for checking RAM, which in terms of efficiency is not much inferior to similar analogue programs. Want to check it out? Then let's get to work!
Option #1: Microsoft System Method
It is worth noting that testing RAM using Windows 7 itself can be done differently depending on whether the computer is in working condition or not. In particular, to routinely check the performance of RAM on a PC, you can use this method:

In addition, it is also possible to check the operation of the RAM when starting Windows 7. In this case, when starting the computer, you will first need to press F8 to get to the menu of additional boot options, and then select Esc on the keyboard one by one (to access the manager windows downloads), Tab (to select a memory test tool) and finally Enter (to start diagnostics): 
At the same time, you can perform a RAM test using a disk with Windows distribution 7. In this case, after launching it on the computer in Windows installation mode, we only need to open the system recovery options and select the memory diagnostic program from among them. The whole process looks something like this: 
In any case, regardless of the chosen method after start system diagnostics A blue window will appear in the RAM, in which the entire progress of the check will be displayed:

However, you need to take into account that by default in Windows 7 the usual set of several standardized tests RAM. It provides, of course, a fairly time-efficient, but average-in-effectiveness check: 
In this case, for a more thorough analysis of RAM after running the utility, it is preferable to reconfigure the test scheme, choosing a wide set instead of the usual one. How to do it? Simply press F1 and then Tab to select the appropriate option and F10 to save the setting. Similarly, you need to disable cache checking and increase the number of passes to at least 20 in order to increase the efficiency of passing the test.
One way or another, after completing the RAM analysis, the testing tool built into Windows will notify you of all errors found in a report or in a system message after restarting the PC (depending on the selected diagnostic method).
Option No. 2: RAM test programs
At the same time, the RAM on a computer with Windows 7 can be checked for errors using special RAM tester programs. They are presented quite widely today, but among them all free software tools such as SuperRam, MemTest86 and SiSoftware Sandra.
The easiest to use among them, undoubtedly, is the Russian-language SuperRam utility. At the same time, in terms of the effectiveness of RAM tests, it is not much different from the well-known software “monster” MemTest86. This utility, in particular, allows you not only to test the RAM on your computer in different modes, but also automatically increases the productivity of its use. In addition, the program is compatible with absolutely all RAM modules and Windows versions, which makes it a truly indispensable PC tester. 
Meanwhile, at the first signs of the impending death of RAM, appearing along with the blue screen of death, the MemTest86 program can bring the computer back to life. Its peculiarity is that, unlike many other similar utilities, it is launched in a “pure” form using its own bootloader, which provides it with a more thorough test of the operating memory for bugs. 
True, MemTest86 also has two small drawbacks. Firstly, in order to check RAM with its help, you will first have to pore over writing a resuscitation flash drive with an iso image of the utility; and, secondly, the process of analysis with the help of this testing software tool usually takes quite a long time - from 1 hour or more, as practice shows. 
As for SiSoftware Sandra, this program can hardly be called a full-fledged RAM tester, given that it has both a general Windows stability test and separate modules for analyzing the state of the motherboard, CPU, video card and other equipment connected to the PC. Meanwhile, its efficiency indicators are quite good, which, however, sets it apart from a dozen other analogue programs.
