Installing windows xp on acer laptop. How to Reinstall Windows Xp on an Acer Laptop. Preparing a Windows XP distribution
You can restore the Windows 7 (vista, XP, Windows 8) operating system on an Acer Aspire One laptop to its previous working state or completely to factory settings.
Only the last option is not suitable for everyone, but only for owners of Acer laptops who bought it with pre-installed Windows 7 or another.
Then the recovery image is specially written to a separate partition on the hard drive - it is hidden by default.
If you accidentally (unknowingly) messed something up, then using the first option is much better (the second deletes all your personal files: games, programs, settings).
The first option is to restore the Windows operating system on an Acer laptop
To restore Windows on an Acer laptop, be sure to connect the charger. Then turn it off and on.
When you see the laptop logo, press two keys (simultaneously) Alt + F10 (you can do it several times).
The Windows Acer eRecovery Management recovery utility will launch (the Disk-to-Disk (D2D) option must be enabled in the BIOS).
When prompted for a password, here are the standard ones: “000000”, “AIM1R8”, “00000000”. Next, click on the line “full restore system factory settings.”
Yes, I almost forgot, there is also the possibility of recovery while saving user data.
On an Acer netbook this takes about 15 minutes. Confirm by clicking “OK”. The computer will restart, and
The second system recovery option on an acer aspire one windows laptop
This recovery option can only be used if your laptop is still able to boot.
Then you can start restoring Acer eRecovery Management to factory settings directly from a running Windows operating system.
To do this, then click at the bottom “all programs” and click on the line “Acer eRecovery Management”.

After that, on the left side, click “restore”. Next, you can choose “restore the operating system and save user data” or without them. All further actions are similar to the first option.
If “the work does not work”, as already written above, enter the “BIOS” and in the “Main” tab, enable the “D2D Recovery” option - set the position to “Enabled”.
Immediately after this you can press F10 and after rebooting Alt + F10. Then the process described in the first option will follow. Good luck.
I got my hands on an Acer Aspire One 722 netbook. The machine, like all netbooks, is not particularly performant. I wanted it to work faster. Windows 8 was installed by default, which (largely due to ease of use) was scrapped. The only choice left is windows7 or windows xp. The netbook has an average 2GB of DDR3 RAM (of which 256MB is allocated to the video card) and a dual-core AMD C60 processor with a frequency of 1GHz (1.33GHz in automatic overclocking). Agree, this is not enough for comfortable work in Windows 7. And, as it turned out later, this is not enough even for Windows XP :)
Digressing from the topic of the article, briefly my impressions of the appearance and ergonomics. Overall I liked the netbook. Thin, especially the lid. The lid has an interesting relief design in the form of frozen waves of plastic, and glossy plastic 🙁 Full-size laptop keys - now working with a netbook is as convenient as working with a laptop. All keys are in place. No painful habituation required. However, there was a fly in the ointment spilled on the keyboard. The cursor keys are half the size of the other keys. I, as a person who constantly uses total commander in my work, cannot accept this global trend. What manufacturers are thinking about when making cursors so small (and not just on netbooks) remains a mystery to me. I liked the screen with a resolution of 1366x768 - the standard resolution for a 13-15-inch laptop. Of course, such permission comes at a price in fine print. But enough about the netbook itself. You didn’t come here for my impressions, did you?
The system was installed from a flash drive. The image was transferred using the WinToFlash program. The AHCI mode for working with the hard drive was previously enabled in the BIOS. The AHCI driver was inserted via a floppy disk using a USB FDD drive. No modifications to the distribution were made. For those who do not have a USB flash drive, there is a way to enable AHCI mode after installing the system. And it’s even easier to restore a finished Windows XP image. Links below.
You can download drivers for Acer Aspire One 722 for Windows XP from the link below:
http://dfiles.ru/files/q858ygoui
mirror:
http://f-bit.ru/128266
Windows XP images for Acer Aspire One 722
Acer Aspire One 722 image with drivers
Image: Acronis True Image Echo Server 9.7
Operating system: Windows XP Professional
Version: 5.1.2600
Platform: x86
Service pack: 3
Russian language
Distribution: original MSDN image
Activation: Volume License Key (corporate key, no activation required)
Additionally: All drivers are installed correctly, including AHCI during the OS installation stage!
Recently, the vast majority of laptops come with pre-installed Windows Vista And Windows 7. Many users appreciated the innovations of the new operating system, but some still need it to work Windows XP.
This material describes the procedure for installing Windows XP on laptops not only from Acer, eMachines or Packard Bell, but also from other manufacturers, regardless of what operating system was previously there. All questions about installing and configuring Windows XP are addressed in this forum topic: . Before asking, I urge you to use the search on the topic.
Note: Owners of Windows Vista Business, Ultimate and related editions of Windows 7 can upgrade to Windows XP Professional for free. Read more about this opportunity
If you still decide to install Windows XP, then read on.
Preparing for installation
Now there is a clear trend when manufacturers, instead of equipping laptops with system recovery disks, create hidden partitions on the hard drive. This is typical not only for Acer, but also for many other manufacturers. It is assumed that the user will create them himself using special utilities. How to do this using the example of Acer laptops is described in this material:. If your laptop does not have a CD/DVD drive, you can use this guide: . More details about the technology of recovery from hidden partitions are described in these materials: and.
Note: In addition to system recovery disks, it is highly recommended to create images of hidden partitions. How to do this is described in this material:
One of the main problems when installing Windows XP is drivers. They can be found:
4) on manufacturers' websites.
Once the drivers have already been downloaded, you can begin preparing the distribution.
Preparing a Windows XP distribution
The Windows XP distribution does not contain drivers for SATA controllers from Intel and AMD 7th and older series. As a result, when installing Windows XP, not a single hard drive will be found. To fix this, we do ONE action described below:
1) go into the laptop BIOS and switch the operating mode of the SATA controller from AHCI to IDE-mode (the names may have a different form. Compatibility mode, For example). In this case, Windows XP should install successfully. Then integrate drivers for the SATA controller into the already installed Windows XP. How to do this is described in this article: . When the integration is complete, in the BIOS we switch the operating mode of the hard drive back to AHCI
2) integrate drivers SATA into the distribution with Windows XP. How to do this is described in this material: . Integration of SATA drivers into the distribution is discussed in this forum thread: . This is the option I recommend.
Note: now you can find a great variety of different builds of Windows XP with integrated drivers, service packs and other things. I strongly do not recommend using such assemblies. Practice shows that the vast majority of problems with drivers are associated with the use of such assemblies. The most common problems are with sound and Wi-Fi adapters. This is why I recommend using original builds of Windows XP without any drivers integrated by “traditional craftsmen”. It is recommended to use pure MSDN builds of Windows.
If you have a chipset from nVidia or AMD 6-series, then you DO NOT need to perform the operations described above. Windows XP will be installed anyway
Installing Windows XP
Installing Windows XP on a laptop is no different from installing it on a regular PC. It is very important not to confuse the disks where to install the system. The fact is that when installing XP, hidden partitions (read more about them here:) are visible as normal partitions, where XP can be installed.
BE CAREFUL! DO NOT INSTALL WINDOWS XP ON HIDDEN PARTITIONS!
Installing Windows XP from a flash drive is more complicated. It is described in these guides: Installing Windows XP from a flash drive or memory card and Installing Windows XP from a flash drive using WinToFlash.
All questions about installing Windows XP can be found in this forum thread:
Once the system is already installed, you can begin installing drivers. How this is done is described in detail in the manual: . If you have problems installing and searching for drivers, please refer to this forum topic: .
Return to Windows Vista or Windows 7
If you want to go back to the factory one again Windows Vista or Windows 7 with all the programs and drivers, then first you need to restore the MBR (as described here:), then you need to copy all the important information from drive C: because when restoring ALL information from drive C: IS ERASED! Information from drive D: remains intact.
When all the information has been copied, you can begin recovery. First you need to reboot and when a white screen appears with the inscription Acer you have to press at the same time ALT And F10. It’s not a fact that your recovery will start the first time, you need to practice :) If it doesn’t work out, then you need to go into the BIOS and see if the function is enabled eRecovery.
Note: for the automatic recovery function to work using ALT+F10, the presence of a hidden PQService partition and the original MBR are MANDATORY!
If you don't have a hidden section PQService, but there are recovery discs Factory Default Disc then it’s quite easy to boot from them... and regardless of the presence of hidden partitions and the original MBR, the system will be restored.
If the process has already started, then in half an hour or an hour the laptop will have a completely restored system, just like after the purchase :) And if something doesn’t work out, ask questions in the appropriate thread.
As an alternative to this technology, you can consider a quick system recovery method, which is described in this article: /
If you have neither hidden partitions nor disks, but want to have a licensed Vista or Windows 7, then read these materials: Installing Windows Vista and.
How to install Windows 7 on an Acer laptop with UEFI BIOS! Hello friends, a friend of mine bought an Acer Aspire ES1-511 laptop without an operating system. The laptop is inexpensive and is not designed for games, but only for work.
The BIOS of the Acer ES1-511 laptop is common for all Acer laptops with UEFI elements with all the ensuing consequences, and my friend could not install Windows 7 on it. Having spent two weekends on this matter, on Monday he called me and asked me to install the operating system for him.

How to install Windows 7 on an Acer laptop
A friend of mine lives outside the city and it took a long time to get there, and then I was almost eaten by his dog.

Then we take our laptop out of the box,

We connect our bootable USB flash drive to it. We connect the flash drive to a USB 2.0 port, since Windows 7 does not support USB 3.0 (ports are usually colored blue).


Turn on the laptop and press F2, enter the BIOS and immediately go to the Main tab.

Main Tab
We enable the ability to call the laptop boot menu when booting using the key F12. Set the F12 Boot Menu option to Enabled, then go to the tab Boot.

Boot tab
Naturally, this tab does not contain our Kingston installation flash drive, but it would be there if we made it a special UEFI flash drive. Set the Boot Mode option to Legacy

We agree with the warning. OK


Click F10, by doing this we save the changes made to the UEFI BIOS parameters and reboot.

Click when loading F12(call the laptop boot menu)

and please our Kingston bootable flash drive is present in Boot Menu, select it using the arrows on the keyboard and press Enter.

Note: If for some reason you are unable to open the laptop boot menu using the key F12, then enter the UEFI BIOS on the Boot tab and using the keys F6(raise up) place the flash drive in the first position, then press F10(save the settings and reboot),

As I already noted, after successfully installing Windows 7 on an Acer laptop with UEFI BIOS, we will face problems with drivers and we will successfully solve them.
What to do if Windows 8.1 is already installed on the Acer Aspire ES1-511 laptop, how to install it thenWindows 7 on this laptop
When the message “Press any key to boot from CD or DVD” appears on the screen, press any key on the keyboard, thereby agreeing to boot from the installation disk.


Install.

We accept the terms of the agreement. Select the full installation.

Friends, to install Windows 7, you need to delete all existing partitions on your GPT hard drive and install Windows 7 directly into the unallocated space. Click on the “Disk Setup” button and delete all existing partitions,

then install Windows 7 directly into the unallocated space.
Windows 7 automatically converts the hard drive to the MBR standard during installation. Click on the Next button.

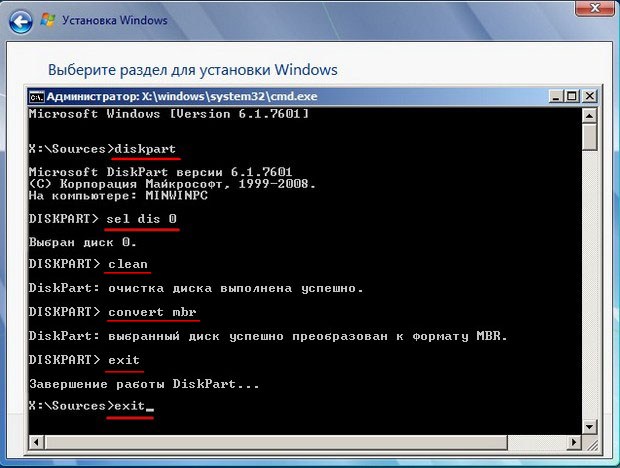
If the Next button is inactive or an error occurs (which is unlikely), then we call the command line, press Shift + F10 on the keyboard and convert our hard drive to the MBR standard in the command line, all partitions and data on the disk will also be deleted.
Press Shift + F10 on the keyboard. On the command line, enter the commands sequentially:
diskpartseldis 0
clean
convert mbr
exit
exit
Click Update.

How to install Windows XP on a laptop? If you have not installed Windows before and are encountering this for the first time, then before you begin the installation, be sure to read the lesson. There is also a lesson on. After installation, be sure to install the program CCleaner. I wrote a lesson on how to install and use the program.
Installing XP on a Toshiba Satellite L655 laptop. The problem is this:
Windows cannot start due to a corrupted or missing file: WINDOWSsystem32configsystem You can try to repair this file by running Windows Setup from the original installation CD-ROM. Select 'r' in the first dialog screen to start the recovery procedure
We won't rebuild. We will reinstall the OS. At the same time, we will learn how to install the OS. Namely Windows XP.
The only weapon I have is the Licensed Disk. Windows XP Service Pack 3:

But this does not mean that you should have the same one. You can take Zver, Chip or any other assembly. You can even pirate it. Vista, 7 and 8 don't count since we have a lesson on XP.
So, insert the disk into the drive, turn on the laptop and immediately hold down the key "DEL" or "F2" on the keyboard until the computer enters BIOS. Everyone's BIOS may look different depending on the manufacturer and version. But the settings are basically the same. In our case, this is what the BIOS looks like:

Select a tab "BOOT". If there is no such tab, go through the tabs and find which one contains the device boot parameters.

Yours should be something like this too. You will immediately notice if you look through the tabs. Now our task is to make sure that the laptop boots from the disk. And for this we need to swap points 1 and 2 (see photo), i.e.
be the first to do CD/DVD. in my case, to swap items you need to select the item and click f5 or f6. It may be different for you: + And — , or through Enter. After that, go to the tab Exit, select Save & exit setup. and click ok. That's it, BIOS setup is complete. Your laptop is rebooting, wait until the message appears on the screen “Press any key to boot from CD...”, which means "press any key to boot from CD". Press any key and the installation program immediately appears.

After checking the system configurations, you will be given the option to Install the system or restore the existing system. Here you need to select ENTER and start installation:


Click C=continue installation:

Choose "Format partition in NTFS system":

Click F:


And the program starts copying files:

After this, the computer will restart:

Attention!!! After the reboot you will again be prompted to press any key - “Press any key to boot from CD...” — do not press anything, otherwise you will start the installation again!!! Or if you want this message to no longer appear, you can go into the BIOS and set it to boot from the hard drive (i.e. return everything to its place) You know how to do it, you did it.
After the reboot, we continue the installation, but in a slightly different environment:

You don’t have to configure anything and click FURTHER:


Set the date, time and time zone and click next:

If this message appears, click OK:


Select an item "Delay this action", and click NEXT:

We write the account name. You can have up to five accounts, but this is optional. FURTHER:

Click ready:

Installation completed! HOORAY!!

All that remains is to install the drivers for normal operation of the computer. You have driver disks (usually they come with the laptop when you purchase it) if you have stored them well. Or you can download it from the website of the laptop or equipment manufacturer.
