Tips on how to reinstall Windows on an HP laptop yourself. Reinstalling Windows on an HP laptop You can’t do without theory: BIOS and UEFI, MBR and GPT
If you are a laptop owner HP Envy M6 running on a new operating system Windows 8, - You are definitely looking for an answer to the question: how can reinstall more familiar and stable Windows 7 instead of very raw and incomprehensible Windows 8? And, if you have reached a dead end in search of a decent answer to this question, then you have come to the site you need!
Let's look at the main points using my laptop as an example. HP Envy M6 1151sr .
First we must correctly install the Windows 7 operating system. Laptops latest models, as you may have noticed, are equipped with a fundamentally new intermediary interface between the equipment and the system called UEFI. You can read what it is on the Internet. I will only touch on a few points. New interface — overcomes limitations, imposed by the system BIOS on the amount of memory (both physical and RAM), processor power, etc. One of the new features is support hard drives volume more than 2 TB . This is achieved using a new format for placing partition tables on the disk: replacing the master boot record MBR comes the so-called GPT. GPT allows the system to create a protected, separate partition that will contain Windows boot loader .
Typically, during installation, the system creates local disk 100 MB volume specifically for the bootloader. In the case of GPT, two partitions will be created - a 100 MB bootloader and a kind of “limiting line” - a disk that separates the boot partition from other local disks. All this is supported by Windows 7, but problems may arise after installation. If you are the owner licensed Windows 7 , - there is nothing to worry about. Just install it on disk and activate it. Otherwise, activation currently existing methods , will be impossible due to the fact that boot partition locked. And as a result, after the 3-day activation period, you will receive non-working system .
The best way to avoid this problem is - convert disk to MBR using external bootable flash drive Windows 7. This operation WILL DELETE ALL FILES ON THE DISK! Don't forget to make a backup. Boot from the flash drive and click on the Start button. Enter in the search field "Computer Management" and open the appropriate program. Next, go to the “Disk Management” section. Right-click on the hard drive icon and select the menu item "Convert to MBR disk". Follow the steps as in the screenshot below, however, my disk is already in MBR and the menu item reads “Convert to GPT disk”.
After that delete all partitions from the disk - you will create them after installation.
The next important step is to boot correctly from installation disk without UEFI. The fact is that in UEFI, by default, GPT mode is enabled for the hard drive, but we need MBR. Therefore, when you turn on the computer, press F9 and select "Boot from internal CD/DVD-Rom" or something like that. Under no circumstances should we select “Boot from CD/DVD (UEFI)”, since the disk will be converted back to GPT when installing the system.
Which system to install is up to you, but my advice is to use original Windows 7 disk images. Since laptops HP Envy M6 run on processors Intel Core i3, i5, i7 with 64-bit architecture, as well as the number random access memory exceeds 4 GB, - accordingly, we must install Windows 7 x64, I advise SP1- it is more stable. Another tip - when installing, do not allocate a lot of space for the system disk. Limit your volume 50-60 GB.
So, we successfully completed the installation. The second problem you will encounter is device drivers . The fact is that on the official website HP The manufacturer has provided the laptop with drivers only for Windows 8. And if you, like me, hate “burnt” drivers and “All in One” driver packages, then I will try to tell you how to find native drivers for Windows 7 on the Internet.
First of all, open Windows Device Manager: Computer (right click) -> Properties -> Device Manager . In the window that opens, some devices will be identified, some will have a yellow question mark. That's what we need.

There is only one unidentified device in the picture, but you will have more of them. The first thing we must do is create text file with equipment identifiers. Perform the following action for all devices with a yellow question mark: right click -> Properties -> Details and select a property from the list - Equipment ID. Copy to the first line in the list that opens below and paste into a text file:

After the list is compiled, we pay attention to those lines that contain VEN_8086- this is the manufacturer identifier Intel. CPU, motherboard, controllers in laptops HP Envy M6- production of the company Intel.
The procedure is as follows:
1. In the search for the drp.su website, enter the equipment identifier line;

2. Copy the device name from the search results;
3. We are looking for a device driver in search engine Google.Com, specifying the search query in this format:
Device name Windows 7 x64 HP.com

4. Find the driver page on the official hp website in the search results and go to this page;

5. Download the driver.
Next we look for drivers for all other devices. I’ll say right away - drivers WiFi, Bluetooth, Audio Cards, Fingerprint Readers, Card Reader and TouchPad suitable from the driver package for Windows 8. Simply go to the HP website in the Support -> Driver Downloads section, select your laptop from the list and download the specified drivers for Windows 8.
Switchable drivers graphics adapters can be found this way:
1. Go to the driver download page for your laptop on the official HP website;
2. In the “Graphics” section, copy the name of the driver, for example: “Graphics AMD driver High-Definition (HD)";
3. Search Google for the driver using the above method.

Here is a link to a driver that is suitable for a laptop HP Envy M6 1151sr: http://h10025.www1.hp.com/ewfrf/wc/softwareDownloadIndex?cc=ru&lc=ru&dlc=ru&softwareitem=ob-98292-1 .
Concerning other devices, - if searching for any driver on Google does not produce any results from the official HP website, then you should use the site search driver.ru. In the search bar you need to specify not the name of the device, but its identifier, which we copied earlier.
I did all this work previously for a laptop. HP Envy M6 1151sr. You can download drivers for this model here. And before you perform all the above steps to search for drivers, check their availability among my drivers.
After all device drivers have been downloaded, install them one by one with MANDATORY REBOOT after installation, in the following order:
1. Chipset (motherboard drivers)
2.Intel MEI
3. Intel USB 3.0
4. Intel Rapid Storage
5. HP 3D Drive Guard
6. Graphics drivers (switchable graphics);
7.TouchPad
8. Network
9. All other drivers.
This is the only way you can get a fully functioning Windows 7 system. Thank you for your attention!
Hello admin! How to install on new laptop HP ENVY, with prev installed Windows 8.1 and UEFI BIOS, a second Windows 7 operating system on a GPT disk?
I bought a new HP laptop, the hard drive has one drive (C:) with pre-installed Windows Store 8.1. I separated 100 GB from the C: drive, unallocated space appeared and now I want to install Windows 7 on it.
I connect the installation Windows flash drive 7 to the laptop, turn it on, enter the boot menu of the laptop, and my flash drive is simply not there. The same thing applies when using the installation disk.
Knowledgeable people advised to disable the option in the BIOS Secure Boot. Disabled it, then booted into the program Windows installations 7, I selected a partition for installation, and an error appeared: The order of partitions on the disk selected for installation differs from the recommended one. For more information about installing on GPT disks, go to the Microsoft Web site (http://go.microsoft.com/fwlink/?LinkID=154898) and search for "GPT" . Continue installation? OK or Cancel.
How to install a second Windows 7 operating system on a GPT disk on a new HP ENVY laptop with pre-installed Windows 8.1 and UEFI BIOS


Of course, our reader’s data will not be deleted and after clicking OK, Windows 7 will be installed by the second system on the specified partition hard drive, but in today's article I want to offer you something different.
If you purchased a new laptop with pre-installed Windows 8.1 and UEFI BIOS, but want to install a second Windows 7 operating system on a pre-created partition, then this is quite feasible for some laptop models (unfortunately not for everyone), interestingly, you don’t even need to create a bootable UEFI USB flash drive for Win 7. In this article, I will show you the easiest way to install Windows 7 as a second system on your laptop.
- Note: Friends, this method tested and works on all simple computers and old laptops without UEFI BIOS. You can also apply it to new ones ASUS laptops, HP Pavilion and HP ENVY, with UEFI BIOS, but there is one thing! With new laptops it's not so simple. Due to the fact that computer equipment manufacturers can change at any time functionality UEFI BIOS on a laptop, I advise you to make a backup copy of the BCD boot store before starting. If you cannot install Windows 7 as a second system on your laptop, then you can deploy a backup of the BCD boot storage and return the laptop to the state it was before our experiments. In my article I will tell you everything step by step, so don’t worry, you will succeed.
For this article, let’s take the same HP ENVY laptop. Before starting work, let's make some preparations. First, let's create a backup of the BCD boot storage, since after installing Windows 7, the boot menu of the laptop will be changed and a choice will appear in it operating systems: Windows 7 or Windows 8.1, if after some time you want to get rid of Windows 7 and format the partition with its files, then the system selection menu when booting the laptop will still remain, you can remove it by simply restoring the BCD from the backup.
Creating a BCD Backup
Create a folder on disk (C:) bacup,

then open command line as administrator and enter the command:
bcdedit /export C:\bacup\bcd

and appears in the bacup folder backup copy repository download file bcd. Do not delete the bacup folder on the drive (C:), at the end of the article I will show how to restore the bcd boot storage from a backup.
Disk Management
We create a partition for installing Windows 7. We enter Disk Management and see three service partitions and a 680 GB drive (C:) with Windows 8.1 installed, right-click on it and select Shrink Volume...

50 GB will be enough for me, if you intend to work seriously in Windows 7, choose a larger volume.

From the unallocated area that appears, we create a simple volume (F:), onto which we will deploy Win 7.


ISO Windows image 7
To install the system we need , you can according to our article. I will download it directly to the desktop and double-click on it with the left mouse and attach it to the virtual drive (J:).


WinNTSetup
This program (familiar to you from) will help you deploy Windows 7 from ISO image to the partition we created (F:) without a bootable USB flash drive or system installation disk.
Download WinNTSetup You can use it on my Yandex.Diskhttps://yadi.sk/d/xLGkpAOzhXCPcor on the official website
http://www.winntsetup.com/?page_id=5

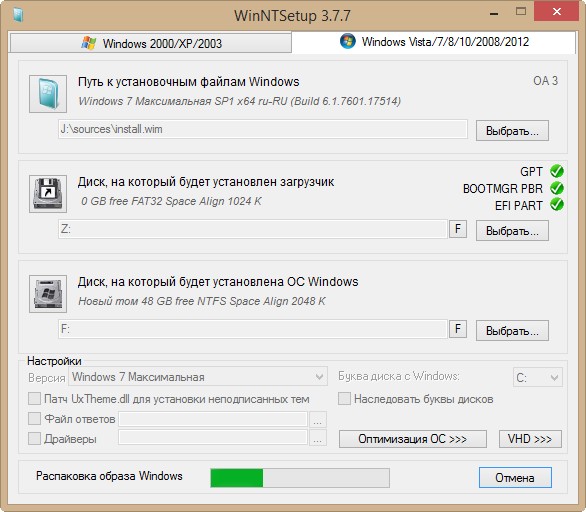
Extract the utility from the archive and run it executable file WinNTSetup_x64.exe

Click on the Select button

and indicate the path to the installation Windows files 7. We only need the install.wim file from the sources folder of the distribution. Let's go to virtual disk(J: ) to the sources folder, select the install.wim file with the left mouse and click Open.
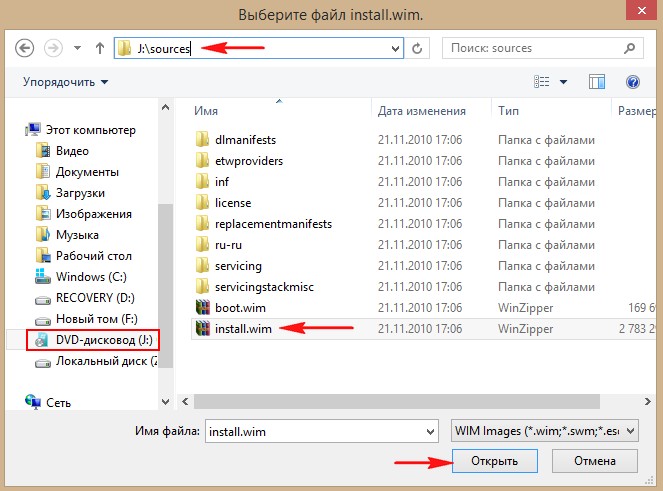
Way to installation files Windows 7 is specified.
The disk on which the Windows 7 bootloader will be installed is selected automatically - Z: (section Reserved by the system, volume 350 MB).
Select the disk on which Windows 7 will be installed. Click Select

Specify New Volume (F:) and click Select Folder.

Installation


The Windows 7 installation process begins

We reboot and enter the BIOS, set the Legacy support option to Enabled, and the Secure Boot option to Disabled (sometimes this is not enough), save the settings and reboot.

The operating system selection menu opens: Windows 7 or Windows 8.1, select the first

and immediately enter the final phase of installing Windows 7.

Enter the username and computer name


We accept the license terms

Your choice


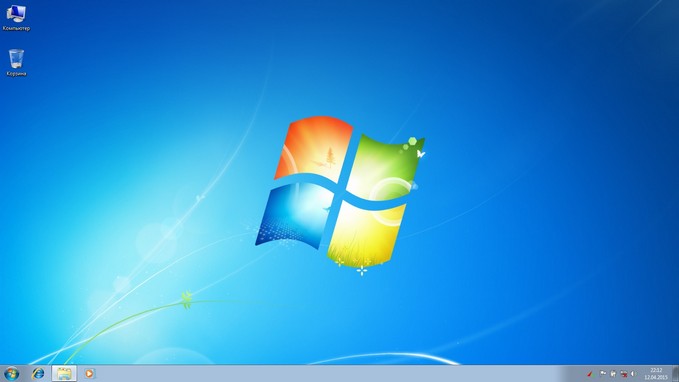
Windows 7 is loading.
If you want to boot into Windows 8.1 and it doesn’t work, then enable the UEFI interface in the BIOS and be sure to boot into Win 8.1.
In Disk Management you can see that the letter system disk(C:).

The hard disk properties indicate the GUID (GPT) partition style.

Computer window

How to remove Windows 7 without a trace
We used the “seven” and decided to delete it. To do this, boot into Windows 8.1.

Open a command prompt as administrator and enter the command:
bcdedit /import C:\bacup\bcd ,

With this command we restore the storage Windows boot 8.1 to its original state, that is, when you turn on the laptop, the menu with a choice of operating systems will not appear.
HP laptops usually come with Windows 8 pre-installed, which many users prefer to replace with the more familiar Windows 7 and turn to Windows 7 for help. service centers. We want to help you a little and tell you how to reinstall Windows on an HP laptop yourself.
You can’t do without theory: BIOS and UEFI, MBR and GPT
To reinstall the operating system, as a rule, you should start by going to the BIOS. But in the case of an HP laptop, we will have to deal not with a traditional BIOS, but with BIOS UEFI - a new, more modern interface between the system and equipment.
Among the many new functions of the “Extensible Firmware Interface”, this is how the abbreviation “Unified Extensible Firmware Interface” is translated, we want to note only one - the ability to work with disk space of 9,000,000,000 TB. This is achieved through the use of GPT - a partition table that replaced the usual MBR. For comparison: MBR provides access to disk space of no more than 2 TB.
Disable Secure Boot
One of the pitfalls of Windows 8 is the Secure Boot mode, which does not allow loading operating systems other than it.
Our goal is to provide the ability to boot Windows 7 onto an HP laptop.
- As soon as the laptop starts to boot, press the Esc key and go to the boot menu.
- Using the F10 key, go to the Bios Setup section.
- Select Boot Options from the System Configuration tab.
- Disable Windows Safe Boot Mode:
Secure Boot = Disabled. - We enable support for compatibility with other operating systems:
Legacy support = Enabled . - To save the settings, press the F10 key and confirm in the dialog box that it is impossible to load the current operating system
"...the system unable to boot the OS...". - We re-confirm the change in the loading method by entering the suggested numbers using the main keyboard after the warning
"... Secure Boot mode is pending ...".

Selecting a boot device
- When restarting the laptop, press the Esc key and go to the boot menu.
- Go to the Boot Device Options section using the F9 key and select the boot device (flash drive, laser disk drive).
Now our HP laptop is ready to install new Windows.
If GPT is not suitable
After you have reinstalled licensed Windows 7, all you have to do is figure out the drivers. But what to do if you do not have the ability to quickly activate the operating system? The boot partition created by GPT will be locked as soon as the period expires Windows activation 7, the system will become inoperative and you will have to reinstall it again. You can solve this problem by converting a GPT disk to MBR.
Convert to MBR with data deletion
Converting a GPT disk to MBR is performed using the DiskPart utility from the Windows 7 distribution and entails complete removal data on disk. This option is suitable for users who decide to reinstall the operating system immediately after purchasing an HP laptop. For everyone else, be sure to back up your drive before converting.
- Booting from the installation Windows disk 7 and we reach the stage of selecting the OS installation partition.
- In command line mode, launch the DiskPart utility using the keyboard shortcut
+F10 :
diskpart - We get a list of hard drives installed on the computer and find the one we need:
list disk - To select a disk we use select command disk N , where N is the disk serial number. Disk numbering starts from zero. Our laptop only has one hard drive, so the disk selection command looks like this:
select dick 0 - Deleting data:
clean - Convert the disk:
convert mbr - We finish working with the command line:
exit - We continue installing Windows.
Convert to MBR without data loss
Converting a GPT disk to MBR without data loss is done using the Paragon Manager utility, which can be found on multiboot disks (Live CD). We will use the Lex Live CD (build from Lexa 2011).
- Boot from Live CD.
- We launch Paragon Manager and select our hard drive, which Paragon recognized as Basic GPT.
- We start the conversion process by selecting the option Convert to Basic MBR disk (team HDD top menu).

Greetings, my dear readers. The other day they brought me an interesting laptop: HP 255 G2 with Windows 8.1 pre-installed (as it should be now), however, its owner did not want to relearn and tearfully asked to put the usual seven. As they say: the master is the master, and it was decided to demolish Windows 8.1, which came with the kit, and install Windows 7. However, everything turned out to be not as simple as I thought at first glance!
How to install Windows 7 on an HP laptop in pictures
So how to install Windows 7 on an HP 255 G2 laptop, even if standard delete or f2 do not allow us to get into the usual Laptop BIOS? (which puzzled me a lot). It was then that I remembered a clever phrase: if all else fails, then finally read the instructions!
The instructions included were very sparse: it showed how to insert the battery and what to press to turn it on... well, and a couple of pages on how to use Windows 8.1. As you can imagine, such reading was of little use to me and I had to go to the official website for answers, and I found them!

Here's the information... to get into the BIOS! to set the boot device we need to press when starting the laptop first and then, after that you will be taken to the BIOS, where you can make settings.
How to install Windows 7 on an HP laptop
Since new HP laptops (almost all) have UEFI instead of the usual BIOS (A sort of modern alternative to BIOS) then there are some subtleties here (UEFI is a topic for a separate article, so we won’t consider it here, we’ll just figure out how to load seven on a laptop)... By the way, quality control was checked by my faithful cat, who never left his laptop for a minute :)

If it weren't for the cat, I don't even know if I would have figured it out or not.
So, if we briefly talk about UEFI innovations, then the main crutch in the installation of any other OS other than Eight - SECURE BOOT mode, which increases the security of the OS. The main problem is that no one except Windows 8 supports this feature. (from desktop OS of course), so to install Windows 7 on our HP 255 G2 or similar laptop, you just need turn off SECURE BOOT and instead of it activate Legacy Support , after these manipulations it may be easy to install any other operating system... at least 😉
As soon as you turn on the laptop, immediately press and then until you get to the BIOS. Here we go to the tab System Configuration and select the item Boot Options on the menu…

As you can see, there are very few settings here, so there shouldn’t be any difficulties here... in order for us to install Windows 7, we need to disable Secure Boot (Select


However, that’s not all, since changing the loading method will not allow the eight to load, we need to enter the confirmation code and press. I warn you right away that the buttons on the number pad are not active in this case... dial the code (in my case 9993) and press Enter

Actually, that's all... now at startup we press + and we find ourselves in Boot Options - where we need to choose what to boot from, that’s all, the HP laptop is ready to install Windows 7.
Instead of an afterword: If you, like me, decided, then take a closer look at USB port in the laptop... there it is USB ports 3.0, which do not work quite correctly without installing drivers for them. For example, installing Windows 7 was impossible for me due to the lack of drivers for optical drive, which sounds a little crazy - I put it with USB storage... but keep this in mind, if you have the same error, just insert the flash drive into another USB port of the laptop and repeat the download. Now you definitely won’t have any questions left: How to install Windows 7 on an HP laptop! In my opinion, we have considered all possible options;)
In contact with
Hello admin! How to install a second Windows 7 operating system on a GPT disk on a new HP ENVY laptop with pre-installed Windows 8.1 and UEFI BIOS?
I bought a new HP laptop, the hard drive has one drive (C:) with Windows 8.1 preinstalled from the store. I separated 100 GB from the C: drive, unallocated space appeared and now I want to install Windows 7 on it.
I connect the Windows 7 installation flash drive to the laptop, turn it on, enter the boot menu of the laptop, and my flash drive is simply not there. The same thing applies when using the installation disk.
Knowledgeable people advised to disable the Secure Boot option in the BIOS. Disabled it, then booted into the Windows 7 installer, selected a partition for installation, and an error appeared: The order of partitions on the disk selected for installation is different from the recommended one. For more information about installing on GPT disks, go to the Microsoft Web site (http://go.microsoft.com/fwlink/?LinkID=154898) and search for "GPT" . Continue installation? OK or Cancel.
How to install a second Windows 7 operating system on a GPT disk on a new HP ENVY laptop with pre-installed Windows 8.1 and UEFI BIOS
Of course, our reader’s data will not be deleted and after clicking OK, Windows 7 will be installed by the second system on the specified partition of the hard drive, but in today’s article I want to offer you something else.
If you purchased a new laptop with pre-installed Windows 8.1 and UEFI BIOS, but want to install a second Windows 7 operating system on a pre-created partition, then this is quite feasible for some laptop models (unfortunately not for everyone), interestingly, you don’t even need to create a bootable UEFI USB flash drive for Win 7. In this article, I will show you the easiest way to install Windows 7 as a second system on your laptop.
- Note: Friends, this method has been tested and works on all simple computers and old laptops without UEFI BIOS. You can also use it on new ASUS, HP Pavilion and HP ENVY laptops with UEFI BIOS, but there is one thing! With new laptops it's not so simple. Due to the fact that computer hardware manufacturers can change the functionality of the UEFI BIOS on a laptop at any time, I advise you to make a backup copy of the BCD boot store before proceeding. If you cannot install Windows 7 as a second system on your laptop, then you can deploy a backup of the BCD boot storage and return the laptop to the state it was before our experiments. In my article I will tell you everything step by step, so don’t worry, you will succeed.
For this article, let’s take the same HP ENVY laptop. Before starting work, let's make some preparations. First, let's create a backup of the BCD boot storage, since after installing Windows 7, the boot menu of the laptop will be changed and a choice of operating systems will appear in it: Windows 7 or Windows 8.1, if after a while you want to get rid of Windows 7 and format the partition with its files , then the system selection menu will still remain when you boot the laptop; you can remove it by simply restoring the BCD from the backup.
Creating a BCD Backup
Create a folder on disk (C:) bacup,
then open the command line as administrator and enter the command:
bcdedit /export C:\bacup\bcd
and a backup copy of the download storage, the bcd file, appears in the bacup folder. Do not delete the bacup folder on the drive (C:), at the end of the article I will show how to restore the bcd boot storage from a backup.
Disk Management
We create a partition for installing Windows 7. We enter Disk Management and see three service partitions and a 680 GB drive (C:) with Windows 8.1 installed, right-click on it and select Shrink Volume...
50 GB will be enough for me, if you intend to work seriously in Windows 7, choose a larger volume.
From the unallocated area that appears, we create a simple volume (F:), onto which we will deploy Win 7.
Windows 7 ISO image
To install the system we need , you can according to our article. I will download it directly to the desktop and double-click on it with the left mouse and attach it to the virtual drive (J:).
WinNTSetup
This program (familiar to you from) will help you deploy Windows 7 from an ISO image to the partition we created (F:) without a bootable USB flash drive or system installation disk.
Download WinNTSetup You can use it on my Yandex.Diskhttps://yadi.sk/d/xLGkpAOzhXCPcor on the official website
http://www.winntsetup.com/?page_id=5
Extract the utility from the archive and run the executable file WinNTSetup_x64.exe
Click on the Select button
and specify the path to the Windows 7 installation files. We only need the install.wim file from the sources folder of the distribution. Go to the virtual disk (J: ) to the sources folder, select the install.wim file with the left mouse and click Open.
The path to the Windows 7 installation files is indicated.
The disk on which the Windows 7 bootloader will be installed is selected automatically - Z: (section Reserved by the system, volume 350 MB).
Select the disk on which Windows 7 will be installed. Click Select
Specify New Volume (F:) and click Select Folder.
Installation
The Windows 7 installation process begins
We reboot and enter the BIOS, set the Legacy support option to Enabled, and the Secure Boot option to Disabled (sometimes this is not enough), save the settings and reboot.
The operating system selection menu opens: Windows 7 or Windows 8.1, select the first
and immediately enter the final phase of installing Windows 7.
Enter the username and computer name
We accept the license terms
Your choice
Windows 7 is loading.
If you want to boot into Windows 8.1 and it doesn’t work, then enable the UEFI interface in the BIOS and be sure to boot into Win 8.1.
In Disk Management you can see that the system drive letter (C:).
The hard disk properties indicate the GUID (GPT) partition style.
Computer window
How to remove Windows 7 without a trace
We used the “seven” and decided to delete it. To do this, boot into Windows 8.1.
Open a command prompt as administrator and enter the command:
bcdedit /import C:\bacup\bcd ,
With this command we restore the Windows 8.1 boot storage to its original state, that is, when you turn on the laptop, the menu with a choice of operating systems will not appear.
