How to remove deleted files from your hard drive
When deciding to clean out a hard drive, users usually use formatting or manually deleting files from the Windows Recycle Bin. However, these methods do not guarantee complete erasure of data, and with the help of special tools you can recover files and documents that were previously stored on the HDD.
If you need to completely get rid of important files so that no one else can recover them, standard operating system methods will not help. For these purposes, programs are used to completely delete data, including those deleted by conventional methods.
If files have already been deleted from the HDD, but you want to erase them permanently, then you need to use special software. Such software solutions allow you to erase files in such a way that later they will be impossible to recover even with the help of professional tools.
In short, the principle is as follows:
- You are deleting a file "X"(for example, through the “Trash”), and it disappears from your field of view.
- It physically remains on the disk, but the cell where it is stored is marked free.
- When writing new files to disk, the cell marked as free is used and the file is overwritten "X" new. If the cell was not used when saving a new file, then the previously deleted file "X" remains on the hard drive.
- After repeatedly overwriting the data on the cell (2-3 times), the initially deleted file "X" finally ceases to exist. If the file takes up more space than one cell, then in this case we are talking only about a fragment "X".
Therefore, you yourself can delete unnecessary files so that they cannot be restored. To do this, you need to write any other files 2-3 times to all the free space. However, this option is very inconvenient, so users usually prefer software tools that, using more complex mechanisms, do not allow them to recover deleted files.
Method 1: CCleaner
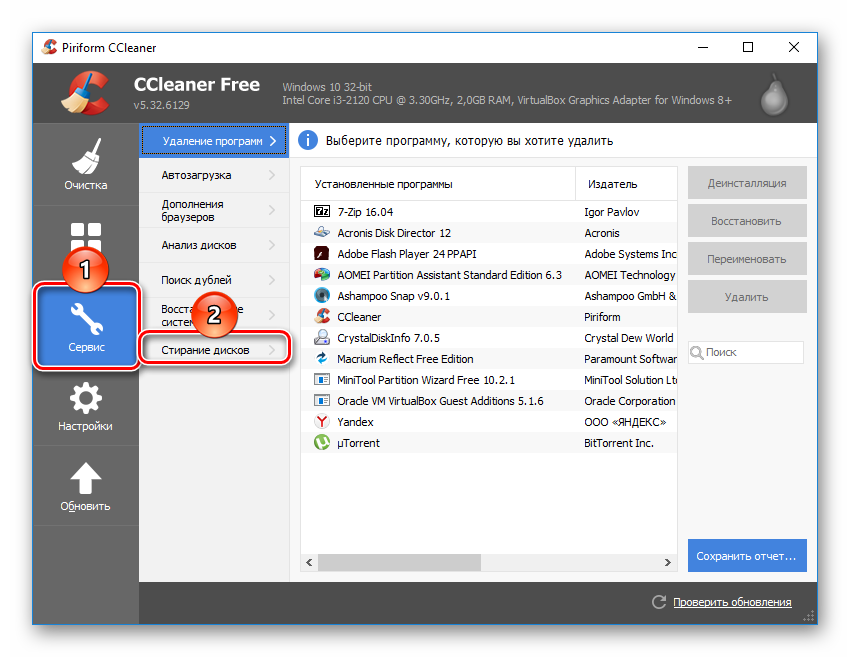
A well-known program designed to clean your hard drive of debris, it can also reliably delete data. At the user's request, you can clear the entire drive or just free space using one of four algorithms. In the second case, all system and user files will remain intact, but unallocated space will be securely erased and inaccessible for recovery.
Method 2: Eraser
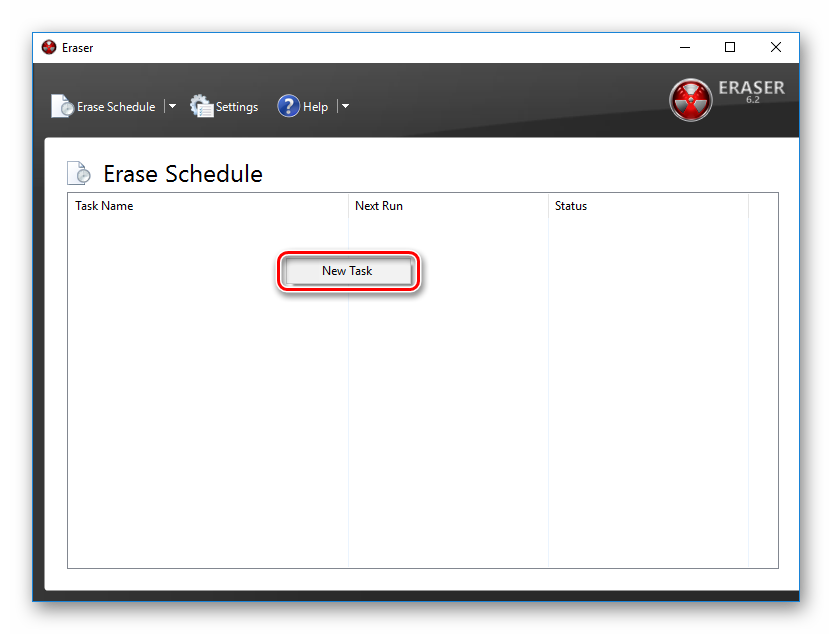
Eraser, like CCleaner, is easy and free to use. It can reliably delete files and folders that the user wants to get rid of, and in addition to this, it cleans up free disk space. The user can choose one of 14 deletion algorithms at his discretion.
The program is built into the context menu, so by right-clicking on an unnecessary file, you can immediately send it to Eraser for deletion. A small minus is the lack of Russian in the interface, however, as a rule, basic knowledge of English is sufficient.
Method 3: File Shredder
The File Shredder program is similar in its operation to the previous one, Eraser. Through it you can also permanently delete unnecessary and confidential data and erase free space on the HDD. The program is built into Explorer and can be called by right-clicking on an unnecessary file.
There are only 5 erasure algorithms, but this is quite enough to safely delete information.
Note: Despite the fact that it is very easy to use such programs, this does not guarantee complete data deletion if only part of the disk is overwritten.
For example, if there is a need to permanently delete an image, but the OS has thumbnail display enabled, then simply deleting the file will not help. A knowledgeable person will be able to restore it using a photo that stores sketches. A similar situation is with the paging file and other system documents that store copies or sketches of any user data.
Method 4: Multiple formatting
Normal formatting of the hard drive, of course, will not delete any data, but will only hide it. A reliable way to delete all data from a hard drive without the possibility of recovery is to perform a full format and change the file system type.
So, if you use the NTFS file system, then you need to complete(not fast) formatting to FAT and then again to NTFS. Additionally, you can mark up the drive by dividing it into several sections. After such manipulations, there is practically no chance of data recovery.
If you have to work with the hard drive where the operating system is installed, then all manipulations must be performed before booting. To do this, you can use a bootable USB flash drive with the OS or a special program for working with disks.
Let's analyze the process of multiple full formatting with changing the file system and partitioning the disk into partitions.
- Create a bootable USB flash drive with the desired operating system or use an existing one. On our website you can find instructions for creating a bootable flash with,.
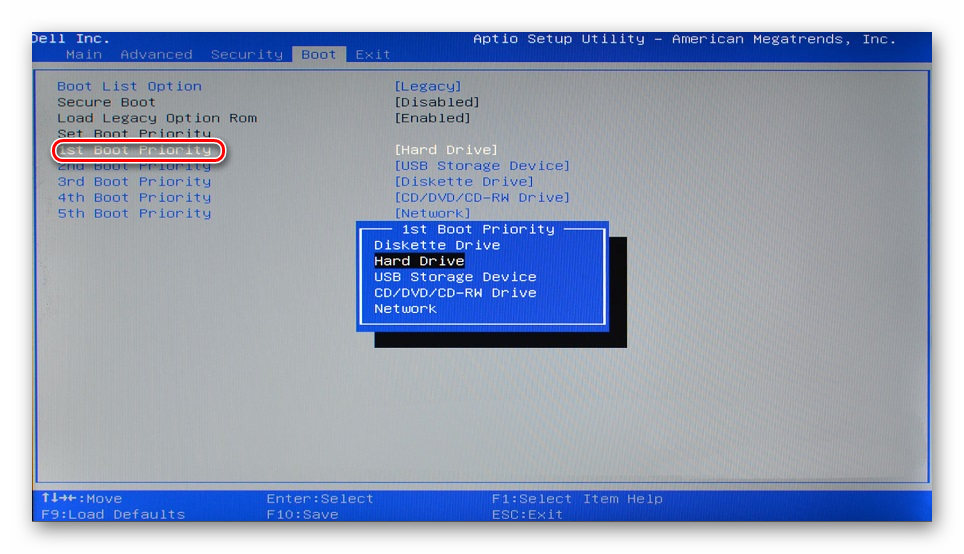
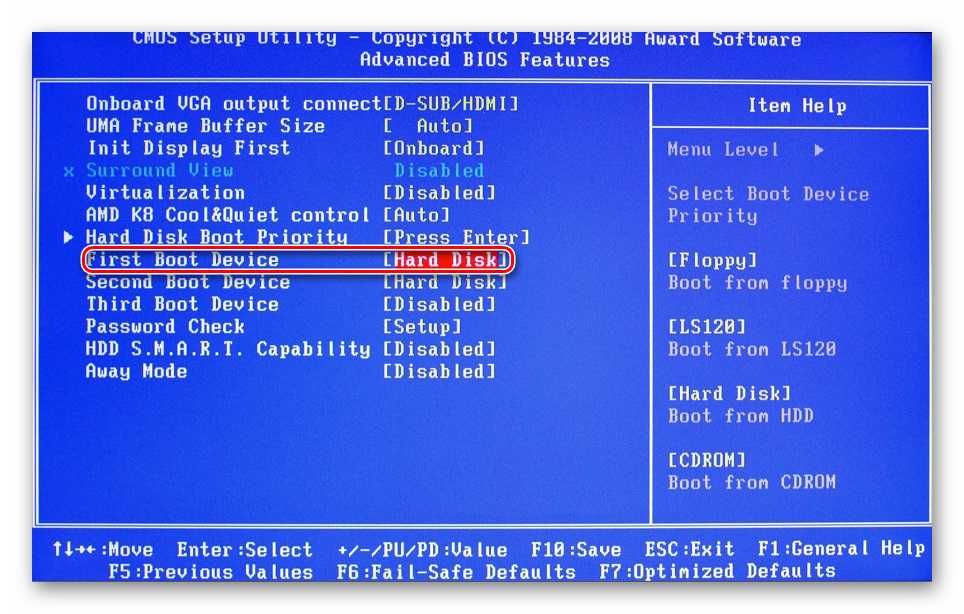
- Connect the USB flash drive to your PC and make it the main boot device through BIOS.
In AMI BIOS: Boot > 1st Boot Priority > Your flash
In Award BIOS: > Advanced BIOS Features > First Boot Device > Your flash
Click F10, and then "Y" to save settings.
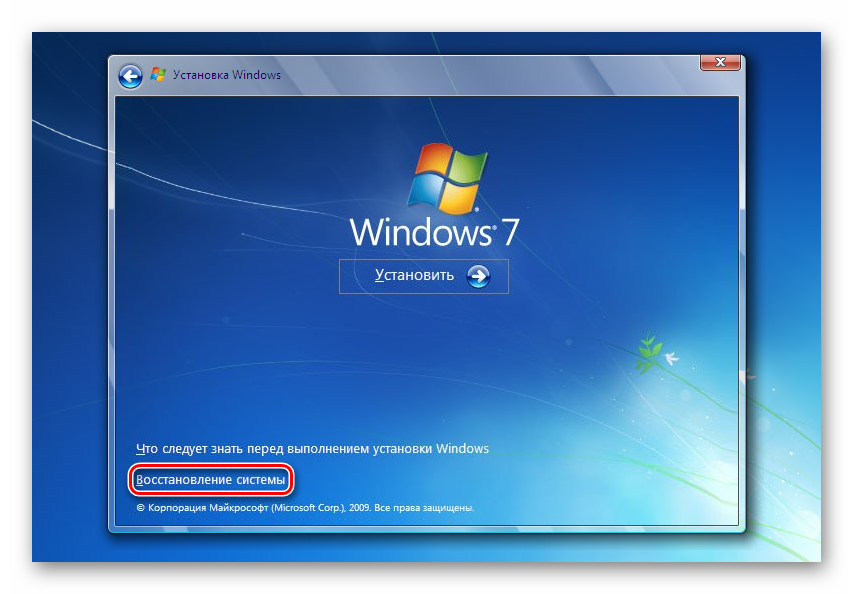
- Before installing Windows 7, click on the link "System Restore".
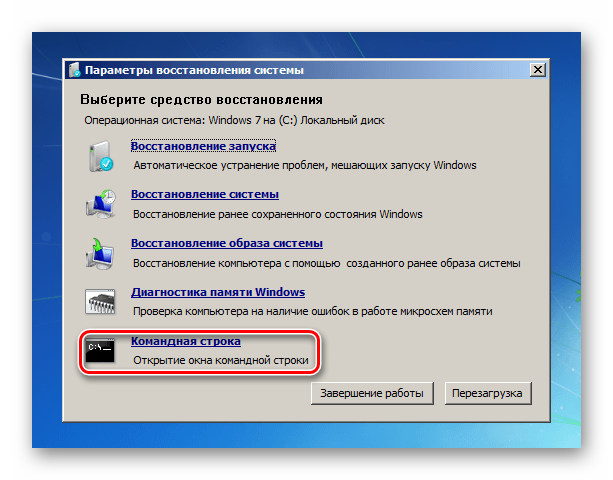
In Windows 7 you are taken to "System Recovery Options", where you need to select the item "Command line".
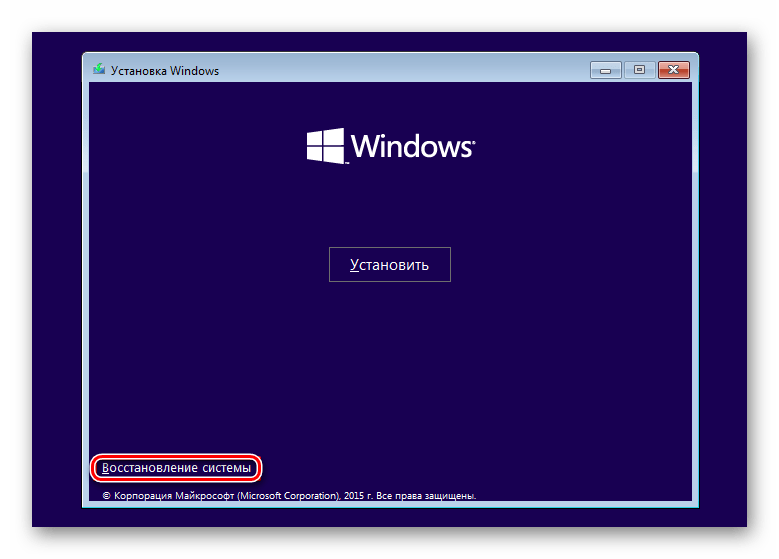
Before installing Windows 8 or 10, also click on the link "System Restore".
- From the recovery menu, select "Troubleshooting".
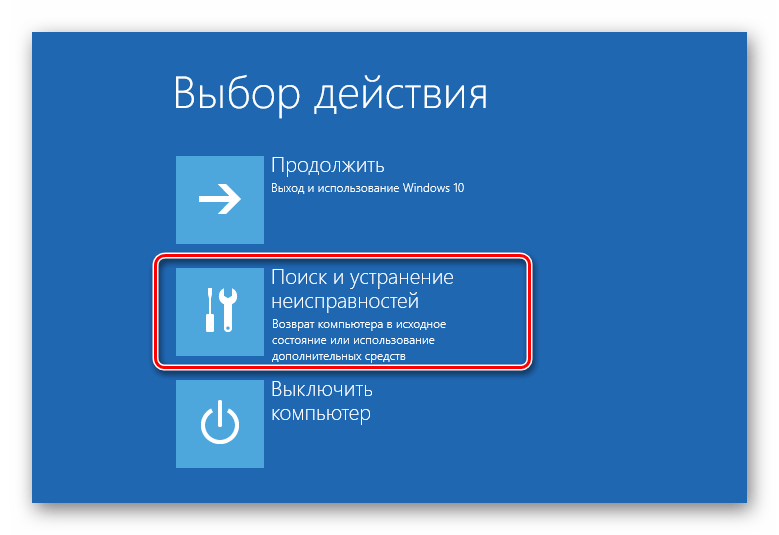
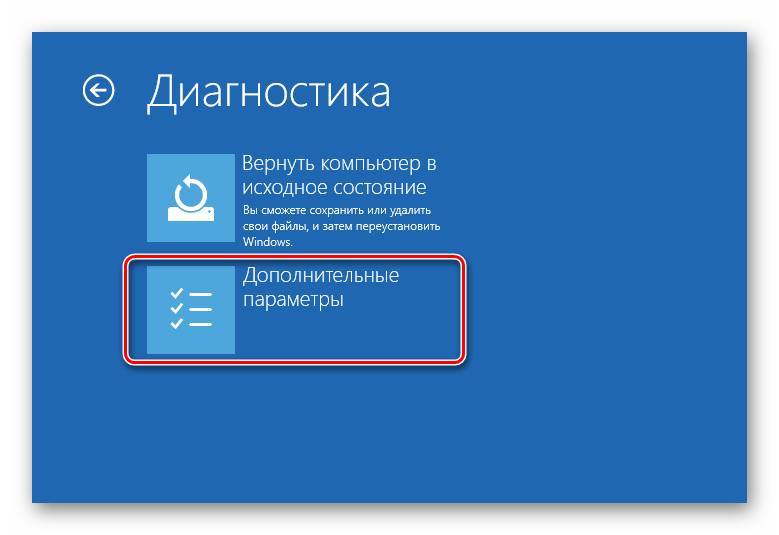
- Then "Extra options".
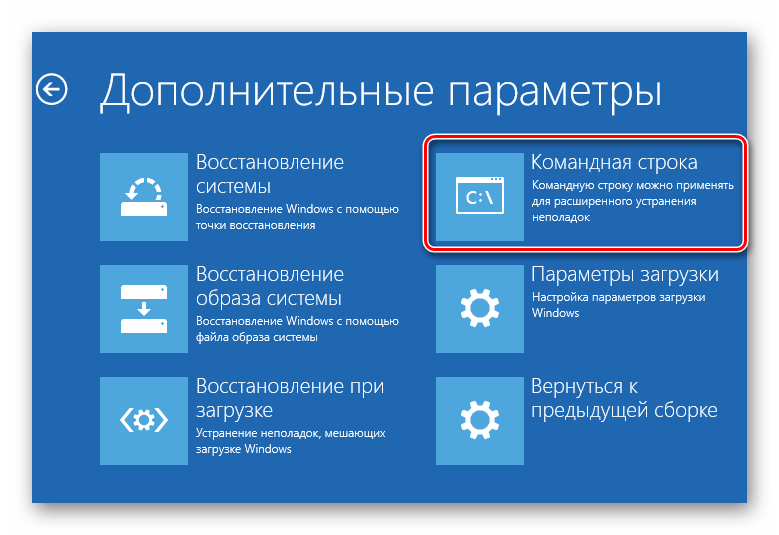
- Select "Command line".
- The system may prompt you to select a profile and also enter a password for it. If you have not set a password for your account, skip entering and click "Continue".
- If you need to find out the real letter of the drive (provided that several HDDs are installed, or you only need to format the partition), enter the command in cmd
wmic logicaldisk get deviceid, volumename, size, description
and press Enter.
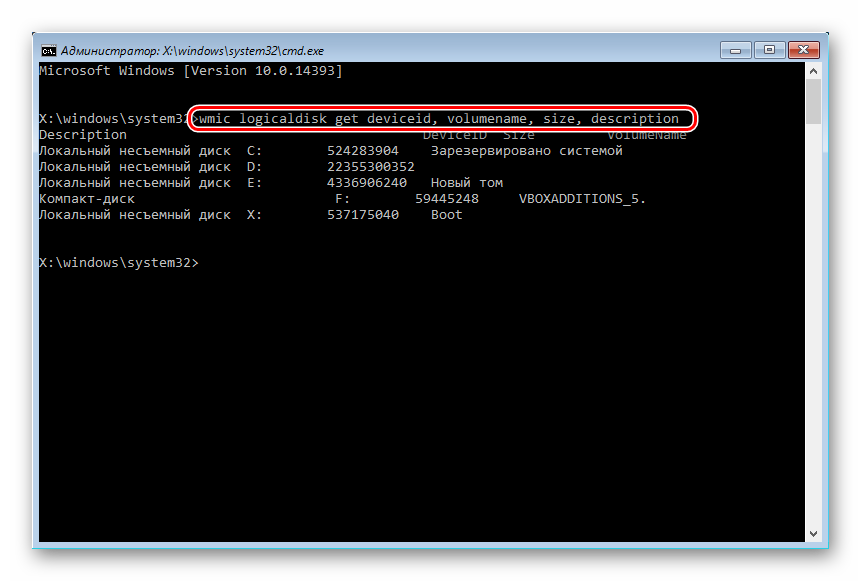
- Based on the size (in the table it is in bytes), you can determine which letter of the desired volume/partition is real, and not assigned by the operating system. This will protect you from accidentally formatting the wrong drive.
- For complete formatting with changing the file system, write the command
format /FS:FAT32 X: - if your hard drive currently has the NTFS file system
format /FS:NTFS X: - if your hard drive currently has a FAT32 file system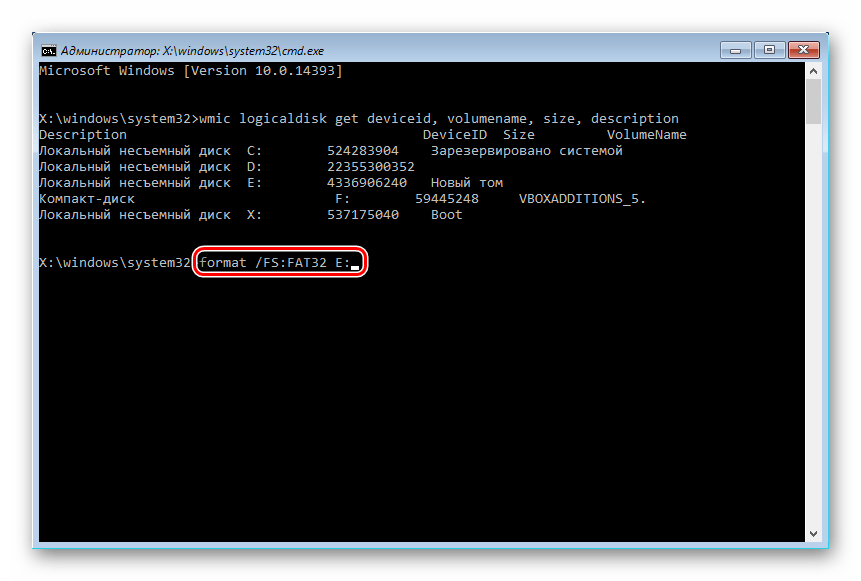
Instead of X Substitute the letter of your drive.
Do not add a parameter to the command /q- it is responsible for quick formatting, after which file recovery can still be done. You only need to do a complete formatting!
- After formatting is complete, write the command from the previous step again, only with a different file system. That is, the formatting chain should be like this:
NTFS > FAT32 > NTFS
FAT32 > NTFS > FAT32
After this, the installation of the system can be canceled or continued.
