4.1. What is a firewall for?
Antivirus protects system and user files from malicious software. The purpose of firewalls is to filter incoming and outgoing traffic and block unauthorized access to a computer.
To work on the Internet, the operating system uses services that open ports and wait for connections to them. Knowing the port number, the user can connect to it from a remote computer and gain access to some resources. The problem is that the implementation of some services contains errors that can be used for a network attack - either a virus attack or one aimed at disrupting the operation of a vulnerable service or the system as a whole. A firewall, using a set of rules, allows or denies access to a computer from the Internet.
Note
Initially, a firewall was a partition in locomotives located between the engine room and the cars and protecting the latter from possible fire. In its modern meaning, this word began to be used approximately in the early 1990s, when an unambiguous translation could not be found for the English word firewall. Since the German word Brandmauer meant the same thing and was already known, they began to use it, although only in the post-Soviet space.
The first to appear packet filters, which acted based on information placed in the header: IP address, source and destination port numbers, packet type and length. It looked like this: A computer on the internal network with a specific IP address is allowed to connect to any external computers using only the specified port. For example, the SMTP protocol, which is used to send email, uses port 25, the POP3 protocol, through which mail is received, uses port 110, web services are usually configured on port 80. When trying to access other services, the firewall blocked the connection.
Gradually it became clear that such a static scheme was not enough. This led to the emergence of filters that monitor the state of connections (stateful). Gradually, the functionality of firewalls increased, application-level filters and connection filters appeared that could control the context. Let's not delve into history, especially since today it is almost impossible to find them in their pure form.
Most often, it is difficult for the user to decide what to deny or allow to whom. The Windows operating system accepts the following user interaction with the firewall in use. For example, the address or name of the server is typed into the web browser. The firewall, having analyzed the request, temporarily blocks it and asks the user for confirmation, providing him with all the information: the application or service, the IP address or name of the remote host and the destination port. If you really intended to access the Internet using this utility, the user confirms this and the firewall allows the connection. In order not to disturb the user in the future, the answer is remembered. Although, to reduce the likelihood of error, the process is repeated after some time.
Thus, if by chance a connection was allowed for a hidden Trojan, there is a possibility that it will not be allowed through next time. However, virus creators also use this interaction feature. Now, in order to hide their program, they just need to download it as an Internet Explorer extension; sometimes the browser itself is called, the address bar of which contains not only the name of the remote host, but also the information that was stolen. The user does not always understand the essence of the request, so in most cases the deception is successful.
A firewall must be used in conjunction with an antivirus program. These are not mutually exclusive applications, but rather complementary ones, although many of today's firewalls have grown into real security systems that can monitor the above situation.
It is necessary to control both incoming and outgoing traffic. In the first case, you will be protected from unauthorized access attempts from the outside, and control of outgoing traffic will allow you to block Trojans and other malicious programs trying to gain access to the Internet, as well as unnecessary traffic in the form of banners. It should be noted that while all firewalls are similar, each specific implementation may contain bugs.
The emergence of built-in Firewall Windows XP was welcomed by many, but it soon became clear that it only controls incoming traffic, and is inferior to most solutions in terms of ease of settings. Improved Firewall in Windows Vista it has somewhat greater capabilities - it supports filtering of incoming and outgoing traffic. It can prevent applications from accessing or responding to requests from other computers, so multimedia programs can play media files on the local computer but cannot connect to Web sites on the Internet. Firewall Windows Vista monitors operating system resources and, if they begin to behave differently, which usually indicates problems, blocks the connection. If another program tries to go online to install an add-on, the user will see a warning message sent Firewall.
However, in practice, the user has few means for fine-tuning, and a malicious application, once on the computer, will first of all try to create an allowing rule, focusing specifically on the built-in Windows Firewall, or simply disable it, so we will not consider it, but several typical solutions.
4.2. Personal firewall Outpost Firewall
Outpost Firewall began with the hacker attack detection utility Jammer, which quickly became popular. The reason for its popularity turned out to be banal. A foreign government company used a Trojan to spy on its users. A certain employee installed Jammer and not only discovered the spyware, but also tracked the direction of its activity. This incident hit the press, a scandal broke out, and Jammer immediately gained popularity. The Outpost Firewall Pro firewall, the first version of which appeared in 2001, almost immediately gained recognition and today is popular due to its wide functionality and low cost.
Today the company offers several options for Outpost Firewall Pro:
Outpost Firewall Pro 2008 is a personal firewall that provides comprehensive Internet protection and is designed for personal use. This version is compatible with Windows Vista, an early version 4.0 is available on the project website, supporting Windows 2000, XP and Server 2003;
Outpost Security Suite Pro – also intended for personal use, provides 100% computer protection, includes all the necessary security tools: firewall, antivirus, antispyware, antispam filter and proactive protection;
Outpost Network Security is a solution for protecting small and medium-sized businesses from external and internal threats;
Outpost Firewall Free is a personal firewall for those who surf the Internet irregularly.
Let's take a look at Outpost Firewall Pro 2008.
Installing Outpost Firewall Pro
Installation of Outpost Firewall Pro is traditional. In the first step, you can select the installation language - Russian, on which all messages will then be displayed. Accept the terms of the license agreement. During the installation process, you can check the box of the same name to download the latest Outpost Firewall updates. After copying the files, it will appear Setup Wizard.
In the first window Setup Wizards(Fig. 4.1) you have to select the level of security that the program will provide:
Elevated– for advanced users; the firewall will provide the greatest possible protection;
Ordinary– Outpost Firewall Pro will protect the system from the most dangerous methods of penetration, without bothering the user with constant requests; this level is recommended for most cases.
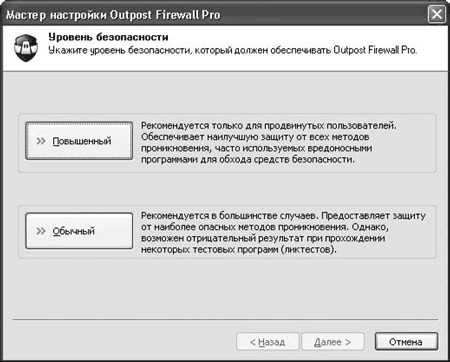
Rice. 4.1. Outpost Firewall Pro Setup Wizard
Scan files on startup– prevents known malware from running, but does not block other access attempts such as copying or saving;
Scan files on any access attempt– prevents all attempts to access files infected with known malware.
The second option provides the most protection, but may negatively impact system performance. If you notice a decrease in performance, on low-power computers it is better to then switch to the first option. To improve performance, you can check the box Enable verification status caching. In this case, the first time you access it, a hidden cache file will be created, the next time it will be checked against the current state, and if no differences are found, the check will stop.
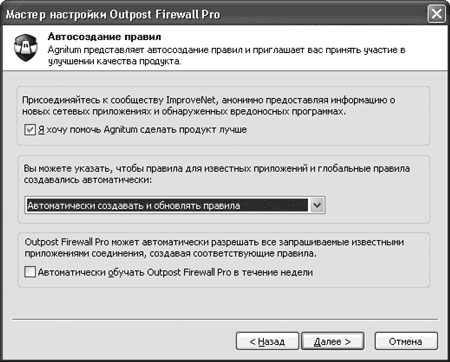
Rice. 4.2. Configuration Wizard Dialog Box
The following options are possible here:
Automatically create and update rules– the most convenient and recommended option: as applications go online, the user will create rules for them and update them as necessary;
Automatically create rules– the same, but without automatic updating of the rules; in the latter case the user is prompted;
Don't create rules automatically– rules are not created automatically.
By checking the box Automatically train Outpost Firewall Pro within a week, you will enable automatic creation of allowing rules for known applications that request connections.
Additionally, Agnitum offers to take part in the ImproveNet program. If you check the appropriate box, data about network applications for which there are no rules will be automatically collected, new system rules and application usage statistics will be created. The collected information will be sent to the development company once a week (the information will be transmitted in compressed form in the background without interruption in the operation of the system). Based on the information collected, new rules will be created, which will then become available through the update system. The result of the ImproveNet program should be a reduction in the number of requests to the user: Outpost should gain greater autonomy in decision making. If necessary, these settings can be changed by running the command Settings > General > ImproveNet.
When you launch the program for the first time, a prompt will appear on the screen to register the program; If you do not have a license, you can legally use Outpost Firewall for 30 days by clicking the button Use.
Working with Outpost Firewall
After installation, Outpost Firewall is configured and ready to use. This is indicated by an icon that appears in the notification area, the appearance of which depends on the selected policy. By default it is installed training mode. According to it, every time an application for which a rule is not set tries to access the Network, the user is presented with a request (Fig. 4.3) containing the necessary information that allows, in most cases, to make a decision: program name, remote service, port number and IP address.
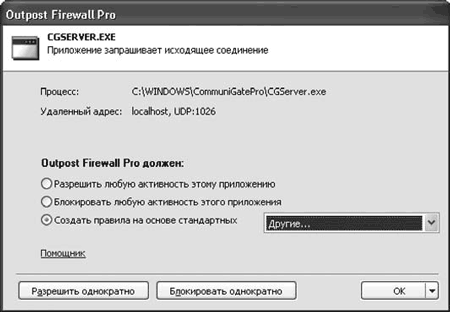
Rice. 4.3. The application is trying to access the network
Additionally, when the Anti-Spyware module is enabled, the request is analyzed, and if everything is normal, a label appears next to the application name No spyware detected. Based on the information received, the user can make one of the following decisions:
Allow any activity to this application– the application is added to the list of trusted ones, and all connections requested by it are automatically allowed;
Deny any activity to this application– the application receives the status of prohibited, and all connections are automatically blocked;
Create a rule based on standard– most applications require access to the Network only through certain protocols and ports; Outpost includes templates that can be used to create rules for such applications - in this case, the application will be limited to the specified protocols;
Allow once or Block once– if you doubt the purpose of the program, you can allow or deny its access to the Network once and monitor the application’s reaction.
Clicking on the link Assistant, you can get more detailed information about the process to help you make the right decision, including information from the developers' website. In the menu buttons OK can be activated Auto-learning mode.
For such an application, you can also create your own rule with a description. For example, let's create a rule for the Firefox web browser. In the context menu called by right-clicking the icon in the notification area, select Settings, in the window that appears (Fig. 4.4), go to the tab Firewall > Network Rules and press the button Add.
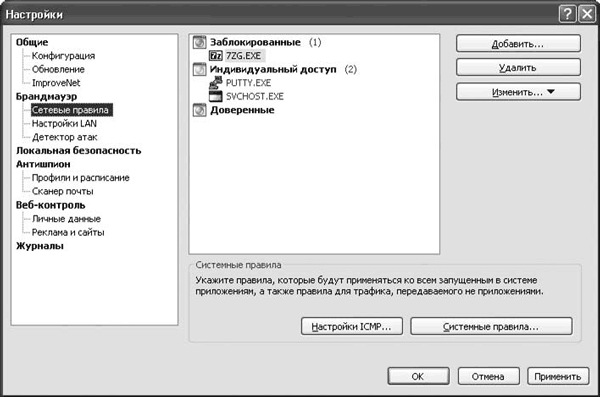
Rice. 4.4. Network rules creation window
The program will ask you to specify the path to the executable file. Using your file manager, navigate to the directory where Firefox was installed (by default this is C:\Program Files\Mozilla Firefox), where select the file firefox.exe. By default, the application falls into the category Blocked; to allow him access to the Network, select the item in the context menu Always trust this app.
In this case, the application will have full access. To customize its behavior more finely, in the same menu, select Use rules. A window will appear Rules editor, where on the tab Network rules need to press a button New. In the window that appears, edit the rule by specifying the event (direction, address and port) and parameters (notify, activate dynamic filtering, do not register). Click on the underlined link in the field Decoding the rule you can change the parameter values.
After the end of the training period, that is, when all the rules have been created and the user no longer receives requests, you need to go to Background mode work. In this case, the firewall operates in invisible mode to the user and does not display an icon in the notification area. Thanks to this, for example, parents can block unwanted traffic and control work on the Internet without their child noticing. In this mode, Outpost Firewall consumes fewer resources.
To switch to background mode, call the settings window. On the tab Are common in the dropdown list Select boot mode install Background. To prevent anyone from changing the firewall settings, on the same tab, select the switch Password protection to position Turn on and set a password.
Except Training modes The following policies exist (they are available in the context menu of the notification area icon):
Block everything– all connections are blocked; this policy can be used, for example, to temporarily disconnect a computer from the Network;
Lock mode– all connections except those allowed are blocked; after the training stage it is worth using this particular policy;
Resolution mode– all connections are allowed, except prohibited ones;
Switch off– the operation of Outpost Firewall, including the attack detector, is suspended, all connections are allowed.
Program interface
After installation, Outpost Firewall is ready to work, and most of the time the user will communicate with it solely in the form of answering questions when trying to access any application on the Internet. To view robot statistics and network activity of applications, fine-tune the firewall policy and plug-ins, you need to open the main program window (Fig. 4.5).
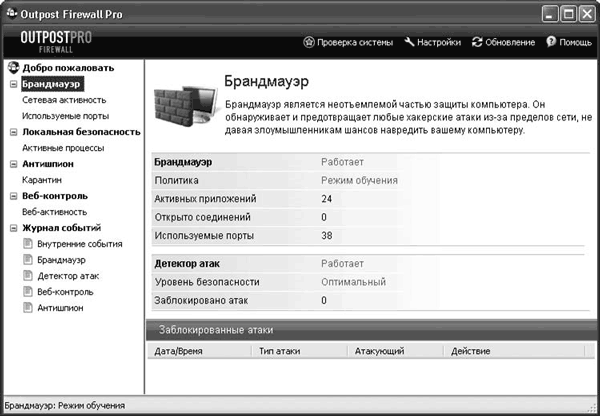
Rice. 4.5. Main program window
Visually, the main window is divided into two parts. At the top there is a panel with buttons that provide quick access to some functions.
To display information in a user-friendly form, there is an information panel located on the left, the work with which is reminiscent of working in Conductor Windows. The left panel selects a category, and the right panel displays detailed information. Next to some items there is a plus sign, by clicking on which you can expand the list. Selecting the item Welcome, you can get information about the license, view news from the developer’s website, etc. Item Firewall contains two subparagraphs.
Network activity. By selecting this item, you will be able to view a list of all applications and processes that have currently active connections, and detailed information about them (protocol, IP address and port, connection start time and duration, number of bytes sent and received, speed, status).
If you see a connection that you did not allow, or you suspect that a hidden Trojan is operating, you can terminate the connection by right-clicking on the corresponding line on the right side of the screen and selecting the item in the context menu that appears Disconnect. By selecting the item in the same menu Columns, you can edit the information output fields. Paragraph Create a rule allows you to quickly open the rules editor for this application.
Ports used. This displays all applications and processes that currently have open ports, including those waiting for connections.
Component Local Security Protects your computer from unknown or disguised threats. Here you can change the security level and create a list of exceptions for processes that do not need to be monitored, enable or disable the internal protection of Outpost Firewall Pro. In subparagraph Active processes A list of all active processes is displayed, indicating their network activity.
Component Anti-spy Protects your computer from Trojans, worms and spyware. At the touch of a button Run system check you can scan the system for threats and suspicious objects. In this case, you can choose one of the options for checking the system: Fast, Full And Selective. All suspicious objects will be moved to the tab Quarantine, from where they can be deleted, simply restored, or restored by adding them to exceptions. The real-time protection mode and the operation of the mail scanner are also set here.
On the tab Web control shows the number of blocked objects (Cookies, active content of web pages, referrers, advertising banners), as well as attempts to transfer personal data.
Note
Referrers contain information that allows you to track from which resource the user was redirected to a given address. A set of referrers allows you to find out which resources were visited.
All events recorded by Outpost Firewall Pro can be viewed by going to The event log. They are divided into categories (internal events, firewall, attack detector, web control, anti-spyware), which is convenient for analysis.
Setting up Outpost Firewall Pro
Outpost Firewall Pro settings can be accessed by clicking the button of the same name. The main settings items match the names in the main program window (Fig. 4.6).
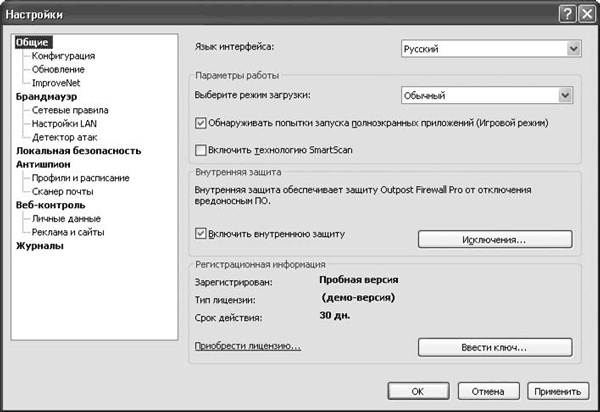
Rice. 4.6. Outpost Firewall Pro settings window
Let's look at the most commonly used settings and those that may be needed at the initial stage of work.
On the menu Are common select the interface language, download mode and game mode resolution, in which the firewall does not bother the user with messages. By checking the boxes, SmartScan technology and internal firewall protection are activated. By going to the submenu Configuration, you can protect the settings with a password, save and restore the configuration. The update schedule is indicated in subparagraph Update. After installation, updates are checked hourly. This can be changed if necessary.
On the menu Firewall The firewall operation mode is configured in normal, background and game mode. During installation, Outpost Firewall Pro analyzes network settings, and local networks that are safe from its point of view are entered in the sub-item LAN Settings. By default, any communication with such networks is allowed. If necessary, here you can change the list of trusted networks, individual IP addresses and domains. Check box Fiduciary next to the address will allow all connections; To allow connections to shared files or directories using the NetBIOS protocol, select the checkbox of the same name. Module Attack detector, the settings of which are located in the corresponding menu (Fig. 4.7), adds functions that are usually not typical of classic firewalls: detection and prevention of computer attacks from the local network and the Internet. The module scans incoming data for signatures of known attacks, and also analyzes scanning attempts and attacks aimed at denial of service (DoS - Denial of Service), and other, including unknown, network attacks.
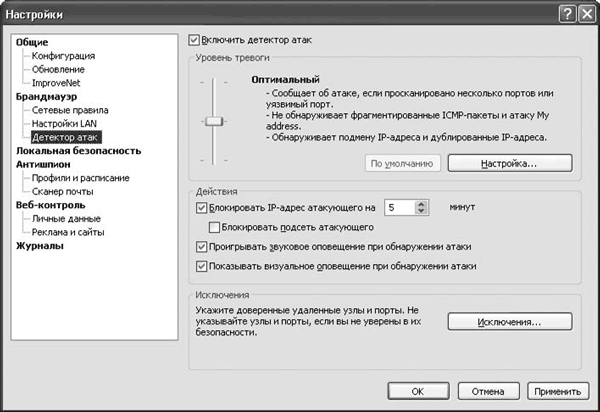
Rice. 4.7. Attack Detector module settings
Advice
If a network system for detecting and repelling attacks is installed on your computer, the Attack Detector module should be disabled by unchecking the corresponding box.
In field Alarm level the alarm level and actions of the module when an attack is detected are configured. Using the slider, you can select one of three alarm levels: Short, Optimal And Maximum, which differ in their response to some benign types of attacks. The latter provides the highest level of protection, but will issue a large number of warnings. Pressing the button Settings, you can specify what types of attacks Outpost Firewall should detect and prevent. On the tab Ethernet configures protection against certain attacks typical of Ethernet and Wi-Fi networks. In particular, ARP filtering should be enabled here to protect against attackers spoofing the IP address. In area Ethernet attacks the module's reaction to such attacks is configured. On the tab Additionally you can edit the list of attacks that the module should detect and prevent. Each attack has a short description, but it is recommended to disable anything only if you know exactly what you are doing. Pressing the button Vulnerable ports, you can specify all the port numbers that require special attention. Here you can enter the port numbers traditionally used by Trojans and remote computer control programs. Check box Block the attacker for ... minutes allows you to set the period of time for which the IP address of the attacking node will be blocked, that is, no one will be able to connect to the protected computer from this address. Additional checkbox Block the attacker's subnet allows you to protect yourself in case an attacker wants to change the IP address (for example, when reconnecting via a modem connection, you can get a different IP address). To receive alerts when attacks are detected, select the checkboxes Play a sound alert when attacks are detected And Show visual alert when attacks are detected. To ensure that trusted nodes are not blocked by the attack detector, they should be specified in the field Exceptions– all packets sent by them will not be considered malicious.
Module setup Local Security similar to that described above. Using the slider, depending on the nature of the current work, one of four security levels is set - from Short, which controls only network access requests from modified executable files, to Maximum, the activation of which enables maximum system protection. Pressing the button Settings, you can specify which actions, events, and components this module should monitor. You should only use this option if problems arise or if you know exactly what you want to achieve. In most cases it is more convenient to use the slider Security level. Applications that may be called by other programs can be listed Notable Applications, and configure control rules individually in the list Anti-Leak Control Exceptions. To do this, click the button of the same name and specify the path to the executable file. Module Local Security will not control their actions and bother the user with requests.
On the tab Anti-spy Enables or disables the spyware control module and the configuration of alerts and exceptions. Check box Check for spyware when starting a program will allow scanning of all running programs after Outpost Firewall Pro starts. If the scan loads the system, you can select the checkbox Run specified tasks with low priority. In subparagraph Profiles and schedule system check profiles and automatic check tasks at specified times are configured. When setting up a scan profile, you can specify which system objects and hard drive partitions should be scanned, as well as scan certain types of files and archives. Using a drop-down list Choose an action Sets the default action for detected malicious objects. Check box Skip files larger than: ... MB allows you to set the maximum size of scanned files. On the tab Mail scanner configures the mode for checking attachments in emails. If your mail is already being scanned by an antivirus program, you can disable such scanning by checking the box Disable attachment filter. The remaining items allow you to rename attachments with specified extensions or quarantine them.
Tab Web control contains settings for the module of the same name. Use the slider to select the level of web control. At the lowest Lightweight Only advertising based on keywords is blocked, interactive elements are allowed. Even though interactive elements were originally designed to simplify user interaction, they can be exploited by hackers. When setting the level Optimal Some dangerous interactive elements are blocked. Pressing the button Settings, you can specify which specific elements to block or allow: ActiveX and Visual Basic scripts, Java applications and scripts, Cookies, pop-ups, external interactive elements, hidden frames, animations and referrers.
Like other information sources, many Internet resources exist thanks to advertising. Some sites abuse banners, which are images of different sizes, which leads to slower loading times. In addition, a user who pays per megabyte loses valuable traffic. Disabling the display of pictures only partially solves the problem.
Note
It is generally accepted that banners slow down loading due to their size, which sometimes exceeds the size of the information itself, which is why the user downloaded the resource. That's not all: banners are loaded using scripts that generate the address dynamically, but most often from other sites, so in some cases the user is forced to wait until the site is found and the information he then sees is determined.
When setting the slider to level Maximum Ads can be blocked by size. However, active content is used on many resources today, and without its activation, full-fledged work is impossible. Such sites can be added to the tab Exceptions. On the tab Personal data blocking the transfer of personal data is configured, for example, an attempt to transfer a credit card number. By setting various parameters, you can automatically replace personal information with asterisks or block the transmission of such packets. However, if you work with online stores and other resources that require such information, add them to the menu Exceptions. You can completely block known malicious sites and configure ad blocking by keywords in the subsection Advertising and websites. On the tab By keywords you can specify a list of keywords that if matched in HTML tags IMG SRC= And AHREF= their download will be blocked. Pressing the button Download or Save, you can download a list obtained from another computer, or save such a list for later use on other systems. Tab To size contains a list of picture sizes that, if matched in the HTML tag A the drawing will be blocked. To add a banner size that is not in the list, enter its data in the fields Width And Height and press the button Add.
4.3. Free firewall COMODO Firewall Pro
Without a doubt, Outpost Firewall is rich in capabilities and allows you to provide complete protection. However, many users do not want or are not able to pay for the software product. Let's consider one of the available free firewalls - COMODO Firewall Pro. There are no variety of additional features in such products, but it performs the main function - protecting network connections, and to combat spyware, viruses and other “gifts” that the Internet is rich in, you can use other programs described in this book.
COMODO Personal Firewall Pro was developed by the American company Comodo Group and has repeatedly won prizes in various tests. The project website is located at http://www.personalfirewall.comodo.com/. This firewall is able to independently deal with most potential threats and issue the user with an appropriate warning and recommendation. For personal use, Comodo Firewall is distributed free of charge, but for a fee the product provides additional features. Although its characteristics are already sufficient: it recognizes several thousand different applications in various categories (adware, spyware, secure, etc.). You can add registry and application file monitoring functions; Suspicious files may be sent to the company’s server for analysis by specialists. The program has a simple and user-friendly interface, unfortunately, the latest version 3.0 is only in English. Version 3.0 will work in Windows Vista, 64-bit versions of Windows XP and Windows Server 2003. An earlier version 2.4 is available on the project website, which has a version with a Russian interface. Version 2.4 supports Windows 2000.
In the new version, the firewall has been moved to a new architecture, called A-VSMART (Anti-Virus, Spyware, Malware, Rootkit, Trojan). Its task is to significantly increase the level of protection through more careful traffic control, process monitoring and restriction of access to critical system objects. Version 3.0 has become more flexible in configuration, the user has more parameters at his disposal. A group of pre-configured policies allows you to build more complex rules, if necessary.
Working with Comodo Firewall Pro
Installation of the program is traditional and, despite the lack of a localized interface, simple. In most cases, it is enough to accept the default settings and click the button Next to go to the next step. After collecting system parameters and selecting a directory for installation, the wizard will launch Comodo Firewall Pro Configuration Wizard. In the first step, it will ask you to select the application operating mode: Firewall with Defense + (Recommended) or Firewall. The second mode is to work as a firewall without additional features. If you don't have an application installed on your computer that causes a conflict when working with it, you should choose the first option, which provides maximum protection. The next step is to answer whether to connect A-VSMART - answer positively.
After installation, the program begins to learn, monitoring the launch of any applications on the user’s computer and attempts to establish a connection. If COMODO cannot make a decision on its own, a prompt window will appear (Figure 4.8) prompting the user to do so. The color of the top of the window depends on the severity of the situation. If COMODO evaluates an event as critical, the color will be red; if the danger is not so great, it will be yellow.
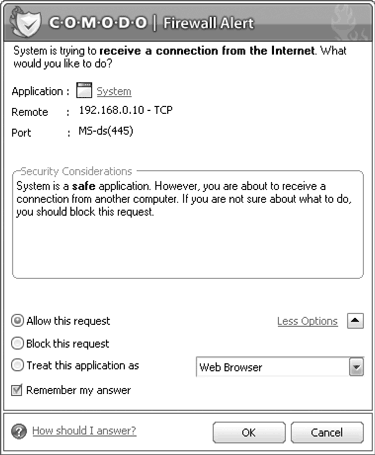
Rice. 4.8. Request to user from COMODO
At the top of the field Application indicates the application that is participating in the request, in Remote– IP address of the remote system and protocol (TCP or UDP), and in Port– the port on the local system to which the request was received. The user can choose one of the following options:
Allow this request– allow this connection;
Block this request– block this connection;
Treat this application as– indicate how to view this application.
When selecting the last item using the drop-down list, you must specify a predefined rule. If it is a network request - Web browser(Web browser) FTP client(FTP client), Trusted application(Trusted Application), Blocked application(Block application), Outgoing Only(Outgoing only). If this application is Installer or Updater(Installation or Updater) Trusted application, Windows System Application(Windows System Application) Isolated Application(isolated application), Limited Application(limited application). To ensure COMODO remembers your selection, make sure the checkbox is checked Remember my Answer. When your selection is made, press the button OK.
When running a local application or attempting to establish a connection with another computer, the user is informed via a pop-up window Firewall is learning(Fig. 4.9).
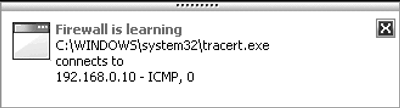
Rice. 4.9. Firewall training in progress
COMODO Firewall interface
Let's look at the main points. Visually, the program window is divided into three parts. At the top there is a panel with four buttons that provide access to the main functions of the firewall. To get a summary of the current status, click Summary(Fig. 4.10).
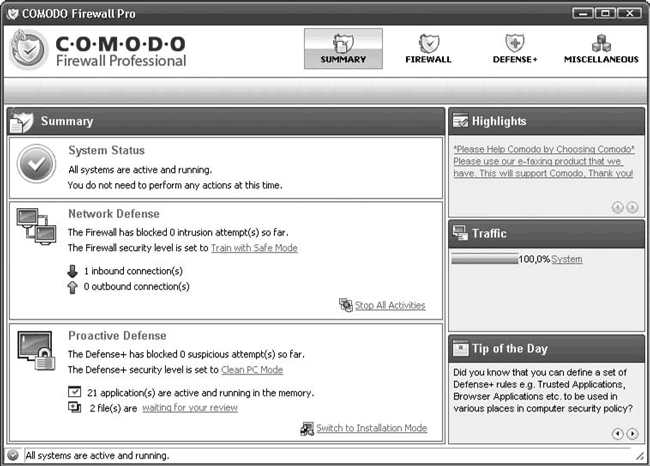
Rice. 4.10. COMODO interface
In field System Status shows the status of the firewall; After the system boots, it will take some time to check the current settings and running applications and services, after which it will display the result. If everything is fine, you will see a green icon. If problems arise, COMODO itself will suggest a solution. In field Network Defense shows the total number of inbound connection(s) and outbound connection(s). Clicking the link Stop all Activities, you can quickly block all connections. Link after The firewall security level is set to, shows the current protection level. Clicking on it will take you to the settings window Firewall Behavior Settings, in which you can use the slider to set one of five levels of protection:
Disabled– network policies are disabled, all incoming and outgoing traffic is allowed;
Training Mode– the firewall is in learning mode, information about applications establishing connections is remembered without contacting the user;
Train with Safe Mode– default mode; network policies are enabled, information about outgoing traffic initiated by secure applications is remembered, the user is notified by a pop-up window, when an unknown application tries to establish any network connection, the user receives a request;
Custom Policy Mode– this mode should be selected after training the firewall; it simply follows established policies, blocking unknown ones and allowing connections described in the rules;
Block All Mode– blocking mode for all connections.
Pay attention to the numbers in the field Keep an alert on screen for maximum…second– exactly how many seconds the warning window will be displayed. If necessary, set a different value here. On the tab Alert Setting warning levels are set. The default is set to low ( Low). Using the slider Alert Frequency Level, you can enhance it so that it informs the user about all events on the network. For the changes to take effect, you must click the button before closing the window. Apply.
Similar to network connections, in Network Defense in field Proactive Defense application activity is shown. Of particular interest is the link waiting for your review(Waiting for your review), next to which the number of files will be displayed for which COMODO cannot make a decision on its own. Click on the link - in the window My Pending Files(My files in question) a list of them will be displayed. For each file, you can find out its location, company (if any) and status (for example, new or modified). If it is difficult to make a decision on your own, mark the file with a checkbox and click the button Lookup(Search) – the firewall will connect to an Internet database and return information about the file. To confirm this file, click the button Submit(Present), to remove a file from the list – button Remove(Delete), and to remove from the system – Purge(Clean). Using a button Move to(Move) The file can be moved to the specified location. If you need to manually add a file to this list, use the button Add, then select a file on disk ( Browse Files) or process ( Browse Running Process).
Link in line The Defense security level is set to allows you to change the protection system mode, the purpose of which coincides with those described above. Optimal is used by default Clean PC Mode, at which policies are executed. When running trusted applications, COMODO learns by writing new information to the policy. Executable files on non-removable media (except those located in My Pending Files and new ones) are considered trusted.
Pressing the button Firewall, you can access the firewall settings, view events and connections, add applications to the list of trusted or prohibited, and specify trusted and untrusted networks. Similar points are located in Defense+, only here the settings concern applications, not network connections. IN Miscellaneous you can import/export settings, perform diagnostics and set some general parameters for COMODO operation.
The list of free firewalls is extensive. Among other solutions, we can recommend Jetico Personal Firewall from the Finnish company of the same name ( http://www.jetico.com/) or PC Tools Firewall Plus ( http://www.pctools.com/ru/firewall/). The latter has a localized interface.
