The second stage is creating an installation package
So, we have a Calculator project, ready to be used to create an installation package. In the VS environment, the installation package is created like this. First of all, a new one is created project a special type that will be a tool for obtaining an installation package from the Calculator project. Then the programmer performs certain actions in this new project to configure the future installation package. This new project is then compiled as usual. The result of compilation is the installation package.
Let's look at these steps in order.
We create an installation project. Launch VS. Then File ® New ® Project ® in the left field of the project creation window (Fig. 4.30) select Setup and Deployment Projects, and in the right field - Setup Project ® come up with a name for the installation project, for example, My Calculator. ® OK.
The installation project and solution have been created. The tool has been created (Fig. 4.31).
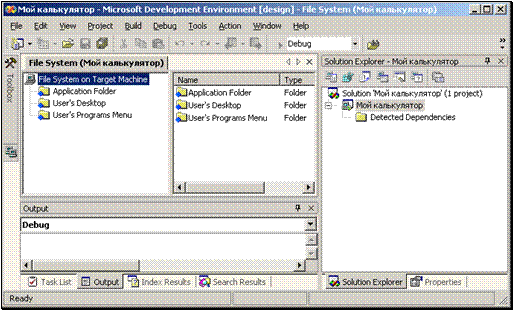
If you were going to install Web applications, you would need to select Web Setup Project.
Add the required project. Now the tool needs to explain what it must work on in order to obtain the installation package. This “subject of labor” will be our Calculator project. You just need to add the Calculator project to the solution. This is done in the usual way: File ® Add Project ® Existing Project ®…
Thus, our solution now consists of two projects: the installation project My Calculator and the Calculator project itself (Fig. 4.32). Obviously these projects can't have the same name, otherwise VB will get confused. More information about multiple projects in a solution and the Solution Explorer is written in 21.3.
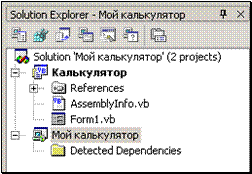
We determine the content of the future installation. Next step. Select the My Calculator project in Solution Explorer. Further: Project ® Add ® Project Output. A window will appear in front of you (Fig. 4.33).
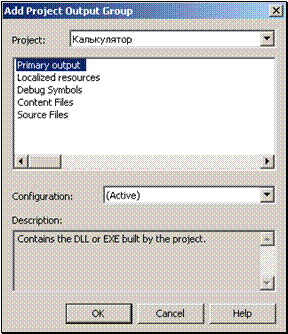
Make sure that all the information in the fields of the window is the same as in the figure. In this window, we indicate that the installation package needs to be created specifically for the Calculator project (top field), and we determine the content of the installation package (list in the center of the window). The highlighted Primary output element means that the result of the installation will be the main thing that is required, namely: the application executable file (exe) or library (dll). However, the installation result can also be other auxiliary objects, for example, files with the source code of the program. If necessary, you can select all elements in the list, but for now Primary output is enough for us.
Click OK. In the Solution Explorer window, the My Calculator project began to fill with content (Fig. 4.34).
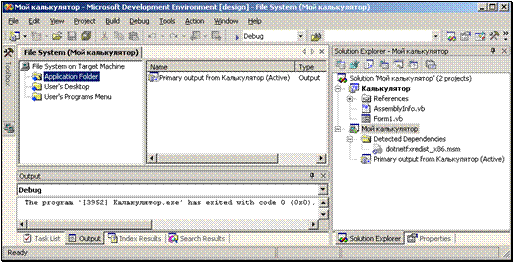
File System window. Let's talk about the structure of the File System window of our My Calculator installation project, which you see in the figure. It allows you to make certain installation settings. In its left panel you see a schematic representation of some (installation-related) elements of the file system of the computer on which the application will be installed. Here is the meaning of these elements:
In the right pane, you see the contents of the selected item in the left pane. So far the last two elements are empty inside.
We remove the manufacturer. Let's start setting up the application folder. Select the Application Folder element and go to the properties window. The value of the DefaultLocation property is a certain conditional scheme:
It means that the files of the installed application are located by default on the computer in a folder with the name of this application (ProductName), which is located inside the folder with the name of the application manufacturer (Manufacturer), which is located inside the Program Files folder. You can leave everything as it is, or you can, if you know the mechanics of this scheme, change something. Let's, for example, throw out the manufacturer. This is what you get:
Shortcut in the Start menu. Now let's make sure that there is a shortcut for our application in the user's start menu, otherwise the user will not be able to launch our application from the start menu. To do this, select the Application Folder element in the left panel, right-click on the Primary output element in the right panel and select Create Shortcut to Primary output in the context menu. A shortcut with a long name is added to the application folder (Fig. 4.35).

There is nothing for it to do, drag it to the User’s Programs Menu folder, and then rename it to something more digestible and short, for example, Calculator.
Add files to the application folder. If the code of your Calculator project contains links to any external files, as I talked about in the previous subsection, then these files must be included in the installation package. Let the Calculator project code have the following operator:
Division_key.Image = Image.FromFile("Earth.JPG")
This means that in the BIN folder inside the Calculator project folder there is a graphic file Earth.JPG that the project uses during operation. This file must be included in the installation package. To do this, select the My Calculator project in Solution Explorer, then Project ® Add ® File ® Find the file on the disk and double-click on it. The file ends up in the application folder (Fig. 4.36). After installation on the user’s computer, it will also be there in the application folder.
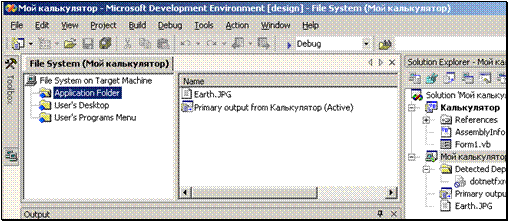
Add files to other folders. If you want, you can make sure that during installation, some other files you need are added not to the application folder, but to other folders on the user’s computer. Right-click on the File System on Target Machine item and select one of the suggested folders from the context menu, for example, Windows Folder. It will appear in the File System window next to others (Fig. 4.37).

Now add a few files you need to the application folder, and then drag them from there to the Windows Folder. After installation, they will appear on the user’s computer in the Windows folder (which I generally do not recommend doing).
Application icon. If you want your application's launch file to have an icon that differs from the annoying standard launch file icon, do the following. Right-click the Calculator project in the Solution Explorer window and select Properties from the context menu. In the properties window that appears (Fig. 4.38), select Build. By clicking on the ellipsis button, select the appropriate icon. Then OK.
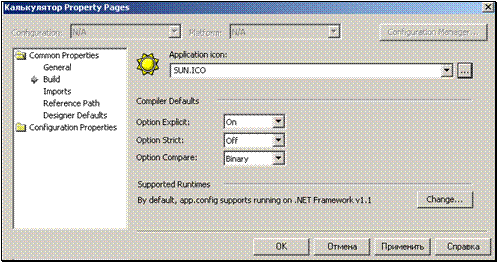
This does not mean that your application will have this icon on the taskbar. To do this, you need, as written in 3.4.3, to set the Icon property of the form accordingly.
Setting up the configuration. Your actions: Build® Configuration Manager. A window appears (Fig. 4.39).
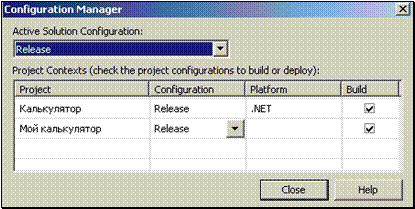
Projects can have a Debug configuration, which is convenient for debugging, or they can have a Release configuration, which is necessary when everything has already been debugged and the application is released into the world. We don’t need to debug anything anymore, so we select Release in the top list. Everything should be as in the picture. Click Close.
Compilation. We have made the basic necessary settings. The final chord is the compilation of the installation package. For this - Build® Build Solution. The computer compiles for some time (both projects are compiled), messages appear in the Output window, and finally the message Build Succeeded appears in the status bar. This means that the creation of the installation package has been successfully completed.
Where is it – our installation package? Let's exit VS on Windows. Let's look at the My Calculator project folder. The Release folder appeared there. In it you see, among other files, the file My calculator .msi. This file is our installation package.
