Do you want to burn a video to disk?
Today, you don’t even need to leave your home to watch videos on the big screen. If you have a home theater, video projector or TV and DVD player, you can burn your favorite movie to DVD and watch it in your home at any time! In addition, many people store their family video archives on disks to free up space on their computer. Indeed, we don’t review these recordings very often, and they take up a lot of space on our hard drive.
There are many programs designed exclusively for burning discs. However, highly specialized products are not always convenient, because recording to disk is usually accompanied by other video processing tasks. For example, you may need to edit your video before recording or improve its quality. Also, sometimes there is a need to copy videos from VHS tapes to DVD or save a video from the Internet on a disk. Now you don’t need to look for separate programs to solve each of these problems, because everything you need is in one universal software package - Movavi Video Suite.
This guide will show you how to quickly and easily burn video from your computer to disk using Movavi Video Suite.
Download and install Movavi Video Suite
Download the program distribution kit to your computer. Run the downloaded file and follow the instructions that appear on the screen. Typically, the installation process only takes a few minutes.
Open a disc burning program
Once installation is complete, launch Movavi Video Suite. In the main program window, go to the tab Data and select the option Burning a disc. Please note that the disc burning module is not included in the Movavi Video Suite distribution and must be installed separately. If the module is not already installed on your computer, you will be prompted to download and install it. Once the installation is complete, run the program by selecting the option again Burning a disc.
Add video to the program
In the program window for burning video to disk, go to the tab Video. Click the button Add files located in the lower left corner of the program window. In the window that opens, select the video file you want to burn to disk and click the button Add files. Once you have added all the required files, click Close to return to the program interface.
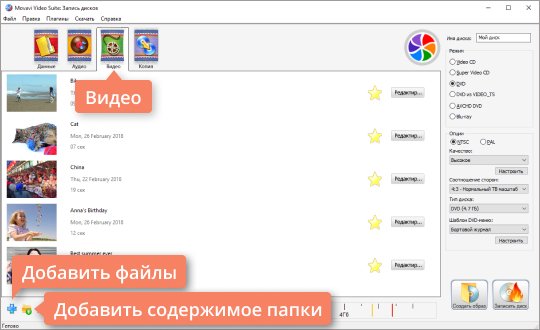
If you want to add all files from one folder, use the button Add folder contents. Video files can also be transferred to the program directly from the Explorer window.
You can add recordings in any popular video formats: AVI, MP4, WMV, MKV, MOV, FLV and others.
Enter a name and select the disk type
First you need to give the disk a name. Enter the desired name in the field Drive name.
You can burn the video to DVD, CD or Blu-ray. For CD, the program provides two options: Video CD And Super Video CD. The Super Video CD standard produces higher quality video than a Video CD, but an SVCD disc can hold less video than a VCD.
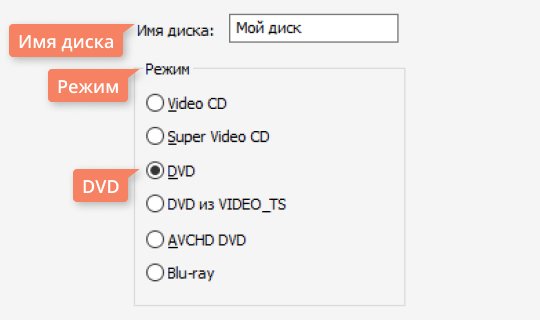
For DVDs there are three options: DVD, DVD from VIDEO_TS And AVCHD DVD. AVCHD DVD is a more modern standard than DVD; it allows you to record higher quality videos. However, not all standard DVD drives read AVCHD DVDs.
Option DVD from VIDEO_TS is intended for recording video to disk from the VIDEO_TS folder. This feature is useful if you previously saved a DVD video disc on your computer and now want to transfer its contents to a DVD. You can also use this option to copy videos from one DVD video disc to another.
We'll talk about burning video to disc using DVD as an example. To create a DVD video disc, under Mode you need to check the box DVD.
Specify disk settings
In chapter Options you can specify DVD settings. First you need to select a standard - NTSC or PAL. The standard you choose depends on the geographic region in which you plan to use the drive. If the disc is intended for Russia and the CIS countries, select PAL.
Next you need to select from the list Quality: Low, Average, High or User Settings. To adjust the quality manually, click the button Tune and set the desired bitrate using the sliders. The higher the bitrate, the higher the quality of the video, but the more disk space it takes up.
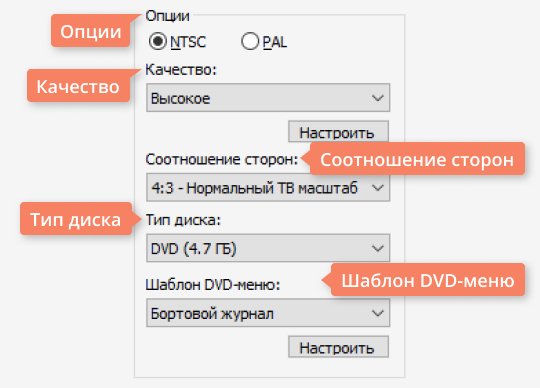
From the list Aspect Ratio Select whether the video on disc will have an aspect ratio of 4:3 (standard video) or 16:9 (widescreen video). If you plan to watch DVDs on a wide-screen device, such as a Full HD (1920x1080) TV, choose 16:9.
