A program for combining a printer and scanner. Free programs for scanning documents. Advantages and disadvantages of the program
Our selection included a list of the most popular programs to scan text. An important factor for programs in this category is the ability to decipher the text of documents, as well as the quality of scanning - it is necessary that the information is completely readable, and the image scanner clearly transfers every line of the picture into the document.
Some applications have a Russian-language design, which can be another significant factor when choosing the best program scanning. So let's take another quick look at the programs below that can properly recognize text and scan a document into a file:
The ABBYY FineReader 10 Home computer program is one of the most common tools for scanning documents. Can quickly and efficiently find blocks and translate text written in different languages. The advantage of ABBYY FineReader is the presence of an impressive language base. Don't forget about the availability of a Professional version with advanced features.
OCR CuneiForm stands out among its competitors with good grabbing performance for photographed text. It is noteworthy that a photograph can be taken even with a 2MP camera of any rather outdated mobile device. The program boasts a dictionary checking function, which guarantees a high degree of information quality of the finished material.
Scanitto Pro will do an excellent job with more specific work. The application will recognize the text very quickly and will be able to save it in the required document format. It is noteworthy that the program can find a given area of paper and improve the appearance of the material before saving it to the storage medium. There is a function for scanning with one click of a key.
VueScan has a strong database of comparable scanner devices. Among analogues, the program demonstrates the highest connection speed to the scanner. Among the additional pleasant options, it is worth noting the convenience manual settings color rendition.
When choosing free document scanning programs, you should pay attention to PaperScan Free. The utility is quite simple in terms of functionality, on the other hand, it performs all the necessary scanning options, in addition, you will be pleased unique technology compression, which can significantly reduce file size while maintaining the original display quality. If you like the Free version, you can always purchase the extended Professional modification with more impressive functionality.
RiDoc is another fairly powerful scanning tool. It is worth noting that Ridoc includes a specialized tool for reducing file sizes without noticeably degrading the display appearance. The information remains readable. If necessary, the RiDoc document scanner will help you export document formats to graphic extensions. The program can install watermarks on finished material and send the document by mail.
Note that we did not consider standard means - software manufacturers, for example HP Scan, as well as applications whose main functions are aimed at solving other problems: scanner Adobe Reader, Nitro Pro. There is also BlindScanner, created to organize access to scanning devices over a network from different laptop computers.
Also, the portable utility Winscan2pdf Portable was not included in the rating. It works without installation operating system, but lacks many required functions, in particular, does not allow you to change formatting, does not print, and does not recognize words. But the ease of use is okay here. Just run it, select a folder in the dialog box and click on the "Scan" button. However, for this to work, you need to ensure that the virtual printer is not disabled in the OS!
Please note that we only considered solutions for PCs - Android applications were not included in the review. You can also select and download from Google Play any you like. Their operating algorithm is approximately the same. And all they allow you to do is digitize a sheet of paper into PDF format using the camera of a smartphone or tablet. To start scanning, you just need to take a photo. It will not be possible to fully process it or translate it into text. Some programs, of course, have a mode for converting digital photography into text format, but desktop solutions handle this much better.
Hello everyone, sometimes I was faced with the need to either quickly scan a document or install a free program for scanning documents in the office, and now I will show you what programs I have in stock. These programs are suitable for scanners: Canon, Epson, HP, Xerox and many others.
1.ScanLite
The most famous document scanning program, it is very easy to use and easy to understand.

What's in the program:
- The first is the name of the document that will be scanned.
- The second is the path where the file will be scanned.
- The third is the scan button itself.
Attention! The disadvantage of this program is that you have to rename the file each time (in step one), otherwise the program will overwrite the previous one.

Here you can select the program skin, pdf (document) or jpg (picture) format, color or black and white image and quality. I think everything is clear here.
2.WinScan2PDF
This program is very simple and, as I understand it, is the most popular. But its downside is that it can only scan into PDF, and the author gave it the appropriate name.

We choose which device to scan from, you can check the box to scan multiple pages.
Well, the scan button and exit the program.
3. ScanCorrector
And the latest free program for scanning documents already has more settings.
When starting, if a warning appears, do not be alarmed.

Everything is described here step by step.
1. Select which device to scan from and what color to scan (there is a button next) to scan the next image.
2. Here you can edit the image a little, add brightness or contrast.
3. In the end, you can print the image, save it in jpg or bmp, or open it to see the result.
Please also pay attention to the checkbox to fill in, if you check it, the image will be on the entire A4 sheet.
Well, that's all, I use these tools in everyday life. Of course there may be better program, but they are paid and weigh more. These free scanning programs They cope with their task quite well.
Bonus:
And a little technology)
Photocopier is a program unique in its simplicity and functionality, which allows you to copy various documents with one click of a mouse button, having only a scanner and printer at hand.
But, as they say, let's look at everything in order and start with goals and objectives, and finish with solutions and results.
Goals and objectives.
In everyday life, we often encounter the need to make copies of various documents. This can be done in two main ways: having a copier at home (or multifunction device, preferably laser) or go to the nearest “service”, where they will provide us with a similar service for our hard-earned money.
So, on one of the beautiful spring evenings, I urgently needed to copy several documents of different sizes, or rather, 36 pieces in total... But what to do?! It’s dark outside, the “services” have been closed for a long time, running to someone you know is also not an option...
Solutions.
The solution has been found! After all, I have an inkjet multifunctional device at my disposal. Canon MP140(scanner, inkjet color printer/copier) and laser printer HP P1006. Happy about this state of affairs, I started scanning and printing... But that was not the case - the resulting image did not correspond to the original, and the utilities included with the devices could not make friends with two different devices.
Of course you can download graphics editor, remove fields and adjust the image size, but this option, acceptable for a small amount of copying, was clearly not suitable in my case. Putting the documents aside, I began to remember that somewhere I had once seen something similar to “software copier”, which allows you to make friends between a scanner and a printer... Having turned to the Internet for help, to my great joy, I almost immediately came across a wonderful program Photocopier.
Installing the program is extremely simple, as is its interface. Just look at the screenshot and it immediately becomes clear that this is a real copy machine!

Despite its simplicity, the program allows you to make black and white copies, grayscale copies (black and white photos) and color copies. You can also set the size of the resulting copy to 100% or 70% of the original, set the brightness and number of copies.
It is important that the program is distributed absolutely free of charge!!!
Result.
When I started copying, I was surprised - the first copy completely corresponded to the original, and the program did not ask for any additional parameters! The only thing to remember in my case is to use laser printer“by default”, since the program automatically prints to the printer installed “by default”, and there is a possibility that the system is installed as such jet printer. If you use ordinary scanner and the printer, then everything is configured there automatically.
Conclusion which can be done: Photocopier- a wonderful program, at the same time simple and functional, in some cases even irreplaceable - one click of the mouse and a copy of the document is already printed on the printer! For those who find the functionality of this version not enough, there is a more “advanced” version - Photocopier Pro, which has a number of additional, more fine adjustments. But this program is already paid - after installation it will work for 30 days, after which you will need to enter the registration key.
A free program for combining a scanner and printer into a convenient copier.
Nowadays, various organizations are increasingly starting to talk about the introduction of electronic document management. However, in reality it rarely comes to this and in the end you have to tinker with a whole heap of papers again and again. At the same time, documents often need to be copied in several copies, and there may be only one photocopier for the entire floor! Common situation?
Employees of various government agencies, I think, have encountered a similar problem more than once and fully understand its scale. However, “I’m burning” can be helped if you have at least some scanner, printer and program at hand iCopy, which allows you to “link” these two devices into a convenient copier!
Comparison of the iCopy program with the paid analogue Scanitto Pro
According to their own functionality iCopy most closely resembles the commercial scanning program Scanitto Pro:
| Peculiarities | iCopy | Scanitto Pro |
| Price | for free | from 499 rub. |
| Scan driver | WIA | TWAIN |
| One-button copying | + | + |
| Multi-page copying (including from the automatic paper feeder) | + | + |
| Save to PDF | + | + |
| Saving as images | JPG, PNG, BMP, GIF | JPG, PNG, BMP, GIF, TIFF |
| Text recognising | - | + |
The only significant drawback of iCopy, as we can see from the comparison, is the lack of a text recognition function. This, of course, is a significant minus, but we are faced with the task of simply quickly replicating copies of the document, and the program copes with this very well.
Installation and pre-configuration
iCopy comes in two versions: installer and portable, which does not require installation. The portable version, as is known, leaves no traces on the system and can work directly from a flash drive. However, the installer also has an advantage. With it, you can “bind” the scan button on your scanner to activate the iCopy copy function! All you need to do is check the box on one of the screens during installation. "Register iCopy to scanner button":
It is worth noting that your antivirus may “swear” at the iCopy installer, so you may have to either add it to the “White List” or simply disable protection during installation.
If you have at least one scanner connected to your computer, the first time you launch iCopy it will detect it and offer to select it as the default scanning device:
![]()
The first time the program can boot with an English interface. If you have this problem, press the small button "Settings" on the right side of the working window and in the window that opens in the tab "General" in the dropdown list "Language" indicate the item "Russian (Russia)". To apply the changes, click the button "Ok" and restart the program:

To be fair, it should be said that the Russification of iCopy leaves much to be desired... In the interface here and there you constantly come across inscriptions that have not been translated from English, and in some windows (for example, in “Options”) only the window title is translated!
Since we're talking about settings, let's take a little look at them at the same time. There are only two tabs here. On the already mentioned “General” tab, apart from choosing the language, essentially nothing else needs to be changed. Unless you can activate the option of automatically rotating pages with printing on both sides in the automatic document feeder (if there is one) - “Flip duplexed pages”.
On the second tab - "File Settings"- you can set the default folders in which scan results will be saved in PDF format and as images (by default, iCopy asks you to specify the save path before each scan):

iCopy Interface
Now let's take a closer look appearance working window iCopy:

On the left side there is a large main button to start copying, and below it are three smaller ones:
- Multi-page scanning- allows you to first scan all pages of a document, and then print everything at once or save it as a multi-page PDF file.
- Saving as an image- activating this button makes it possible to save each of the scanned sheets as a separate image in JPG, PNG, GIF or BMP format of your choice.
- Save to PDF- saves scan results page by page or into a single multi-page (if the first button is active) PDF file.
The central part of the iCopy window is dedicated to various scanning and printing options. The top section is shifted slightly to the right. Here you can select the scanning and printing mode, specify the paper size and the required number of copies. By default, the scanning mode is “Color,” but in older scanners the lamp is often too low, resulting in a copy that is very light and difficult to read. Therefore, in such cases, I recommend setting the “Text” mode for the scanner and, accordingly, “Black and white” for the printer.
At the bottom section of the center of the iCopy window there are only three checkboxes. Of these, the last two will be inactive if your scanner is not equipped with an automatic paper feeder, since the second allows you to use it, and the third activates duplex sheet scanning (if such a function is supported).
The first option is "Preview". It is always available and allows you to activate scanning through the standard Windows WIA interface with the ability to view the captured image. However, if you activate this mode of operation, the system scanning settings will “interrupt” the parameters specified in iCopy, so in the preview window you will need to re-select the image capture type to “Black and white drawing or text”:

Finally, on the right side of the iCopy window are settings buttons. Button "Select scanner" calls up the window that is already familiar to us, which appeared when we first started it. A similar window will appear when you click the button "Printer Settings":

In fact, the standard pre-print interface for selecting a printer and setting its parameters is called up, which may be different (depending on your specific printer).
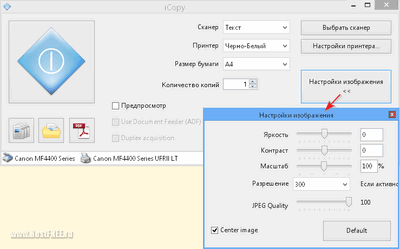
Finally, the third button is "Image Settings"- calls up a window in which you can use sliders to adjust the brightness of the scan, its contrast, scale, resolution and quality. By default, the option is also active here "Center image", which allows you to automatically align the captured image to the center of an A4 sheet (or another specified in the settings):
Working with iCopy
We talked about the interface and its main parameters, and now let’s try to work with iCopy in practice. First, we need to set the scanning and printing options. They, as I already said, are best set in the “Text” (for a scanner) and “Black and white” (for a printer) modes. We'll leave the paper size at A4, and in the box below we'll indicate how many copies of each scanned page we need to print. All you have to do is click on the big blue button on the left and the copying process will begin:

Please note that in the screenshot above I have the multi-page copy button activated. It is not necessary to enable it, however, if it is enabled, then we have the possibility of delayed printing. That is, first we scan everything required pages documents, and then press the button and their automatic printing begins. And while everything is being printed, we are going to drink tea :)

But seriously, the multi-page scanning mode can also be useful if we want to save all scans into a single PDF file. To do this, activate the button "Export to PDF", keeping delayed printing active. Please note that in the status line in this mode Instead of a printer, we will have an export function. Add all the necessary pages to the future PDF document, and then click the button "Print Pages". The finished multi-page PDF file will be saved in the default folder (if you specified it in the settings) or in the directory you specified before starting scanning:

If you need to scan single sheets and save them as image files (formats available to choose from: JPG, BMP, PNG and GIF), it is better to disable the multi-page scanning function. Instead, activate the second button and specify the folder to save the pictures (again, if you did not specify the default path in the settings).
Advantages and disadvantages of the program
- works with almost all scanners and printers;
- support for automatic paper feeder and duplex scanning;
- the ability to “bind” the copy function to a button on the scanner (for installer only);
- simple interface and program management;
- preliminary scan quality settings;
- multi-page scanning and delayed printing function;
- the ability to save scan results in PDF (including multi-page) and as graphic files(JPG, PNG, BMP, GIF).
- clumsy Russification of the interface;
- there is no own mechanism for previewing scan results (the standard Windows WIA interface is used);
- There is no text recognition capability.
conclusions
When I was thinking about what to write down as the disadvantages of iCopy, I realized that it doesn’t have any particular disadvantages. For a program that weighs less than a megabyte, it can do a lot and there’s really no point in complaining about the clumsiness of the translation, since even in English everything is intuitive. Naturally, a preview of the scan would not hurt. But, on the other hand, if you use iCopy only as a software copier, then it is not needed at all!
Well, as for text recognition, for the Russian language so far, alas, there is nothing better than the paid ABBYY FineReader. And it would be foolish to hope that a full-fledged one would be shoved into such a small utility as iCopy. The program performs its task quite successfully, therefore, I think that it is not for nothing that iCopy bears the title of one of the most best solutions for copying documents.
P.S. Permission is granted to freely copy and quote this article, provided that an open active link to the source is indicated and the authorship of Ruslan Tertyshny is preserved.
