Installing centos 6. System integrator. Creating a new CentOS user
Name operating system on Linux based- CentOS is revealed as a Community ENTerprise Operating System. This distribution is based on the commercial Red Hat Enterprise Linux, developed by Red Hat and is fully compatible with it. At its core, CentOS is the same Red Hat Enterprise Linux, only with a changed name, logo and graphics. Red Hat distributes the compiled operating system for a fee, however, since the OS itself consists of free software open source, then under the requirements of the GPL and other types of licenses based on the GPL, Red Hat is required to provide source codes. From these codes, with minor changes, CentOS is compiled. CentOS uses the yum program for updating (like Fedora, also developed by Red Hat) and is updated from the CentOS Mirror Network repository, while Red Hat Enterprise Linux receives updates from Red Hat servers Network.
This article describes how to install CentOS 6.3 from a DVD distribution on a new computer.
Download the DVD distribution from the CentOS website https://www.centos.org/
Burn iso images to DVD
Boot from the iso image and at boot select "Install or upgrade an existing system"

You will be asked to check the checksum of the DVD disc, because... There may have been errors during recording. In most cases this is not required, especially if you are installing on a non-production server, so you can click "Skip" to skip this lengthy process.

If your computer has enough random access memory The graphical installer will launch. Click "Next".


In the next step you will need to select your keyboard layout. If you chose the Russian installation language, then by default you will be offered the Russian keyboard layout. However, it is recommended to select the English layout, because... otherwise, the Russian layout will also be the default system layout, which will cause inconvenience when working with the system, because All commands are entered in Latin.


If you are installing CentOS on a new HDD, you will receive a warning that you need to initialize your hard drive.


Selecting a time zone. Leave the “System clock uses UTC” checkbox only if Fedora 17 is the only system on your computer. If you are installing CentOS as a second operating system after Windows, then uncheck it, otherwise the clocks on different systems will conflict. The problem is that CentOS 6 suggests using the more modern Coordinated Universal Time, while Windows uses Greenwich Mean Time as the time reference.

Enter the system password account(root password). It is recommended to use a complex alphanumeric password with characters in different case and at least 8 characters long.

At the next stage, you are asked to choose a partitioning method hard drive. Standard options are suitable for most users. If you are installing CentOS on a computer without other operating systems, then select the “All space” option, and if the second option, then most likely “Use free space” will suit you.

You will then need to confirm the changes to your hard drive.

The next step is to select the CentOS 6 installation type, i.e. which programs will be installed with the system. Of course, any software can be installed later. By default, the "Minimial" option is offered, but this option does not even contain utilities for configuring the system from command line and will be very difficult to master and initial setup, especially for novice users. For initial work, it is recommended to select "Desktop" or "Minimal Desktop".

For reference, here is a list of package groups that are included in each installation type:
- Desktop: base, basic-desktop, core, debugging, desktop-debugging, desktop-platform, directory-client, fonts, general-desktop, graphical-admin-tools, input-methods, internet-applications, internet-browser, java-platform, legacy-x, network-file-system-client, office-suite, print-client, remote-desktop-clients, server-platform, x11
- Minimal Desktop: base, basic-desktop, core, debugging, desktop-debugging, desktop-platform, directory-client, fonts, input-methods, internet-browser, java-platform, legacy-x, network-file-system-client, print -client, remote-desktop-clients, server-platform, x11
- Minimal: core
- Basic Server: base, console-internet, core, debugging, directory-client, hardware-monitoring, java-platform, large-systems, network-file-system-client, performance, perl-runtime, server-platform
- Database Server: base, console-internet, core, debugging, directory-client, hardware-monitoring, java-platform, large-systems, network-file-system-client, performance, perl-runtime, server-platform, mysql-client, mysql , postgresql-client, postgresql, system-admin-tools
- Web Server: base, console-internet, core, debugging, directory-client, java-platform, mysql-client, network-file-system-client, performance, perl-runtime, php, postgresql-client, server-platform, turbogears, web -server, web-servlet
- Virtual Host: base, console-internet, core, debugging, directory-client, hardware-monitoring, java-platform, large-systems, network-file-system-client, performance, perl-runtime, server-platform, virtualization, virtualization-client ,virtualization-platform
- Software Development Workstation: additional-devel, base, basic-desktop, core, debugging, desktop-debugging, desktop-platform, desktop-platform-devel, development, directory-client, eclipse, emacs, fonts, general-desktop, graphical-admin-tools , graphics, input-methods, internet-browser, java-platform, legacy-x, network-file-system-client, performance, perl-runtime, print-client, remote-desktop-clients, server-platform, server-platform -devel, technical-writing, tex, virtualization, virtualization-client, virtualization-platform, x11

When finished, remove the DVD from the drive and reboot.

When you boot for the first time, you will be required to perform initial system setup.

The first step will be asking you to agree to the license terms.

Then you need to create a user.

Next, set the date and time. Surely your computer will be connected to the Internet, then it will be useful to check the box next to “Synchronize date and time over the network”, which will ensure high accuracy of the time displayed on the computer.


The last step will ask you to enable kdump. Kdump is a service that collects information about kernel crashes to later determine the cause of the crash. Using kdump requires special knowledge, so given that kdump requires the allocation of some RAM, it may be worth disabling its use.

Also, in case you don't have enough RAM, you won't even be able to activate kdump

The initial setup is complete. CentOS 6 welcome screen.


So, the CentOS 6 installation is complete.
You will need to enter your root user password.
ISO image installation disk CentOS 6.5 On a mirror I am index 32-bit and 64-bit builds of CentOS 6.5 are available for download. You can download an ISO image of a Live CD, Live DVD or CentOS 6.5 distribution for 2 DVD discs, CentOS 6.5 minimal ISO or netinstall ISO.
On I am index in the mirror you can download torrent links to download any of these CentOS 6.5 distributions:
Double-click on the "Install to Hard Drive" icon to install the CentOS 6.5 operating system on your computer's hard drive.
When you first install CentOS 6.5 on your computer, you need to select your preferred keyboard layout:

Select the type of hard drive on which CentOS 6.5 will be installed:

Warning, there may be information on your hard drive, you may need to save it before installing CentOS 6.5


Create a password for the CentOS 6.5 root administrator user


Write the selected settings to your hard drive. Information on the CentOS 6.5 selected for installation will be destroyed during the formatting process.


Installation of Linux SuteSCHY 6.5 is complete.

You need to restart your computer. Before pressing the Restart button, remove boot disk CentOS 6.5

The final stage of installing CentOS 6.5


Do not forget, during the installation of CentOS 6.5, switching the Russian/en keyboard layout is done using two Shift keys.

Check the box Synchronize date and time over the network

Uncheck Enable kdump

To apply all settings CentOS system 6.5 must be rebooted.

CentOS 6.5 installed and ready to go

All that remains is to configure support for the Russian language and additionally install games.
Original: Install CentOS/RHEL/Scientifc Linux 6.5 In Text Mode
Author: Senthilkumar
Date of publication: January 30, 2014
Translation: A. Krivoshey
Transfer date: February 2014
As you probably already know, RHEL and its clones, such as CentOS and Scientific Linux, support installation in both text and graphical mode. In this guide we will look at installing CentOS 6.5 on text mode. This mode may be more difficult for novice users. It is best suited for servers that often do not have enough memory and disk space for a graphical installation.
Below we will describe installing CentOS 6.5 on a local machine, as well as from a remote system using telnet.
Method 1 - Install CentOS 6.5 from the server itself
Boot your computer from the CentOS 6.5 installation DVD. You will see the following picture:
Select "Install" or "upgrade an existing system" from the menu and press TAB. Next, type "linux text" as shown in the screenshot below and press enter.

(or)
Press the ESC key and enter "linux text" in the boot prompt.


Method 2 - Remote installation of CentOS 6.5 using telnet
You probably don't want to sit in front of every server and install the system. This can be done from your workplace or from home. Very simple.
Boot your server from the CentOS 6.5 installation disk. You will see the following picture:

Select "Install" or "upgrade an existing system" from the menu and press TAB. Now enter the following command as shown in the screenshot below:
Linux text telnet ip=Give-IP-Address netmask=Give-Netmask

(or)
Press ESC key and enter the following command in the boot prompt as shown in the screenshot below.
$ linux text telnet ip=Give-IP-Address netmask=Give-Netmask

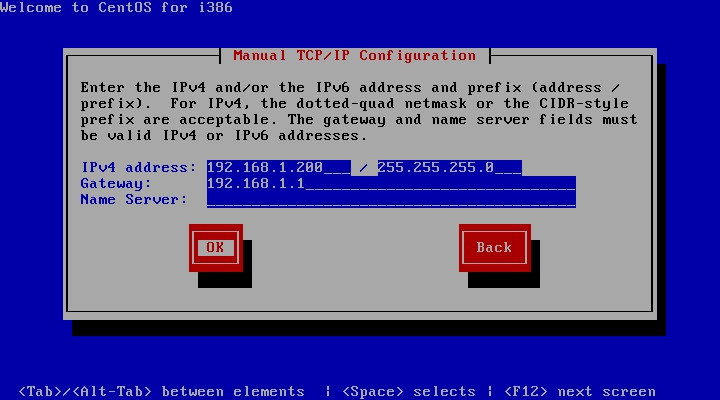
Enter your IP address, netmask and gateway. Check the ping of your server from clients.
The installer will save the settings and wait for a telnet connection from client systems.
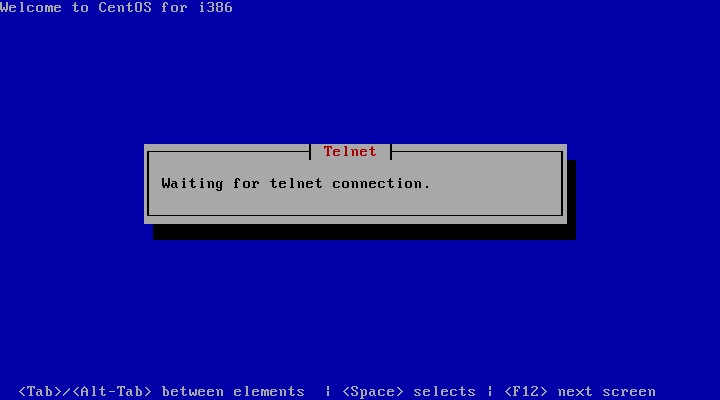
Now go to the client system, open a terminal and enter the following command:
$telnet ip-address-of-your-centos-server

Here 192.168.1.200 is the IP address of my centos 6.5 server.
After entering the above command, you will be connected to the installer and can continue the installation from your client system.

As you can see in the above screenshot, I am installing CentOS 6.5 on a server from my laptop. You can now continue with the installation as usual.
x86_64/ .
We see that CentOS is distributed in the following form:
- 7 CDs - this is not suitable for us, so many discs need to be cut, and then juggled with them
- 1 DVD is better, but still, it weighs a lot - it will take a long time to download.
- LiveCD is a tool for getting acquainted with CentOS without installing it on your hard drive.
- netinstall- but this is more interesting, it weighs only 9.4Mb, the OS will be installed over the network, i.e. You won’t have to download anything extra. We will choose her.
netinstall CentOS:
Download CentOS-5.4-x86_64-netinstall.iso.
We cut it onto disk and boot from it. In order not to use the graphical mode when installing, I write “linux text” at the bootloader suggestion and press it.
A window appears asking you to select a language. Select the language - “Russian” and the keyboard type - “ru”.
Next, select the installation method, select HTTP:
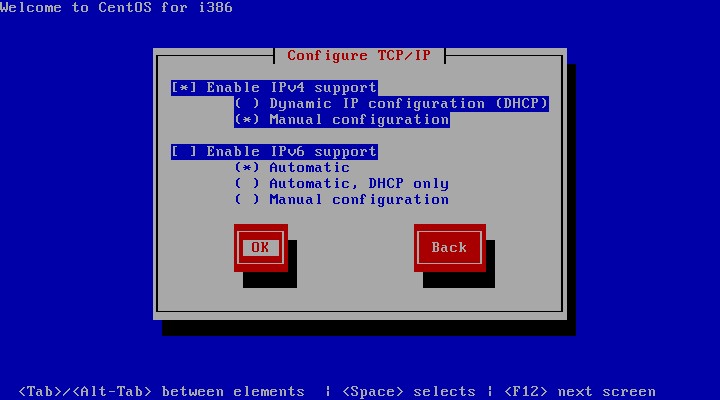
Now we need to configure the network, although I have a DHCP server on the network, I will still configure it manually:
We drive in IP numbers. The gateway is also my name server:
The next step is to specify the path to the mirror where the files for installing CentOS 5.4 are stored
Click “OK”, the installer downloads the necessary files for further installation.
A welcome window appears. Followed by a window hard marking disk:
I select the partition manually, the default partition does not suit me, because... I don't need LVM.
After setting up the bootloader, a window appears asking you to configure the network interface in the system, we say “YES” and configure it in the same way as we did before.
A window appears with a choice of time zone, select which one is ours.
Now we need to select the packages that will be installed:
I'm cleaning up graphical interfaces, I leave server, and check the “refine software selection” checkbox for a more detailed selection of packages.
Before the installation begins, a window appears where it says that the complete installation log will be located in /root/install.log.
After the installation is complete, you will be told that the system is installed.
Let's reboot. When you launch CentOS for the first time, a window will appear where you can configure some system parameters.
On this CentOS installation ends. Installing this operating system is no more difficult than installing Windows.
