How to attach an image to the body of an email. Emails: how to insert a picture into the body of an email? Technical support for users with disabilities
Hello. Any user on the Internet has probably sent or received emails at least once in his life. We can conduct personal or business correspondence, receive messages from interesting Internet resources to which we have subscribed, notifications of various kinds, and much more. In a word, correspondence via electronic messages plays an important role in the life of an Internet user.
And there are times when we need to insert a picture into the text of a letter, be it a greeting card or just a photo (picture). Do not attach photos to the letter as files, but insert them into the text of the letter in order to somehow decorate appearance letters. This is what we will do today.
We will look at this process on popular email services, as well as in email clients: The Bat And Mozilla Thunderbird. On the latter you will find several articles on our website in the category Useful software -> For computer.
How to insert a picture into the body of an email on yandex.ru
I suggest you start with the Yandex service. We go to our mailbox. How to create it, . Press the button Write
Next, a window will open for writing a new letter. Fill in the standard fields: to whom, subject. We write any text you need. And we want to insert a picture in the middle of the letter. How to do it? If we simply transfer the image to the body of the letter, it will download as an attached file

And we need the picture to fit into the text. To do this, let's go to design mode. To switch to this mode, click to the right of the letter text field " Create a letter»

Now in the letter window there is a panel for formatting text: bold, italic, positioned on the left, right, in the middle. You can set the text color, background color, etc. Very similar to the standard Word panel

Let's now try to put our picture in the text of the letter. We first place the cursor in the place where we will place the image, then open the folder with the photo and simply drag it into the letter window, to the place where the cursor is. And as you can see, the picture was successfully installed.

Now select our image by clicking on it with the mouse. Markers have appeared around the picture, by moving which we can reduce or increase its size. However, remember that as the image size increases, its quality deteriorates.
We can also place the photo in the middle of the letter, on the left edge, in which case the text will flow around it on the right. Or we will align it to the right, the text will flow accordingly to the left side. We can also put a link to the image by clicking on the appropriate button.
This way you can add several pictures to your letter. And then click on the button " Send» to send the letter to the recipient. As you can see, there is nothing complicated. Go ahead.
How to insert a picture into a letter using Google Mail
Open your mailbox on Google. If you don't have mail there yet, then you should. Click on the button " Write", enter the text, then place the cursor in the desired place, open the folder with the photo and calmly transfer it to the letter.

The image ended up exactly where we wanted it. Here, as it turned out, it is much easier to insert a picture than in Yandex.
Here you can also change the size of the picture. To do this, select it and use markers to change the size.

Or use the panel where you can specify the desired size: small, optimal or original.
To align the picture to the middle, right edge, open the formatting panel and select the right option alignment.

Unfortunately, for some reason the image does not wrap around the text when aligned to the left or right. After this, you can send the letter to the recipient. Go ahead.
How to insert a picture into a letter on mail.ru
Having entered the mailbox from mail.ru, click Write a letter.
While adding images to a letter on this service, this interesting picture was discovered. If we add using a browser Mozilla Firefox, then everything is fine. The picture is in the right place.

But when using Google browser Chrome and Yandex Browser, the picture is downloaded automatically to your computer and opens in a new browser tab. What should I do?
Method 1 is to go to the Firefox browser and from there add pictures to the letter.
Method 2 is to attach these pictures to the letter as files, then the recipient will see the text itself, and the pictures underneath it.
Method 3 - write a letter with pictures in Word editor, save to a file, and then attach the file to the letter.
Method 4 is a little more complicated. Go to My World, Photos section, load the desired photo into any album, open it, right-click on it and select Copy image from the context menu

After that, go to your mail, create a new letter and insert our image into the desired place using the context menu or a combination Ctrl keys+V

That's it, our image has successfully entered the letter. Just remember, if you delete a picture from My World, it will disappear from your letter.
We looked at how to insert an image into a letter in popular email services. Now let's see how to insert pictures into letters using email clients The Bat and Mozilla Thunderbird.
Inserting pictures into a client letter The Bat
Those who use this email client to receive and send letters have probably noticed that inserting pictures into a letter is also impossible - the pictures are saved as attached files. This doesn't quite suit us. In order for an image to be inserted into a letter, you only need to change the format of the letter. To do this, at the bottom of the window for creating a new letter, change the letter format to HTML/Plain text

After this, the pictures will be freely inserted into the letter.

You can also resize the photo and change its location using the formatting panel. After creating the letter, you can send it to the recipient.
Inserting images in the Mozilla Thunderbird email client
In this, inserting pictures is simple and easy. Create and drag the desired image into our letter text

That's all, perhaps, for today. Let's finish. I hope everything works out for you. Good luck and see you again!
1 voteFor confession there is forgiveness, for concealment there is no pardon. Open sin is better than secret sin.
Peter the First
Good day, dear readers. The ability to write and format beautiful letters is never superfluous. Often the fate of the project you are going to work on depends on this. Thanks to today's article, you will learn how to insert a picture into a Yandex letter.
Why suffer?
Writing is a simple and free way promoting your own services. No matter what you do or make pottery, emails can help you find clients. I'm not talking now about the garbage that some users throw at people. There will be no need to just bombard people with meaningless spam.
Let's say you have found a customer and are going to send him a unique offer by email that may be of interest to him. A beautiful letter design will give a broader picture of you as a specialist, which means there will be a greater chance of receiving an order.

You can look at the resources in your region and understand that the company’s portal is outdated, but you can do it better, faster and cheaper. Find in the companies section email address and write a letter. Insert pictures into the body of the message to show what can be fixed and show that you can handle the task. Everything is simpler than you think.
One of my friends received his first order this way. He simply found a very old and ugly portal and analyzed it in detail. As it turned out, the entrepreneur spent a lot of money on creating this site and no longer wanted to be associated with it; he was convinced that all the developers were working just as badly as his previous contractor.
The friend was able to show even those mistakes that the owner of the company himself did not see.
If you offer your own services, you must provide all the conditions for convenient perception of information. No one will look at the drawings in the application, dig around and compare.
In addition to this method of promotion, there is another one. You communicate with colleagues or friends, but who among them knows about your new hobby? Accidentally sent information in the signature can play into your hands. Even if they don't need it, they may pass on your contact information to others in need.
How to insert a picture into the body of an email
So, first we need to log into Yandex mail. Once again I will not bore you with a description of how to register; if you wish, you can find and read a detailed publication about this on my blog.
Now select “Write a letter”.

We turn on the design. Without this nothing will work.

Now we write the text. This is the best place to start.

Now you can insert a photo into a message. Open the folder with the image, left-click on the image and hold it, drag it into the text of the message.

The result is not very encouraging. The photo is too big.

It can be easily reduced. Just click on the picture. Dots should appear along its edges, as shown in the figure below.

Grab them with the left mouse button and hold them and point them in the direction you want.

You can also drag the image to a better location. Focus on the cursor at the back.

If you don’t know where to find beautiful pictures, then just recently an article on this topic appeared on my blog. From it you can learn everything about legal and illegitimate methods, searching on Google, on a free service Pixabay , as well as the secrets of free acquisition of pictures from a wonderful, but relatively expensive resource DepositPhotos .
About formats and sizes
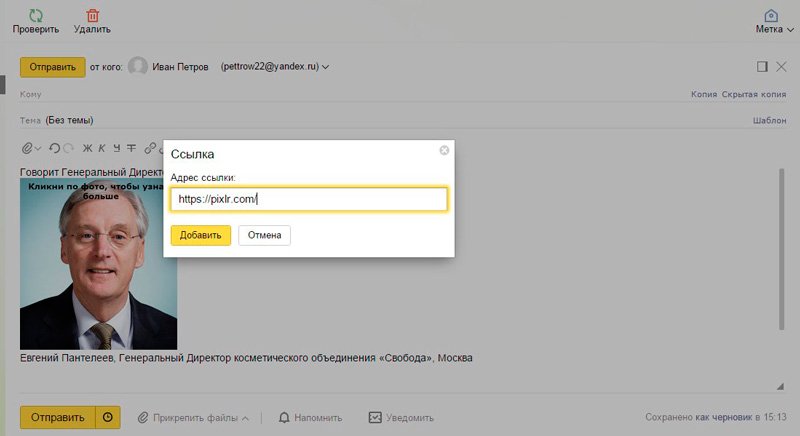
All image formats can be used to insert into a letter. Only its weight will depend on this. A “heavy” message may not be sent; a simplified message can be used to compress images. online version Photoshop programs (www.pixlr.com ).
Open a photo in it.


How to make a picture a link
The next step to improve your own skills is to make the picture a link. When a customer, friend or any other reader clicks on it, an adjacent window will open in the browser. You can direct it to any page on the Internet. At the same time, not.
Select an image.


Add it.
How to create a beautiful signature with contacts or a business card
Your picture with personal data or a business card picture can be automatically added to the end of the email message. The service will help you do it quickly and professionally www.logaster.ru .
I also already wrote about it, here you can quickly and most importantly, a business card and other promotional materials. From the publication you can learn about the advantages of the service and its disadvantages and in various ways work with him.
Let's return to the signature. Find “Personal data, signature, portrait” in your Yandex mail settings.

Going down a little you can find “Your signatures”.

As in the previous case, simply insert the image into the desired window.

You can add text or leave just an image. Starting from the next new letter, the signature will be added by itself. And the messages will look something like this.

Video instruction
Now you know everything, and in the following publications I will tell you how to insert an image on the forum and in Gmail. Subscribe to the newsletter so as not to miss any topic useful to you.
Good luck to everyone and see you again!
Giving or sending cards is already a tradition. Meanwhile, this tradition came to us from Western European countries. From the moment they appeared in Russia, postcards were given as follows: colorful pictures brought from abroad were sent with best wishes on the postcard itself only to close and dear people. This tradition is still alive and has smoothly transformed from cardboard postcards to electronic postcards.
You will need
- - Internet service “Yandex.Postcards”
Instructions
If you decide to send a postcard to several contacts, then click the copy button; you can specify no more than 25 contacts in one letter. You can enter text in 2 modes:
Just text;
Create a letter.
In the “letter design” mode, you can beautifully design the written text: apply highlighting, italics, a different text color to the words, insert emoticons. To switch from one mode to another, click the corresponding button opposite the field with the text of the letter.
You can also use spell checking and insert a signature for all outgoing letters.
It's great to receive congratulations through email. In the body of the letter you can not only type text, but also insert a beautiful postcard, picture or animation, depending on the email used.
Instructions
1. Give a congratulatory message letter to Yandex. Mail” It’s easier for everyone to insert a postcard into a message via Yandex. In the “Letters – Write” tab there is an icon in the form of a flower with the inscription “Postcard”. Click on it, select a postcard on a topic that concerns you (congratulations, gratitude, declaration of love, etc.) and it will immediately appear in your letter. Enter the text, recipient's address, subject of the letter and send.
2. Send postcards via Mail.ru email Mail.ru allows you to make your own postcard, preferring a specific background. In the “Write” tab on the right, click on “Genre” and click on the picture you like, which is placed in each letter window. Text can be printed anywhere in the picture. Send the finished postcard to the desired email address.
3. Pass it on letter with a postcard via Outlook Express You can send a postcard via Microsoft Outlook Express. In this messaging service, click on “Create a message.” For comfortable work, expand the window that appears to each screen. Go to the “Format” tab and check the box next to the “HTML Format” line. There is a graphical menu above the letter window; select the icon on the far right, which indicates inserting a picture. Next to Picture Source, click Browse, locate the appropriate card on your computer, and click OK.
4. Send a postcard via GmailIn Gmail email, do letter. Go to “Settings” in the top right corner and select the last line “Experimental Features”. Find the “Insert Pictures” function and click “Enable”. Click on "Save Metamorphosis". On the left side of the letter samples, select “Advanced Formatting.” In the panel that appears, click on the “Insert Image” icon. Find the postcard previously saved on your computer and send letter .
Files gif format contain illustrations, including animated ones. Like any other files, they can be attached to email messages and sent to someone.

Instructions
1. Make sure that the gif file you want to send is made by you personally from scratch, or it is allowed to be distributed under the terms of free license, or it contains a work that has become a social heritage. Launch your browser and go to the web interface of the email service you use. To do this, enter the appropriate website address into the address bar of your browser. When the initial page loads, enter your username and password.
2. Depending on which mail server you use, as well as your personal settings, either a list of folders or an “Inbox” folder will load. If you want to reply to an existing email, select it in your inbox by clicking on its title. If you are going to compose a new message, click the button or follow the link, which, depending on the server, may be called “New message”, “Write a letter”, etc. If there is a result on the existing message, click the button or follow the link “Reply”, “Full result form”, etc. The short form of the result will not work because it often does not allow attaching files.
3. When the result is sent to an existing message, the fields for the recipient's address and the subject of the message will be filled in more closely. If you are writing a new letter, fill out these fields. Check if the address entered is positive. Enter the text of a new message or a result for an existing one. Now attach the gif file that you want to send. Click the Browse button below the text entry field. A file selection window will appear. Find the folder in which the file is located, select the file itself, and click the button, which may be called “Open” or “Ok”. Depending on the mail server, the file will either be attached mechanically, or uploaded to the server at the same time as sending the letter, or it will need to be attached manually by clicking the “Attach”, “Attach” button, etc.
4. If necessary, attach one or more files. Now click the button, which may be called “Send” or “Send message”. After a minute, check your inbox for a new error message. If there is, you have the wrong address and will have to send the letter again, this time entering the address positively. Or the recipient’s mailbox may be full, then notify him about this using another method (by writing to a different address, calling, sending a message via ICQ, etc.). When you have finished working with the mailbox, click the button or follow the “Exit” or “Exit” link.
Video on the topic
Electronic letter HTML format is a fairly successful form of communication. Publishers with its support can track, for example, the following information: whether letter, whether it was sent, whether links in the letter were followed.

You will need
- – a computer with Internet access;
- – browser;
- – HTML layout skills.
Instructions
1. Go to your mailbox, click the “Write” button letter" In order to create letter V html format, it must be written using tags. Use tables to present data. They appear more correctly to readers than emails made with the help of CSS standards. Decide what yours should look like letter. If there is a lot of information there, then make columns. Be sure to make a header, place your logo and navigation links to the original web page - this will ensure the appearance of the site. Next, insert links to news posted in the future text of the letter. You can make a one- or two-column electronic letter. IN latest version There is a column on the left with links and navigation. The right column contains core text.
2. Break the text into blocks to make it easier to understand. Place in table columns. The table is made with tag support, which contains tags for rows and cells (and respectively). Place the most important information at the top to immediately attract the reader's attention. Further, readers more often than not look at the upper right corner, and then every other text. In accordance with these features, you can build your own html- letter. Use the following features in table and cell tags to control the display: for example, border=”0”, align=”left” and so on. This will make it possible for the letter to be displayed correctly even in shabby mail clients.
3. Use CSS Genres to Layout letter HTML. For example, use the inline genre, as shown here: . This technique can be used when creating an HTML letter in the tags of cells, tables and links. Register genres, placing them below the tag - this is necessary in cases where servers scan letters and find genres above this tag and delete them. Set the table width to 98%. In the middle of the table, set the width to 100%. Write down the basic information about the font genre in the cell tag, closer to the data. This will make it possible to repeat genres in other cell tags.
4. Test what you've done letter in different mail customers - this will give a chance to find and correct layout errors. First of all, check how it is displayed letter V Firefox browsers, Internet Explorer. Next, test the display of the letter in Outlook, Google Mail and Yahoo. If the sample is displayed correctly, move on to the texts. Send them to your test email addresses on different mail services. Use the services that your subscribers primarily use. Don't use JavaScript - it will be disabled by email clients. Use the background tag to put background image. You save the pictures for the letter on the server in a special folder, do not delete them - readers can return to the letter in a week or month.
When you write virtual letter, there is a need to illustrate the text with a postcard, picture, table. And you need to do this easily in the message itself, and not add files as attachments. Now inserting an image into an email is easy.

Instructions
1. Use the Microsoft Outlook email program. Make a new message. After that, in the menu at the top you need to select the “Format” item. Find the "HTML" tab. In the menu that appears, click on the icon with a picture and an inscription with the name “Picture”. Specify the required file and click OK.
2. IN Microsoft program Outlook 2007, as usual, in order to insert a postcard into a message, you need to find the “Insert” item, the one located in top menu. In the “Picture” drop-down window, select the “Picture” tab and insert the required file.
3. Login to the Gmail server. As usual, today this is an exceptional email service, one that allows you to insert an image into the body of your letter, rather than sending it as an attachment. Create a message. In the upper right corner, click on the “Settings” link. After that, in the window that appears, select the “Experimental functions” link. In the proposed list, find “Insert pictures” and click “Enable”.
4. Next, click on the “Save metamorphoses” item. Next in the sample letter you will find “Advanced Formatting”. Click on this button. You will see a panel with various icons. Click on the appropriate “Insert Image” item, select a file and send letter with a picture inserted into the body of the message itself.
5. Use the Yandex server. Launch it, after which you will see the “Mail” item on the left side of the web page. Log in to this service. In the “Letters” section, click on the “Write” tab letter" In the “To” field that opens, you must enter the addressee, and fill in the “Subject” with text.
6. In order to send a postcard either picture multiple users, click the “Copy” button. Please note that you are allowed to indicate no more than 25 people in one message. After creating the letter, add the image you prefer by clicking on the “Postcard” link.
7. Indicate one of the presented pictures, and to do this, click on it, and it will automatically appear in the text input field of your message. At the same time, you can adjust its location and add congratulatory text. Now click “Send” so that the message reaches the desired recipient.
Video on the topic
Archiving an email in Gmail is the most primitive method to clear your inbox list without the risk of deleting necessary messages. This function allows you to remove individual letters or chains of letters into the archive, while leaving them in the mailbox in order to be detected and used if necessary.

Instructions
1. Message archiving is a special feature that Gmail allows use by every user. Its essence is to move a specific message or group of letters to a special archive. As a result, the list of incoming letters is promptly cleared. At the same time, a significant difference between this probability and the usual placement of messages in the trash bin or deletion is their continuous storage in the mailbox. Letters placed in the archive remain fully accessible for search, reading, and other use, which eliminates the risk of deletion or loss of necessary information.
2. Archiving messages in Gmail is quite easy; this operation takes a few seconds for every user. So, if you need to send one letter from your own mailbox to the archive, you should open a page with a list of messages. On the page you will need to check the box opposite the exciting letter, and then click the “Archive” button at the top of the page. You can also easily open this message and then press the indicated button. Later, the letter can be found in the “Archive” section or using a search by mailbox.
3. It's also easy to archive multiple messages at once in your own Gmail inbox. To do this, you need to display each list of messages prepared for archiving on the page. In order to determine the specified list, it is especially possible to use a search in the mailbox or select all letters marked with a certain label. After creating the list, you should check the box at the top of the page, which will highlight all the letters placed on it. If the list accidentally includes necessary messages that are used continuously, you can uncheck them. After this, you should also click the “Archive” button, as a result of which all marked messages will be placed in the archive.
4. At any time, the user can find an archived letter using a regular search in the mailbox. Also, archived message threads reappear in the inbox list when a new result is generated from the corresponding user. It must be remembered that letters in the archive are stored indefinitely, due to the fact that the archive itself is not analogous to a recycle bin, from which each information is irretrievably deleted after a certain period of time. Precisely consequently this function is relevant.
Giving or sending postcards is already a tradition. Meanwhile, this custom came to us from Western European countries. Since their inception in Russia, postcards have been given in the following way: colorful pictures brought from abroad were sent with best wishes on the postcard itself only to close and dear people. This custom is still alive today and has gradually transformed from cardboard postcards to electronic postcards.

You will need
- – Internet service “Yandex.Postcards”
Instructions
1. In order to insert a picture into the letter you want to send, you need to first write the letter. Let's look at an example with postcards on Yandex. Launch your Internet browser and enter “yandex.ru” in the address bar and press Enter. On the left side of the page there is a “Mail” section, go to it. Log in to Yandex.Mail. In the “Letters” category, click the “Write a letter” button.

2. A new window will open in front of you, in which there are “To” and “Subject” fields. Enter the addressee in the “To” field; in the “Subject” field you can indicate the reason why you are sending the postcard (it is not necessary to indicate the subject, but some letters without subjects may end up in spam). For example, “Happy Birthday” or “Happy New Year.” The recipient can be selected from the history of saved letters (address book). To do this, click the person’s image opposite the “To” field and select the email address you need. You can also enter the address manually; the system will prompt you with valid options when entering the first characters of the email address. If you decide to send a postcard to several contacts, then click the copy button; you can specify no more than 25 contacts in one letter. You can enter text in 2 modes:- easy text; - format a letter. In the “letter formatting” mode, you can perfectly format the written text: apply highlighting, italics, a different text color to the words, insert emoticons. To switch from one mode to another, click the corresponding button opposite the field with the text of the letter. You can also use spell checking and insert a signature for each outgoing letter.

3. After completing the letter creation, add a postcard, which you can choose on the “Yandex.Postcards” page or by clicking on the “Postcard” button. Select one of the presented categories - click on the image of the postcard, and it will be mechanically displayed in the text entry field of the letter. Adjust the location of the picture, add congratulatory text (if necessary). Click send so that the letter reaches its recipient.

The modern letter delivery system has changed a lot. However, despite the new possibility of sending a message by e-mail, many people continue to openly rejoice at greeting cards sent on Valentine’s Day, New Year and other holidays. And if it’s also a flash card, then the recipient’s furore will know no bounds.

You will need
- – a computer with flash software and Internet access;
- – computer program to create a postcard.
Instructions
1. Choose a theme for the upcoming card. If this is a greeting card, then you need to make a plot that matches the theme. It is possible that the theme of the upcoming New Year celebration will be in demand.
2. Download and install a program for creating flash animation on your computer. This can be either the well-known Macromedia Flash program or any other alternative software, say, Sothink SWF Quicker.
3. Start making an animated postcard. Make the usual symbol of the New Year holiday - snowflakes. It’s cooler to choose a dark, roughly black background background so that the snowflakes look more advantageous. Draw snowflakes inside the pre-drawn rectangle. To create a spectacular illusion of snowflakes moving and falling, move the rectangle slowly and carefully. At the same time, do not forget that smooth movement in the animation file is achieved with the help of a thoughtful arrangement of snowflakes over each area of this geometric figure.
4. Divide the rectangle into several parts (usually three or four fragments). Make sure that the pattern of snowflakes matches in adjacent episodes. Otherwise, the postcard will turn out sloppy, gluing and jerking of the image will be noticeable. Turn on storyboard mode and locate the ending frame. Remove it by closing the plot of the postcard and thus making a “loop” or a resulting loop in which the animation will repeat indefinitely.
5. In order to achieve more realistic movement, make another layer in which you also draw snowflakes inside the rectangular fragment. Use the result of perspective. Draw smaller snowflakes, the 2nd layer will act as a backdrop. Because of this, it should be in total a little smaller than the first, but at the same time wider.
6. Choose the appropriate font and write the desired text. If desired, you can also insert it into the animation postcard a voice congratulation in advance or a primitively beautiful melody.
Video on the topic
Helpful advice
You can also attach any file to a letter, but the recipient will have to save it and open it on a computer or view it on a separate page on the Internet. It's not very comfortable. If you are sending a postcard to your business partner, it is unlikely that he will go through all the trouble of viewing the postcard.
