To search for a file or application
Made a big step towards developing a hybrid operating system in the form of Windows 8 (8.1), but many users did not appreciate the changes and are still inclined to the familiar desktop. Some of the user audience even ruled out switching to the new product due to negative reviews about the Metro interface...
How to boot directly to the desktop?
I propose to eliminate the loading of the initial screen with tiles, replacing it with the desktop. A useful feature for the users mentioned above, since when you log into Windows 8.1, a screen with tiles loads by default.
To fix the loading of the working environment, you can use third-party utilities, such as, installing such will return not only the loading of the desktop, but also the classic appearance of the Start menu. But you can also resort to add-ons to the system itself:
Instead of an afterword
As you can see, there is nothing complicated, and loading the desktop when you start Windows 8.1 is a matter of a couple of minutes, and there is no problem adapting to the tiles!
In the taskbar properties window, you can experiment with other settings, for example, by setting the same wallpaper for the tiled and standard desktop.
In terms of the overall design philosophy, nothing has changed in Windows 8.1, but this has not diminished the desire to try out the latest version of the OS due to the new features and improvements that Microsoft has added. In ours, I noted that in addition to the return of the Start button, Windows 8.1 allows you to boot directly to your desktop. This article will focus on this feature, as well as other options found in the new Navigation tab in the Taskbar Properties dialog box.

The new Navigation section in Windows 8.1 is full of surprises, so I explored them all. This section can be accessed in the following way: right-click on the taskbar, select “Properties” in the context menu and in the dialog box that opens, go to the “Navigation” tab.
Disable or enable the top left and top right hotspots
Hot corners (aka hot corners) are one of the most annoying features of Windows 8 for desktop and laptop users. For those who, for some reason, have not yet had time to get acquainted with Windows 8, I’ll clarify that when the mouse pointer hits the area of these corners, the so-called “Charms bar” panel or a panel for switching between running applications automatically appears on the screen, depending on the whether it is the upper right or upper left corner. Most often, these panels appear accidentally, for example, when the user simply wants to close the current program window. Windows 8.1 addresses this shortcoming by allowing you to disable the top active corners of the screen - in Windows 8 this can also be done, but only by editing the registry or using third-party applications.
The first two options on the Navigation tab allow you to enable or disable the top right corner (to open the Charms bar) and the top left corner (to open the app switching interface).
Command line instead of PowerShell in the “Power User” menu and vice versa
In Windows 8, if you press Win + X or right-click in the bottom left corner of the screen, you will see the Power User menu, which allows you to launch Command Prompt. In Windows 8.1, the command line is no longer in this menu, but there is a PowerShell tool. Luckily, Microsoft has made it possible to bring back the command line. To do this, uncheck the third checkbox on the “Navigation” tab and click the “OK” button.

Load to Desktop or Start Screen
Windows 8.1 allows you to choose which workspace should open after loading the OS - the desktop or the start screen. Many users hated Windows 8 simply because it was the Start screen that opened immediately after loading the OS, so third-party developers have released a number of tools that allow you to change this. Now Microsoft has integrated a similar feature directly into the OS.
You'll find the above-mentioned option under the Home Screen section of the Navigation tab.
Desktop background on the Start screen
Windows 8's Start screen design is limited by the ability to set multiple color images, forcing users to use third-party apps (such as Decor8) to decorate the Start screen with their own images. In Windows 8.1, you can use your current desktop image as the Start screen background. To do this, you need to activate the option “Display desktop background on the Start screen”.

It looks very nice and overcomes the feeling of switching between two radically different environments.
Home screen on the main display
If you have multiple monitors connected to your computer, you can configure the OS so that when you press the Start key on the primary monitor, the Start screen will always open
"Applications" instead of the Start screen
Windows 8.1 has a special Applications menu that you can open by clicking on the small arrow in the lower left corner of the Start screen. If you want this menu to open instead of the Start screen by default, enable the option “When you go to the Start screen, automatically open the Applications view.”

By default, the Applications menu searches only your applications. If you want to search everywhere, activate the penultimate function.
Finally, if you enable the most recent feature, classic programs will be listed first when sorting apps by category in the Apps menu.
Overall, Microsoft has done an admirable job of addressing the shortcomings of Windows 8 and making significant improvements to the user experience.
Have a great day!
The desktop in Windows 8.1 is used in the same way as in any previous version of the OS. You can pin a program to the taskbar on the Start screen or All Apps view by right-clicking and selecting Pin this program to taskbar.
Pinning programs to the taskbar offers the fastest and most efficient way to open them from the desktop without going to the Start screen.
The desktop has been different from previous operating systems since the first versions of Windows 8. These changes included the ability to boot the PC directly from the desktop. As well as other useful features for adjusting the OS, including changing the user view.
A regular right-click on the desktop still brings up the context menu. On a touchscreen, this action is performed by touching and holding your finger on the screen. The same touch method works in previous versions of Windows, starting with Windows XP and other touch-based OSes, including Windows Phone and Android.
In Windows 8 and Windows 8.1, clicking the Start button no longer opens the traditional menu, although with the ability to pin programs and files to the taskbar and program the Start button to display all applications instead of the Start screen, this is not really necessary. Clicking or tapping the Start button returns the user to the Start screen. This behavior of this button can be changed so that instead of the Start screen, it goes to the All Apps view, the place where your desktop programs are located.
Right-clicking the Start button opens the Control menu, which provides additional options.
Windows 8.1 control menu.
Even though the Start button is hidden on the Windows 8 desktop, it is by no means removed. Right-clicking in the very bottom left corner of the screen or on the Start button on the desktop (also accessible by pressing Win + X) brings up the standard menu of options, including the Run command and Command Prompt. This menu offers a large number of administrative options, plus quick access to Reboot, Shutdown, and Sleep controls.
Please note one important point: the Command Prompt and Command Prompt (Administrator) items in the screenshot are located in the Windows PowerShell subsection. The fact is that the controls in the Start menu can be moved between two subsections. How to do this will be described in the following articles.
Let me say right away that compared to its predecessor, Windows 8 offers significantly improved capabilities for setting up multi-monitor setups. Although these features may be of great interest to desktop users, they will not be discussed in this article.
Windows 7 (and Vista) offered Aero effects, which provided transparency and color variations to Explorer windows and other desktop interfaces. There are no Aero effects in Windows 8 (they have been removed in order to save mobile device batteries), they have been replaced by a new opaque interface (strangely, for some reason the taskbar has retained its transparency effects). Therefore, some of the customization options you were familiar with are also gone.
But Windows 8 lets you change your desktop wallpaper, and you can still change the color of the borders of now-opaque Explorer windows. As before, you can also save combinations of these settings as themes. However, if previously, in Windows 7, you configured these themes manually (for example, if you had a green wallpaper with a view of Ireland and wanted to make the windows green, you had to do it yourself), then in Windows 8 this can be done automatically.
To see how this works, launch the Personalization Dashboard. The easiest way to do this is to right-click on the desktop and select Personalization from the menu that appears.
Then, at the bottom of the window, click on the Color icon. As a result, you'll see a color and appearance control panel that's a little simpler than it was in Windows 7. It does have a new option, Automatic Color (the first in the list of 16 window border colors to choose from).

By selecting this option (it is set by default), the border colors of Explorer windows and the taskbar will automatically change to match your desktop wallpaper.


With the transition to the Aero interface in Windows Vista, Microsoft added a screen scaling feature to the OS, making it easier to view on-screen elements on large, high-resolution screens (as screen size and resolution increase, on-screen elements such as icons and menus become smaller; as a result they become unreadable).
Windows 8 retains this ability, but also gives us a unique new interface that allows us to independently control the size of some on-screen elements.
This interface, called the Screen control panel, is not at all easy to find, especially if you don’t know where it is. However, there are two fairly quick ways to detect it: by searching for the Start screen (we wrote about setting it up) and by using the Personalization control panel, which we used in the previous part. At the bottom left of this control panel there is a link to the Display panel.
The top half of this window works as before, allowing you to adjust the new screen scale if desired. But at the bottom of this window there is a new option. There you can individually resize some desktop interface elements, such as title bars, menus, message boxes, icons, context windows, etc.
Instead of resizing everything on your desktop, you can only change the text size of an individual element. This can be very useful, especially for those who have difficulty seeing small elements.
If you want to change anything in this window, do not forget to write down the original values of the options being changed. After all, there is no button to return to the original version.

When you sign in to Windows 8 using a Microsoft account—which is what I use and what I recommend for you—you can take advantage of syncing your settings from computer to computer. It all works via SkyDrive. Synchronization also includes synchronization of desktop settings.
You can set up synchronization using the “Sync Settings” interface in “PC Settings”. The easiest way to call it is to use the key combination WINKEY + I, then select change computer settings, and then select synchronize settings.

This interface says that synchronizing desktop settings includes “themes, taskbar, contrast, etc.”, which is not very clear, and indeed not accurate at all. For example, Windows 8 does not sync pinned taskbar items. What is actually synchronized is: the desktop theme (including background, Explorer window color, sounds and screensaver), taskbar settings and photo slideshow options.
Moreover, the desktop sync switch is not the only element that affects the desktop. For example, synchronization includes information about which application or applications you use to open certain types of files. So if you prefer to use the Adobe Reader desktop app instead of the Windows Reader app for Metro, this will also sync from computer to computer.
The password switch enables web passwords (via IE10). The app settings switch includes some app settings and files purchased through apps. And other Windows settings are also important for desktop users. These include File Explorer and Mouse settings.
Even though the SkyDrive app - which adds SkyDrive storage to Windows 8 - doesn't come with Windows 8, it is in fact a necessary part of Windows 8. That's why it's included in the free Windows Essentials 2012 add-on, which also provides other useful desktop apps like Windows Mail and Photo Gallery. You can download the SkyDrive app and the rest of Windows Essentials 2012 from the Essentials website.
By installing SkyDrive, in addition to settings, you can also synchronize documents, pictures and other content between computers. This will allow you to always see all your data, no matter what computer or even mobile device you are working on today.

Already, some people are trying to sync small collections of music using SkyDrive. It is possible that video file synchronization will be added over time. Although, given the size of the latter, not all people will be able to use it right away.
That's all for today! Good luck to you!
After the release of the Windows 8.1 operating system, users had the option to complete the download of the Windows 8.1 operating system directly to the Desktop. Microsoft Corporation, in the new version of the Windows operating system, has provided the user with the ability to choose what the operating system will look like immediately after booting. What exactly will be opened - the Desktop, or the “start screen” with a tiled interface will be opened.
Previously, when using the Windows 8 operating system, in order for the Desktop to be immediately opened when it started, it was necessary to make some changes in the operating system settings. Now this can be done much easier.
Getting an update to Windows 8.1
All users of the licensed Windows 8 operating system can upgrade their operating system to Windows 8.1 for free. To do this, they will need to go to the Windows Store to download the system update to Windows 8.1. The Windows 8.1 operating system will be downloaded to your computer from the Windows Store in the edition and bit level that was installed on your computer.
There are several options that vary depending on the requirements.
After updating the system, the Windows 8.1 operating system will be installed on your computer. In it, the developers introduced the ability to choose how to load the Windows display when loading the operating system.
By default, when you start or restart the Windows 8.1 operating system, the “Start screen” or otherwise “new user interface” (Modern UI), formerly known as Metro UI, opens. Now the user has the opportunity to choose what exactly will need to be opened when starting or rebooting the operating system.
Many users don't like the default tiled interface. After opening the “start screen”, they will be forced, immediately after that, to open the Desktop. Such unnecessary movements cause irritation for many users.
Still, using the Desktop is more convenient on a desktop computer, because in one place you have wider access to different functions of your computer than launching applications in a tiled interface, and switching to other functions and commands is not very convenient with non-touch controls . Moreover, to perform many actions you will still have to open the Desktop.
Boot to Desktop in Windows 8.1
In order to change the display of Windows after loading, you will need to right-click on an empty space in the “taskbar and navigation bar”. After this, a context menu will open in which you will need to select “Properties”.

In the “Start Screen” field, opposite the item “When you sign in and close applications, open the desktop instead of the Start screen”, check the box, and then click on the “OK” button.
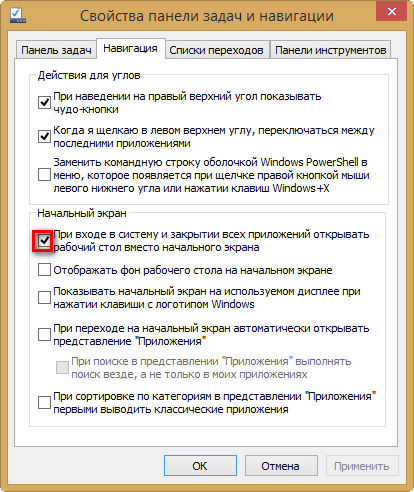
After this, the display of the Windows 8.1 operating system, after booting the system or after closing all applications, will be changed to the Desktop.
Conclusions of the article
Now your computer will load the Desktop in Windows 8.1 immediately after starting the operating system. You can immediately get to the Desktop without making unnecessary movements.
Moreover, switching to the tiled interface in Windows 8.1 is very easy. To do this, you just need to left-click on the “Start” button, immediately after that the “start screen” with a tiled interface will open.
