Thunder mail. Working with the Mozilla Thunderbird email client. Attaching files to sent emails
Mozilla Thunderbird is a free multi-platform email client that will allow users to exchange messages with friends, family and work colleagues. by email. Thanks to its wide functionality this program can be used both at home and at work, and thanks to special extensions and additions, it can be easily customized to suit your own requirements. Let's figure out how to use Thunderbird and what functionality The client offers us immediately after installation.
Thunderbird is part of the standard set of programs in most modern Linux distributions, so most often does not need installation. If you don’t have this program by default, then you need to open a terminal and enter in the line:
sudo apt-get install thunderbird
After this, confirm the installation of the program and wait until all procedures are completed. Stable versions are always available in the basic Linux repositories, so no additional resources are required. Thunderbird can also be installed through the application center (Ubuntu, Mint and other distributions aimed at the average user).
Since Thunderbird is available on all modern operating systems, the email client can be installed on Windows and even Mac OS. To do this, just follow the link https://www.mozilla.org/ru/thunderbird and download the appropriate installer. The official website will automatically detect your OS and select the most optimal version. The subsequent setup process looks exactly the same as in Linux.
Program interface
Externally, Thunderbird looks like most similar programs. By default, the left side of the window contains all your mail folders, and on the right are message previews, links to RSS feeds, news groups, and much more. The menu bar contains links to the most popular user actions, such as receiving mail, filter, address book, chat and tag filter.

All these elements can be edited and changed based on your own preferences. Just right-click and select “Configure” from the context menu.

How to set up Thunderbird
Setting up Thunderbird is one of the most important steps. The program contains many functions that may be difficult to understand at first, so after the first launch we are greeted by a special wizard. At this stage, you can both register a new mailbox and use an existing one.

After clicking on the appropriate button, setting up mail in Thunderbird will begin. Here you just need to enter your e-mail, name, which will be displayed on the left side of the window, and password.

After entering the data, Thunderbird will check your credentials and, if possible, adjust the necessary settings for connecting to the mail service. Here the user can choose which protocol to use - IMAP or POP3. The first one provides remote access to letters on the server, the second one will download all letters to a PC.
Using corporate mail or a little-known service provider, you will need to enter the parameters for sending/receiving messages yourself using the " Manual setting" As soon as the data is entered, the program will automatically check the configuration and you can get started right away.

If you use several accounts, then click the menu button in the upper right part of the window, go to “Settings - Options” account" and in the lower left part of the window select "Add account"

After this, carry out the setup according to the same scheme as before.
Synchronizing emails
Initially, Thunderbird downloads all letters and folders that are on your mail server, but later the user can independently choose which folders need to be synchronized. To do this, click on the account name on the left side of the window and open its settings.

Navigate to the Sync & Storage category and then select the settings that best suit you. In the "Advanced" menu, you can mark specific folders for your account, messages from which will be sent to your computer.


When finished, click the “Ok” button, and to ensure that all subfolders are displayed correctly, restart the client. The Thunderbird mail setup can be considered complete at this stage.
Searching for messages in folders
Searching in Thunderbird can be done using both the quick entry line and the quick filter. To find the desired contact or message, just start typing the word in the appropriate field.


The search system in Mozilla Thunderbird is clear and accessible even to users who have not previously worked with the program.
Creating mail messages
There are several ways to write a message in Thunderbird:
- Click the “Create” button in the main program window, and then enter all the necessary recipient data;
- right click on the address desired contact and select “Send” in the context menu.
The message creation window is a simple editor with basic capabilities. The user can attach files to the letter, select the size, color and type of font, and also add emoticons to the letter.
It is worth paying attention to several recipient input fields - here you can select several recipients at once, as well as add hidden copies that will be sent to individual mailboxes.
Working with contacts
Using Thunderbird is made easy by its extensive address book. To add a new contact, you need to click on the name of the sender/recipient with the left mouse button and select the appropriate item.

If you have not previously sent or received messages to a particular recipient, you can add it manually through the “Address Book - Create” menu. The contact card contains all the necessary information, and if necessary, it can even be supplemented with a photo.

Expanding the capabilities of Thunderbird with add-ons
Working with Thunderbird is made easier by the ability to modify the program to suit your own needs. To do this, the developers have created a whole add-on center, where users can find all the most useful extensions, from design themes to almost separate programs.
You can find the update center by clicking on the “Menu - Add-ons” button. The most popular plugins will immediately appear in front of you, and if necessary, you can open full version a site where everything is divided into categories.

Greetings, dear visitor to the Penserman blog.
This topic will be of interest to those readers who have already set up an email account, and perhaps more than one. Those who have not had time to do this, hurry to fill this gap by reading the topic: “”, there, in my opinion, everything is laid out in very detail and intelligibly.
Having got yourself email address don't put it off long box and installation mail program, For example, free Muzzies Thunderbird. In this topic I will try to write everything about it intelligibly and clearly.
So why do many PC users prefer to work with their mail using special programs. To answer this question, it is enough to list some of the advantages they have.
Advantages of mail programs
- to check mail, you do not need to open any pages in the browser, just launch the program and it will download all the mail to your computer;
- there are no intrusive advertising or other unnecessary things that sometimes interfere with concentration;
- she can check mail at any number of different post offices;
- mail can be sorted by topic, creating the necessary folders in an unlimited number;
- letters are opened instantly, since they are already on your computer’s hard drive, this is especially nice when photographs are attached to the letter.
- letters can be written without connecting to the Internet, and as soon as you connect they will be sent immediately;
- significantly saves traffic when viewing and reading mail, and this is not an unimportant factor if you do not have unlimited mail;
Main mail programs and advantages of Mazila
Leading among them are Outlook Express, The Bat, Mozilla Thunderbird, PegasusMail, Foxmail. We will not analyze each of them in detail, we will limit ourselves only to brief characteristics:
Outlook Express- one of the best, but there is practically no protection from it.
The Bat- considered the best to date, but paid.
PegasusMail- free, lightweight, but not Russified, there is no password to enter your own mailbox.
Foxmai is free, very light, simple, has enough functions, but sometimes there are difficulties with encoding.
Benefits of Mozilla Thunderbird:
- Virus protection is at the proper level, unless, of course, you open attachments from unknown senders;
- very similar to Outlook, so many will find it easy to navigate;
- easy to set up and there is nothing superfluous;
- free;
- works correctly with Russian encodings;
- there is a spell check;
The conclusion suggests itself: of all the above, this is the most acceptable option, especially since it can be used as an alternative to Outlook Express.
Download and install Mazila Thunderbird
Let's now proceed directly to installing this email client - this is also what all these programs are called . So, first, download it from the official website - click on the following word: -> HERE. There, click on the large green rectangle with a logo in the form of a bird with an envelope and the inscription “Thunderbird Download for free.”
Our download manager is starting to work, if you have not installed it yet, hurry up and read the topic: "" . With or without it, our Mazila will download anyway. The next step is installation. We run the downloaded file and see the following window:
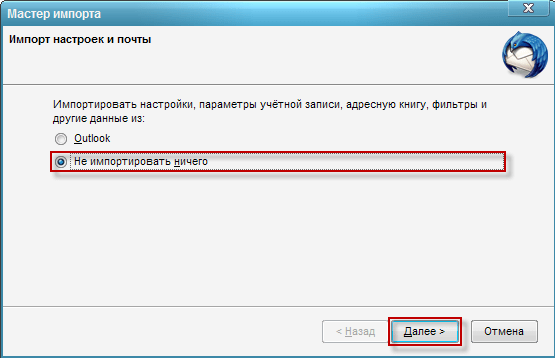
If this program is being installed on your computer for the first time, then perhaps the “Import Wizard” will automatically launch after installation. I think you have nothing to import yet, so do what is highlighted in the picture:
Just in case, I’ll show you another window that appeared when I first installed this program for myself (although it was a very long time ago), perhaps it is no longer shown, because at least I didn’t have it when preparing this material. If it is “drawn”, then do what is shown in the picture below:

Create an account and set the mail storage location
At the next stage we will be taken to the window of our program. I will not show the entire window, but only the part that we need. In the bottom picture, select: ""OK""

In the following picture, what is highlighted in red:

In the next window, fill in all the fields shown and click “Continue”, but note that the address Email you need to write in full, that is, in this case, not only ivanov.piotr, but also @inbox.ru, too.

Here is the final installation window. If you select "IMAP"" ( remote access to folders), that is, all mail will be stored on the server, and only management will be carried out from the computer - sending, receiving, deleting, etc., then click “Finish” and we can “sleep peacefully”:

Setting up mail storage on your computer
If you want to store mail on your computer, then put an end to “POP3”, and then it makes sense to immediately adjust the server parameters in the account settings. But first, let's add a "Menu Bar" to the top panel of our email client. This must be done in any case to make it more convenient with the program:
- Left-click on the stripes in the upper right corner and a list will appear.
- We select (do not click) with the cursor “Settings” - another list appears.
- Select “Menu Bar” and left-click on it to check the box.
Let's see how this is done in the bottom picture:

Now on the “Menu Bar” that appears at the top:
- Select "Tools" and left-click - a list appears.
- Click on "Account Settings".
The picture below shows everything:

After the above-described manipulations, the following window will open, where we should find the line “Server Settings” under our account. We click on it so that these parameters are shown to us on the right, but there we need to decide on the values highlighted in the red frame.

I think it makes sense to uncheck the “No more than 14 days” box and regularly delete unnecessary emails yourself. You never know what you might need to find later. Well, at the same time, look at the other parameters, maybe you want to change something.
Adding mailboxes
If you need to add more accounts, then do what is shown in the bottom picture either in the “red option” or in the “green” option, after which you will see the “Mail Account Settings” window and then repeat the same procedure , as with the first box.

I hope you guessed that the top inscription in the green rectangle will appear after clicking on "" [email protected]"", which is not visible in the picture due to the drop-down list.
I will not describe in detail how to check mail, send, delete and other various simple things, which, I think, you can figure out using the “scientific poke” method. I will only focus on how to create a message (letter) and attach some kind of file (photo, for example) to it.
Attaching files to sent emails
So, on the toolbar of our Mazila, click on “Create”. We look at the picture below of part of this window:

The following window appears - creating a message (I also did not show all of it, but only the part we need), here we click on the inscription “Attach” next to the image of a paper clip:

At the next stage, we need to specify the path to this file, in other words, find this, for example, photo on your computer using the following window that opens - do what is shown in the picture below:

In the picture below is the final stage of our actions - we make sure that the file is attached, check whether everything was written correctly and we can click “Send”:
Notification of received messages
Mazil Thunderbird also has such a nice feature as a notification about received messages, where the top line indicates which mailbox the letter came to and the bottom line from whom. It appears as a pop-up window in the lower right corner and is accompanied by a short beep:

One could, of course, write more about the creation backup copies and the recovery opportunities that it allows mail program Mazila Thunderbird, but I think this needs to be dedicated to a separate topic. That's all.
Good luck to you! See you soon on the pages of the Penserman blog!
Mozilla Thunderbird is a popular free email program for working with email and newsgroups. Contains many useful and convenient features: self-learning antispam filters, import of email and message settings from Microsoft Outlook and The Bat, quick search letters, spell checking while entering text.
Key Features of Mozilla Thunderbird
- Supports IMAP, POP, HTML and RSS news feeds.
- Antispam filters. automatically detect unwanted correspondence.
- Digital signatures, message encryption, certificate verification.
- Attachments are never opened without your command, providing virus protection.
- Archiving messages. The "Archive" button or the "A" key places the mail in the archive.
- Scam email protection monitors phishing emails.
- Add-on Manager - search and install add-ons directly from Thunderbird.
- Virtual folders. The message is displayed in several folders specified based on filters.
- Interface customization, visual themes. By default, the interface is similar to the Outlook Express email client.
Mozilla Thunderbird download
Download Mozilla Thunderbird for free Russian version from the official website. We monitor all program updates so that you have latest version Mozilla Thunderbird email client.
Your name is your username (for example, "Alice Little");
Email address mail - your mailing address on Yandex (for example, « [email protected] » );
Protocol - IMAP;
Server name is imap.yandex. ru ;
Port - 993;
SSL - SSL/TLS;
Launch the program and click the button in the welcome window Skip this and use my existing email.
In the window Setting up your existing email account specify the following account parameters:
Click the Continue button.
Click the button Manual setup and specify the following email server parameters: Incoming mail
Server name is smtp.yandex. ru ;
Port - 465;
SSL - SSL/TLS;
Authentication - Normal password.
Also indicate the username - your Yandex login, for example, “alice.the.girl”.
Attention. If you set up receiving mail from a mailbox like “login@yandex. ru », the login is the part of the address before the “@” sign. If you use Yandex.Mail for a domain, you must specify the full mailbox address as your login.
Click the button Retest to check the correctness of the entered parameters. If the test was successful, click Finish.
If you want to always use to send emails Mozilla program Thunderbird, in the window Integration with the system click the button Set as default.
Right-click on the account name and select Settings.
Go to section Server settings and install in point When deleting a message meaning Move it to the Deleted Items folder.
","hasTopCallout":false,"hasBottomCallout":false,"areas":[("shape":"rect","alt":"","coords":,"isNumeric":false)]))\ ">
Go to the Copies and folders section and set all folders to the name of your Yandex mailbox.
","hasTopCallout":false,"hasBottomCallout":false,"areas":[("shape":"rect","alt":"","coords":,"isNumeric":false),("shape ":"rect","alt":"","coords":,"isNumeric":false),("shape":"rect","alt":"","coords":,"isNumeric": false),("shape":"rect","alt":"","coords":,"isNumeric":false)]))\">
Click OK to apply the changes and restart the program.
Problems with Mozilla Thunderbird
This step by step guide will help you solve problems related to your email program.
Select an issue:
What message did you receive?
If a message appears about no connection to the server, try logging into the Yandex.Mail web interface with the same username and password that you use in the program. Enter your username and password manually, without using those stored in the browser.
Mail programs include the protocol you want to use.\\n
Make sure that in the mail program settings you have accurately specified\\\\n the following server parameters:\\\\n \\\\n \\\\n
If you are using IMAP
- \\\\n \\\\n
connection security - SSL;
\\\\nport - 993.
\\\\n- \\\\n \\\\n
connection security - SSL;
\\\\nport - 465.
\\\\n\\\\n \\\\n \\\\n \\\\n
If you are using POP3
\\\\n \\\\n \\\\n Incoming mail \\\\n \\\\n
- \\\\n \\\\n
connection security - SSL;
\\\\nport - 995.
\\\\n- \\\\n
mail server address - smtp.yandex.ru;
\\\\nconnection security - SSL;
\\\\nport - 465.
\\\\n\\\\n \\\\n \\\\n \\\\n\\\\n
For more information on how to check server settings in different mail programs, see the section.
\\\\n ")]))\\">
Make sure that in the mail program settings you have accurately specified\\nthe following server parameters:
\\n \\n \\n
If you are using IMAP
- \\n
mail server address - imap.yandex.ru;
\\nconnection security - SSL;
\\nport - 993.
\\n- \\n
mail server address - smtp.yandex.ru;
\\nconnection security - SSL;
\\nport - 465.
\\n\\n \\n \\n \\n
If you are using POP3
\\n \\n \\n Incoming mail \\n \\n
- \\n
mail server address - pop.yandex.ru;
\\nconnection security - SSL;
\\nport - 995.
\\n- \\n
mail server address - smtp.yandex.ru;
\\nconnection security - SSL;
\\nport - 465.
\\n\\n \\n \\n \\n\\n
Encryption of transmitted data.
\\n\\n ")]))\">
Make sure that the protocol you want to use is enabled in the Mail Programs settings section.
Make sure that in the mail program settings you have accurately specified\\n the following server parameters:\\n \\n \\n
If you are using IMAP
\\n \\n \\n Incoming mail \\n \\n
- \\n
mail server address - imap.yandex.ru;
\\nconnection security - SSL;
\\nport - 993.
\\n- \\n
mail server address - smtp.yandex.ru;
\\nconnection security - SSL;
\\nport - 465.
\\n\\n \\n \\n \\n
If you are using POP3
\\n \\n \\n Incoming mail \\n \\n
- \\n
mail server address - pop.yandex.ru;
\\nconnection security - SSL;
\\nport - 995.
\\n- \\n
mail server address - smtp.yandex.ru;
\\nconnection security - SSL;
\\nport - 465.
\\n\\n \\n \\n \\n\\n
For more information on how to check server settings in different mail programs, see the section Encrypting transmitted data.
\\n ")]))\">
Make sure that in your mail program settings you have accurately specified the following server parameters:
If you are using IMAP
Incoming mail
mail server address - imap.yandex.ru;
connection security - SSL;
port - 993.
mail server address - smtp.yandex.ru;
connection security - SSL;
port - 465.
If you are using POP3
Incoming mail
mail server address - pop.yandex.ru;
connection security - SSL;
port - 995.
mail server address - smtp.yandex.ru;
connection security - SSL;
port - 465.
For more information on how to check server settings in different email programs, see the section Encrypting transmitted data.
If the "Authentication required" message appears, "Sender address rejected: Access denied" or “Send auth command first”, authorization on the Yandex SMTP server is disabled in the mail program settings. Make sure the option is enabled User Authentication(for Outlook Express) or SMTP Authentication(for The Bat!).
If a message appears "Sender address rejected: not owned by auth user", the address from which you are trying to send a letter does not match the one under whose login you are authorized on the SMTP server. Make sure that in the mail program settings, the return address is set to exactly the address from which the login is used in the SMTP authorization settings.
If a message appears "Login failure or POP3 disabled", the mail program cannot access mailbox via POP3 protocol. Make sure that the correct password for the mailbox is entered and that access via the POP3 protocol is enabled in the Mail programs settings section.
If a message appears "Message rejected under suspicion of SPAM", the contents of your email were recognized by Yandex.Mail as spam. To solve the problem, open the Yandex.Mail web interface and send any one letter as a test. This way you will prove to the system that the letters are not being sent by a robot.
Check your computer for viruses using free antivirus programs: CureIt! from Dr.Web and Virus Removal Tool from Kaspersky Lab.If your mail program does not accept or send letters, check that your mail program settings are correct, as well as your computer’s Internet connection settings.
If you are using antivirus program, firewall or proxy server, disable them and check if this reproduces the problem.
personal data and link a phone number to your account.
Read step-by-step instructions to find missing emails. Before you start, open Yandex.Mail in a new tab.
Select an issue:
When you delete messages, they go to the Deleted Items folder and are stored there for 30 days. During this period you can restore them:
Go to the Deleted Items folder.
Select the required letters.
Click the To Folder button.
If more than a month has passed since they were deleted, it will not be possible to restore the letters - they have been permanently deleted from the Yandex.Mail servers.
If the letters are not in the folder where they should be, then most likely they ended up in another folder, for example in Deleted Items or Spam. If you remember the sender's name or address, part of the text of the letter or the subject, try searching for letters in all the folders in your mailbox.
Have you found the letters?
You can restore letters:
Go to the folder in which the letters were found.
Select the required letters.
Click the To Folder button.
Select from the list the folder where you want to move the letters - for example, Inbox.
Why emails disappear and how to avoid it
The Deleted emails folder is stored for 30 days, and the Spam folder for 10 days. After this, they will be permanently deleted from Yandex servers. Why can emails end up in these folders without your knowledge:
Another user has access to your mailbox
Emails can be deleted by a user who has access to your mailbox: perhaps you forgot to end your session after working on someone else's device. To end your session, click the link in your account menu Log out on all devices. This can also be done on the Passports page - using the link Log out on all computers.
Letters disappear in the mail program
service page
A rule has been configured that deletes or moves letters. Letters disappear in the mail program.
If you use an email program and delete letters in it, they disappear on the service page. This happens because your program is configured using the IMAP protocol - in this case, the mailbox structure on the service is synchronized with the mailbox structure in the program. To delete messages only in the program, but leave them in Yandex.Mail, you can configure the program using the POP3 protocol, but we recommend not doing this: the messages may not synchronize correctly with the server.
A rule has been configured that deletes or moves emails Indicate reliable personal data in Yandex.Passport and link a phone number to your account. Our security system may have found your account suspicious and blocked your mailbox. Most often this happens due to the fact that the phone number is not attached to the box or the Passport contains fictitious name and last name. It usually takes a couple of hours to remove the lock.
If you delete letters in your mail program, but they are still in their folders on the Yandex.Mail website, then most likely your mail program is configured using the POP3 protocol. Due to the peculiarities of the POP3 protocol, messages in the mail program may not synchronize correctly with the server. To work with Yandex.Mail, it is recommended to use the IMAP protocol. To learn how to migrate your email program from POP3 to IMAP, see Migration from POP3.
If your email program does not display sent emails, then most likely your email program is configured using the POP3 protocol. Due to the peculiarities of the POP3 protocol, messages in the mail program may not synchronize correctly with the server. To work with Yandex.Mail, it is recommended to use the IMAP protocol. To learn how to migrate your email program from POP3 to IMAP, see Migration from POP3.
If you receive errors about an incorrect certificate when activating SSL encryption in your email program, make sure that your email program and operating system configured correctly:
Manually add a certificate to the list of trusted certificates (Windows)
Attention. If you are not sure that you can install the certificate yourself, contact a specialist.
To add a certificate to the list of trusted certificates:
Download the certificate. (If the linked file opens directly in your browser, click CTRL + S and save the file to your computer; there is no need to copy text from the file.)
Open the Start menu.
Came out a new version Thunderbird mail client. Mozilla Thunderbird is a popular free email client. Mail clients are computer programs designed to work with mail.
This client has many useful and thoughtful functions that make its use as convenient as possible. We can note the high security of operation, a fast message search mechanism, and a “smart” spam filter.

There is also a function for importing settings from other email clients (The Bat!, Microsoft Outlook, Outlook Express). Ability to work with RSS, check spelling directly while writing.

Despite its free status, this program includes all the necessary tools for convenient work with mail:
- spam filtering system;
- ability to read news via RSS;
- the ability to sort messages into folders based on a variety of criteria - by date, by sender;
- built-in HTML editor, which creates a fairly compact code, which in turn reduces the final size of sent letters;
- support for all kinds of encodings;
- expandability through additional modules.
If you still decide to use postal Thunderbird client, we recommend that you download a very useful program
