The 1c configurator is working. Windows system configuration. How to start the system configurator
A quick step-by-step demonstration of application development on the 1C:Enterprise 8.2 platform.
To run the example, you will need the 1C:Enterprise 8.2 platform. On our website you can download. This demo was prepared using exactly this version!
Simple HR system
Now we will create a mini-system for personnel records of employees at the enterprise. It will allow us to hire and fire employees, as well as work with personnel documents.
Each configuration should be stored in a separate directory (folder).
1. Create a new folder on any drive of our computer, for example, "C:\Our Frames".
2. Launch 1C:Enterprise. A list of infobases will open. If you haven't created any information base and did not add existing databases, the list will be empty.

1C:Enterprise can work with several databases on one computer. For example, one database maintains personnel records, another database maintains goods records, a third maintains accounting records for Company A, and a fourth maintains accounting records for Company B.
3. Click the "Add" button.
At the first step of the wizard, select the option "Add an existing infobase to the list."
In the second step, specify the name of the infobase as it will appear in the list of databases, for example, “Our personnel.” The name of the database can be arbitrary, nothing depends on it. 
4. In the next step, specify the path to the folder that you created in step 1 of our step by step guide(in our case this is C:\Our Frames). Click "…" , enter the folder and click "Select".


The directory with the information base can be located on the local hard drive of the computer, for example, “C:\Our Personnel”, or maybe on another computer on the local network, for example, “\\SERVER\KADR”. In this case, full access rights to this folder must be granted (read, write, etc.).

To edit it, you can click the Edit button. For example, the infobase has been moved to another location or you want to give it a different name. To remove an infobase from the list, click the Delete button. In this case, the infobase is removed from the list, but is not physically deleted from the disk.
6. Let's select the "Configurator" launch mode. To do this, click on the “Configurator” button.

1C can be launched in two modes:
- 1C:Enterprise- mode of using the information base. Regular users work in this mode, enter data, print reports, etc. In this mode, you cannot edit the configuration structure.
- Configurator- configuration (programming) mode. Programmers work in this mode, create new directories, reports, and write program modules. In this mode, you cannot enter data into the infobase.
7. Since there is nothing in the created folder yet, 1C will ask for confirmation to create a new information base.

8. Click Yes. Next, select the option “Creating an infobase without configuration to develop a new configuration or load a previously unloaded infobase” (option 2) and click the “Next” button. In the next step, click the "Finish" button.
9. The configurator will launch. Open the configuration tree, which is where we will work very often. To do this, select “Configuration” - “Open configuration” in the menu or click on the corresponding icon.

The configuration tree window will appear. Give it a comfortable size.

This window presents all configuration objects, such as directories, documents, reports, etc. To expand a specific branch, you need to double-click on the plus sign or double-click on its name.
Creating Configuration Objects
10. Place the cursor on the "Directories" line and click the button (or right-click and select Add). This will open Configuration object editing window(a kind of constructor for creating a directory).

The configuration object editing window is intended for quick creation new configuration objects. The data entry sequence is designed in such a way that previous data can serve as the basis for subsequent data entry. Movement is controlled by the buttons at the bottom of the window "Next" and "Back". At each step, you are asked to enter a group of logically related data. You can also move through the steps by clicking on the corresponding tab (Main, Subsystems, Functional options, etc.).
11. In the first step (tab), set the “Name” of our directory (identifier), for example, “Positions”. After entering the Name, press the "Enter" key on the keyboard, or move the mouse to the next field. Based on the “Name”, the system will automatically create a “Synonym”.

The name of the object (in our case, the directory) is an important and required property of any configuration object. This is what will be used when writing program code in 1C language. The name cannot be corrected just like that, since all places in the program where this directory is used will also have to be corrected.
Take the directory "Name" very seriously. The name should be concise, understandable, reflecting the essence of the directory, for example: “Countries”, “Employees”, “Products”, etc.
The names of configuration objects, details, variables, procedures and functions in 1C can contain letters of the Russian and English alphabets (lowercase and uppercase), underscores and numeric characters. The name cannot begin with numbers.
Any configuration object also has the "Synonym" property. It is intended to store an “alternative name” of a configuration object (in our case, a directory). It is this that will be used in the interface elements of our program, that is, it will be shown to the user. There are no restrictions for “Synonym” and it can be set in a readable form, for example, “List of positions”, etc.
Each directory has two predefined (predefined) fields “Code” and “Name”. You can edit the length of the name, the length of the code, and the type of code: “Number” or “String”.

13. Close the "Positions" directory editing window.
14. Let's create a new directory "Employees" (see point 10).
Set the directory name (identifier) to "Employees".
Set the name length to 100 characters.
We will store the employee's full name in the name. Sometimes there are quite long first and last names, so 100 characters is just right.
15. In this directory, in addition to the already specified fields (Code and Name), we will have several more fields (details, attributes). Now the list of additional details (fields) is empty. Click the "Add" button.

As a result, a window for editing props properties (properties palette) will open. By the way, props, attribute and field are basically the same thing. It’s just that in 1C terminology it is customary to use “props”.
16. Set the attribute name in the properties palette to “Position”. Specify the type of attribute - “DirectoryLink.Positions”, which we created earlier. This suggests that the values of this requisite will be selected from the "Positions" directory. Close the properties palette window.

17. Create the "Salary" attribute (type Number, Length 10, Accuracy 2). For a value of the "Number" type, the precision indicates the number of decimal places (in our case, 2 decimal places).
18. Create the details of Admission Date and Dismissal Date (Date type).

19. Now we have two directories and we can enter some data.
Let's update the database configuration (save all the changes we made to the configuration). This can be done using the program menu (Configuration – Update database configuration), or the corresponding icon on the toolbar, or the F7 key.
Since we edited (changed) the structure of the information base, 1C will analyze these changes and show a window with a list of them. Click the "Accept" button.

20. Start the system in 1C:Enterprise mode. This can be done directly from the Configurator by clicking on the toolbar or the F5 key. The 1C:Enterprise window will appear.

21. Open the Positions directory. To do this, click in the navigation panel (on the left side of the application window) on the inscription (link) Positions. A directory window will open.
22. Enter multiple positions using the INS button or key. For example, director, accountant, programmer.

Please note that codes are assigned automatically, although they can be edited. In this case, it is necessary to maintain the uniqueness of the codes. Uniqueness parameters can be configured in the configurator; for example, you can completely disable code uniqueness control.
By default, sorting is set by Name. This allows you to type the first letters of the job title, and the cursor will automatically move to the desired position. You can also set another type of sorting: by code or by details. To do this, just left-click on the name (title) of the attribute.
23. Open the Employees directory.
24. Get some employees. For example, Ivanov Ivan Ivanovich is a director, Petrov Petr Petrovich is an accountant, Sidorov Sergey Sergeevich is a programmer. We only fill out the details Name (full name) and Position. Please note that when you specify a position, the Positions directory opens. To save a new directory item (new entry), click “Save and close”.

25. Close the 1C:Enterprise window and return to Configurator mode.
In real life, the hiring of an employee is carried out using the personnel document “Order for Hiring”. This is what we will implement in Part 2 of our Step-by-Step Example.
Software on the 1C platform: Enterprise, regardless of modification, has two launch modes. The first option is intended for a custom database start, and the second (1C configurator) is used by programmers or developers. And only for the period of making changes to the code, screen or printed form.
Access to the "Enterprise" mode is usually provided to those whose responsibilities include filling out directories, entering documents, generating reports and starting processing. Full access to both options is available to specialists (system administrators) who have sufficient qualifications for this.
Launch method and interface appearance
To start the 1C configuration via local network or the Internet, there are several launch methods: thick and web client. If you need to start the 1C program in the “Configurator” mode, you should consider the possibility of launching it only through a thick client. Or you will have to do the setup work locally on the server, where it is possible to directly connect to the database.
Important. The lack of access to the configurator in custom launch modes provides additional protection against unauthorized interference in the database.

Externally, the interface of the 1C program configurator differs little from the user interface, but the set of menu items here is completely different. The program window contains the following positions:
- Configuration. Basic functions like “open”, “save changes”, etc.;
- Debugging. Used by programmers to test changes made;
- Administration. Setting up access rights, creating new users;
- Service. Interface settings, calculator, calendar;
- Window. Functions for managing windows open in the configurator;
- Reference. Helper for syntax, functions, general information about the program.
Below this menu are quick commands that are most popular when working with the configurator. Their list can be changed at will. The main window displays metadata representing a predefined set of classes.
To the right of the metadata tree, the 1C configurator displays the properties of the class that is open for editing. In fact, this is the main Workspace programs. It will open:
- Screen form editor.
- Editor of printed forms and syntax.
- Reference materials.

After making changes, you can check the functionality of the innovations in debugging mode. You need to save the changes and select launch in “Enterprise” mode (F5 key). If the errors are syntactic in nature, then before saving the configuration the Configurator will issue warnings indicating the errors. If an error appears in enterprise mode, for example, division by 0, then the programmer can go from the error window to the configurator to the part of the code where the error occurs.

Purpose
The first launch after installing any configuration of 1C 8.x programs is mainly carried out in configurator mode. This is necessary to create users, assign certain rights to them, and install protection for the software module from unauthorized access by employees and third parties.
Tip: To open the configuration, you must immediately set a password, otherwise changes to even a small section of code may result in complete inoperability of the program.
In the future, this mode is used to make adjustments and introduce new modules. The complete list of functions is as follows:
- Program change;
- Debugging code execution;
- Checking the performance of modules;
- Setting up logbook parameters;
- Database reindexing;
- Checking logical and referential integrity;
- Publishing the database on a web server;
- Creation backup copy bases;
- Recovery after failures;
- User administration.
To facilitate and speed up the work of programmers and developers, contextual hints are used in the 1C configurator window. With them, it is enough to master the general basis of editing modules; it will be really difficult to make a mistake in writing commands.
Configuration update
One of the most popular areas for using the “Configurator” mode is the implementation of updates. The 1C company releases to the market at least once a quarter new version each configuration. Due to this, errors that users find are corrected, printed and electronic forms in accordance with current regulations. Accounting is characterized by regular adjustments and even the introduction of new types of reporting.

Only when using automatic update with executable file The installer usually erases non-standard code changes. Before starting, you should consider the following:
- If there are large database changes, it is better to use the manual update method.
- Before starting the process, you should make sure that there are no changes blocked.
If you carry out the procedure without taking into account the implementation of the new code, system administrator then you will have to restore everything manually. Therefore, they try to use the “Update configuration” item in the “Configuration” menu.
The specialist has the opportunity to preliminary compare the two modules. If in the new file the code change affects only those areas where no changes were made, then automatic update. In other cases, it is easy to transfer the necessary innovations to the database step by step, ignoring those that may disrupt the functionality or performance of your own modules.
Configurator 1C 8.3 - development environment information systems based on the "" platform. Application solution development is usually called . Using this environment, it is possible not only to refine a solution, but also to develop your own, full-fledged configuration.
Below I will try to describe the main features and interface of this development environment.
The main function of the 1C configurator is to help the developer develop a viable solution for business automation in the shortest possible time. Additional functions– taking a database backup, entering users, working with storage, updating the solution, routine testing of the database, etc.
The entire set of commands, the location of menus, buttons - all this can be changed by the developer, so we will consider the “out of the box” state.
The appearance of the 1C configurator is quite simple and conservative:

The top panel contains the main context menus of the program - file, edit, configuration, etc.:

Below are the shortcut commands most often used by users:
The Windows 7 operating system allows you to manage the boot parameters of installed operating systems, manipulate services and startup. The “System Configuration” utility, called by the msconfig command, is intended for this purpose.
How to enter the msconfig.exe configurator?
There are several ways to launch the utility. We will give 3 of the simplest ones.
Search line
To launch the utility, you must enter the word in the search bar of the Start menu msconfig, and then select the found utility from the search results.
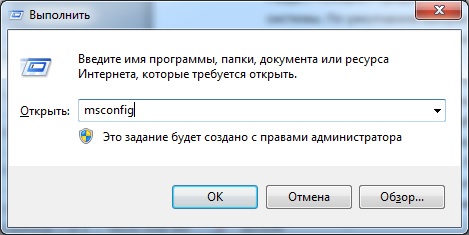
Run command
Open the Run submenu located in the Start menu and type in the text field msconfig, then press Enter or the “OK” button.
Command line
Open Start - All Programs, and then in the Accessories folder select Command Prompt.
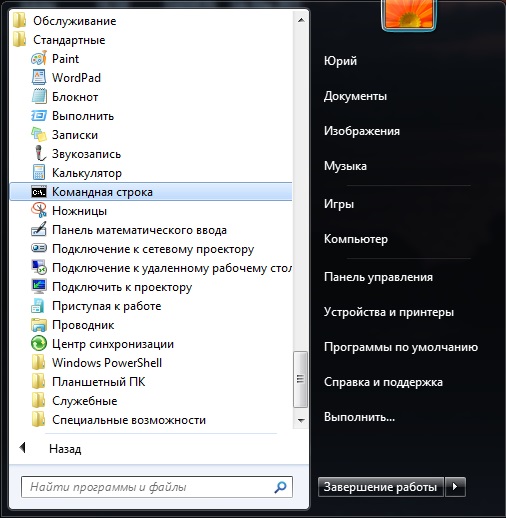
In the window that opens with a black background, enter msconfig and press Enter.

In addition to the listed methods, it is possible to open the utility directly from the folder where it is located. To do this, go to the C:\Windows\System32 directory and run msconfig.exe.
Correctly setting up msconfig for current needs
The "System Configuration" (MSCONFIG) utility window has several tabs: "General", "Boot", "Services", "Startup" and "Service".
Are common
The “General” section is designed to select one of three options for loading the operating system. By default " Normal launch", which loads all the necessary drivers, services and programs at startup.

The user can install “Diagnostic startup” to load only the drivers and services necessary for the system to function. This mode is used to identify the causes of errors in Windows work 7. For example, when loading you started to see an error unknown to you, or after some time the computer simply reboots or displays blue screen"of death". The cause may be errors in drivers or system files, or the error may be caused by installed application. If in diagnostic mode there are no problems with the system, then the user program is to blame.
“Selective startup” serves for further diagnostics and identification of the causes of problems in the system. You can sequentially enable additional services and startup programs. It is recommended to start the system by first enabling system services, then enabling items in startup and rebooting. At the last step, enable “Use original boot configuration”, which will correspond to the normal OS startup option. This way, you can localize the cause and identify the group of programs or services that lead to errors.
The “Boot” section allows you to manage the loading of installed operating systems. If you have multiple systems installed, you can configure which one will boot first. To do this, select one of the systems from the list and click on the “Use as default” button. Additionally, you can set the waiting time for the user to select a particular system by changing the time interval in the “Timeout” field.

Here you can also configure additional download parameters. Enabling the Safe Mode feature will allow you to start the operating system with disabilities. In this case, only the most necessary drivers and devices are loaded. This mode is used to diagnose software faults.
There are several options for working with safe mode:
- “Minimal boot” essentially allows you to load a minimal set of drivers and use only the required number of devices, without support for network services and devices.
- "Another shell" allows additional use in safe mode command line, however Windows Explorer will be unavailable, just like the network.
- "Recovery Active Directory» – allows you to launch Windows Explorer in safe mode with support for Active Directory directories.
- “Network” – loads network services and devices.
- “Without GUI” – disables the operating system boot animation.
- “Boot log” – enables the ability to save information about system boot to a file (keep a boot log). The log is saved in the file “Ntbtlog.txt”, which is located in the system folder %SystemRoot%.
- “Basic video” – makes it possible to replace video card drivers. That is, instead of the installed video drivers, standard VGA drivers will be used.
- “OS Information” – allows you to display information about loaded drivers during system boot.
You can also set other additional boot options for Windows 7 by clicking on the corresponding button under the OS list. The purpose of this section is to set limits on the use of physical resources at startup.
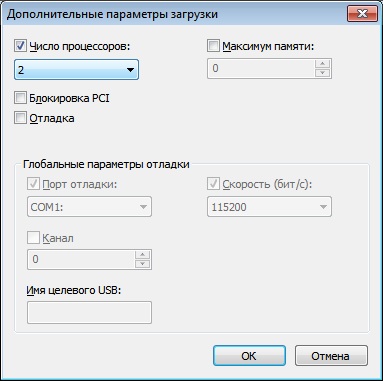
- “Number of processors” – limits the use of multi-core processor cores by specifying their number.
- “Maximum memory” – sets the limit of used RAM.
- “PCI blocking” – allows you to restrict the use of I/O devices connected to the PCI bus.
- “Debugging” – activates debugging mode. It is used primarily by driver and software developers.
Services
“Services” section – used to enable and disable all operating system services. During system diagnostics, you can disable some services to identify the causes of malfunctions. To hide system services, check the “Hide Microsoft services” checkbox. After that, on the “General” tab, set the “Selective startup” mode and enable the “Load system services” item. On the Services tab, disable all other user services and restart your computer. If problems do not arise after this, then the user services are the cause. Now turning on services consistently, you can easily determine the source of the problems. If the problem does not disappear, then the reason lies in the system services. Disable all services and then enable them one by one to identify the source of the system failure.

The “Startup” section – allows you to enable or disable the automatic launch of certain programs when the OS starts. To disable automatic download any program, you should uncheck the box next to the selected program and click the “OK” button. You can manage startup parameters to diagnose problems or increase system boot speed. Often, while using a computer, a user has up to 20 applications in startup, most of which he is not even aware of. Naturally, such a number of programs significantly slows down loading Windows. If you are diagnosing the system, you can disable all programs in startup, and then turn them on one by one to determine the source of the error.

Service
The “Service” section is used to launch additional system utilities. Here the user can launch additional diagnostic, administration and management tools operating system. Just select the utility you are interested in (there are short description each of them) and click on the “Launch” button to open it.

As you can see, the “MSCONFIG” utility is quite easy to use and allows you to diagnose software problems during boot Windows systems. But still chaotic changes in this application can lead to undesirable consequences, so write down the changes you make so that in case of problems you can easily return everything to its original position.
