Form 1c details. Basic details of the form. Data types available in a managed form
How to add additional details to a directory element in 1C Accounting 8.3 (revision 3.0)
2016-12-07T18:20:33+00:00It happens that we lack the capabilities already available in 1C. And you don’t always need to contact a programmer. I will tell you about one of these cases in relation to the new 1C: Accounting 8.3 (edition 3.0).
Let us not have enough fields to enter information about our counterparties. And we want to add a new field, which will be called "Status" and have one of three values - "High", "Medium" and "Low". I will tell you below step by step how to add such a field without going into the configurator.
1. Go to the "Administration" section and select " General settings" ():
2. Find and check the “Additional details and information” checkbox if it is not already checked. Click the "Additional details" link:

3. In the left part of the settings window that opens, select “Account”. Click the New button on the toolbar.
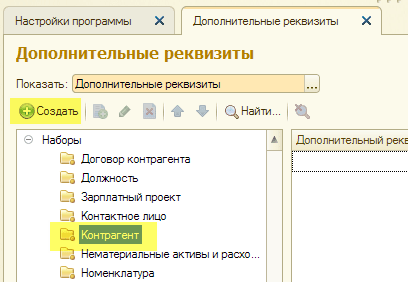
4. A window for creating new details for elements of the “Counterparties” directory has opened. Enter "Status" in the Name field. Leave "Additional value" as the value type, although in the future keep in mind that other value types are possible (string, number, date, etc.). But what we need now is the additional value, since we want to provide the user with a limited choice of three options.

5. To create each option, go to the “Values” tab, click the “Create” button there, enter the name of the value (for example, “High”) and click the “Save and close” button.

6. And so on until all three values are created with the names “High”, “Medium” and “Low” as shown in the figure below. Click the "Save and Close" button.

7. As you can see, the Counterparty now has the Status attribute in the list of additional details.

8. Now, if we go to any element of the counterparties directory, we will see at the very bottom of the form a new Status field ( If you don’t see it, expand the “Additional details” group collapsed on the form.):

9. We can substitute one of the three values we created into this field. You can make a selection using this field in the form of a list, it can be displayed in reports, etc.

Listed below are the main 1C objects that are used when working with managed forms. Brief code examples are given that demonstrate the traditional use of these objects when writing 1C configurations.
ThisForm
Used in the form module, in procedures&On the Client and &On the Server.
Allows you to access both form elements and details.
The form element is accessed through an object Elements and looks like this:
ThisForm.Elements.VersionNumber.Header = "v."+ProgramVersion;
Accessing attributes that exist on the form occurs like this:
ThisForm.Advertisement Text="Hello, comrades!";
Simplified access to form elements and details
In principle, you don’t have to specify a keyword in a form module ThisForm . You can access form elements and details in a simplified way:
// Form element
Elements.VersionNumber.Title = "v."+ProgramVersion;
// Form details
Advertisement Text="Hello, comrades!";
Features of obtaining form details (important!)
If the form attribute has a simple type - String, Number, Date ... then you can get (set) the value of the attribute simply by name:
Text=ProductName; // Product name is a form attribute
However, in this way it is impossible to obtain details of a “complex” type -Table of Values, Tree of Values . When you try to get an attribute with this type by name, an object of type will be returnedDataFormsCollection.
To get the value of an attribute with a “complex” type, you need to use the functionFormAttributesValue():
CurrentTable=FormAttributesValue("SelectedConstructionObjects");
To set the value of a “complex” attribute, you can use the functionValueInFormAttributes(<Значение>, <ИмяРеквизита>) , both parameters are required.
Functions FormAttributesValue() And ValueInFormAttributes()available only on the Server.
An object
Strictly speaking, this keyword within the form no. Simply, when a form is created, for example, an element form, 1C automatically creates an attribute on the form with the name An object . Through this prop properties of the current object that is being edited on the form are available.
or, more complete notation:
ThisObject
Contains the object itself. Intended for getting an object in an object module or a form module.
Usage: Read only.
Availability: Server, thick client, external connection.
The user's work with reference books and documents in 1C consists of filling out fields on the form.
1C details are directory and document fields that are displayed on the form for the user to fill out.
Let's take a closer look at the topic of details in 1C.
What are 1C Details
Each directory and 1C document consists of a set of fields. Such fields are called 1C details (for a 1C programmer).
In the configurator, in the 1C configuration tree, open any directory or document and you will see the Details branch. This is a list of directory details (fields).

Look how the same 1C details look on the 1C directory form.

Each 1C attribute has properties that indicate what type of value is stored in the attribute (string, number, etc.) and how the user will work with it.
Right-click on any 1C attribute and click Properties. A list of properties of the selected attribute will open in the window on the right.

Main properties of 1C details:

Standard 1C details
As you noticed, on the directory form there are 1C details that are not listed in the configurator: group, name, BIC.

The directory list form also contains 1C details that are not in the list: deletion mark.

These are standard 1C details. What it is? Everyone has a default set of 1C details. For directories this is, for example, code and name. For documents this is the date and number.
Standard 1C details can be viewed as follows:
- Go to the editor of the 1C object (directory or document) by double-clicking on it with the mouse
- In the editor that opens, select the Data tab
- Here you can configure the standard details Code and Name of the directory
- Click the 1C Standard Details button to view the full list.

General 1C details
Starting with version 1C 8.2.14, a new 1C Object has appeared in 1C - General 1C Details. Using it, you can add a property (field) that will be present in many directories and documents at once.

Properties of general 1C attributes:
- Auto-use – adds general 1C details to all directories and documents at once
- Composition - allows you to add general 1C details only to the necessary directories and documents (auto-use is then set to Do not use).

How to add 1C details
Right-click on the 1C Details branch of the desired directory and select Add.

We need to enter the Name of the 1C attribute, for example “Office Address” and the synonym “Office Address”. Leave the default type as String, but check the Unlimited length checkbox.

Let’s add another 1C attribute in the same way, only we’ll select the Boolean type and call it “Works on Weekends”.
How to display details on a 1C form (1C thick client)
Let's expand the Forms branch of the same directory. To open the form, select the element form and double-click on it with the mouse.

Drag the edge of the shape with your mouse and stretch it (optional).

In the configurator panel, click the “Data placement” button. You can also use the Form / Data Placement menu.
You see that our details are not displayed on the form. Check them. And also the Insert labels and Place automatically checkboxes.


How to display details on form 1C ( thin client 1C)
Let's expand the Forms branch of the same directory. Select the shape of the element and double-click on it with the mouse.

On the Details tab, expand the Object line. You will see a list of details that were previously added to the directory.

Now just drag the required attribute from the right window to the left one and it will appear on the form.


Form 1C details
In the thick client, the form has its own details. They are located on the Details tab.

These details are not saved in the database, but they can be used on the form for the fields that are needed to work with the form.

For example, you added a checkmark to the form. When you click it, something happens on the form. The meaning of the checkbox does not matter to you (you do not need to write it down) - it is used only to switch the form when working with it. In this case, you do not use the directory attribute as data, but the form attribute.

Periodic details 1C
In 1C version 7.7 there were periodic details. Their meaning is this: the meaning of the props is different on different dates. For example, the value on September 1 is one, and on October 1, another. Same props.
In 1C 8 there are no periodic details. This is implemented as follows:

Form details
A set of form details describes the composition of the data that is displayed, edited or stored in the form. At the same time, the form details themselves do not provide the ability to display and edit data. Form elements (see the “Form Elements” section of this chapter) associated with form details are used for display and editing. The set of all form details will be called form data.
Important! It must be remembered that, unlike conventional forms, all data controlled form must be described in the form of details. It is not allowed to use form module variables as data sources for form elements.
It is possible to assign Basic form details, i.e., attributes that will determine the standard functionality of the form (form extension). It should be remembered that a form can only have one main attribute.
Form extension– these are additional properties, methods and form parameters of the ManagedForm object, characteristic of the object that is the main element of the form.
During the form development process, you can explicitly set the ability to view and edit specific form details, in terms of roles, using the View and Edit properties (for more details, see the “Role-based form settings” section of the “Editors” chapter). In addition, the availability of a particular attribute in the form itself can be configured using functional options (more details about functional options can be found in the chapter “Configuration Interface Management”).
Form attribute property Saved data is an indication that interactively changing the details will result in an attempt to lock the form data for editing, as well as automatic installation a sign of modified form.
Data types available in a managed form
A managed form also differs from a regular form in the types of data it works with. If regular form works with most of the types that 1C:Enterprise provides (including the types DirectoryObject, DocumentObject, etc.), then in a managed form the following categories of types can be distinguished:
- types that are directly used in the form are those types that exist on the side of the thin and Web client (for example, Number, DirectoryLink.Products, GraphicScheme, TabularDocument);
- types that will be converted to special data types—managed form data types. Such types are displayed in the list of form details in parentheses, for example (DirectoryObject.Products);
- dynamic list (for more details, see the “Dynamic List” section of this chapter).
Converting Application Objects to Form Data
Some application types (such as DirectoryObject, etc.) do not exist on the thin and Web client side (see the Managed Application Concept chapter for more details). Therefore, to represent such application types in the form, the platform has introduced special data types designed to work in managed forms. This feature of a managed application makes it necessary to convert application objects to form data (and vice versa).
The following data types are used:
- Form DataStructure – contains a set of properties of an arbitrary type. Properties can be other structures, collections, or structures with collections. This type is represented, for example, in the form DirectoryObject.
- A FormDataCollection is a list of typed values, similar to an array. A collection element is accessed by index or identifier. Access by ID may not be available in some cases. This is due to the type of application object that is represented by this collection. The identifier can be any integer. This type is represented, for example, in the form tabular part.
- Form DataStructureWithCollection is an object that is represented as a structure and a collection at the same time. It can be treated like any of these entities. This type represents, for example, a set of records in a form.
- Form DataTree – an object designed to store hierarchical data.
An application object is represented by either one or more form data elements. IN general view The hierarchy and composition of the form data depend on the complexity and interconnection of the application objects of the managed form.
For example, a document containing a tabular part will be represented by an object of the FormDataStructure type (the document itself), to which an object of the FormDataCollection type (tabular part of the document) is subordinated.
Important! When developing a configuration, it is important to remember that application objects are available only on the server, while form data objects can be used on both the server and the client.
Passing data between the client and server parts of a managed form
In fact, we can say that form data is a unified representation of data from various application objects with which the form works uniformly and which are present on both the server and the client. That is, the form contains some “projection” of application object data in the form of its own data types and performs conversion between them if necessary. However, if the configuration developer implements his own data processing algorithm, then he must perform data conversion (from specialized types to application types and vice versa) independently.
When editing form details in a specialized editor (for more details, see the “Form Details” section of the “Editors” chapter), it is possible to influence the transfer of data between the client and the server while the form is running. The column of the details editor is used for this. Always use. The effect of this property differs for three types of attributes:
- For attributes subordinate to a dynamic list (column dynamic list):
- property enabled – the attribute is always read from the database and included in the form data;
- property is disabled - the attribute is read from the database and included in the form data only when it is visible in this moment a form element associated with an attribute or its subordinate attribute.
- For props subordinate to the movement collection:
- property is enabled – document movements are read from the database and will be present in the form data;
- property is disabled - document movements will not be read from the database and will not be included in the form data (if there is no form element that references document movements).
- Other form details:
- property is enabled – the attribute will be present in the form data, regardless of whether or not there is at least one form element that is associated with the attribute or its subordinate attribute;
- property is disabled - the attribute will be present in the form data only if there is a form element associated with the attribute or its subordinate attribute. Unlike dynamic list attributes, the visibility of the element associated with the attribute does not matter here.
Note. It should be remembered that the property set on the parent attribute affects all subordinate attributes. For example, if the Use property is always cleared for the tabular part of the document, then the system considers that this property is also cleared for all subordinate details (despite the actual state of the property).
Methods for converting application object data into form data
To convert application objects into form data and back, there is a set of global methods:
- ValueInFormData(),
- FormDataInValue(),
- CopyFormData().
Important! Methods that work with application objects are available only in server procedures. The method for copying values between form data is available on the server and on the client, since it does not require application objects as parameters.
When converting form data into an application object, you need to consider their compatibility.
- ValueInFormData() – converts an application type object into form data;
- FormDataInValue() – converts form data into an application type object;
- CopyFormData() – copies form data that has a compatible structure. Returns True if the copy was successful, or False if the object structure is incompatible.
Note. When performing standard actions (opening a form, executing a standard Write command, etc.) of a form with the main details, the conversion is performed automatically.
Let's give an example of how to use data transformation in your own algorithms.
ObjectProduct = Directories.Products.FindByName("Coffeepot").GetObject(); ValueInFormData(ObjectItem, Object);
End of Procedure
&OnClient Procedure Write()
WriteOnServer();
End of Procedure
&OnServer Procedure WriteOnServer()
ObjectProduct = FormDataValue(Object, Type("DirectoryObject.Products")); ObjectItem.Write();
End of Procedure
The ManagedForm object also has methods available on the server:
- ValueВFormAttribute() – converts an application type object into the specified form attribute.
- FormAttributeVValue() – converts a form data attribute into an object of an application type.
Using these methods is usually more convenient, since they have, for example, information about the type of form details. In addition, the Form AttributesValue() method sets the correspondence between the form data and the object, which is used when generating messages. You can read more about this in the chapter “Service navigation capabilities”.
Let's give an example of using these methods.
// Converts the Object attribute into an application object. Document = Form AttributesValue("Object"); // Performs recalculation using the method defined in the document module. Document.Recalculate(); // Converts the application object back to a prop. ValueВFormAttributes(Document, “Object”);
End of Procedure
Software interface
FormDataTree
- FindById
- GetItems
Description:
Designed to model a tree in managed form data.
This object can be serialized to/from XDTO. XDTO type corresponding this object is defined in the namespace. XDTO type name:
GetItems
Syntax:
GetItems()
Return value:
Type: Form DataCollection of Tree Elements.
Description:
Gets a collection of top-level tree elements.
Availability: client, server, thin client, web client.
FindById
Syntax:
FindById(<Идентификатор>)
Options:
<Идентификатор>(required)
Type: Number. Tree element identifier.
Return value:
Type:FormDataTreeElement.
Description:
Gets a collection element by ID.
Availability: client, server, thin client, web client.
FormDataTreeItem
Properties:
<Имя свойства> (<Имя свойства>)
- GetId (GetId)
- GetParent
- GetItems
- Property
Description:
Form data tree element.
FormDataTreeItemCollection
Collection elements: DataFormTreeElement
For an object, it is possible to traverse the collection using the operator For each... From... Loop. The traversal selects the elements of the collection. It is possible to access a collection element using the [...] operator. The index of the element is passed as an argument.
- Insert
- Add
- Index (IndexOf)
- Count
- Clear
- Get
- Move
- Delete
Description:
Collection of wood elements.
Availability: client, server, thin client, web client.
See also:
- FormDataTreeElement, GetElements method
- DataFormTree, method GetItems
Features of working with a value tree
Tree update
There is a problem falls platforms when updating the tree.
If any node in the tree has been expanded and a subordinate node has been selected, then when updating the tree with the function ValueInFormData the platform falls.
Solution: You need to clear the tree before updating.
For example:
&On the Server Procedure ClearTree(elements) For each element from elements Loop ClearTree(element.GetElements()); EndCycle; elements.Clear(); End of Procedure
&On the Server Procedure Fill Concept Tree() dConcepts = srProperties.Build Concept Tree(OnDate, Meta.CurrentIB()); ClearTree(ConceptTree.GetItems()); ValueInFormData(dConcepts, ConceptTree); End of Procedure
&OnClient Procedure OnDateOnChange(Element) Fill ConceptTree(); End of Procedure
General details in 1C 8.3 is a platform metadata object that allows you to use one attribute for many configuration objects (directories, documents, charts of accounts, etc.). The object was created mainly to make the developer's work easier and to separate data.
General details were initially implemented in version 1C 7.7, but the developers did not immediately include it in the platform version 8. The mechanism of general details was introduced by 1C developers only in release 8.2.14.
It is very convenient to add general details so as not to change standard objects in the configuration; I often use them along with .
After adding a general attribute, it can be used in queries and displayed on the object form - Outwardly, it is no different from ordinary props.
The only limitation of general details is the inability to use them in .
Let's look at the basic settings and properties of general details that differ from other configuration objects:

Compound— a list of objects to which the general details will be used; the setting is reminiscent of setting up an exchange plan.

Get 267 video lessons on 1C for free:
Auto use— the setting determines whether general props will be used for those objects that have the “Automatic” usage mode specified.
Data separation— we will consider this setting separately.
Separation of data in 1C using common details
Data separation- a mechanism similar to the mechanism. However, the performance of this mechanism is more efficient and it is easier to configure.
The mechanism allows you to configure the display of only elements that the user can see. For example, you can distinguish between all objects (documents, directories, etc.) where a certain organization is installed.
Setting up data separation using general 1C details
To configure the general details, you need to specify the data separation - Divide. Immediately after clicking, the system will offer to create default accounting parameters:

In this case, it will be necessary to specify the session parameters when starting the system; how to do this was described with an example in the article.
This completes the setup - the user will only have access to the information that is specified in the selected session parameters.
Example of using common props
Let's look at setting up general props in 1C 8.3 using the example of a frame configuration and props Organization:
The system has 3 documents where it is necessary to indicate the details of the Organization: these are the Receipt Invoice, the Expenditure Invoice, and the Payroll.
The setup is simple:
- We create a new General attribute, specify the type - DirectoryLink.Organization.
- In the composition we arrange for our documents - Use.
That's it, the setup is complete!
Let's see the result:

The system displays general details “as if they were your own”: in requests, in form details, and in other places. This is such magic! 🙂
