Sandisk doesn't see it. Free programs for repairing flash drives. If the disk is visible in Disk Management, but it is not allocated
Unfortunately, removable drives in the form of regular flash drives and memory cards from the manufacturer SanDisk are the most problematic devices, which are the most susceptible to damage of both a physical and software nature among all equipment of this type. In this regard, many owners of such devices often have to rummage through tons of material on the Internet to find a suitable utility for restoring the functionality of the drive or information that may have been damaged or deleted due to failures. For some reason, the manufacturer itself does not offer anything specific for restoring SanDisk flash drives, so quite often you have to use third-party utilities aimed at other devices. But they may not always work. Despite this, there are still several ways to help solve this problem.
The main problems of SanDisk drives
You might be interested in:
So, why are these drives considered the most problematic? As far as one can judge from the reviews of specialists, they do not quite successfully implement the operating algorithms of the built-in controllers themselves, which is why failures constantly occur, leading to firmware crashes, spontaneous changes to the file system, and the inability to access devices in the environment of almost all known devices today. day of operating systems and, ultimately, to the loss of important information that was stored on them. As you can see, such problems can arise with almost all media belonging to the class of flash drives and removable memory cards, but with this manufacturer they appear most often, and quite often for no apparent reason.
Restoring SanDisk flash drives: main directions of action
Thus, based on exactly what situations may arise, we will look for the most optimal solution. But here it is necessary to clearly delimit certain directions of action.

For the most part, programs that allow you to perform, for example, recovery of a SanDisk Ultra 64 Gb flash drive, which belongs to the category of memory cards, which is considered the leader in the number and frequency of malfunctions, are focused on the ability to format the drive, which allows you to restore the integrity of the file structure of the drive. There is no single application that could be used to tidy up the firmware of microcontrollers. However, even after complete formatting, it is quite often possible to “fish out” information previously recorded on it from a flash drive (no matter what anyone says). The main thing is to choose the right software, which will be described a little later.
Unfortunately, removable drives in the form of regular flash drives and memory cards from the manufacturer SanDisk are the most problematic devices, which are the most susceptible to damage of both a physical and software nature among all equipment of this type. In this regard, many owners of such devices often have to rummage through tons of material on the Internet to find a suitable utility for restoring the functionality of the drive or information that may have been damaged or deleted due to failures. For some reason, the manufacturer itself does not offer anything specific for restoring SanDisk flash drives, so quite often you have to use third-party utilities aimed at other devices. But they may not always work. Despite this, there are still several ways to help solve this problem.
The main problems of SanDisk drives
So, why are these drives considered the most problematic? As far as one can judge from the reviews of specialists, they do not quite successfully implement the operating algorithms of the built-in controllers themselves, which is why failures constantly occur, leading to firmware crashes, spontaneous changes to the file system, and the inability to access devices in the environment of almost all known devices today. day of operating systems and, ultimately, to the loss of important information that was stored on them. As you can see, such problems can arise with almost all media related to removable memory cards, but with this manufacturer they appear most often, and quite often for no apparent reason.
Restoring SanDisk flash drives: main directions of action
Thus, based on exactly what situations may arise, we will look for the most optimal solution. But here it is necessary to clearly delimit certain directions of action.
For the most part, programs that allow you to perform, for example, recovery of a SanDisk Ultra 64 Gb flash drive, which belongs to the category of memory cards, which is considered the leader in the number and frequency of malfunctions, are focused on the ability to format the drive, which allows you to restore the integrity of the file structure of the drive. There is no single application that could be used to tidy up the firmware of microcontrollers. However, even after complete formatting, it is quite often possible to “fish out” information previously recorded on it from a flash drive (no matter what anyone says). The main thing is to choose the right software, which will be described a little later.
SanDisk RescuePRO flash drive recovery utility
In the meantime, let's return directly to bringing the drives to life. What can you recommend for use? First of all, you should pay attention to the small flash drive recovery program SanDisk RescuePRO.

At least, this is the only application that can be found on the Internet when submitting a request. However, the developer himself and even the name of the program, in general, have nothing to do with the flash drive manufacturer SanDisk. The application itself can be downloaded directly from the developer’s resource - LC Technology International. True, the user will immediately encounter some inconveniences, since the site will have to fill out a special form indicating personal data, and only then a letter containing a download link will be sent to the provided email address.
The second point is related to the fact that the application does not have a Russian-language interface, so the restoration of SanDisk flash drives will have to be done, focusing exclusively on English names and terms. But don't despair! In the program itself, to start the recovery process, you just need to press the Wipe Media button and wait for the formatting to finish. True, the use of such a program to restore a SanDisk flash drive raises legitimate doubts, since, judging by the interface, the application is not focused on formatting, but on searching for deleted media files, and on SanDisk media, all information is simply deleted.
Note: the process start button can sometimes be inactive, so you simply won’t be able to perform any actions specifically with SanDisk flash drives. And still no one can give a clear explanation why the application works for some and not for others.
Formatter Silicon Power Program
You can restore a SanDisk flash drive using a similar approach using the described application, which, as the name suggests, is intended for devices from another manufacturer, but, according to most experts and users, it is quite good for SanDisk devices (especially for those equipped with controllers PS2251-03).

The actions performed in the application are minimal. You need to run the program, insert the USB flash drive into the port and press the start formatting button. If for some reason you get an error (which is unlikely), your device will most likely be incompatible with this program. But, as stated, it is worth a try.
USB Disk Storage Format Tool Application
But restoring SanDisk flash drives in this program looks very decent. However, you should initially pay attention to the fact that this utility is designed to perform low-level formatting and works similar to another well-known application - HDD Low Level Format Tool.

In the program, you need to select your media in the drop-down list (of course, if it is identified, be sure to check the boxes for Correct errors, Scan drive and Check if dirty), and then click the button perform a check (Check disk). It is quite possible that using this method will restore the functionality of the device. If there is no effect, use the format button. After this, the flash drive can be used again (but without the information previously recorded on it).
Other utilities
Finally, another, in the opinion of many, suitable utility designed for formatting and working similarly to the previous one is MPTool, despite the fact that it is applied mainly to Silicon Power devices, in some cases this application allows you to restore the operation of SanDisk flash drives.

On the Internet you can find posts that somewhere there is supposedly some non-proprietary program developed specifically for SanDisk devices, called Format and Read/Write Check Utility.

But its use is controversial, since it is impossible to find a single intelligible download link on the Internet; in those archives that are available for download, there is a completely different utility - USB Test Tool, which is also completely non-working.
Is it possible to restore the controllers manually?
In principle, you can try to find SanDisk yourself.

To do this, use the ChipGenius utility to determine the VID and PID identifiers of the problem device, and then search for them. There is little hope that there will be some application suitable specifically for this type of device; a list of programs may still be given that will somehow allow you to restore the functionality of the controllers (the main ones were described above).
What to use to recover damaged or deleted data?
Finally, if there is nothing wrong with the drive itself, but you only need to perform data recovery from a flash drive, there is nothing to think about! According to most experts, the best program in this regard is R-Studio, which recovers information even after complete formatting. Everything is simple here!

First, you need to insert a flash drive into the port, launch the program, select a drive from the list of available devices and partitions, click the scan button, and then save the results found on your hard drive, in a logical partition, or on another removable device. True, after restoring the information, you will not see folders with previously present names, so you will have to look through each renamed directory in search of the desired file.
If you don’t like this approach, you can use a simpler program - R.Saver. It is also possible to restore directories and files, but the result will be somewhat worse than in the R-Studio package.
Results
To summarize, it remains to be noted that, in general, there is no need to manually search for the most suitable application for restoring SanDisk drives. The easiest way is to use one or more utilities presented above for users to see. In theory, at least one will give the necessary result. But if we consider all the described applications from a practical point of view, it is best to try to restore the device’s functionality in the Disk Storage Format Tool application, since it is in it that you can perform two types of actions: checking and formatting, if the first action does not have an effect.
Sooner or later, most users encounter a situation where the flash drive is displayed incorrectly (here you can try formatting first) or the information on it suddenly disappears. But do not despair - it is likely that you yourself will be able to revive the device and successfully restore the photos and documents stored on it or “bring to life” the file system.
Thanks to our recommendations, you can save not only on the services of a specialist, but also on special programs - we will consider exclusively free software for repairing flash drives. However, it is also worth keeping in mind that different utilities are designed for devices from different manufacturers.
If you don't know the model of your USB drive
do the following:
Go to the Start menu and in the “Run” line write mmc devmgmt.msc, then press Enter. In the Universal Serial Bus Controllers section, find your “USB Mass Storage Device”, select it and right-click. Open Properties, then go to the Details tab and in the dropdown select Device Instance Code (or Hardware Codes). Write down or remember the PID and VID.
Then go to the FlashBoot.ru website and enter the VID and PID data in the special field. After this, you will receive information about your device and the utilities that are best suited to repair it.
Recovering a Transcend flash drive
To restore devices of this brand, the official Transcend RecoveRx utility is best suited. With its help, you can conduct an in-depth search for already deleted files, which you can later also recover: photos, documents, audio and video files.
By the way, RecoveRx supports all types of storage devices, including memory cards, MP3 players and external hard drives. This program works extremely simply - you just need to specify the type of files or select all.
The second method is online recovery of flash drives from the JetFlash Transcend series. To use it, you must download JetFlash Online Recovery (you must have an active Internet connection). Once launched, the tool will automatically restore all your data.
Silicon Power flash drive recovery
If you have a Silicon Power flash drive, you are in luck - the manufacturer cooperates with Recuva. The File Recovery tool provides a clear interface that will allow you to quickly scan your device and mark those that are subject to reincarnation. You can read more about the operating features of this program.
Kingston flash drive recovery
If you have lost files on media from this company, a flash drive recovery utility can also help you. If you have problems with the operation of the device, then most likely you will have to format it, and do this not with a Windows tool, but with the official Kingston Format Utility. Just launch it, select your device and click “Format”.
Recovering a SanDisk flash drive
USB drives from SanDisk have a five-year warranty, so if you suddenly encounter problems, feel free to go to the store or contact the manufacturer (e-mail.
In this manual I will describe all the ways I know to solve this problem. First, the simplest and, at the same time, the most effective methods will be used in most situations when the computer does not see the flash drive, reports that the disk is not formatted, or produces other errors. There are also separate instructions on how to.
There are many reasons why you may encounter the fact that your computer does not see the flash drive. The problem can appear in any version of the Microsoft operating system - Windows 10, 8, Windows 7 or XP. If the computer does not recognize the connected flash drive, this can manifest itself in several variations.
Start Disk Management using one of the following methods:
- Start - Run (Win + R), enter the command diskmgmt.msc, press Enter
- Control Panel - Administrative Tools - Computer Management - Disk Management

In the disk management window, pay attention to whether the flash drive appears and disappears when you connect and disconnect it from the computer.
The ideal option is if the computer sees the connected flash drive and all partitions on it (usually one) are in the “Good” state. In this case, just right-click on it, select “Make partition active” in the context menu, and perhaps assign a letter to the flash drive - this will be enough for the computer to “see” the USB drive. If the partition is faulty or deleted, then you will see “Not distributed” in the status. Try right-clicking on it and, if such an item appears in the menu, select “Create a simple volume” to create a partition and format the flash drive (the data will be deleted).
Further simple steps
Try going to Device Manager and see if your device is listed as unknown, or in the “Other devices” section (as in the screenshot) - the drive may be called there by its real name or as a USB mass storage device.

Right-click on the device, select Delete, and after deleting it, in the Device Manager menu, select Action - Update hardware configuration.

Perhaps this action will be enough for your flash drive to appear in Windows Explorer and be accessible.
Among other things, the following options are possible. If you connect the flash drive to the computer via an extension cable or USB hub, try connecting directly. Try connecting to all available USB ports. Try turning off the computer, disconnecting all extraneous devices from USB (Web cameras, external hard drives, card readers, printer), leaving only the keyboard, mouse and flash drive, then turning on the computer. If after this the flash drive works, then the problem is in the power supply to the USB ports of the computer - perhaps the power supply of the PC is not enough. A possible solution is to replace the power supply or purchase a USB hub with its own power supply.
Windows 10 does not see the flash drive after updating or installation (suitable for Windows 7, 8 and Windows 10)
Many users have encountered the problem of USB drives not being displayed after upgrading to Windows 10 from previous OSs, or after simply installing updates on an already installed Windows 10. It often happens that flash drives are not visible only via USB 2.0 or USB 3.0 - i.e. It can be assumed that USB drivers are required. However, in fact, this behavior is often caused not by drivers, but by incorrect registry entries about previously connected USB drives.In this case, the free USBOblivion utility can help, removing from the Windows registry all information about previously connected flash drives and external hard drives. Before using the program, I recommend.
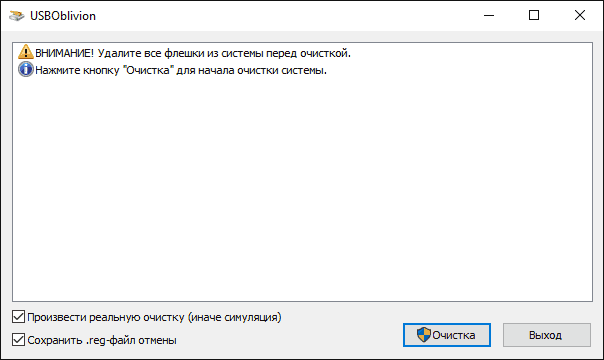
Disconnect all flash drives and other USB storage devices from the computer, run the program, check the Perform a real cleanup and Save the undo reg file checkboxes, then click the “Cleanup” button.

After cleaning is completed, restart your computer and connect the flash drive - most likely, it will be detected and become accessible. If not, then also try going to the device manager (by right-clicking on the Start button) and follow the steps to remove the USB drive from the Other devices section and then update the hardware configuration (described above). You can download the USBOblivion program from the official developer page: www.cherubicsoft.com/projects/usboblivion
But, in relation to Windows 10, another option is possible - actual incompatibility of USB 2.0 or 3.0 drivers (as a rule, then they are displayed with an exclamation mark in the device manager). In this case, the recommendation is to check the availability of the necessary USB and chipset drivers on the official website of the laptop or PC motherboard manufacturer. At the same time, I recommend using the official websites of the device manufacturers themselves, and not the Intel or AMD websites, to search for such drivers, especially when it comes to laptops. Also, sometimes updating the motherboard BIOS helps solve the problem.
If the flash drive is not seen by Windows XP
The most common situation I encountered when calling to set up and repair computers, when a computer with the Windows XP operating system installed on it did not see a flash drive (even if it sees other flash drives), was caused by the fact that the necessary updates for working with USB drives were not installed . The fact is that many organizations use Windows XP, often in the SP2 version. Updates were not installed due to restrictions on Internet access or poor performance of the system administrator.
So, if you have Windows XP and the computer does not see the flash drive:
- If SP2 is installed, update to version SP3 (when performing the update, if you have Internet Explorer 8 installed, remove it).
- Install all Windows XP updates, regardless of which Service Pack you are using.
Here are some of the fixes for working with USB flash drives that were released in Windows XP updates:
- KB925196 - fixed errors that appear in the fact that the computer does not detect the connected flash drive or iPod.
- KB968132 - fixed errors where when connecting multiple USB devices in Windows XP they stopped functioning normally
- KB817900 - The USB port stopped working after removing and reinserting the flash drive
- KB895962 - USB flash drive stops working when the printer is turned off
- KB314634 - the computer sees only old flash drives that were connected before and does not see new ones
- KB88740 - Rundll32.exe error when inserting or removing a USB flash drive
- KB871233 - the computer does not see the flash drive if it has just been in sleep or hibernation mode
- KB312370 (2007) - USB 2.0 support in Windows XP
By the way, despite the fact that Windows Vista is almost never used anywhere, it should be noted that installing all updates should also be the first step if a similar problem occurs.
Completely remove old USB drivers
This option is suitable if the computer says “Insert disk” when you insert a USB flash drive. Old USB drivers available in Windows can cause this problem, as well as errors associated with assigning a letter to the flash drive. In addition, this may also be the reason why the computer restarts or freezes when you insert a flash drive into a USB port.
The fact is that by default, Windows installs drivers for USB drives the moment you connect them to the corresponding port on your computer for the first time. At the same time, when the flash drive is disconnected from the port, the driver does not go anywhere and remains in the system. When connecting a new flash drive, conflicts may arise due to the fact that Windows will try to use previously installed drivers corresponding to this USB port, but to a different USB drive. I won’t go into detail, but will simply describe the steps required to remove these drivers (you won’t see them in Windows Device Manager).
How to remove drivers for all USB devices
- Turn off the computer and disconnect all USB storage devices (and not only) (flash drives, external hard drives, card readers, web cameras, etc. You can leave the mouse and keyboard provided that they do not have a built-in card reader.
- Turn on your computer again.
- Download the DriveCleanup utility http://uwe-sieber.de/files/drivecleanup.zip (compatible with Windows XP, Windows 7 and Windows 8)
- Copy the 32-bit or 64-bit version of drivecleanup.exe (depending on your version of Windows) to the C:\Windows\System32 folder.
- Launch Command Prompt as Administrator and enter drivecleanup.exe
- You will see the process of removing all drivers and their entries in the Windows registry.

When the program finishes running, restart your computer. Now, when you insert the USB flash drive, Windows will install new drivers for it.
Update 2016: It is easier to perform the operation of deleting mount points of USB drives using the free USBOblivion program, as described above in the section about non-working flash drives in Windows 10 (the program will work for other versions of Windows).
Reinstalling USB devices in Windows Device Manager
If none of the above has helped so far, and the computer does not see any flash drives at all, and not just one specific one, you can try the following method:
- Go to Device Manager by pressing Win+R and typing devmgmt.msc
- In Device Manager, open USB Controllers
- Delete (via right click) all devices called USB Root Hub, USB Host Controller or Generic USB Hub.
- In Device Manager, select Actions - Update hardware configuration.
After reinstalling USB devices, check if the USB drives work on your computer or laptop.
Additional actions
- Check your computer for viruses - they may cause inappropriate behavior of USB devices
- Check the Windows registry, namely the key HKEY_CURRENT_USER\ Software\ Microsoft\Windows\ CurrentVersion\ Policies\ Explorer. If you see an option named NoDrives in this section, remove it and restart your computer.
- Go to the Windows registry key HKEY_LOCAL_MACHINE\ System\ CurrentControlSet\ Control. If the StorageDevicePolicies parameter is there, remove it.
- In some cases, completely de-energizing the computer helps. You can do this this way: unplug the flash drives, turn off the computer or laptop, unplug it (or remove the battery if it’s a laptop), and then, with the computer turned off, press and hold the power button for a few seconds. After that, release it, reconnect the power supply and turn it on. Oddly enough, this can sometimes help.
Recovering data from a flash drive that the computer cannot see
If in Windows Disk Management the computer displays the flash drive, but in the status “Not recognized”, “Not initialized”, and the partition on the flash drive is “Not distributed”, then most likely the data on the flash drive is damaged and you will need to use data recovery.
There are a few things to keep in mind that will increase the likelihood of successful data recovery:
- Do not write anything to the flash drive you want to recover.
- Do not try to save recovered files to the same media from which they are recovered
If nothing helps, and your computer still does not see the flash drive, and the files and data stored on it are very important, then the last recommendation would be to contact a company professionally engaged in file and data recovery.
Recovery of SanDisk flash drives
Removable media from SanDisk is one of the most problematic types of equipment in the history of this type of device. The fact is that the manufacturer has not released a single program that could help restore the drive. Therefore, those who have such flash drives can only wander through the forums and look for posts from other users who were able to fix failed SanDisk devices.
We tried to collect all those programs that actually work with media from this company. There were very few of them.
The set of solutions turned out to be very strange and unusual. So, one of them is completely designed for flash drives from another company, but for some reason it also works with SanDisk. Another utility is paid, but you can try it for free.
Method 1: SanDisk RescuePRO
Although the name of the company appears in the title, it seems that SanDisk representatives themselves know nothing at all about it. You can download it on the website of a certain company LC Technology International. In any case, this program copes with the recovery of removable media, and for us this is the most important thing. To use RescuePRO, do the following:
Download the utility from the website of the aforementioned LC Technology International (this link is intended for Windows users, if you are using Mac OS, download the program from here). The site offers three versions - Standard, Deluxe and Deluxe Commercial. You can try using Deluxe first. To do this, click on the button " Try FREE Evaluation" to download the demo version.

You will be redirected to a page where you need to provide personal information. Fill out all the fields - you can enter the information as you wish, but the e-mail must be real. At the end, click on the button Submit" to confirm your consent to receive a demo version of SanDisk RescuePRO.

A link will then be sent to your email. Click on the inscription " RescuePRO® Deluxe" to download the program.

The archive with the installation file will be downloaded. Launch it and install the program. There are photo and video/audio recovery buttons here. Judging by the reviews, these functions do not work, so there is no point in launching them. The only thing that could be used is formatting. There is a button for this Wipe media» (if you installed RescuePRO in English). Click on it, select your media and follow the instructions.

Interestingly, in some cases the format button appears to be grayed out and unclickable. Unfortunately, it is not particularly clear on what basis the division occurs into those users who have this function available and who do not.
If you manage to use SanDisk RescuePRO, all data from the flash drive will be erased. It will be automatically restored and ready for future use.
Method 2: Formatter Silicon Power
This is exactly the same program that for some reason works with some media from SanDisk. The description for it says that it works with devices that have PS2251-03 controllers. But not all SanDisk flash drives that Formatter Silicon Power can service have such a controller. Overall, it's definitely worth a try. To do this, you need to follow a few simple steps:
Insert the USB flash drive and run the program.

If nothing happens or some error appears, then your device is not suitable for this utility. And if it starts, just click on the “ Format" and wait until the drive is formatted.
Method 3: USB Disk Storage Format Tool
