Instructions for using paint net. All Paint features for creating and editing images. Resizing the drawing area
Paint.NET is a simple graphics editor in all respects. Its tools, although limited, allow you to solve a number of problems when working with images.
Paint.NET window, except the main one work area, has a panel including:
- tabs with the main functions of the graphic editor;
- frequently used actions (create, save, cut, copy, etc.);
- parameters of the selected tool.

You can also enable the display of auxiliary panels:
- tools;
- magazine;
- layers;
- palette.
To do this, you need to make the corresponding icons active.

Now let's look at the basic actions that you can perform in Paint.NET.
Creating and opening images
Open the tab "File" and click on the desired option.

Similar buttons are located on the working panel:

When opening, you need to select an image on your hard drive, and when creating it, a window will appear where you need to set the parameters of the new image and click "OK".

Please note that the image size can be changed at any time.
Basic image manipulation
During the editing process, the picture can be visually enlarged, reduced, aligned to the window size, or returned to its real size. This is done through the tab "View".

Or use the slider at the bottom of the window.

In the tab "Image" there is everything you need to change the size of the picture and canvas, as well as flip or rotate it.

Any actions can be canceled and returned via "Edit".

Or using the buttons on the panel:

Selecting and cropping
To select a specific area of the picture, there are 4 tools:
- "Selecting a rectangular area";
- “Selecting an oval (round) shaped area”;
- "Lasso"– allows you to capture an arbitrary area by tracing it along the contour;
- "Magic wand"– automatically selects individual objects in the image.
Each selection option works in different modes, for example, adding or subtracting from a selection.

To select the entire image, click CTRL+A.
Further actions will be performed directly in relation to the selected area. Via tab "Edit" you can cut, copy and paste the selection. Here you can completely delete this area, fill it, invert the selection, or cancel it.
Some of these tools are available on work panel. This includes a button "Crop by Selection", after clicking on it, only the selected area will remain on the image.

In order to move the selected area, Paint.NET has a special tool.

By using the selection and cropping tools wisely, you can make transparent background in the pictures.
Drawing and Filling
Tools for drawing "Brush", "Pencil" And "Cloning brush".
Working with "Brush", You can change its width, hardness and fill type. Use the panel to select a color "Palette". To apply a design, press left button mouse and move "Brush" on the canvas.

By holding the right button, you will draw additional color "Palettes".

By the way, the main color "Palettes" can be similar to the color of any point in the current drawing. To do this, simply select a tool "Pipette" and click on the place where you want to copy the color.

"Pencil" has a fixed size in 1px and customization options "Blend Mode". Otherwise its use is similar "Brushes".

"Cloning brush" allows you to select a point in the image ( Ctrl+LMB) and use it as a source for drawing in another area.

By using "Fills" You can quickly paint individual elements of the image with the specified color. Except type "Fills", it is important to correctly adjust its sensitivity so that unnecessary areas are not captured.

For convenience, the necessary objects are usually selected and then filled.
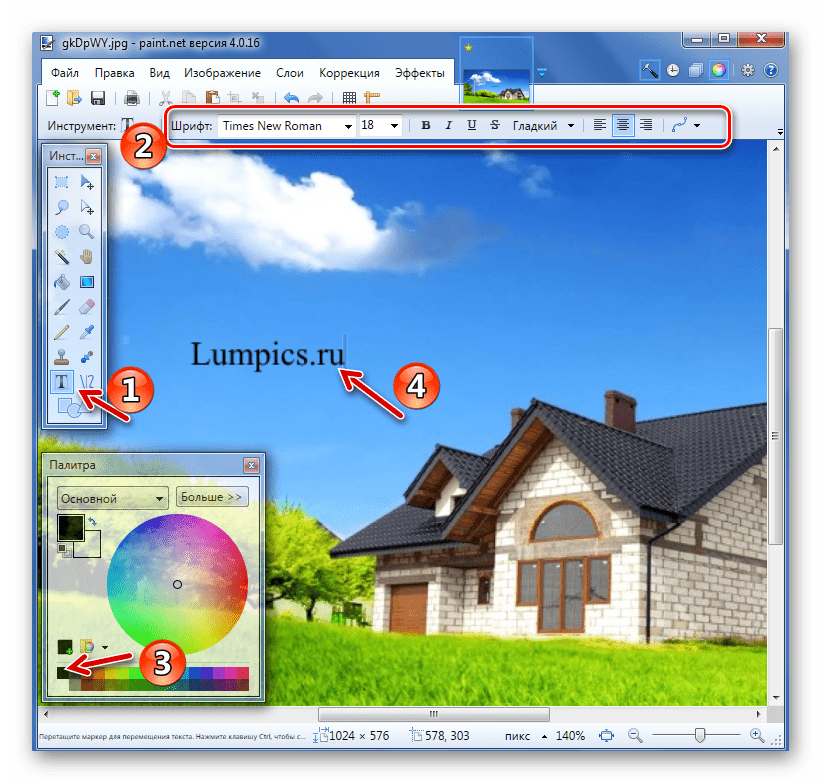
Text and Shapes
To apply an inscription to an image, select the appropriate tool, specify the font parameters and color in "Palette". After that, click on the desired place and start typing.
When drawing a straight line, you can determine its width, style (arrow, dotted line, dash, etc.), as well as the fill type. Color, as usual, is selected in "Palette".

If you pull the blinking dots on the line, it will bend.

Shapes are inserted in Paint.NET in a similar way. The type is selected from the toolbar. Using markers along the edges of the figure, its size and proportions change.

Notice the cross next to the figure. With it, you can drag inserted objects throughout the drawing. The same goes for text and lines.

Correction and effects
In the tab "Correction" There are all the necessary tools for changing color tone, brightness, contrast, etc.

Accordingly, in the tab "Effects" You can select and apply to your image one of the filters that are found in most other graphic editors.

Saving an image
When you have finished working in Paint.NET, you must remember to save the edited picture. To do this, open the tab "File" and press "Save".

Or use the icon on the work panel.

The image will be saved in the location from which it was opened. Moreover old version will be deleted.
To set file parameters yourself and not replace the source, use "Save as".

You can choose the save location, specify the image format and its name.

The principle of work in Paint.NET is similar to more advanced graphic editors, but there is not such an abundance of tools and it is much easier to understand everything. Therefore, Paint.NET is a good option for beginners.
Today the market software is developing by leaps and bounds. And this is quite understandable, since demand, as we know, creates supply. It is no longer possible to do without some programs, because with their help many people study, work and just have fun. Creating programs is not an easy task. It is for this reason that most often all the latest software is available for a certain amount of money. However, sometimes it is possible to download a simplified version of the program for a while. Be that as it may, there are still programs that any computer user can use without problems. Some of them are installed along with the standard software package on Personal Computer immediately after purchasing it.
Graphic editors occupy a special place in the software environment. Of course, because without their help it is no longer possible to imagine creating perfect photographs.
It is one of the free image editors that are used to create and correct images of different sizes, quality and format. Special thanks should be given to those who, when creating the program, focused on special useful features for photographers. Using the program, working with images is easy, simple, and most importantly, the work turns out to be of really high quality. By the way, all these functions have already been appreciated by many ordinary users. Today, almost every family has a digital camera that connects to a computer, and further image processing is not difficult, and it’s also free.
Paint.NET has many useful and powerful characteristics, which make it such a popular program. Separately, it is worth noting such a function as the ability to work with layers.

It is also possible to work with transparent layers.

And of course, there are functions that allow you to work with a scanner and camera.

Even in the format of amateur photography, this opportunity is irreplaceable, because you can develop your creative abilities. In particular, the ability to photograph. There is also a scaling option, thanks to which you can change images, demonstrating your vision of the photo, come up with new solutions and implement the most daring ideas.
There is an effect that allows you to remove redness from the eyes,

as well as a complete history of all photo changes.

This allows you to try different effects, and if they are not the most successful, you can return everything to its previous state.
On this moment Paint.NET supports many formats. These are formats such as IPEG, PNG, BMP, TIF, GIF, and also a format directly from Paint.NET called PDN.

Paint.NET, a raster graphics editor, was created on the platform NET Framework. Moreover, the history of the creation of this editor is more than interesting. The fact is that Paint.NET was originally created as a small project of senior students studying at the computer science department in 2004. Rick Brewster is considered the main developer of the project. At that time, he kept his own blog, in which he said that the very first version was written in 4 months, and it included 36,000 lines of code. Concerning latest versions, then they are already more advanced, and today they include about 140,000 lines of code.
However, after the project was presented, its development did not stop. Today, the program is still developing and is led by two specialists who work for Microsoft. Both of them took part in the creation previous versions programs back when we were studying at the university in Washington.
The program gained enormous popularity, as already in May 2006 it was downloaded no less than 2 million times. Could the students of that time have thought that they would bring such a wonderful project to life?
By the way, it's no secret that Paint.NET is a more than worthy substitute for PhotoShop. Both programs are very similar, and with the use of plugins, Paint.NET can be expanded literally to the level of Photoshop. The main features of Paint.NET are the same as those of its so-called big brother program. As already mentioned, there is an excellent ability to work with layers. There are also many filters, special effects and other useful properties.


But at the same time, Paint.NET is much easier to understand. In addition, the system requirements for installing Paint.NET are greatly simplified. The size of the program is also not large, which will be appreciated by those users who do not yet have this editor.
So, what are the main features of Paint.NET? This is worth dwelling on in more detail.
1) The first thing worth noting is simple and intuitive interface. The program was designed in such a way that any user, even one who has never worked with graphic editors, could get to work right away. Moreover, if you use the wrong function that you needed to use, there is a magic button that allows you to cancel this action.
2) Layers. Everyone is accustomed to the fact that in order to be able to work with layers, it is necessary to install paid programs. This is very expensive for many users. With the advent of Paint.NET, everything fell into place, and today you can also use the program to work with layers without paying money for it. Working with layers is no worse than working in Photoshop.

3) Powerful functionality. Paint.NET has a truly wide range of powerful tools that allow you to do a huge range of work. So, such simple but powerful tools as tools for working with vector graphics, a magic wand used to highlight the desired area, the ability to clone images, and text editor, which is also easy and simple to use, can make the life of many users easier. And of course, there are tools for scaling, as well as the ability to change color, intensity and much more.
4) Paint.NET has unlimited history. In the process of work, most people cannot avoid mistakes. In addition, sometimes it’s just interesting to try this or that action. The image will not be damaged, since there is an excellent opportunity to correct errors. The length of the story is limited only by free disk space, which is incredibly convenient.
5) And of course, it’s worth mentioning separately special effects Paint.NET. In addition to the fact that the program has all the standard special effects familiar to many from the Photoshop program, it also has its own special effects. For example, there is a unique 3D rotation effect. And of course, there are almost unlimited possibilities for working with color, brightness, and intensity.

6) Special plugins. Many plugins have already been developed for the program, with the help of which it is now easy to expand the program’s capabilities. At the same time, new plugins appear constantly, and for those who are interested in them, it will not be difficult to expand the functionality of their program.
The most amazing thing is that all this is available for free.
Difficulty level: Easy
1 step
History window
First off, it's worth mentioning that in Paint.NET the missing color is now transparent (shown as a checkerboard) instead of white, so don't be alarmed if squares appear when you use the eraser. Similarly, you can now set the transparency of a layer or color (see next steps). The buffer for canceling operations has also been increased (history window, see figure); now it is practically unlimited. It should also be noted that if an object is selected, Paint does not allow you to edit the drawing outside the selection. And Paint now automatically smoothes the image.
Step 2
Main toolbars
Let's look at the main toolbars. The top panel contains standard functions, of which it is worth considering only 8 on the right (this is cropping a picture by selection) and 9 on the right (this is deselecting). The bottom panel contains controls for the selected component in the secondary panel.
Step 3
In Paint.NET it is now possible to create an image in multiple layers. Each layer can contain a separate image (remember to use a transparent color and/or transparency, otherwise only the top layer will be visible), and Paint will display them all together (starting with the top layer). To work with layers, use the Layers panel. Check marks indicate those layers that should be displayed/edited at the moment. Please note that when editing layers, changes are made to the one selected in this panel. The panel contains buttons with the following functions (from left to right): Add a new blank layer, delete a selected layer, duplicate a selected layer and place it above the current one, merge with the next layer, raise a layer to a higher level, lower a layer to a lower level, configure layer properties .
Step 4
The palette panel can be used in standard (in the figure on the left) and extended view (on the right). You can change the panel view using the More >>/ button<< Меньше. Палитра позволяет задать 2 цвета: основной (используется при нажатии левой кнопки мыши) и Вторичный (используется при нажатии правой кнопки мыши). Снизу представлена палитра, которую теперь можно сохранять (сохранение и загрузка выбираются в выпадающем списке), для задания нового цвета в палитре нужно его настроить, нажать кнопку над палитрой и выбрать ячейку для замены. При использовании расширенного вида панели нижние 4 строки палитры содержат те же цвета, но засвеченные (3 и 4) и полупрозрачные (5 и 6), а также выводится выбор цвета в форматах RGB и HSV , а также настройка прозрачности.
Step 5
And finally an additional toolbar. Buttons 1,3,5,7 are used for various selection methods (1 – regular rectangle, 3 – lasso, the selection area is drawn as if with a pencil, 5 – ellipse selection, 7 – automatic selection by a specific color, on the main panel you can select the sensitivity and method , when you click on a certain color, either all objects of the same color are selected or only those that touch the object you clicked on - depending on the mode). In this case, on the main panel you can select additional selection methods (using logical functions): intersection, union, subtraction and exclusive union of areas. Also, the selection capabilities increase significantly when using invert (Edit → Invert Selection). Button 4 is used to change the selection area. Button 2 to move the selected fragment.
Step 6
Button 6 is used to enlarge the image; in this case, you can select the required area and Paint itself will enlarge it to fit the screen size. Button 8 is used to move around the drawing. Button 9 – fill the image. You can select fill modes for a continuous area and all areas with similar colors. Button 10 allows you to configure a smooth transition of image transparency (see figure). Button 11 is used for drawing with a small area, the size of which can be set on the main panel. Please note that the thickness setting is common to all tools. Button 12 – erasing an area (painting it transparent). Button 13 – drawing by pixels. Button 14 allows you to select a color that is the same as the object to which this tool is applied. Button 15 is used to clone the selected area. First, by holding ctrl, you need to set the “anchor” to the desired area, then move the cursor and click on the left mouse button, the area from the “anchor” will be copied to the cursor area and now the cursor should already represent 2 areas, copying will be done when you click on the left mouse button.
Step 7
Button 16 is used to invert colors from secondary to primary (left mouse button) and vice versa (right mouse button). The remaining colors remain unchanged. Button 17 is used to add text. Button 18 is used to draw lines. After the line is drawn, it remains active and you can change its parameters (color, thickness, size, etc.), as well as bend it, for which you need to pull one of the anchor points. Buttons 19, 20 and 21 are used to draw ready-made shapes, and you can draw an outline, a shape with a border, and a solid shape. All parameters are configured on the main panel. Button 22 is used to draw a free-form shape.
Regarding Eduard's question, initial lessons on Paint Net. I’ll start by telling you here only about the simple functionality that I use to process and mark up screenshots.
What is Paint.Net
I also use Paint Net to reduce the weight of images so that site pages load faster. This is what we'll talk about.
About the program: Paint.net is distributed free of charge and for this sincerity, huge respect to the developers! Based on its capabilities, the program can easily replace some of the functions of the famous Photoshop. The most interesting paint net lessons you will find the Russian-language version of the program on the official website. And you can download it there.
Lessons Paint.net
For those who have never used graphic editors, I think there are many such users on the rapidly developing Internet. Installed, selected a screenshot, right-click open with, select our program.
First, let's decide on the choice of color with which we will work. The color changes with one click of the left mouse button. If the provided colors are not enough, click the More button
Color selection in paint net
Here we can select the color both in hexadecimal and RGB, or simply by moving the corresponding sliders
Shape tool in paint net
How to make perfectly even ovals: everything is simple, click on the corresponding icon in the right menu (when you hover the cursor over the icons, a hint pops up) and draw an oval with a predetermined color in the right place.
Eraser tool in paint net
If you want to hide some inscription in the picture, then select the eraser on the right and carefully erase the desired area.
Lasso tool in paint net
Lasso will be a convenient tool for you; it can be used to highlight a wide variety of places with different shapes
Eyedropper tool in paint net
For example: we need to fill some place with the color that is already in the picture. We take the eyedropper and click it on the desired area, all the color is copied
Fill tool in paint net
Now select a fill from the menu and click it on the selected area.
Sometimes the fill covers a little more space than you would like. This happens in cases where the boundaries of the area being poured are not so clearly defined. In this case, simply reduce the sensitivity with the slider at the top.
How to Write Texts on Screenshots in Paint Net
Click on the T icon on the right, point the cursor at the right place and write what you want. If you missed the mark a little, it doesn’t matter, grab the cross (just below the written text) and move the entire inscription wherever we want. The size, font, etc. can be adjusted at the top, a standard editor like in Word.
What is shown above is a little thing that anyone can learn on their own, the real lessons are on the off site, link at the top.
How to reduce the weight of a picture
But webmasters will certainly be interested in another necessary tool for reducing the weight of images for inserting images into the site. Even if you are not going to edit anything in the picture, just put a dot somewhere in the corner with the same color as the image itself.
Now in the main menu, select the file - save as . We write a name for the image to be saved, now a window with image quality settings opens. This example uses a PNG file and what would reduce the weight of the picture set the minimum color depth and everything else, To reduce the weight of a jpg image, use the slider. We click ok and are surprised: instead of 100 kb, the image now weighs only 12 kb and the difference in quality is almost unnoticeable.
For JPEG files, there will be only one slider in the settings, here we are already looking at the optimal ratio of weight and quality. For screenshots with similar texts and different square images, the best option is, of course, png, since the weight can be reduced by more than 10 times. For drawings with gradients, a lot of handwritten text and everything round, the png format will be too heavy, in this case it is better to use Jpeg
Hello everyone, dear readers of my blog, in today's episode I will touch on the topic of how to learn to use the paint program, and will also introduce you to its toolbar.
If any of you don’t know, then the paint graphic editor is one of the tools with which, with certain knowledge, you can easily create, edit and save simple images of various formats on your computer.
However, to work with more complex graphics, it is worth installing a more powerful tool, such as Adobe Photoshop or Corel DRAW (depending on what kind of graphics you are going to work with:), more details about the types of graphics can be found at the link.
How to use paint?
So, first you need to launch the program itself, to do this, go to the start menu → all programs → standard → paint.
And now you will see the window of the program itself:

At the top of which there is a toolbar and now I will try to familiarize you with this panel.

- Section "Clipboard".
- Insert - using this icon you can insert any photo or image directly into the editor itself. In addition, you can insert a picture using the “ctrl+v” command;
- Scissors icon - You can use it to cut out any part of the picture by first selecting it with the “selection” tool, which I will talk about a little later;
- An icon of two documents - with it you can copy the entire picture or a specific part, also by first selecting it.
- Section "Image".
- Select is the same tool that I wrote about a little earlier and with which you can select part of the picture;
- Crop - here you can crop part of the picture, but first you need to select this part with the “select” tool; I wrote more about how to do this in the article: ;
- Resize - here you can accordingly change the size of the entire image by increasing or decreasing it, but be careful, as you increase the image quality deteriorates;
- Rotate - with this tool you can rotate the image clockwise or counterclockwise.
- Section "Tools".
In this section we have 6 tools for certain actions with images:
- Pencil - designed for drawing on an image, to change the color of the pencil, you need to go to the “colors” section, which I will talk about a little later;
- Fill with color - with this tool you can fill the entire image or a selected shape, of course, having previously selected a color in the “colors” section;
- Text - allows you to also change the style of this text by changing the font, color and size;
- Eraser - designed to correct errors with image editing, for example, if you made a mistake somewhere, then using the eraser you can quickly remove it;
- Eyedropper - used to select the desired color by clicking on the image;
- Scale - allows you to increase the scale of the picture; in cases where you are editing small defects, the scale helps a lot.
- Section "Shapes".
- Brushes - contains many types of brushes, starting with a sprayer and ending with a marker;
- Window with figures - there are 23 figures of various types from ordinary squares and circles to arrows and hexagons;
- Contour - allows you to draw shapes along the contour;
- Filling - in principle, it is no different from the one I described a little earlier in the “tools” section;
- Thickness - allows you to increase the thickness of various tools, such as shapes, pencil or brushes.

- Section "Colors".
- Color 1 - used to select paint;
- Color 2 - intended for the same thing as the first item;
- Color table - needed to quickly select a color for some tool such as a pencil, brush or shape;
- Changing colors - allows you to fine-tune colors.
And before finishing, I would like to recommend you my article, where I talked about the most interesting functions, with which you can: crop, clone, reduce the size of a photo and much, much more.
That's all guys, today I told you how to learn how to use the paint program, introducing you to its toolbar. This post is quite long by the standards of my previous posts, so if you share it with your friends, I will know that I didn’t waste my time on it. Thank you all for your attention and see you soon.
