The hp all-in-one does not recognize the windows flash drive. BIOS does not see the flash drive. Computer tips for ordinary users. Malfunction of the power supply or excessive current overload of the USB portal
So, you have decided to install a new system, or use some kind of utility to work with the same system, but it must be written to a flash drive. You insert a flash drive into a USB port, and then a question arises: Why doesn't the BIOS recognize the bootable USB flash drive??
You created a bootable USB flash drive, but the BIOS does not see it. Many factors play a role here, for example, you made the bootable USB flash drive incorrectly, the BIOS needs to be reset or even updated, the program you used to create the bootable USB flash drive turned out to be damaged, and much more. Let's try to solve this problem.
What to do if BIOS does not see the bootable USB flash drive
How to make a bootable USB flash drive and how to do it correctly
First, you should make sure that the flash drive really does not work with your computer. You can check this by using the drive on another PC or laptop; if the same thing happens there, then you probably created the bootable USB flash drive incorrectly.
I would like to note that if you just threw files onto a flash drive and think that it will work, then I hasten to disappoint you. To record a distribution of a system or program, special utilities are required. I will list them now:
- WinSetupFromUSB
- Rufus
- Windows USB/DVD Download Tool
- WinToHDD
- Windows To Go
- Ultra ISO
And this is not all the programs, but I have listed the most basic tools. I have a review for each. For example, if you want to make a bootable USB flash drive with Windows, then use Rufus or WinSetupFromUSB. If the first one does not work and the flash drive is not visible in the BIOS, then use another one.
I will list the articles that I talk about creating a bootable USB flash drive. You probably know many of the methods.
If you have used all the specified utilities and the flash drive still does not work, make sure it is working properly, try formatting it to NTFS or FAT32, and try booting from another computer. And if this does not help, then use another flash drive.
How to set up BIOS for a bootable USB flash drive
First you need to understand whether the flash drive is not visible at all in the BIOS, that is, there is no line “USB flash drive name”, or there is a line, but when you click on this item you see nothing but a black screen.
There are two options why this happens - your flash drive is faulty or you recorded the image incorrectly, or there are problems with your BIOS, so the BIOS does not see the bootable flash drive.
The best option is to boot from a flash drive - . You can enter it using the ESC key or F8. It's different on different devices, that's why . Having opened the Boot Menu, you will see a list of devices from which you can boot - flash drives, hard drives, CD-DVDs. You'll need to find something like a Kingston 8 GB USB or similar, depending on the brand of your flash drive.
If you do not have the Boot Menu, or it is disabled, then in the BIOS on the tab Boot or Advanced you need to move your flash drive to first place. This is done using the F5 and F6 keys, but I repeat, the parameters may differ for each BIOS model, you will have to figure it out yourself, or write in the comments so that I can help you.


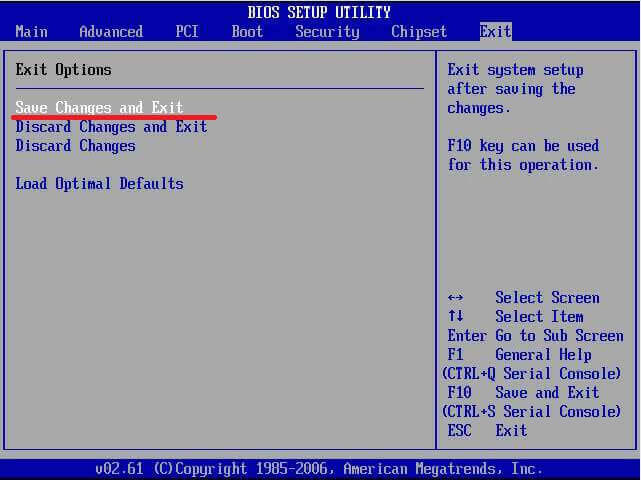
After you have placed the bootable USB flash drive in the first place in the BIOS, press the key F10 to save the current BIOS settings. Or on the tab Exit select the option Save Changes and Exit.
Finally, you can if none of the above helps. Follow the link and read about it. Typically the reset option is located on the Exit tab and is called Load Optimal Defaults or a little differently.
Let's summarize all of the above and say why the BIOS does not see the bootable USB flash drive:
- The flash drive is faulty. Use another flash drive, or try using it on another PC.
- The wrong program was selected to create a bootable USB flash drive.
- The image recorded on the flash drive is damaged and needs to be replaced.
- The BIOS settings are incorrect, you need to reset it.
- The BIOS does not support booting from flash drives (this also happens), then the BIOS needs to be updated.
If you have such “misunderstandings” with a flash drive, then try creating a disk with Windows or the desired program. Regarding this, I would like to note that you need to be extremely careful. First, you need to find the correct firmware that fits your motherboard, if the wrong version is selected, or from a different board, then there is a high probability of failure of the entire motherboard, and you certainly don’t want that.
Flash drives have now become an indispensable tool for storing and transferring information to a PC. Most PC users use flash drives to install Windows or Ubuntu. This is due to the fact that you do not need to burn the image to disk, but rather install it directly from a flash drive.
In addition, now most laptop and computer manufacturers, such as Acer and Lenovo, produce desktop and laptop computers without optical drives, which further popularizes installing Windows from a bootable USB flash drive. When installed in this way, many users of laptops and desktop computers experience situations where the BIOS does not see the bootable USB flash drive. In this article, we will try to understand in detail how to write an image to a flash drive, and also understand the BIOS settings for the correct installation of Windows and Ubuntu.
If you are faced with the fact that your flash drive is not detected when you restart your PC, then the first thing you need to do is make sure that The flash drive is really bootable. The fact is that simply copying files to it is not enough.
Moreover, if you have an “absolutely working” bootable flash drive, since you have already installed the system from it many times, then we have to disappoint you: currently there are several types of boot systems and A flash drive that works on one PC will not work on another. To succeed in this case, the system must be rewritten differently.
Therefore, the main part of the article contains detailed instructions on how to properly burn a bootable USB flash drive using various software. The rest of the article contains recommendations for setting up different types of BIOS.
Correctly creating a bootable USB flash drive for Windows
First of all, to create a boot disk with Windows, you will need a flash drive with a capacity of 8 GB or higher. You may ask why such a volume is needed. The answer is simple, now the installation files of modern operating systems are more than 2–4 GB in size. In these examples, we will look at creating a bootable flash drive on the following popular operating systems:
- Windows 7;
- Windows 8.1;
- Windows 10;
To create a bootable USB flash drive for Windows 7, you need to download a licensed image. You can download it on the official page www.microsoft.com/ru-ru/software-download/windows7. To write an image to a flash drive, you will need a proprietary utility Microsoft Windows USB/DVD Download Tool, which can be downloaded from www.microsoft.com/en-us/download/windows-usb-dvd-download-tool. After installing the utility, you can begin creating a bootable USB flash drive. After launching the utility, a window will appear in which you need to indicate where the image is located.

After clicking the Next button, you will be taken to the device selection window for recording the image.

In this window, you need to click the USB device button, after which you will proceed to select a flash drive.

Having selected the required flash drive, click the Begin copying button. The process of copying the installation files to the USB flash drive will begin. Also be careful, as all previously stored files on the USB drive will be erased.

The inscription in the last window “ Status: Backup completed" will mean that your bootable USB flash drive is ready.

To install Windows 8.1 you need to download the official utility MediaCreationTool at http://windows.microsoft.com/en-us/windows-8/create-reset-refresh-media. After launching the utility, you will be taken to the OS version selection window, where you need to select the language, version and bitness of the operating system.

In the next step, you need to select a device to record Windows. In our case it is “ USB flash memory device»

The next step will give you the opportunity to select a flash drive.

After this, the next step is to download and write files to the drive. Just like with the previous example, all data on the flash drive will be erased. 
The last window will notify you that the installation drive is ready.

To make a bootable flash drive for Windows 10, you need to download the utility MediaCreationTool from this page: www.microsoft.com/ru-ru/software-download/windows10. If you run the utility on Windows 7 or 8, the program will offer you two options: update or create installation media. You need to choose the second option.

The step of creating a bootable drive will be similar to the example for Windows 8.1.

Correctly creating a bootable USB flash drive for Ubuntu 15
For Ubuntu 15, you need to download the UNetbootin utility from https://unetbootin.github.io. After launching the program, you need to select the options as in the figure below and click OK.


The final window will ask you to restart your computer or laptop and boot from the flash drive.

Setting up BIOS to boot from a USB drive
Let's look at an example of loading UEFI BIOS from a USB drive. For example, we will use the MSI motherboard - A58M-E33, which has the latest version of UEFI BIOS. To enter the UEFI BIOS settings of the A58M-E33 motherboard, you must press the F11 key when starting your laptop or desktop computer. A boot menu will open in front of you, in which you need to select a flash drive, in this case it is “KingstonDataTraveler 2.0PMAP”.

You can also set it in the options so that the flash drive boots immediately from the BIOS. To do this, press the Delete key when loading. You will be taken to the UEFI BIOS main menu.

Then go to the menu " Settings\boot" and place the flash drive in the first place as shown in the picture below.

Now your system will boot from the selected flash device. But if your PC or laptop has UEFI and the system does not see the bootable USB flash drive, which means the image was written incorrectly, or “Safe boot” mode is enabled(how to fix it, see the section below “How to configure UEFI to...”).
Booting from a USB drive on older computers
On older BIOS versions, you can also boot from a USB drive. For example, to boot from an old Acer laptop, you need to press the F2 key at startup. Once in the BIOS of your Acer laptop, go to the " BOOT».


Now after saving, your Acer laptop will boot from the flash device. This configuration of the old BIOS is installed on most Acer laptops. Therefore, with other older Acer laptop models, the setup will be similar.
USB drive for UEFI computer
If you buy a new computer or laptop now, it will definitely support UEFI BIOS. There are many benefits to using the new UEFI BIOS, so the bootable flash drive must support UEFI systems.
If you create a bootable USB drive for Windows 7, 8.1 using MediaCreationTool, then the UEFI system will support it. And with the utility Windows USB/DVD Download Tool This option will not work for Windows 7.
Let's consider the option of creating an installation flash drive with support for UEFI systems for Windows 7. To do this, download the program from the website https://rufus.akeo.ie Rufus. Before starting the program, insert the USB drive. After launching the Rufus utility, select the Windows 7 image. This can be done by clicking on the DVD disk icon. The program window will look like this.

If all the points match, as shown in the figure, then feel free to press the Start button, after which file recording will begin.

After recording the files, you can use the flash drive to install Windows on the UEFI system. Rufus can also be used for systems with a regular BIOS. A notable feature of the Rufus program is the fast speed of writing the image to the drive.
After reading this material, you will be able to create bootable flash drives for Windows and Linux-like operating systems. And you won’t have questions like: why is my flash drive not in the BIOS or why Windows doesn’t support the UEFI system.
How to configure UEFI so that the computer sees a bootable USB flash drive
There are some quirks to installing Windows 7 or XP on a PC running Windows 8 or 10. The latest versions (8 and 10) are configured with UEFI and GPT partition table, while the previous ones used MBR disk partition.
UEFI has a new feature " Safe boot", ensuring the safety of system booting. A new level of security blocks booting from external devices such as USB flash drives and CD drives.
Therefore, even if you make an exclusively correct bootable USB flash drive, it still will not appear in the boot menu when you restart your PC or laptop.
To eliminate this reason, you can do the following:
- Make sure that your USB bootable flash drive is configured to work with UEFI (how to properly make such a flash drive was described above).
- Disable “Safe boot”, and change “Boot Mode” to “CSM/Legacy BIOS Mode”.
Working with bootloader settings requires experience; we do not recommend beginners to perform such actions. We also recommend that you save all important data first, as it may be lost.
To disable "Safe boot" follow these steps:
- Restart your computer or laptop and go into BIOS.
- Go to the page " BIOS Settings».
- In the BIOS security settings, set the option " Safe boot" to the meaning " Disable».
- Option " Boot Mode"translate to " CSM(Compability Support Mode)/Legacy BIOS" or " CSM Boot"- possible different options.
- Make sure USB is first in the boot sequence settings " Boot Order».
- Exit BIOS and save changes " Save and exit".
Video on the topic
Installation using Rufus
8 reasons why the computer does not see the flash drive
It happens that the BIOS does not see the bootable USB flash drive. This can happen on any personal computer with absolutely any operating system, be it Windows XP, G7 or G8. What to do if BIOS This is a very popular question among all users. In addition, any owner of a personal computer or laptop has encountered such a problem at least once in their life. Some people in such a situation immediately contact service centers. And some even go to the store where they bought the flash drive, indignant and complaining that it doesn’t work.
Of course, it may also be that the whole issue is really a faulty device. But sometimes BOIS does not see the flash drive for a number of other reasons. And even if everything was fine before, the problems that have arisen now can be caused by various malfunctions that simply “accumulated” in the system. Or the flash drive may not have enough power of your system unit. Or... Below are the most popular reasons why problems arise with identifying flash drives and other USB devices, as well as ways to solve these problems.
Why doesn't BIOS recognize removable media?
When you connect a device via a USB port, it is automatically detected, and Device Manager reports that a new device is connected. In some cases, it also asks you to install drivers or updates. But sometimes the BIOS does not see the bootable USB flash drive or cannot synchronize its operation. What to do in this case? There are several most likely causes and solutions to this problem.

USB controller: setup
The BIOS is part of the operating system, which is where problems with a flash drive lie in most cases. Where exactly is the problem? The most obvious reason why the BIOS - USB controller is not working correctly or is simply disabled. How to deal with the problem? Turn it on! To do this, in the Award BIOS section, find the Integrated Peripherals subsection, and then go to the second menu item - Advinced (where there will be advanced BIOS settings). Then we find the USB Configuration category, go into it, press Enter and pay attention to the inscription that appears opposite the USB parameters. Disabled and Enabled may light up there. If the controller is in a disabled state, then you need to turn it on using the pointer buttons. To save the changed settings, be sure to press F10.

If the controller is connected, but the BIOS does not see the flash drive, you can try it on another port of the system unit. This one may be faulty or incorrectly configured, which is preventing it from functioning.
Sometimes none of the ports can detect the flash drive. In this case, the USB controller itself makes sense. This problem especially often occurs after a reinstallation or rollback of the operating system, when some of the necessary data may be lost or the settings are reset to “default”. Therefore, re-downloading all the latest drivers may solve the problem with the flash drive.
Compatibility issues
The vast majority of modern peripheral devices only support USB version 2.0, which, of course, will not be recognized on computers whose interface is configured for 1.1. In this case, to solve the problem you just need to install the supporting software, which, as a rule, always comes with the device - on the same disk with drivers or separately. Sometimes the necessary applications can be downloaded from the official websites of USB drive manufacturers.

System file INFCACHE.1 - the root of all evil
If you have tried all the above methods, but the problem has not disappeared, then you can try another, but more drastic method. Simply remove the INFCACHE.1 system file from your computer. You can find it in the WINDOWS root directory, on your hard drive C, or wherever your operating system is installed. The full path to this file looks like this: WINDOWS:system32DriveStore. You can also find it through a search or using If after deleting this file the problem disappeared, then all the problems were related to cache memory corruption. The next time you turn on your computer, the INFCACHE.1 file will be restored by itself.
Is it still a matter of BIOS?
Instructions for setting up this part of the system software will help solve problems with the flash drive in some cases. For example, if, as mentioned above, the problem is a disabled USB controller. Correctly setting up the BIOS is not difficult, but important. Almost any user can cope with this, even with little experience working with a personal computer.

So, in order to get into the parameters, you need to press the F2 key (in some cases DELETE) at the moment when the BIOS system boots. Next you need to go to the Advanced tab, where you can manage advanced features, select the Integrated Peripherals section and press Enter. By performing these simple manipulations, you can see if the controller is working, as well as other means that affect the functioning of the ports and the automatic detection of connected USB devices.
BIOS does not see other devices connected via the port
If the computer cannot detect not only a flash drive, but also other external media and devices connected via USB (for example, a printer, speakers, camera or phone), then this case requires special and radical measures.

Remove the casing (protective side plates) from the computer. As a rule, they are either bolted to the case or fastened with “latches”, then we connect a flash drive or other device directly to the USB port on the motherboard. In most cases, this may be enough for the BIOS to see the device. But if this does not happen, then you can try installing the appropriate driver package for correct operation and eliminating incompatibility problems. If this doesn’t help, there is still a way out!
Other reasons why the BIOS does not see a flash drive and other USB devices
It often happens that many different devices are connected to the computer, requiring a large amount of energy. For example, a scanner or a powerful sound system. And just these two connected devices may be enough to cause a power shortage when connecting even such an economical medium as a flash drive. What can we say about trying to connect a camera to the computer in order to reset or view photos on the big screen. In this case, the BIOS does not see the flash drive (or other device) due to the too low level of electricity that can be spent on this port. In other words, the device may need more power than the USB connector can provide. As a result, it simply does not have enough power to turn on and function.
In order to eliminate this problem, you need to find out the USB controller of your personal computer. You can clarify this in the “Device Manager” on the “Properties” tab in the “Power” column. USB 2.0 devices typically require 500 mA, while newer 3.0 devices consume 900 mA. Based on this, it can be assumed that sometimes, in order to connect a device, you first need to disconnect one or even several previously connected but currently unused devices. If you charge your phone or player from a computer, and the flash drive is not detected at the same time, then you should try disconnecting the charging cord for a while. In 90% of cases, this will be enough for the BIOS to see the connected device.
Or maybe the flash drive is to blame?
Have you tried everything but nothing helps? Then there is a possibility that the problem is with the device itself. You can read reviews about your flash drive. BIOS may not be the reason why it is not detected if you come across a device with a factory defect, for example. It is also possible that this model requires some special manipulations or the presence of a USB HUB for correct operation. There can be many options, so you should study all existing ways to identify the problem.

Conclusion
If you identify a problem due to which the BIOS does not see the flash drive, and its solution is unsuccessful, then, of course, you should contact a service center. But before that, simply disable the power management function of the USB controller from the operating system. To do this, go to the “Device Manager”, find the “Universal Serial Bus Controllers” tab, select the “USB Root Hub” subsection and double-click the “Power Management” window, uncheck the corresponding box and click “OK” to save the changes. And we repeat this procedure for each USB hub. Perhaps this is what will save you from going to the service center.
Do you know what is the most common question among users who first decided to install Windows from a flash drive?
People constantly ask why Bios doesn’t see the bootable USB flash drive. To which I usually answer, is it bootable? 😛
In this short note, I would like to dwell on the main issues that you need to go through if you have a similar problem...
1. Is the bootable USB flash drive written correctly?
The most common thing is that the flash drive is written incorrectly.
Most often, users simply copy files from a disk to a flash drive... And, by the way, some say that it works for them. It’s possible, but you shouldn’t do this, especially since this option won’t work for most...
It is best to use a special program to burn a bootable USB flash drive. We have already gone through the most popular utilities in detail.
Personally, what I like best is to use the program: it can even burn Windows 7 or Windows 8 to a flash drive or external hard drive. In addition, for example, the recommended utility “Windows 7 USB/DVD Download Toll” allows you to write an image only to an 8 GB flash drive (at least for me), but UltraISO will easily write an image to 4 GB!
To burn a flash drive, take 4 steps:
3) The settings window should appear. There are several important points to note here:
In the Disk Drive column, select exactly the flash drive on which you want to write the image;
Select the USB HDD option in the recording method column (without any pluses, dots, etc.);
Hide Boot Partition - select the no tab.
After that, click on the recording function.
4) Important! When recording, all data on the flash drive will be deleted! Which, by the way, is what the program will warn you about.
After the message about successful recording of the bootable USB flash drive, you can begin setting up the BIOS.
2. Is the BIOS configured correctly, is there a function to support a bootable flash drive?
If the flash drive is written correctly (for example, as described just above in the previous step), most likely you simply configured the Bios incorrectly. Moreover, in some BIOS versions there are several boot options: USB-CD-Rom, USB FDD, USB HDD, etc.
1) First, restart your computer (laptop) and go into Bios: you can press the F2 or DEL button (look carefully at the welcome screen, you can always see a button to enter the settings there).
2) Go to the download section. In different versions of Bios it may be called slightly differently, but the word “BOOT” is always present there. What interests us most is the loading priority: i.e. queue.
Just below the screenshot shows my download section on an Acer laptop.
The important thing here is that the boot from the hard drive comes first, which means the turn simply won’t reach the second line of the USB HDD. You need to make sure that the second line of the USB HDD becomes the first: on the right side of the menu there are buttons that can be used to easily move the lines and build the download queue the way you need.

ACER laptop. Setting up the boot partition - BOOT.
After the settings, it should look like the screenshot below. By the way, if you insert a flash drive before turning on the computer, and after turning it on, go into Bios, then you will see opposite the USB HDD line - the name of the flash drive and you can easily figure out which line you need to move to the first place!
When you exit Bios, do not forget to save all the settings you made. Typically this option is called "Save and Exit".
By the way, after a reboot, if the flash drive is inserted into the USB, the OS installation will start. If this doesn’t happen, your OS image is probably not of high quality, and even if you burn it to disk, you still won’t be able to start the installation...
Important! If your version of BIOS does not have a USB option, then most likely it does not support booting from flash drives. There are two options here: the first is to try (this operation is often called firmware); second - .
Perhaps the flash drive is simply damaged and therefore the PC does not see it. Before throwing away a non-working flash drive, I recommend that you read it, maybe it will serve you faithfully...
