How to remove a printer driver: instructions and tips. How to remove a printer driver from different operating systems Remove an old printer
Sometimes you have to deal with the need to solve a problem related to how to completely remove a printer in Windows 7. The need for such action can come from a variety of problems. For example, complete removal of printer drivers may be necessary if the device refuses to print (the operation cannot be completed), some error appears, or its driver is already very outdated and needs to be replaced with the latest version. In any case, in order to properly remove a printer from a computer running Windows 7, you should carefully read the recommendation below.
- To remove the multifunction printer from the system and clear any mention of it, first of all, open the section in the “Control Panel”, where a list of connected devices and printers is presented. You can also get there using the Run program (Windows + R), where you should enter the command “control printers”.
- Find the desired printing device from the list of presented devices. Call its context menu - to do this, right-click on its icon.
- Among the list presented, find and click on the item that launches the function of deleting this device. This will allow you to erase the printer driver.
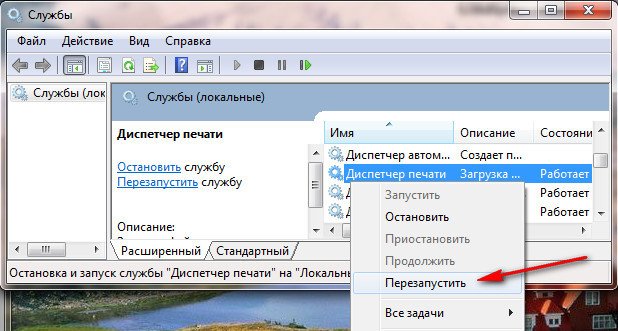
- Open the “Run” window again and enter the “Services.msc” command there to launch the “Services” add-on. You can also find this add-on through the “Control Panel” by going to the administration section. There you need to click on the service called “Print Manager” and right-click on it. In the drop-down list, click on the item responsible for restarting this service.
- The above actions will restart the above service. This kind of procedure is necessary for the printer driver to be uninstalled normally.
- Now you will need to turn your attention to the print server. Again, use the Windows + R key combination to call the Run program and enter the command “printui /s /t2” there. As a result of this action, a window with the properties of the print server will open in front of you.
- Find and go to the tab where all the drivers are listed, then find the option that applies to your printing device and, having marked it, click on the “Delete” button.
This completes the main part of the actions aimed at solving the problem of how to completely remove a printer in Windows 7. However, that's not all, because... Using the steps described above, not all traces of the printer’s presence on your computer will be removed. Therefore, you should proceed to the following steps:
- Open the add-in called “Print Management” by first opening the “Run” program window and entering the “printmanagement.msc” command there.
- In the new window, you should go to the “Custom filters” section, and from there click on “All drivers”.
- As a result of the described manipulations, a list of drivers will appear on the left side of the add-in window responsible for managing printing.
- Find your equipment among them and, opening its context menu, click on the delete item.
Using the Uninstall Programs Panel
Now you need to uninstall all software applications that are related to your printer or multifunction device. To do this, you will need to use the standard Windows 7 OS tools through the Uninstall Programs panel. Find in the list of installed software everything that is associated with your device and remove it. It should be added that this method is suitable not only for Windows 7, because... it can be used in windows 10, 8, and XP. In the latter version, the only difference is the name of the section for office equipment.
Cleaning “Program Files” and the registry
But before you reinstall the device or connect a new printer to your PC, you should clear out all the “garbage”. To do this, open the “Program Files” folder and delete from there all those folders that could be connected in one way or another with your office equipment. You will also need to clean the registry. To do this, open “Run” and enter the “regedit” command into the only field of this program. In the window that appears, you should click on “Edit” and in the list that opens, click on the “Find” item. Enter the name of your printing device in the search field and click on “Find Next”. Everything related to the printer will be highlighted by the program. In this case, all you have to do is delete all these items until a message appears stating that nothing suitable was found anymore.
Now all you have to do is restart the computer and, if necessary, the latest version or perform some other actions that the old software interfered with.
What to do if the driver is not removed
But it happens that the Windows 7 printer is not removed. What to do in this situation? To do this, you can open the registry by running it using the “regedit” command, which you need to type into the “Run” window. After that, open a thread
Control\Print\Environments\Windows\" and go to "Print Processors". Be sure to rename everything you find there, for example, instead of winprint, enter winprint_old. After that, open the print manager and, after removing your device from it, stop the service. Then rename it back and run this manager again. Thanks to this action, you may be able to solve the problem of uninstalling the printer driver.
If the described method does not help you, then follow these steps:
- Open the section with devices and printers under an administrator account. Find the desired device there and delete it.
- Go to “Administration” through the “Control Panel” and click on “Services”. There, find the Print Spooler service and stop it.
- Open the registry as described above and go to the branch
"HKEY_LOCAL_MACHINE\SYSTEM\CurrentControlSet\
Control\Print\Environments\Windows\Drivers\". - Find the driver you are having trouble uninstalling and rename it.
- Start the print service again and remove the printer from there, as already described in the first half of this article.
Printer once and for all. This question, to be honest, is not as difficult as it might seem at first glance. In general, getting rid of any driver requires the right approach. Otherwise, it will not be possible to complete the process. So let's try to solve the problem assigned to us today.
Control Panel
Printer? XP, 7, 8, 10, Vista or any other operating system you have installed - it doesn’t matter. The important thing is that the first step is to get rid of the application that your printer created during installation. This process is the basis of all work. Without it, the driver will not be completely removed.
How to get rid of specialized content? Go to the “Control Panel”, select there Now you should see the name of your equipment. In the list that appears, find the name of the printer, and then highlight these lines. There may be several of them. Practice shows that there are usually about 2-3 of them. How to remove printer drivers? Simply right-click on each line associated with your printing equipment, and then select the "Delete" option. All this will help you cope with the task.
Programs
By the way, sometimes during driver installation the computer also installs software for processing documents. And this kind of content also needs to be gotten rid of. It is often not displayed in What should I do in this case?
Go to "Start" and select "All Programs" there. In the list that appears, you should look for printing applications (usually they have the brand of your printer in the name). Go to properties and follow the specified installation path. Ready?

Then, to figure out once and for all how to remove the printer driver from the system, select the root folder with the “editor”. Hold Shift on your keyboard and press Del. You will see a message informing you that the process is irreversible. The program folder will not be placed in the Recycle Bin, it will simply disappear from the hard drive. This is exactly what we need! We agree with the warning and look at the result. But that's not all. It’s not enough to get rid of all the content that was installed on your computer. You need to follow a few more simple steps so that you can understand how to remove printer drivers once and for all.
Device
Next, you will have to worry about ridding the operating system of the printing equipment connected to it. That is, you need to take and remove the printer directly from the computer. This is especially true in cases where the driver will not be reinstalled on the printing device.
To uninstall the printer driver in Windows 7, look at the Control Panel. But now it’s worth paying attention to a service called “Equipment”. In it, find “View devices and printers.” Click on this line. You will be taken to a window in which all equipment for printing documents will be displayed.

You will have to find the model of our device in the list. Select the corresponding shortcut and click on the right mouse button. You will see the “Remove device” option. Click on it. Most likely, the system will ask for administrator rights. Agree with this message and confirm your actions. To do this, click “Yes” as soon as a small window pops up asking you if you really want to get rid of the installed printer.
Important: You must first remove content and programs related to the device, and only then clear the equipment list. If you do the opposite, the driver will not disappear completely. Reinstalling will change the application rather than reconnecting the devices.
Working with the print server
Well, we are almost finished considering the question of how to completely remove the printer driver from the operating system. Now that the bulk of the work is done, it’s worth looking into a service such as a print server. Not all users do this when they get rid of a printer on their computer. This step is not mandatory, but it is advisable to do it.

Press the Win + X key combination on your keyboard. A long list with possible actions will appear on the screen. Here you will have to pay attention to “Run”. You can also immediately press Win + R on your keyboard. You will be taken to the desired service.
How to remove a printer driver from the system once and for all? In the line that appears, you will have to type some command. In our case it is printui /s. Click "OK" or Enter. We will find ourselves in the print server properties. Next you will have to go to the "Drivers" tab. You will see a small list that have ever been connected to the operating system. To rid your computer of the driver, you need to find the printer that we worked with before. Now select the desired line and click on the "Delete" button at the bottom of the window.
You will have a small choice of actions: either you get rid of only the driver, or you get rid of it but with a special package. Select the second option. It's called "Remove Driver and Driver Package". And then, as in all previous cases, you will simply have to agree with all the changes. Click on "Ok" several times. The process is complete.

Cleaning up trash
In principle, all actions are completed. The printer drivers have been removed. But sometimes there are cases when some documents and files from the device remain in the operating system. It is advisable to get rid of them. Especially if the reason for removing the printer was a printing problem.
How to do it? Look on your computer for folders with the name of your printer, and then delete them. Most often they are located in the Program Files partitions of the hard drive. You should get rid of everything you find in the same way as in the case of applications - by holding Shift or emptying the trash at the end of all manipulations. This is what helps to permanently remove printer drivers from the operating system.
Registry
The next step is also optional. But it is advisable to do it. After all, it not only helps to get rid of residual printer files, but also normalizes the operation of the operating system. We need to clean up the computer's registry. For this, it is preferable to use CCleaner.
Install the application and launch it. Now in the window that appears, click on “Analysis”, and then click on “Cleaning”. A few minutes of waiting - and all problems are solved. You can be sure that we are able to answer how to remove printer drivers from your computer.
Possible problems
But there are some exceptions. Sometimes, due to unforeseen circumstances, you cannot remove the printer driver. What to do in this case? There are several options for the development of events.

First, make sure that there is no queue of documents to print on your computer. If you have them, you will have to either print the files or discard them altogether.
Secondly, scan your operating system for viruses. Sometimes Trojans and spyware are able to block driver removal.
Third, run all services with administrator rights. This helps in many cases. If none of the above helped, then you can either forget about the idea or reinstall the operating system. However, the latter option is used in exceptional cases.
Often, when removing a printer from the system, a number of problems may arise when errors appear or incomplete removal occurs. Also, when installing a new device and drivers, various errors appear in the form of unavailable printing functions and the like.
To avoid these problems it is necessary to correctly and completely remove previous printer. How to do this will be described in detail in this article.
How to remove a printer yourself
- The first step is to open the Control Panel window. This can be done using the menu "Start". Or press “Win + R” - enter in the window control panel and click "OK".

- Next, go to the subsection "Devices and Printers".

- In the window that appears, select the desired printer and click on it with the right mouse button. Select the line from the menu "Remove device."

- If the deletion is accompanied by an error, then move on to the next point. In the case when the removal goes smoothly, it is still worth following the following points.

- In the Control Panel window, go to the “System and Security” subsection, and there, select the item "Administration".
- Click on the label "Services" and in the window that appears, we are looking for "Print Manager".
- Select the line with the mouse, and in the left panel click on the link "Restart".
- Next, you need to launch the “Run” window. To do this, press the Win + R buttons.
- In the window, enter the directive printui /s /t2 and click “OK”.
- In the print server properties window, you must select the printer to be deleted and click on the “Delete” button.
- After this action, a small window will appear where you will need to check the second entry, which suggests removing the driver itself and its package.
- After checking the box, click "OK".
Now you need to clear the registry of “junk”.
The registry should be cleaned very carefully; if you are not absolutely sure that manual cleaning will go smoothly, then it is better to use specialized programs. There are quite a lot of them and they are downloaded completely free of charge.
- In the window " Execute"We register the regedit directive. Click "OK".
- In the system registry window, click on the menu “ Edit" Select the line " Find next».
- In the search window, enter the name of the printer or driver and perform a search.
- Everything that is found is deleted.
- We conduct the search several times until a message appears stating that no suitable files were found.
- After this procedure, reboot the device.
Now, if necessary, you can reinstall the printer and drivers; there should be no errors.
Removing a Windows 7 printer is associated with certain difficulties and there is no easy way to remove the wrong driver. Let's do this operation together, screenshots of each of our steps are at the end of the article.
- First thing to do: Go to Control Panel->Devices and Printers and delete our printer until we reboot.
- Second: Start->Run, type Services.msc and go to the tab Services restart Print Manager.
- Third: Start->Run, type printui /s /t2 we get into the window Print Server Properties and remove our printer driver. We can choose Remove driver and driver package.
- Fourth: Opening Print management Start->Run, type printmanagement.msc. In folder Custom filters need to choose All drivers, right-click on our driver and select from the drop-down menu Remove driver package. If an error appears, it means it has already been deleted.
Also in Print Management, in the tab Print servers, select the item Drivers And Printers remove our driver.
Basically remove Windows 7 printer driver Now we have already succeeded and after a reboot the new driver should be installed successfully, but you can still do the rest of the manipulations to be sure.
- Fifth: Look at the menu Uninstalling or changing a program Is there any mention of your printer, if yes, then click Remove, then remove all components of your printer software. Delete all files related to the printer from your computer, starting with the folder Program Files.
- Just in case, look through the registry for the presence of keys with the name of your printer.
Reboot and install a new printer driver.


Sometimes the owner of a printing device needs to update its configuration. However, some software conflicts with previous versions. Therefore, it is logical that you first need to remove the old driver, and only then install the new one. The whole process takes place in three simple steps, each of which we will describe in as much detail as possible below.
In addition to the reason stated above, users want to uninstall files due to uselessness or incorrect operation. The guide below is universal and is suitable for absolutely any printer, scanner or multifunctional equipment.
Step 1: Uninstall the software
A large number of the peripherals in question work with the operating system using its own proprietary software, through which printing, editing documents and other actions are performed. Therefore, you should delete these files first. You can do this as follows:
- Via the menu "Start" go to section "Control Panel".
- In the menu that opens, select "Programs and Features".
- Find the driver with the name of your printer and double-click on it.
- In the list of devices that appears, select one or more required ones and click on "Delete".
- The interface and functionality of the software is slightly different for each manufacturer, so the uninstallation window may look different, but the actions performed are almost identical.


Once the removal is complete, restart your PC and proceed to the next step.
Step 2: Removing the device from the equipment list
Now that the proprietary software is no longer on the computer, you should remove the printer itself from the list of equipment so that no conflicts arise in the future when adding a new device. This is done in just a few steps:

There is no need to restart your computer now, it is better to do this after completing the third step, so let's move on to it right away.
Step 3: Remove the driver from the print server
The print server in the Windows operating system stores information about all connected peripherals. Active drivers are also located there. To completely uninstall the printer, you will need to remove its files. Perform the following manipulations:

Now all you have to do is wait until the driver is removed and you can restart your computer.
This completes the removal of the old printer driver. Installation of the latest version should proceed without any errors, and to ensure that no problems arise, follow the instructions provided in the article at the link below.
